background image

25

Connecting Other Components

—Continued

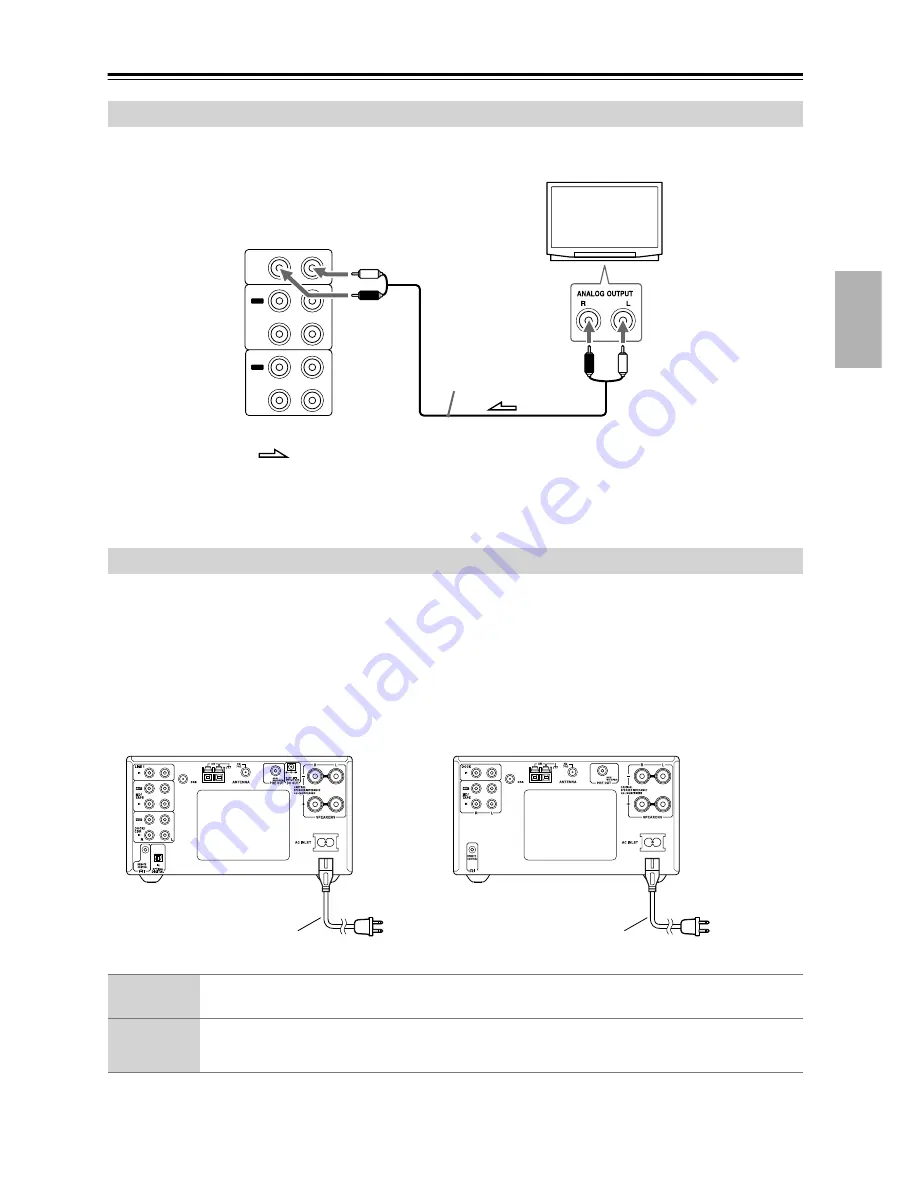
Connect the CD receiver’s LINE 1 IN jacks (use the DOCK IN jacks on the CR-315DAB) to the TV’s audio output 
jacks.

Hint:

To listen to the TV, select the LINE 1 input source (select DOCK on the CR-315DAB).

Notes:

• Before connecting the power cord, connect all of your speakers and AV components.
• Turning on the CD receiver may cause a momentary power surge that might interfere with other electrical equipment 

on the same circuit. If this is a problem, plug the CD receiver into a different branch circuit.

• Do not use a power cord other than the one supplied with the CD receiver. The supplied power cord is designed 

exclusively for use with the CD receiver and should not be used with any other equipment.

• Never disconnect the power cord from the CD receiver while the other end is still plugged into a wall outlet. Doing 

so may cause an electric shock. Always disconnect the power cord from the wall outlet first, and then the CD receiver.

To set the clock with the AccuClock function, the CD receiver must be able to receive RDS radio stations, which means 
an FM antenna must be connected (see page 16).

Connecting a TV

I N

I N

R

LINE 1

MD/
TAPE

L

I N

OUT

OUT

DOCK/
CDR

: Signal flow

CR-515DAB’s

rear panel

White

Red

Red

White

Analog audio cable (RCA)

TV

Connecting the Power Cord

1

2

1

2

To wall outlet

Supplied power cord

CR-315DAB

CR-515DAB

To wall outlet

Supplied power cord

1

Connect the supplied power cord to the CD receiver’s AC INLET.

2

Plug the power cord into a suitable wall outlet.

The STANDBY indicator lights up.

Summary of Contents for CR-315DAB

Page 1: ...will enable you to obtain optimum performance and listening enjoyment from your new CD Receiver Please retain this manual for future reference Contents Getting Started 2 Connections 16 Basic Operation...

Page 2: ...aratus does not operate normally by following the operating instructions Adjust only those controls that are covered by the operating instructions as an improper adjustment of other controls may resul...

Page 3: ...it especially if it s installed in an audio rack If the ventilation is inadequate the unit may overheat leading to malfunction Do not expose this unit to direct sunlight or heat sources because its in...

Page 4: ...cordance with the following code Blue Neutral Brown Live As the colours of the wires in the mains lead of this appa ratus may not correspond with the coloured markings identifying the terminals in you...

Page 5: ...the same room or the CD receiver is installed close to equipment that uses infrared rays the remote con troller may not work reliably Don t put anything such as a book on the remote con troller becau...

Page 6: ...nel and 1 Output CD Player Plays CDs MP3 CDs CD Rs and CD RWs 25 Track Programming 2 Repeat Mode Track Full 4 Play Modes Normal Random Memory 1 Folder CR 515DAB Wolfson Single Bit D A Converter CR 315...

Page 7: ...Tuning into FM AM Radio Stations 38 Displaying Radio Information 39 Receiving RDS 39 Listening to DAB Digital Radio 40 Presetting FM Stations Automatically Auto Preset 43 Presetting AM FM DAB Stations...

Page 8: ...8 Getting to Know the CD Receiver Front Panel 1 2 3 5 4 6 7 M N O 9 8 J K L 1 2 3 5 4 6 P N O Q 9 8 J M R CR 515DAB CR 315DAB...

Page 9: ...to select the input source J DIRECT button 28 Used with the Direct function On the CR 515DAB the DIRECT button s indica tor lights up when the Direct function is on K TONE button CR 515DAB 28 Used to...

Page 10: ...a timer has been pro grammed 1 2 3 4 Light up when a timer has been pro grammed Lights up when a timer has been programmed for recording K Tuning indicators AUTO Lights up when Auto Tuning is selecte...

Page 11: ...WL 1 s instruction manual for more information H SPEAKERS 18 These terminal posts are for connecting speakers I REMOTE CONTROL 20 24 This Remote Interactive jack can be con nected to an jack on anothe...

Page 12: ...12 Getting to Know the CD Receiver Continued Remote Controller K O M Q R T S P U V B A 3 5 J 4 L 6 7 N 8 9 K O M Q R T S P U V B A 3 5 J 4 L 6 7 N 8 9 RC 662S CR 515DAB RC 660S CR 315DAB...

Page 13: ...playback Starts playback I VOLUME buttons 27 31 Adjust the volume level J S BASS button 28 Sets the Super Bass function K Onkyo RI Dock and CD recorder control buttons Pauses playback or recording St...

Page 14: ...ling rate of between 8 kHz and 48 kHz and a bit rate of between 8 kbps and 320 kbps 128 kbps recommended Incompatible files cannot be played Constant bit rate MP3 files are recommended how ever variab...

Page 15: ...scs Never touch the underside of a disc Always hold discs by the edge as shown Never attach adhesive tape or sticky labels to discs Cleaning Discs For best results keep your discs clean Fingerprints a...

Page 16: ...ready for use you ll need to tune into an FM radio station and adjust the position of the FM antenna to achieve the best possible reception 2 Use thumbtacks or something similar to fix the FM antenna...

Page 17: ...use the same antenna for both FM and TV reception as this can cause interference problems If cir cumstances demand it use a TV FM antenna splitter as shown Connecting an Outdoor AM Antenna If good re...

Page 18: ...ive and negative wires Doing so may damage the CD receiver Do not connect both speaker cables to the same L or R terminals Fig 1 Do not connect more than two speaker terminals to each speaker Fig 2 SP...

Page 19: ...s optical digital jack has a shutter type cover that opens when an optical plug is inserted and closes when it s removed Push the plug in all the way Caution To prevent shutter damage hold the optica...

Page 20: ...analog audio cable RCA In addition the Input Display for the MD TAPE jacks must be set to TAPE Since this is the default setting unless you ve changed it it can be left as it is see page 29 Some capab...

Page 21: ...the MD TAPE jacks must be set to MD see page 29 Some capable components have two jacks They re both the same so you can use either one The extra jack is for connecting additional capable components N...

Page 22: ...ceiver with an cable and an analog audio cable RCA On the RI Dock set the MODE switch to HDD See the RI Dock s instruction manual for details CR 515DAB To use the Input Display for the DOCK CDR jacks...

Page 23: ...ack LINE IN jack on the CR 315DAB on the front panel to the portable audio device s output jack Depending on the type of output jack on the portable audio device you may need to buy a suitable cable T...

Page 24: ...component to the CD receiver with an cable and an analog audio cable RCA In addition you must change the Input Display for the DIGITAL IN so that it matches the type of component that you connect When...

Page 25: ...the CD receiver and should not be used with any other equipment Never disconnect the power cord from the CD receiver while the other end is still plugged into a wall outlet Doing so may cause an elect...

Page 26: ...ction automatically updates the clock daily at 2 A M 3 A M and 2 P M If for some reason the clock cannot be set automatically see Setting AccuClock to Use a Specific Station on page 49 and Setting the...

Page 27: ...buttons You can select CD DAB AM FM or a connected com ponent TAPE DOCK LINE DIGITAL as the input source To select the input source press the remote controller s INPUT buttons repeatedly On the CD re...

Page 28: ...r lights up when the Direct function is on To mute the output of the CD receiver press the remote controller s MUT ING button The MUTING indicator flashes on the dis play On the CR 515DAB the volume c...

Page 29: ...selection Input Source Name Abbreviations Sometimes the input source name may be displayed as a 2 letter abbreviation as per the following table Changing the Input Display 1 Use the INPUT buttons to...

Page 30: ...you can select MP3 files in other fold ers see page 32 Display Disc tray CR 515DAB CR 315DAB Display Disc tray 1 Press the Eject button to open the disc tray Tip Pressing the Eject button while the CD...

Page 31: ...djust the volume Press the VOLUME Up button to turn up the volume Press the VOLUME Down button to turn it down Press to start playback Pressing this button while the CD receiver is on Standby will tur...

Page 32: ...On the CR 515DAB you can also use the multi control for steps 2 3 and 4 Turn the multi control to select files and folders and push it for ENTER Selecting MP3 Files File 11 File 1 File 10 Folder 3 Fi...

Page 33: ...f playback is stopped playback starts with the first MP3 file in the specified folder If playback is already in progress press ENTER to play the first MP3 file in the specified folder 3 Use the number...

Page 34: ...current MP3 file Notes On the CR 315DAB you can also use the CD receiver s DISPLAY button to display this informa tion To display the disc name press the DISPLAY button while playback is stopped If a...

Page 35: ...select the first track you want to add to the playlist and then press ENTER Repeat this step to add additional tracks to the playlist You can also use the number buttons on the remote controller to se...

Page 36: ...ayback random playback or 1 Folder playback Cancelling Repeat Playback To cancel repeat playback press the REPEAT button repeatedly until both the REPEAT and REPEAT 1 indicators disappear Repeat playb...

Page 37: ...applies to CD Extra discs and deter mines whether music in the audio session or MP3 files in the data session are played Joliet Use SVD ISO9660 This preference applies to MP3 discs in Joliet format an...

Page 38: ...will be in mono 3 Use the Fast Reverse and Fast For ward buttons to tune into a station In Auto tuning mode once a station is found tuning stops automatically The American model changes FM fre quency...

Page 39: ...rts and displays the Program Ser vice Name PS and Radio Text RT types of RDS data The RDS indicator appears on the display when the CD receiver is tuned to an FM station that supports RDS Notes If the...

Page 40: ...or U K see Auto Tuning on page 42 and then press ENTER to start the Auto Tuning function The number of stations found and the scanning progress are shown on the display To cancel Auto Tuning press the...

Page 41: ...ing DLS text data the text will scroll across the display 2 Program Type Displays the type of program 3 Bit Rate and Audio Mode Displays the station s bit rate and audio mode ste reo mono or joint ste...

Page 42: ...he Auto Tuning function see page 40 UK Band III 11B 12D Worldwide default Band III 5A 13F and L Band LA LW DRC Setting With the DRC Dynamic Range Control setting you can reduce the dynamic range of DA...

Page 43: ...i control The confirmation message AutoPreset appears 4 To start the Auto Preset function push the multi con trol After Storing Presets You Can Select them see page 45 Name them for easy identificatio...

Page 44: ...on For example 27 FM and 13 AM or 20 FM 12 AM and 8 DAB Although AM FM and DAB presets share the same num bers they re selected independently For example preset 1 will store an AM station when the AM...

Page 45: ...DAB stations press the Stop button for 3 seconds until Preset Mode appears on the dis play 3 Use the Previous and Next buttons to select a preset Selecting Preset Stations 1 Use the BAND or INPUT butt...

Page 46: ...Use the number buttons to select numbers Press the 10 button repeatedly to select space Press the 0 button repeatedly to select 0 or space ENTER MENU NO DISPLAY Number buttons Character group Note Not...

Page 47: ...that s already stored in preset 1 you may want to copy it to an unused preset first Copying Presets 1 Select the preset you want to copy see page 45 2 Press the MENU NO button and then use the Previou...

Page 48: ...ase the preset push the multi control Erasing a Preset s Name 1 Select the preset whose name you want to erase see page 45 2 Press the MENU NO button and then use the Previous and Next buttons to sele...

Page 49: ...Use the Rewind and Fast Forward buttons to tune into the FM station Tip If you press the YES MODE button instead of using the Rewind and Fast Forward buttons the CD receiver will automatically search...

Page 50: ...ds Note that having the time displayed in Standby mode will consume a little more power Setting the Clock Manually 1 Press the TIMER button repeat edly until Clock appears 2 Press ENTER 3 Use the Prev...

Page 51: ...a morning alarm for Mon day to Friday Timer Examples The following examples highlight some of the ways in which you can use the timers Timer 1 To wake up to your favorite radio station pre set 1 ever...

Page 52: ...or MD recorder is properly connected to the MD TAPE jacks pages 20 and 21 and the Input Display is set accordingly page 29 TIMER STANDBY ON ENTER Number buttons or 3 Use the Previous and Next buttons...

Page 53: ...are recorded when using timer recording set the On time slightly ahead of the program s start time about 1 minute SUN TUE MON Days Set Everyday WED THU SAT FRI 11 Use the Previous and Next buttons to...

Page 54: ...ttons to selectTimer On or Timer Off After a few moments the previous dis play reappears TIMER ENTER MENU NO CLEAR or Checking Timer Settings 1 Press the TIMER button repeat edly to select timer 1 2 3...

Page 55: ...Using the Sleep Timer Press the SLEEP button repeat edly to select the required sleep time With the SLEEP button you can set the sleep time from 90 to 10 minutes in 10 minute increments Use the Previ...

Page 56: ...a TV Try moving any such devices away from the CD receiver If you have any devices that emit high intensity radio waves near the CD receiver such as a cellular phone that s being used to make a call...

Page 57: ...or the power cable is disconnected If the preset stations are lost preset them again see pages 43 44 The clock and timer settings will be lost Set the clock and timers again see pages 49 50 Can t adju...

Page 58: ...EEP or TIMER button while a timed operation is in progress the timer will be cancelled Make sure the cables and analog audio cables are connected correctly see pages 19 to 25 If you re using an Onkyo...

Page 59: ...dB 80 Hz BASS 8 dB 10 kHz TREBLE 7 dB 80 Hz S BASS 6 dB 80 Hz BASS 8 dB 10 kHz TREBLE 7 dB 80 Hz S BASS Signal to Noise Ratio 100 dB LINE IHF A 100 dB LINE IHF A Speaker Impedance 4 16 4 16 Tuner Sect...

Page 60: ...el 201 785 2600 Fax 201 785 2650 http www us onkyo com ONKYO EUROPE ELECTRONICS GmbH Liegnitzerstrasse 6 82194 Groebenzell GERMANY Tel 49 8142 4401 0 Fax 49 8142 4401 555 http www eu onkyo com ONKYO E...

Reviews: