background image

38

EN

FUNCTION SETUP

How to navigate through “HDMI Multi(LPCM)”.

1

 Use [

K

 / 

L

] to select your desired menu item then press [ENTER].

2

 Use [

K

 / 

L

] to select your setting items.

Press 

[RETURN]

 to go back to the previous screen.

3

 Use [

s

 / 

B

] to select desired options. (Except for “Test Tone”, “Default” and setting 

options in “Speaker Size” setting.)

For setting options in “Speaker Size” setting:
Press [ENTER]  to select desired options.
For “Test Tone”:
Use [

s

 / 

B

] to select “Off”, “Manual” or “Auto”, then press [ENTER].

The test tone will be output. If you select “Manual”, use 

[

K

 / 

L

]

 to select desired speaker, then use 

[

s

 / 

B

]

 to adjust 

the volume. If you select “Auto”, use 

[

s

 / 

B

]

 to adjust the volume of the speaker that outputs the test tone.

If you want to stop the test tone, press 

[RETURN]

.

For “Default”:
Press [ENTER] to reset to the default.

4

  Press [SETUP] to exit.

Menu

Setting items 

Options

Descriptions

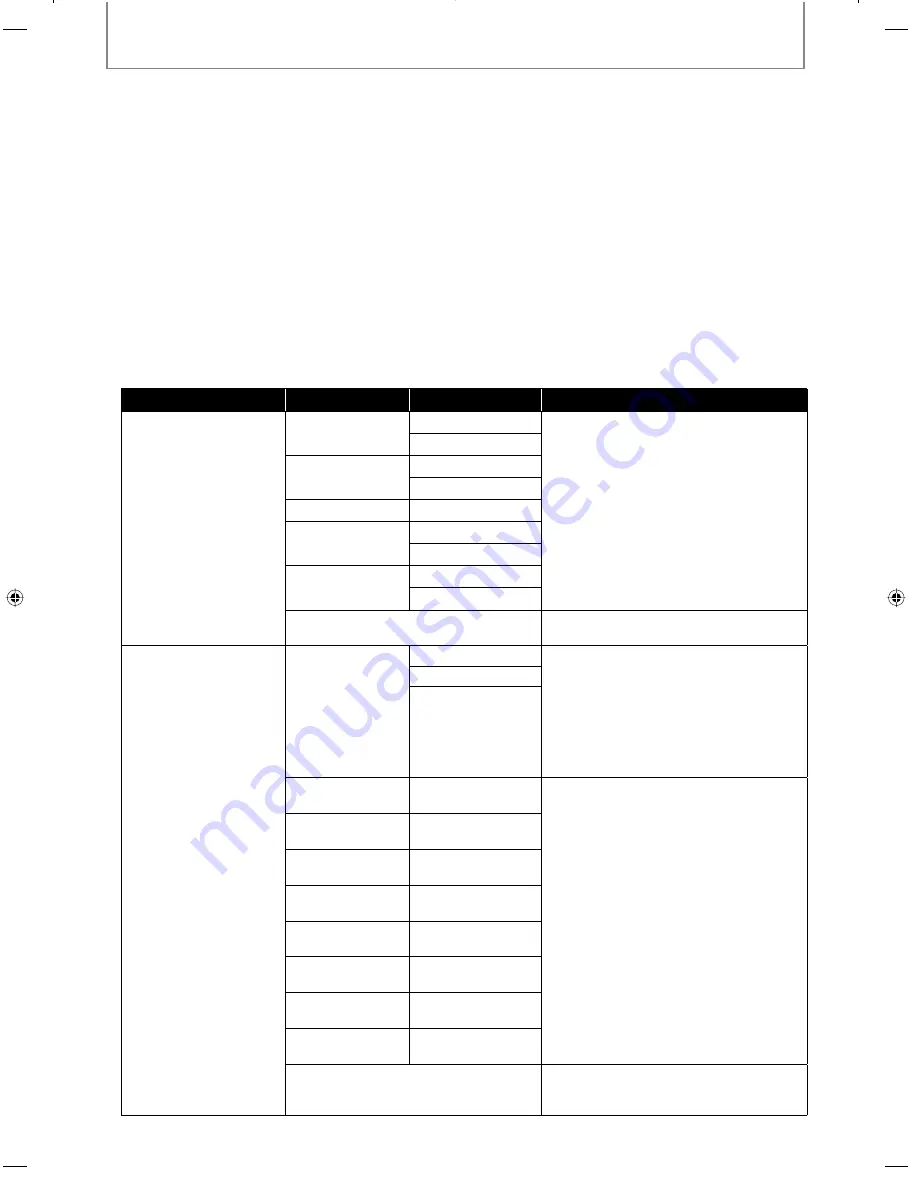
Speaker Size

Selects the desired 
speaker to set. Then 
change the setting 
appropriately by 
referring to the 
descriptions.

Front

Large*

Large:
For the large speakers with strong low 
frequency reproduction capabilities.
Small:
For the small speakers which do not 
provide strong bass sound.
You cannot change the setting of 
“Subwoofer”. If connected device is not 
compatible with subwoofer, “Subwoofer” 
will be displayed in gray.  

Small

Center

Large*

Small

Subwoofer

On

Surround

Large*

Small

Surround Back

Large*

Small

Default

Select “Default”, then press 

[ENTER]

 to 

reset “Speaker Size” setting to the default.

Channel Level

Tests or sets the volume 
for each speaker.

Test Tone:
“Test Tone” is the 
test tone which 
can be output 
from the speakers 
so that you  can 
adjust the volume 
for each speaker.

Off*

Select “Off” to deactivate “Test Tone”.
Select “Manual”, then press 

[ENTER]

 to 

manually set the volume for the desired 
speaker.
Select “Auto”, then press 

[ENTER]

 to 

automatically output the test tone from 
each speaker.

Manual

Auto

Front Lch

0 dB to -12 dB 
(0 dB*)

If you have selected “Manual” in “Test 
Tone”, select the desired speaker to set 
and adjust the volume for the selected 
speaker.
If you select “Auto” in “Test Tone”, test 
tone will automatically be output in order. 
Adjust the volume of the speaker that 
outputs the test tone.

Center

0 dB to -12 dB 
(0 dB*)

Subwoofer

0 dB to -12 dB 
(0 dB*)

Front Rch

0 dB to -12 dB 
(0 dB*)

Surround Rch

0 dB to -12 dB 
(0 dB*)

Surround Back 
Rch

0 dB to -12 dB 
(0 dB*)

Surround Back 
Lch

0 dB to -12 dB 
(0 dB*)

Surround Lch

0 dB to -12 dB 
(0 dB*)

Default

Select “Default”, then press 

[ENTER]

 to 

reset “Channel Level” setting to the 
default.

E5H50UD_DV-BD606_EN_v1.indd   38

E5H50UD_DV-BD606_EN_v1.indd   38

2008/08/20   14:03:56

2008/08/20   14:03:56

Summary of Contents for BD606 - DV Blu-Ray Disc Player

Page 1: ...se read this manual thoroughly before making connections and plugging in the unit Following the instructions in this manual will enable you to obtain optimum performance and listening enjoyment from y...

Page 2: ...sert the plug fully into the outlet try reversing the plug If the plug should still fail to fit contact your electrician to replace your obsolete outlet Do not defeat the safety purpose of the polariz...

Page 3: ...p and rear panels may get warm after prolonged use This is normal If you do not use this unit for a long time it may not work properly the next time you turn it on so be sure to use it occasionally Wh...

Page 4: ...ser from being exposed do not remove the cover Refer servicing to qualified personnel For U S Models FCC Information for User CAUTION The user changes or modifications not expressly approved by the pa...

Page 5: ...ries BONUSVIEW is trademark of Blu ray Disc Association Supplied Accessories remote control with batteries AAx2 RCA audio video cables AC cord instruction manual warranty card Instruction Manual Note...

Page 6: ...21 Pause 21 Resume Playback 21 Playing Back an audio CD and a Disc with MP3 Files 22 Reading the SD Memory Card 23 SPECIAL PLAYBACK 25 Fast Forward Fast Reverse 25 Slow Forward Playback 25 Step by Ste...

Page 7: ...ot guarantee 100 interoperability with other brands of HDMI CEC compliant devices PIP Picture in Picture BONUSVIEW setting Some BD video have the PIP picture in picture function which enables you to d...

Page 8: ...you can control the unit from a distance 10 SD CARD slot Insert an SD Memory Card and play back the contents in it 1 VIDEO OUTPUT COMPONENT jacks Use to connect a TV with component video inputs with a...

Page 9: ...LUTION button Press to set the HDMI output mode 15 OPEN CLOSE A button Press to open or close the disc tray 16 PIP button Press to switch picture in picture feature on or off only applicable to BD vid...

Page 10: ...comply with governmental regulations or environmental public instruction s rules that apply in your country or area Do not recharge short circuit heat burn or disassemble batteries Using a Remote Con...

Page 11: ...such as title number elapsed time repeat mode etc Playback status icon Mode Disc SD Memory Card Playback is in progress Stop mode Pause mode Fast forward mode Fast reverse mode Slow forward mode Appea...

Page 12: ...does To utilize this feature a component or an HDMI connection is required Refer to HDMI Video Resolution or Component Output setting on page 34 to set the video resolution 2 Analog audio connection...

Page 13: ...dio signals are not output from HDMI OUT jack You cannot select the video resolutions which are not supported by the connected TV except when this unit s HDMI OUT jack is connected to a DVI compatible...

Page 14: ...TS bitstream or LPCM will be output from AUDIO OUTPUT DIGITAL COAXIAL OPTICAL jacks depending on Digital Out setting Refer to page 37 Audio signals output from HDMI OUT jack Disc type Audio recording...

Page 15: ...AUDIO INPUT COAXIAL DIGITAL AUDIO INPUT OPTICAL digital audio coaxial cable audio this unit AUDIO OUTPUT DIGITAL COAXIAL OPTICAL AV receiver amplifier digital audio optical cable or digital audio coa...

Page 16: ...nmix LPCM 2ch Downmix LPCM audio CD MP3 2ch LPCM 2ch LPCM DTS CD DTS 2ch Downmix LPCM For BD titles with secondary or interactive audio these audio will be output as Dolby Digital when all the conditi...

Page 17: ...SD Memory Cards Do not remove the SD Memory Card or turn off the unit while the contents of the card is in playback It may result in malfunction or loss of the card s data Please keep the SD Memory C...

Page 18: ...o CD audio CD track 1 track 2 track 3 track 4 track 5 Data discs or SD Memory Cards containing MP3 are divided into folders and the folders are subdivided into files group folder 1 group folder 2 MP3...

Page 19: ...nly for 2 layered discs L0 Layer 0 is played back L1 Layer 1 is played back Track File information SD 1 14 0 00 51 B 1 3 4 2 1 Current track file number Total number of track file 2 Elapsed time Remai...

Page 20: ...enu screen may appear In this case use K L s B to select the desired item then press ENTER 7 Press STOP C once to stop playback temporarily Refer to Resume Playback on page 21 To eject the disc Press...

Page 21: ...ual accompanying the disc for details Pause 1 During playback press PAUSE F Playback will be paused 2 Press PLAY B to return to normal playback Note For BD and DVD set Still Mode setting to Field in V...

Page 22: ...otal page number 5 Indication of previous next page Use SKIP H G to go back and forward between the pages Press TOP MENU to return to the first item Icons Folder audio CD track MP3 file It is recommen...

Page 23: ...ontents for BD ROM Profile 1 ver 1 1 which can be downloaded from the internet You can store the contents on an SD Memory Card via computer and play them back with the BD video For more information ab...

Page 24: ...your finger 2 Grasp the card and pull it out from the SD CARD slot Compatible Cards SD Memory Card 8MB 2GB SDHC Memory Card 4GB miniSD Card 8MB 2GB microSD Card 8MB 2GB For miniSD Card and microSD Car...

Page 25: ...w forward playback mode are blurred refer to page 35 Step by Step Playback BD V DVD V 1 In pause mode press PAUSE F repeatedly Every time you press PAUSE F playback will advance one step at a time 2 P...

Page 26: ...press MODE The program screen will appear 2 Use K L to select a track file then press ENTER e g audio CD Program CD DA Total 0 09 49 1 2 3 4 5 6 7 3 40 2 33 2 22 2 28 2 45 3 41 2 58 6 3 41 1 3 1 1 1...

Page 27: ...l the random playback press MODE when the random playback screen is displayed To repeat the current track file in the random selection press REPEAT repeatedly until Track appears during playback To re...

Page 28: ...ing SKIP H G Time search is available only in the same track file or title For BD chapter and time search are available only during playback Marker search This feature allows you to assign a specific...

Page 29: ...ing Audio Soundtrack Some BD and DVD contain multiple audio streams Those are often in different audio languages or audio formats For BD available audio varies depending on BD Audio Mode setting Refer...

Page 30: ...multi LPCM will be output from HDMI OUT jack for BD audio Refer to page 14 In Mix Audio Output mode with HDMI audio being output 2 channel down mixed LPCM will be output from AUDIO OUTPUT DIGITAL COA...

Page 31: ...k Media Select Disc BDAudio Mode HDAudio Output HDMIAudio Out HDMI Multi Normal HDMI Video Resolution Auto Component Output 480i Player Menu English TVAspect 16 9 Wide 4 Follow the procedure below dep...

Page 32: ...The setting items which are not available with current situation of this unit will be displayed in gray and you cannot select them 5 Follow the procedure below depending on the setting items A If B do...

Page 33: ...Japanese Korean Danish Finnish Norwegian Icelandic Hungarian Romanian Turkish Greek Irish Portuguese Polish Czech Slovak Bulgarian Other Disc Menu Sets the language for disc menu or pop up menu Englis...

Page 34: ...es the picture is displayed in the center of the 16 9 screen with a 4 3 aspect ratio HDMI Video Resolution Sets the HDMI video resolution Auto HDMI video resolution will be selected automatically depe...

Page 35: ...0 frame will be output An individual picture on the TV screen is called as Frame which consists of two separate images called as Field Some pictures may be blurred at the auto setting in Still Mode se...

Page 36: ...dio output when playing back BD or DVD recorded in LPCM On LPCM signals are converted to 48 kHz for output Set to On when using digital connections to an AV amplifier that is not compatible with sampl...

Page 37: ...ot effective when the HDMI audio signal is output Speaker setting This unit allows you to enjoy multi channel surround sound such as 7 1 channel 5 1 channel surround e g basic layout with 7 1 channel...

Page 38: ...ound You cannot change the setting of Subwoofer If connected device is not compatible with subwoofer Subwoofer will be displayed in gray Small Center Large Small Subwoofer On Surround Large Small Surr...

Page 39: ...nce from the listening position to the speaker to get the ideal delay time Center 0ft to 60ft 12ft 0m to 18m 3 6m Surround 0ft to 60ft 10ft 0m to 18m 3 0m Surround Back 0ft to 60ft 10ft 0m to 18m 3 0m...

Page 40: ...Level then press ENTER 2 Use K L to select your desired option then press ENTER All To release the limitation Age Setting To set the age limitation After selecting Age Setting use the Number buttons...

Page 41: ...hen you play back an SD Memory Card HDMI CEC allows integrated system control over HDMI and is part of the HDMI standard In addition to Onkyo AV components it allows interoperability with CEC compatib...

Page 42: ...initialization Setup Resets the setup menu to the default Memory Device Initializes the SD Memory Card After confirmation message appears use K L to select Yes then press ENTER Initialize Initialize N...

Page 43: ...isc is defective by trying another disc Cancel the ratings control or change the control level Insert a correct disc that can be played back on this unit SD Memory Card cannot be read The format of th...

Page 44: ...ital Blu ray Disc supports 7 1 multi channel surround sound output Dolby TrueHD Dolby TrueHD is a lossless coding technology developed for next generation optical discs Blu ray Disc supports 7 1 multi...

Page 45: ...a 5860 Lithuanian 5866 Language Code Macedonian 5957 Malagasy 5953 Malay 5965 Malayalam 5958 Maltese 5966 Maori 5955 Marathi 5964 Moldavian 5961 Mongolian 5960 Nauru 6047 Nepali 6051 Norwegian NOR 606...

Page 46: ...ng humidity Less than 80 no condensation Terminals Rear Audio output Analog RCA jack x 2 L R 2Vrms output impedance more than 1k Video output RCA jack x 1 1Vp p 75 Component video output RCA jack x 3...

Page 47: ...47 EN MEMO...

Page 48: ...42 4401 0 Fax 49 8142 4401 555 http www eu onkyo com ONKYO EUROPE UK Office Suite 1 Gregories Court Gregories Road Beaconsfield Buckinghamshire HP9 1HQ UNITED KINGDOM Tel 44 0 1494 681515 Fax 44 0 149...

Reviews: