background image


A d j u s t m e n t  M a n u a l 

I

2

Item 

High light Adjustment  Adj.Process  2AL 


3G(UE-DLX)


M o d e l 

ALL 

Measuring 

Equipment 

* Colour Analyzer 


Preparation 

before Adj. 

* Warm up the receiver for more than 30 minutes. 
* The low light adjustment should be done in advance. 

 
Adjustment 

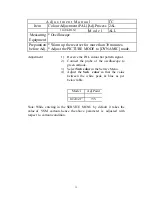
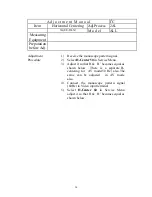
1)  Receive the monoscope pattern signal . 

Procedure 2) 

Select 

R-DRIVE 

&/OR  

B


DRIVE 

 in the 

Service Menu. 

 3) 

Adjust 

R-

DRIVE

 &  B-

DRIVE 

so that the 

white balance is at the directed value 
(Adjustment point “A”). 


4)  Check if the tracking of white balance 

from Low light till High light is good. 


Model 

Adjustment point A 

 Colour 

temperature 

X Y 

ALL 9300° 

0.290 

0.291 


5)  Receive  the pedestal pattern signal . 


6)  Check if the white balance of  low light is 

good. If the white balance of the low light 
is not good, adjust the low light again. 


7)  Receive the monoscope pattern signal. 

Repeat step (4)   onwards till perfect  white 
balance  is  achieved in  low light  and high  
light  paterns. 


12

Summary of Contents for 14XS

Page 1: ...RVICE MANUAL COLOUR TELEVISION 14XS 20XS 21IQ 14TVE 20TVE 21TVE 21BLACK FGL FTG BASIC CHASSIS 3G UE DLX CONTENTS FEATURES ADJUSTMENT MANUAL STANDARD CIRCUIT DIAGRAM COPYRIGHT OCT 2003 MIRC ELECTRONICS LTD MUMBAI 1 ...

Page 2: ... Jack Audio 500 mV rms 4 dBs High impedance RCA Pin Jack 14TVE 14XS 14 Profile 20TVE 20XS 21TVE 20 Profile 21IQ 21 Profile 21FGL Power Consumption 70 W 65W 70W 80 W 80W 90 W 85 W 90W 90 W 95 W Picture Tube 14 14 14 20 20 21 20 21 21 21 36 cm 36 cm 36 cm 51 cm 51 cm 53 cm 51 cm 53 cm 53cm 53cm Audio output W PMPO 120 60 120 200 100 200 200 120 200 200 Dimensions Width mm 390 365 373 547 506 553 504...

Page 3: ...DIGITAL CLOCK ZAP MUSIC MODE GAMES MONO 2 SPK 20XS 250 PROGRAMS 100W PMPO DIGINET HALF MUTE BLACK STRETCH CHILD SAFE DIGITAL CLOCK ZAP MUSIC MODE GAMES MONO 2 SPK 21IQ 250 PROGRAMS 120W PMPO DIGINET HALF MUTE BLACK STRETCH CHILD SAFE DIGITAL CLOCK ZAP MUSIC MODE GAMES MONO 2 SPK 2 ...

Page 4: ...ALANCE GAMES STEREO PLAYBACK 20TVE 250 PROGRAMS CHILD SAFE ZAP AUDIO STATUS MEMORY 200 W PMPO CHANNEL LOCK MUSIC MODE DIGITAL EYE BASS TREBLE BALANCE GAMES STEREO PLAYBACK 21TVE 250 PROGRAMS CHILD SAFE ZAP AUDIO STATUS MEMORY 200 W PMPO CHANNEL LOCK MUSIC MODE DIGITAL EYE BASS TREBLE BALANCE GAMES STEREO PLAYBACK 3 ...

Page 5: ...4 21BLACK FGL FTG FLAT SCREEN 250 PROGRAMS CHILD SAFE ZAP AUDIO STATUS MEMORY 200 W PMPO DIGINET CHANNEL LOCK MUSIC MODE DIGITAL EYE BASS TREBLE BALANCE GAMES DIGITAL CLOCK ...

Page 6: ...e various parameters not specified as FIX are closer to the values to be adjusted The final adjustment should be as per the procedure specified B Digits mentioned in the Service Menu should not be changed wherever Fix is mentioned elsewhere they are subject to change as per procedure specified DATE APPROVED BY CHECKED BY ISSUED 5 ...

Page 7: ...SSM PRESETS 3 VCO Adjustment 4 Low light Adjustment 5 High light Adjustment 6 Bright Adjustment 7 Contrast Adjustment 8 Colour Adjustment PAL 9 Tint Adjustment NTSC 10 Focus Adjustment 11 Vertical Size Adj 12 Vertical Centering 13 Horizontal Centering 14 RFAGC Adjustment 15 High Voltage Confirmation 6 ...

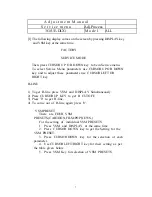
Page 8: ... LEFT OR RIGHT key H LINE 1 To get H line press VSM and DISPLAY Simultaneously 2 Press CURSOR UP KEY to get R CUTOFF 3 Press 0 to get H line 4 To come out of H line again press 0 VSM PRESET There are FOUR VSM PRESETS CARTOON FILM POP NEWS For the setting of individual VSM PRESETS 1 Press VSM and DISPLAY at the same time 2 Press CURSOR DOWN key to get the Setting for the VSM PRESET 3 Press CURSOR D...

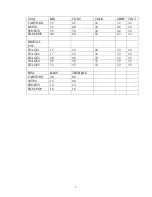
Page 9: ...S 32 60 39 48 32 SPORTS 25 50 30 42 32 FILM POP 48 60 52 63 32 DIGITAL EYE STAGE1 15 25 26 32 32 STAGE2 17 35 32 32 32 STAGE3 20 40 32 32 32 STAGE4 25 50 32 32 32 STAGE5 32 55 32 32 32 SSM BASS TREBBLE CARTOON 08 08 NEWS 12 08 SPORTS 12 12 FILM POP 16 16 8 ...

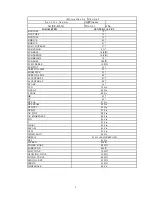
Page 10: ...VERTICAL SIZE 33 ZOOM SIZE 55 VERTICAL POS 02 H CENTER 50 07 H CENTER 60 08 RF AGC 56 VCO 7F Fix D TRAP 00 Fix F TRAP 00 Fix HR 03 CV 09 DT PAL 07 Fix DT SECAM 05 Fix DT NTSC 05 Fix DT BW 07 Fix AV TINT 0F Fix AV SHARPNESS 0F Fix B G 01 Fix I 01 Fix D K K1 01 Fix SECAM 01 Fix N3 58 01 Fix VIDEO GAIN 05 Fix BGPSW 01 Fix 00 FOR SECAM BPF 01Fix STEREO 01FIX POWER BASS 00 FIX SURROUND 00FIX SOFT TONE ...

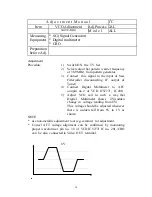
Page 11: ...f Saw Filter after disconnecting IF output of Tuner 4 Connect Digital Multimeter to AFC out pin no 2 of VCD IC52771 IC201 5 Adjust VCO coil in such a way that Digital Multimeter shows 4V sudden change in voltage reading from 8V This voltage should be adjusted whenever there is sudden fall from 8V to 1V as shown NOTE use non metallic adjustment tool eg ceramic for adjustment Correct AFT voltage ali...

Page 12: ...ush 0 key on any mode to make a horizontal line 5 Turn the screen knob the Bottom of FBT gradually from fully left to the right search for the first appearing colour 6 Adjust two colours except for the first colour which appears by the adjustment 5 to the white colour with the following 1 6 key 7 Turn the screen knob so that a horizontal line appear slightly 8 Change the normal screen by pushing 0...

Page 13: ...vice Menu 3 Adjust R DRIVE B DRIVE so that the white balance is at the directed value Adjustment point A 4 Check if the tracking of white balance from Low light till High light is good Model Adjustment point A Colour temperature X Y ALL 9300 K 0 290 0 291 5 Receive the pedestal pattern signal 6 Check if the white balance of low light is good If the white balance of the low light is not good adjust...

Page 14: ... adjustment should be done in advance Adjustment 1 Receive the Black pedestal pattern signal Procedure 2 Select Sub Bright in the Service Menu 3 Adjust the Sub Bright so that the point of below table gradation value does not shine Model Adj Point 14 20 21 0 Note While entering in Service Menu by default it takes the values of VSM cartoon hence the above parameter is adjusted with respect to cartoo...

Page 15: ...rocedure 2 Connect the probe of the oscillocsope to green catthode 3 Select Sub Contrast in the Service Menu 4 Adjust it so that the value between the dot line white peak of the signal waveform as mentioned below to be the directed voltage as mentioned in the Table below Model Adj Point 14 70V 20 21 80V Note While entering in Service Menu by default it takes the values of VSM cartoon hence the abo...

Page 16: ...NAMIC mode Adjustment 1 Receive the PAL colour bar pattern signal 2 Connect the probe of the oscilloscope to green cathode 3 Select Sub color in the Service Menu 4 Adjust the Sub color so that the value between the white peak blue as per below table Model Adj Point 14 20 21 3V Note While entering in the SERVICE MENU by default it takes the value of VSM cartoon hence the above parameter is adjusted...

Page 17: ...de Adjustment 1 Connect the NTSC Video Colour bar pattern signal Procedure White 75 to Video input Terminal 2 Connect the probe of the oscilloscope to BLUE CATHODE 3 Adjust the Sub Tint so that the value between the white peak and Magenta is as per the table shown below Model Adj point TINT 14 20 21 5V Note While entering in the SERVICE MENU by default it takes the value of VSM cartoon hence the a...

Page 18: ...easuring Equipment Preparation before Adj Adjustment of Brightness Contrast should be done in advance Adjustment 1 Receive the monoscope pattern signal Procedure Turn the focus control knob clockwise and anticlockwise on FBT watching the screen adjust it so as to get good clear and Focused picture 17 ...

Page 19: ...ion before Adj Adjustment 1 Receive the monoscope pattern signal Procedure 2 Select Vertical Size in the Service menu Adjust Vertical Size by varying cursor left right keys to get 92 of picture size 3 When both up down lines are located within the 88 96 range of the standard lines on the monoscope pattern signal it is OK 18 ...

Page 20: ...e l ALL Measuring Equipment Preparation before Adj Adjustment 1 Receive the monoscope pattern signal Procedure 2 Select Vertical Pos option in the Service menu Adjust Vertical Pos using cursor left right in such a way that the centre of monoscope to be the nearest position of CRT centre line 19 ...

Page 21: ...oscope pattern signal Procedure 2 Select H Center 50 in Service Menu 3 Adjust it so that H H becomes equal as shown below There is a separate H centering for AV mode 50 Hz also The same can be adjusted in AV mode also 4 Connect the monoscope pattern signal 60Hz to Video input terminal 5 Select H Center 60 in Service Menu adjust it so that H H becomes equal as shown below 20 ...

Page 22: ...or Philips 5V tuner input signal shoud be 60dbuV For Samsung 5V tuner input signal shoud be 70dbuV 4 Connect the multimeter to TP AGC on main board near tuner 5 Adjust RFAGC till the voltage is 4Vdc Method 2 1 Receive the PAL colour bar pattern signal Input level is 75dBµV term 2 Adjust RF AGC so that Noise is min on picture or VIDEO OUT 3 Receive the PAL halfcolour bar pattern signal Input level ...

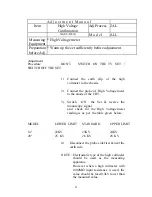
Page 23: ...is 2 Connect the probe of High Voltage meter to the anode of the CRT 3 Switch ON the Set receive the monoscope signal and check for the High Voltage meter reading is as per the table given below MODEL LOWER LIMIT STANDARD UPPER LIMIT 14 22KV 23KV 24KV 20 25 KV 26 KV 28 KV 4 Disconnect the probe side first next the earth side NOTE Electrostatic type of the high voltmeter should be used as the measu...

Page 24: ...V 0 1V 1 4V 0 5V 0 1V 0 1V 290V VCC INH F B DCP DRV SINK B GND C 9 8 7 6 5 4 3 1 2 C914 390PF 2KV D904 HER108G C912 220 16 R996 10K R905 12E 1W R927 47K R919 5 6K 1 2W R904 2R7 2W R903 0 27E 5W C918 0015 C913 220 35 C917 OPT R910 1K MTZJ12 C T2 D912 C911 001 2KV L921 CELC058 820 C921 2 7KpF 500V D921 RU3AM LFC4 K921 CE42050 001 OPT Q923 R925 OPT R921 2 2K OPT Q924 R935 22K PC901 TLP721F GR 2 1 3 4...

Page 25: ...C4722 NP 2SC4722 NP Q333 R339 270 R333 150 R348 1 5K 1 2W R345 12K 2W OMR R336 4 7K SK001 ISHS43S L331 180UH R349 3 3K 1 2W CN00U 4 3 2 1 1 2 3 4 5 010 2KV C338 C334 100 25 TP TP 478 A34JAE10X V01 R352 6 8K C335 470 16 L545 CEM40323 00A R413 3R9 B 1 2 3 4 7K R759 R424 OPT C421 100 50 OPT D405 R403 10K OPT D404 E1MWFS20005 H01A SUEFBT T501 8 1 11 5 3 7 6 4 2 10 9 R420 OPT OPT D406 X701 8 00MHz CRY1...

Page 26: ...8 17 16 15 14 13 12 11 7 6 5 2 3 4 1 10 UF 50V C657 C659 100UF 16V R655 1 5K R654 2 2K R656 1 5K R653 2 2K 10 UF 50V C658 C655 150KPF C652 5 6KPF C654 150KPF C656 330KPF C653 330KPF C651 5 6KPF R652 2K R651 2K 9 PIN D 5 4 3 2 1 6 7 8 9 B 3 PIN 1 2 3 DIGITAL EYE PIN NO 29 OF MICON 5 V 11 5V 11 5V 5 V 9V CREF VCC R OUT L OUT RIN 2 RIN 1 LIN 1 LIN 2 MUXOUT L MUXOUT R BIN R BOUT R BIN L TREB L TREB R ...

Page 27: ...14XS 20XS 21IQ 14TVE 20TVE 21TVE 21BLACK FGL FTG ...

Reviews: