


SWAP
Press Swap key at a certain channel number to toggle between the previously viewed channel and
the present one.
SLEEP
TIMER
Press the key repeatedly to set up the time in increments of 15 minutes up to a limit of 120
minutes. Setting it up puts the television into the stand by mode at the end of the time set up.
MUTE
Press the mute key to reduce the volume level to half the volume level. Pressing it again makes the
sound inaudible.
PICTURE
MUTE
The picture goes off with the press of this key, leaving the audio on. Alarm lamp on the front
panel blinks to indicate that the feature is on.
MAGIC
EYE
Press the key to activate this feature so that the screen automatically adjusts to an optimum
picture setting according to the lighting conditions of your room.
Note: Pressing the VSM key switches the digital eye off.
CHILD
TIMER
You need not bother about TV viewing of your child when you are away/out of home. Just set
Child Timer feature ON. Press Child Timer key.
• Press
4
repeatedly (at the desired channel you wish your child should watch) to set the
viewing time in increments of 5 minutes upto a limit of 120 minutes.
• Press
6
key and then
4
key to change the VSM settings as desired.
• Press
6
key and then
4
key to set the maximum volume you want your child to hear the
program at.
• Press ‘Menu’ key to activate CHILD TIMER.
Once the set time has elapsed, you set will switch OFF automatically. When you switch ON the
set it will ask you for password.
Note: No keys on the remote except (Power and Volume) will work, when child timer is
activated.
SWAP
TIMER
To avoid viewing advertisements, press the Swap Timer key to get a screen indicating Timer
Return. Press Swap Timer key to set the time in increments of 30 seconds. Having set the time,
you may now move to any other channel. After the time lapses, the picture switches to the
channel originally being viewed.
Note : To come to the original channel prematurely, simply press the Swap Timer key once.
16
4. I
NSTALLATION
1. TURNING YOUR TV ON
• Ensure that the set is plugged on and press the main power button on the TV to switch the TV
ON. The power lamp on the front panel glows.
• If no image appears on the screen after 20 secs., your TV is in stand by mode. Press the
POWER button on the remote control or CHANNEL
(or C/-) keys or
any of the numeric keys to switch the TV ON.
• To switch the TV off, press the power button on the remote. The TV is switched to standby
mode. To turn the TV's main power off, press the main power button on the TV. The power
indicator lamp stops glowing to indicate power has been turned off.
2. SEARCHING FOR & STORING TV CHANNELS
You must first store stations to channels in order to view a TV Program Press ‘MENU’ and
press
4
four times.
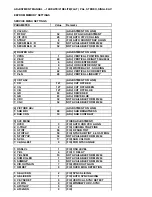
Auto Tune
You can automatically store all TV stations to channels on your
TV by one simple operation.
• After above mentioned operation, press
6
to select ‘AUTO
TUNE’ (Fig 4.1)
• Press
4
key to start ‘AUTO TUNE’
• Changing channel numbers and frequency bar appear on
screen to indicate the progress of tuning process.
Note: To stop Auto Tuning, press DISP key or MENU key on
remote.
Selective Auto Tune
By selecting this option, tuning will start from the Program No displayed on your screen.
Note: To stop Auto Tuning, press DISP key or MENU key on remote.
Channel Search
Set channel number by pressing
3
/
4
repeatedly at PROGRAM NO. To search desired
channel press
3
/
4
key repeatedly at channel search.
Note: To stop Channel Search, press DISP key or MENU key on remote.
5
/
6
5
PROGRAM NO.
14
AUTO TUNE
SELECTIVE AUTO TUNE
CHANNEL SEARCH
FINE TUNE
AFT ON/OFF
PASSWORD
VHF
Fig. 4.1
Summary of Contents for 14DELITE
Page 20: ......


