background image


33 

1.

在拍照

/

攝影

/

重播

/

設定任意模式狀態下按選單“

MENU

”鍵可進入其相對應的選單設

定,詳細請敞開設定目錄表。


2.

在任何模式的選單設定下

,

OK

鍵進入下一級選單,按上下鍵選擇相應的設定後,按

OK

鍵確定,再按

MENU

鍵退出選單。


攝影機開啟

/

關閉及自動關閉設定


1.

按住電源鍵

1

秒左右自動開機,在開機狀態下,按電源鍵

3

秒後鬆開電源鍵即關機。


2.

為節省電池電量,可在選單內設定自動關屏

/

自動關機時間。當攝影機在設定時間內沒

有操作便會自動關屏

/

自動關機。


3.

打開電源,按三次

MODE

鍵切換到設定模式,按下鍵選擇到“自動關機

/

自動關屏”,

在按

OK

鍵進入下一級功能表,可設定自動關機

/

自動關屏時間為“

OFF

1Min

3Min

5Min

”。


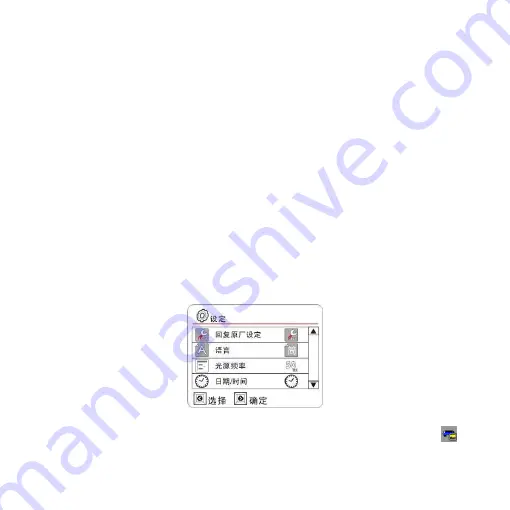
設定日期與時間


1.

打開電源,按三次

MODE

鍵切換到設定模式,按下鍵選擇到“日期

/

時間”,按

OK

鍵進入年、月、日、時、分、秒,按上、下、左、右鍵調到需要設置的項上按

OK

鍵,

當前項顯示為紅色,即可按上下鍵調整,調整好後按

OK

鍵退出,再按下鍵移動到

“√”,再按

OK

鍵確定即可。


攝影模式


1.

打開電源,攝影機完成開機程式,螢幕顯示攝影模式,隨即左上角出現攝影模式“

符號,此時已進入攝影狀態。


Summary of Contents for OTP-P9000

Page 1: ...Product introduction 3 Product features 4 Product structure 6 Usage and installation 7 Operating instructions 9 Storage and video replay 17 Key functions 18 Function icons 19 Menu setting 20 Product...

Page 2: ...hope this product shall meet your needs and serve you in a long term Statement Copyright of the manual belongs to our company Without further notice if have alteration The manual only offers reference...

Page 3: ...ra launched for market demand It has leading functions such as HD audio video recording photography high speed USB data transmission USB charging it also has a number of invention and technical patent...

Page 4: ...l in light Video specification TS Built in microphone speaker Rechargeable lithium battery with high capacity Support high capacity Micro SD memory card HD multimedia jack TV HDMI live telecasting and...

Page 5: ...min 848 480 FPS60 30min 63min 128min 266min Photo resolution 1G 2G 4G 8G 12M 239photos 478photos 956photos 1912photos 8M 367photos 739photos 1486photos 2988photos 5M 517photos 1040photos 2092photos 42...

Page 6: ...6 Product structure...

Page 7: ...Push battery cover open so as to take out the battery Battery charging 1 Charging with charger In shutdown state connect one end of USB cable with USB port of the charger and another end with USB port...

Page 8: ...t 2 Lightly press down memory card take the card out after it pops up Notes 1 Please install Micro SD memory card before use 2 Please note the insertion direction of memory card the camera and memory...

Page 9: ...mera power on off and auto power off settings 1 Press POWER button for 1 second to power on and press POWER button for three seconds in boot up state so as to power off 2 For saving battery power set...

Page 10: ...ss OK button to access year month day hour minute second press UP DOWN LEFT RIGHT button to select the desired item and then press OK button press UP DOWN button for adjustment when then current item...

Page 11: ...s REC button again to stop recording During recording red icon and timer shall display at the bottom of the screen the red icon and timer shall disappear when recording stops 3 Fill in light When the...

Page 12: ...era mode at this moment 2 Aim the camera at the subject to be captured press UP DOWN button to do digital zoom hold the camera and don t shake at this moment 3 Press REC button the camera makes a Clic...

Page 13: ...lically switch among record camera and setup mode 2 Under record and camera mode press Preview button to return to playback mode 3 Under record and camera mode press LEFT button to quickly switch AWB...

Page 14: ...r video playback press MENU button to select delete one and press OK button to confirm so as to access delete one mode and press OK button again to delete the current picture or video file after acces...

Page 15: ...esired to be protected is being browsed and icon shall display on current file which indicates the file is protected press OK button again so that icon shall disappear which indicates the current file...

Page 16: ...car and the battery is being recharged at the same time Note After the car stopped the camera shall use battery automatically until it powers off because of low battery Screen sleep mode After closin...

Page 17: ...mputer on desktop so as to find the stored images through MEDIA DCIM 100MEDIA Connect to TV video signal play 1 Connect camera with HD TV by HDMI cable so as to access record camera browsing pictures...

Page 18: ...X digital zoom Left button White balance auto sunshine cloudy fluorescence tungsten Right button Fill in light Turn on off OK button Confirm Menu button Menu selection Mode button Mode selection Playb...

Page 19: ...w icons particulars shall help you to know how to use this camera better and faster Record mode Camera Mode Photo Playback Video Playback Setup mode Auto Sunshine Cloudy Fluorescence Tungsten 1080P 10...

Page 20: ...d files and continue recording when the card is full Move detect ON OFF ON The camera starts recording when moving picture is detected G sensor Grade Grade Grade Grade I OFF The higher the level set t...

Page 21: ...one picture after each set interval Delete one Delete all Protect Playback Auto play Beep EV 1 0 5 0 0 5 1 Auto power off OFF 1Min 3Min 5Min LCD back light OFF 1Min 3Min 5Min TV standard NTSC PAL Form...

Page 22: ...Mono Shutter Electronic shutter Shutter speed 1 2 1 1 000 sec White balance Auto sunshine cloudy fluorescence tungsten LED light ON OFF Connection USB2 0 HDMI TV Battery External lithium battery 3 7V...

Page 23: ...23 Trouble shooting Cannot take pictures or record videos Please change resolution of photograph or recording or replace memory card with...

Page 24: ...ble provided with the camera The captured pictures and recorded videos are not clear Please wipe the lens before use Operation tips This camera is similar to computer if there is no action of the came...

Page 25: ...25...

Page 26: ...26 26 26 26 27 28 30 31 32 36 37 38 39 40 41 42 43...

Page 27: ...27 90 ISO9001 2000 FCC CE SGS...

Page 28: ...28 USB USB...

Page 29: ...29 2 5 LTPS TFT LCD 1 2 4 10cm 4X LED TS Micro SD TV HDMI 1G 2G 4G 8G...

Page 30: ...8min 266min 1280 720 FPS30 30min 63min 128min 266min 848 480 FPS60 30min 63min 128min 266min 12M 239photos 478photos 956photos 1912photos 8M 367photos 739photos 1486photos 2988photos 5M 517photos 1040...

Page 31: ...31...

Page 32: ...32 1 2 3 4 1 USB USB USB 2 1 2 1 Micro SD 2 3...

Page 33: ...33 1 MENU 2 OK OK MENU 1 1 3 2 3 MODE OK OFF 1Min 3Min 5Min 1 MODE OK OK OK OK 1...

Page 34: ...34 2 REC REC 3 4 1 MODE...

Page 35: ...35 2 3 REC 4 MENU OK OFF 5s 10s 1 MODE 2 AWB 3...

Page 36: ...36 1 MODE OK REC 2 MENU OK OK OK 3 MENU OK OK OK 4 MENU OK OK OK 5 MENU OK 1 2...

Page 37: ...37 USB USB MASS STORAGE USB MEDIA DCIM 100MEDIA 1 HDMI 2 TV...

Page 38: ...38 1 2 3 4 4 3 2 1 OK OK...

Page 39: ...39 1080P 1080I 720P WVGA 2048 1536 2592 1944 3200 2400 4000 3000...

Page 40: ...40 ON OFF ON ON OFF ON OFF 1 3 15 45 1920 1080 1440 1080 1280 720 848 480 ON OFF 12M 8M 5M 3M ON OFF 5 10 5 10 EV 1 0 5 0 0 5 1 1 3 5 1 3 5 NTSC PAL 50HZ 60HZ...

Page 41: ...m 2 5 LTPS TFT LCD HDMI CTS1 2 1080P 1080I 720P WVGA NTSC PAL JPEG 4000 3000 12M TS 1920 1080 30 1440 1080 30 1280 720 30 848 480 60 4 Micro SD 32G 1 2 1 1000 LED USB2 0 HDMI TV 3 7V 800mAh USB USB2 0...

Page 42: ...42...

Page 43: ...43...

Page 44: ...44 HDMI HDMI...

Page 45: ...45...

Reviews: