background image

14

User guide


Transferring calls

You may transfer an active call to any other phone number  

(it does not have to be a One Talk number). There are three 

transfer options: Consultative Transfer, where you have an 

opportunity to speak with the called party before transferring 

the call for pickup; Direct Transfer, where the current active call 

is transferred with no dialog between you and the called party;  

and Direct Transfer to Voice Mail.

Consultative Transfer
While on a call:

1.  Press the 

Transfer

 soft key; this will place the other party  

on hold

2.  Use the dial pad to enter the number (extension or  

10-digit number)

3.  Press 

Consult

; you will be connected and can inform the 

called party of the pending transfer

4.  Press 

Transfer

 to complete

Direct Transfer
While on a call: 

1.  Press the 

Transfer

 soft key; this will place the other party  

on hold

2.  Use the dial pad to enter the number (extension or  

10-digit number)

3.  Press 

Direct

Direct Transfer to Voice Mail

Direct Transfer to Voice Mail enables you to transfer a call to 

someone else’s voicemail.

1.  Press the 

Transfer

 soft key during an active call. This will 

place the call on hold

2.  Press 

**55

, then enter the 10-digit phone number or 

extension to which you want to transfer the call

3.  Press the 

Direct

 soft key to complete the transfer

2.  Enter the appropriate 10-digit number or the extension 

number followed by 

#

3.  Press 

#

 to park against your own extension
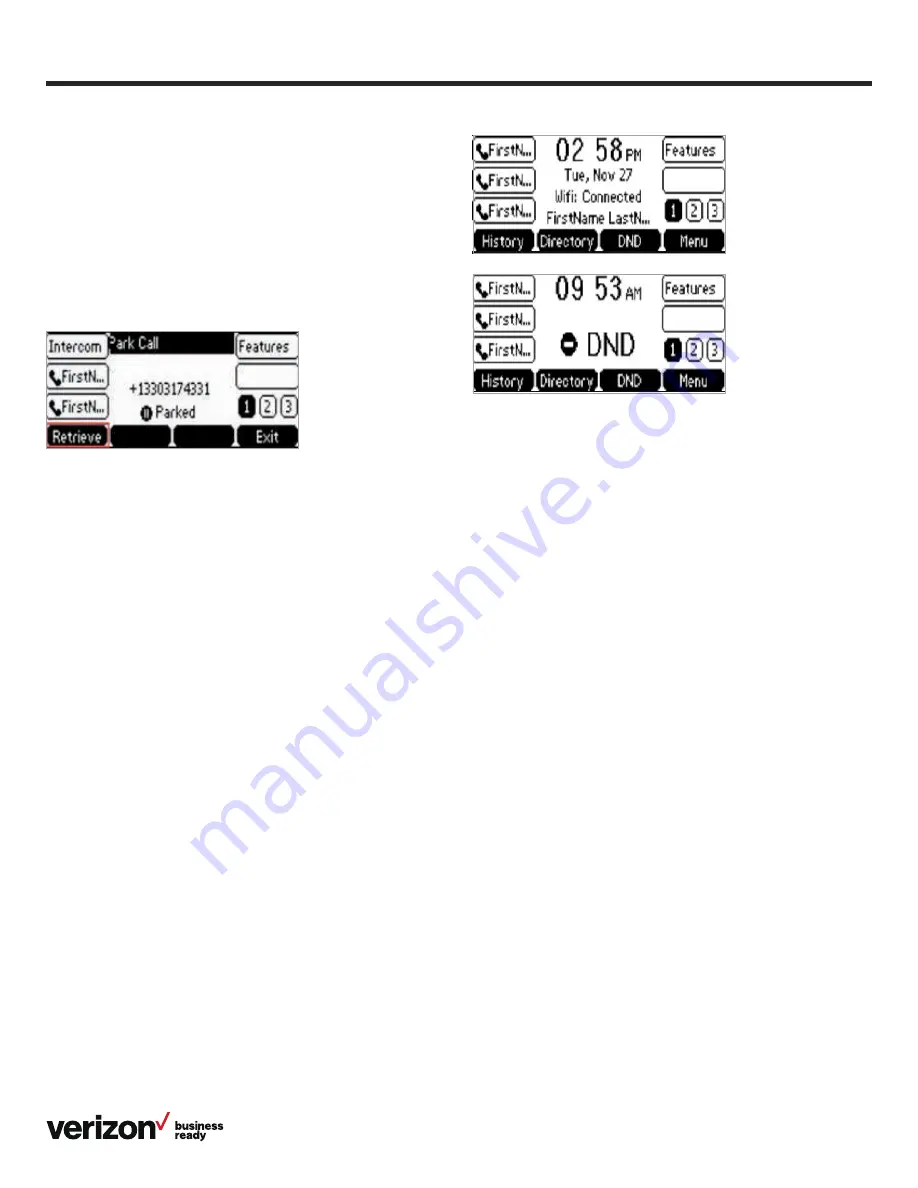
To retrieve a call:

•  Press the 

Retrieve

 soft key

•  The user will receive audio and visual notification of the 

parked call

•  The call can be retrieved by dialing **88 + extension

Caller Line ID Block

You can opt to place outgoing calls anonymously by pressing 

**67

 prior to dialing. This will prevent your phone number  

or any other caller ID information from appearing on the 

recipient’s display. 

Conference calling

You can use any of your lines to hold a one-person 

conversation or a conference call. While on a call:

1.  Press the 

Hold

 soft key during an active call. Then press 

New Line

2.  Enter the number of the second party, and then press the 

Send

 soft key

3.  Press the 

Conference

 soft key when the second party 

answers. All parties are now joined in the conference

4.  Repeat steps 1 to 3 to hold up to a six-way conference call

Do Not Disturb

Rejects incoming calls automatically. If no other devices share 

the One Talk number, callers can be forwarded to Voice Mail 

when DND is enabled.

1.  Select the button that is under DND on your phone display

2.  A DND icon will display at the top of the screen. Press the 

button under DND to toggle the feature on or off

Summary of Contents for T41SW

Page 1: ...User guide vzw com support one talk One Talk T41SW IP desk phone user guide...

Page 2: ...ge preferences 7 Time and date 8 Display settings 8 Sound settings 8 Line keys 9 Speed dial configuration of a line key 9 Intercom key setup 9 Using the Intercom key 9 Voice Mail setup 10 Basic call f...

Page 3: ...s 21 Accessibility features 21 For hearing impaired users 21 For vision impaired and blind users 22 For mobility impaired users 22 Compatible accessories 22 Important customer information 23 WEEE warn...

Page 4: ...he internet port on the phone and the port on the wall or on your PoE capable switch hub device Startup After your phone is powered on the system boots up and performs the following steps Dynamic Host...

Page 5: ...er soft key 4 Scroll to Wi Fi and press Enter 5 Press the Switch soft key to turn Wi Fi on 6 Press the Save soft key The phone will automatically search for available wireless Wi Fi networks in your a...

Page 6: ...plays info about calls messages soft keys time date and other relevant data such as Caller ID Call duration Icons Missed call and second incoming caller information Prompt text 2 Power indicator LED I...

Page 7: ...green The call is placed on hold from current device Off The line is inactive Customizing your desk phone About Basic settings Setup and preference options for the following can be found in the Basic...

Page 8: ...the Time Date settings screen 1 Press the Menu soft key to open the main menu 2 Select Settings 3 Use the keys to navigate to Basic settings and press to select 4 Scroll to Time Date and press to sele...

Page 9: ...1 From the Home screen press the Intercom soft key 2 Enter the target extension for Intercom then press the Send soft key Line keys Your T41SW comes with nine configurable line keys You can use them...

Page 10: ...b mode to turn off ringing and automatically ignore calls by pressing the DND soft key Ignore a call Press Ignore during an incoming call when you wish to trigger the call forwarding options you confi...

Page 11: ...call on hold press or to select the desired call then press the Resume soft key Mute unmute your phone s microphone Press during a call Redial 1 Press to enter the placed call list 2 Press or to sele...

Page 12: ...line you will have access to the same features that are available on your own desk phone line Call Barge Any bridged line or other device that shares a number with you can use the Call Barge feature t...

Page 13: ...ld option callers will hear music To park a call 1 While on an active call press the Park soft key The user will hear a message stating Please dial the number where you want to park your call followed...

Page 14: ...er or extension to which you want to transfer the call 3 Press the Direct soft key to complete the transfer 2 Enter the appropriate 10 digit number or the extension number followed by 3 Press to park...

Page 15: ...tact numbers in the corresponding fields 5 Use the key to enter other information work number mobile number etc 6 Press the Add soft key to accept the change Call History Call History maintains a list...

Page 16: ...em To search for a contact 1 Press the Directory soft key 2 Select All Contacts 3 Press the Search soft key 4 Use the keypad to enter name To edit a contact 1 Press the Directory soft key when the pho...

Page 17: ...irectory soft key 2 Select Add Group 3 Using the keypad enter a group name 4 Use the key to scroll to and select a ringtone to assign to the group if desired 5 Once you are finished editing select Add...

Page 18: ...3 Press the Option soft key and then select Delete from the prompt list 4 Press the soft key to confirm the deletion or the Cancel soft key to cancel To assign a contact to a group 1 Press the Direct...

Page 19: ...on information product ID and MAC address and Account information number of the phone and accounts associated with it 4 Scroll to navigate to and select the info you would like to view and select Rebo...

Page 20: ...boot and press 2 Select Reset to factory settings and press To reboot the phone 1 From Advanced Settings scroll to Reset Reboot and press to select 2 Press the OK soft key to confirm Note Alternativel...

Page 21: ...justable ringtone and volume Choice of a variety of ringtones Volume of the ringer can also be changed to suit needs Adjustable call volume While on a call raise or lower the volume of the voice on th...

Page 22: ...illuminated when activated providing alerts when a feature is enabled For mobility impaired users Feature Description Dedicated headset jack that enables the auto answer function Headset can be set up...

Page 23: ...hnology CO LTD All rights reserved No parts of this publication may be reproduced or transmitted in any form or by any means electronic or mechanical photocopying recording or otherwise for any purpos...

Page 24: ...by Yealink Network Technology CO LTD declares that this phone is in conformity with the essential requirements and other relevant provisions of the CE FCC You can find the CE and FCC information from...

Page 25: ...Line Duration Back Edit OK Option Detail Add to Contact Add to Blacklist Delete All Cancel OK Call Detail Name Work Number Mobile Number Other Number Account Ring Group Back ABC Save Add Group Enter N...

Page 26: ...ssages Firmware More Exit Enter More Network Phone Accounts Back Enter Network IPv4 IP Mode MAC Accounts Line 1 Line 2 Phone Product Name Hardware Firmware Config Version Prod ID MAC Device Cert Basic...

Page 27: ...o locate specific menu items Feature Settings Call Forward Anonymous Call Rejection Forward to Voicemail Start Troubleshooting Trace Back Enter Call Forward Always Forward Busy Forward No Answer Forwa...

Reviews: