SKU 92497 For technical questions, please call 1-800-444-3353 PAGE 7
SAVE THESE INSTRUCTIONS
23.
WARNING! The warnings and precautions discussed in this manual can-
not cover all possible conditions and situations that may occur. It must be under-
stood by the operator that common sense and caution are factors which cannot
be built into this product, but must be supplied by the operator.
IMPORTANT! Before first use, check the sprayer for leaks, or damage by testing with
water. This should be done before using any caustic or irritating chemical in the tank.
1.
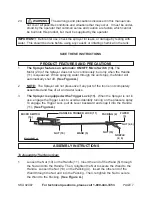
The Sprayer features an automatic ON/OFF Micro Switch (14). The
Motor (20) of the Sprayer does not run continuously, but only when the Handle
(11) is squeezed. When spraying water through the unit stops, the Motor will
automatically shut off. (See Figure A.)
2.
NOTE: The Sprayer will not pressurize if any part of the tool is not completely
assembled and free of air and water leaks.
3.
The Sprayer is equipped with a Trigger Lock (11). When the Sprayer is not in
use, engage the Trigger Lock to avoid accidentally turning on the pressure spray.
To engage the Trigger Lock, pull its Lever backward and snap it into the Handle
(11). (See Figure A.)
ASSEMBLY INSTRUCTIONS
To Assemble The Spray Gun:
1.
Loosen the Nut (10) on the Handle (11). Insert the end of the Wand (5) through
the Nut and into the Handle. Then, retighten the Nut to secure the Wand to the
Handle. Loosen the Nut (10) on the Packing (4). Insert the other end of the
Wand through the Nut and into the Packing. Then, retighten the Nut to secure
the Wand to the Packing. (See Figure A.)
MICRO SWITCH
(14)
HANDLE & TRIGGER LOCK (11)
NUT (10)
WAND (5)
NUT (10)
NUT (2, 6)
PACKING (4)
FILTER
(3)
NOZZLE
(2, 6)
FIGURE A
PRODUCT FEATURES AND PRECAUTIONS

