background image

12

Programming Favorite Channel Scan 

In the 

TV

VCR

DVD

, and 

CBL/SAT

 modes, you can store a list of 

up to 10 favorite channels, in any order, that will be immediately 
scanned when you press 

FAV

 (see “Using Channel Scan”). 

NOTE:

 Only channels of one mode can be stored for Favorite 

Channel Scan. 
1.  On the remote control, press 

TV

VCR

DVD

, or 

CBL/SAT

 once. 

2.  Press and hold 

SET

 until the LED (red light) blinks twice, then 

release 

SET

3.  Enter 

9 9 6

. The LED will blink twice. 

4.  Use the keypad to enter a favorite channel number (e.g., 

031

). 

Then press 

SET

 once. 


NOTE:

 If the original remote control required pressing an 

ENTER

 key to change the channel, also press the 

ENTER

 key 

after the channel number (e.g., 

0 3 1


ENTER

). 

5.  If desired, repeat step 4 (in this section) for each favorite 

channel to be stored, up to a total of 10 channels. 


NOTE:

 If you try entering more than 10 channels, the remote 

control will automatically exit programming. 

6.  To exit programming, press and hold 

SET

 for 3 seconds. The 

LED will blink twice. 

Re-Assigning Device Keys 

You can set this remote to control a second TV, VCR, DVD player, 
or other device. For example, to control a TV, a cable box, and two 
DVDs, you will need to re-assign the 

AUX

 key to operate the second 

DVD as follows: 
1.  On the remote control, press and hold 

SET

 until the LED (red 

light) blinks twice, then release 

SET

2.  Enter 

9 9 2

. The LED will blink twice. 

3.  Press 

DVD

 once, then press 

AUX

 once. 

4.  The 

AUX

 key is now ready to be programmed for your second 

DVD. See “Setting Up Your Components.” 

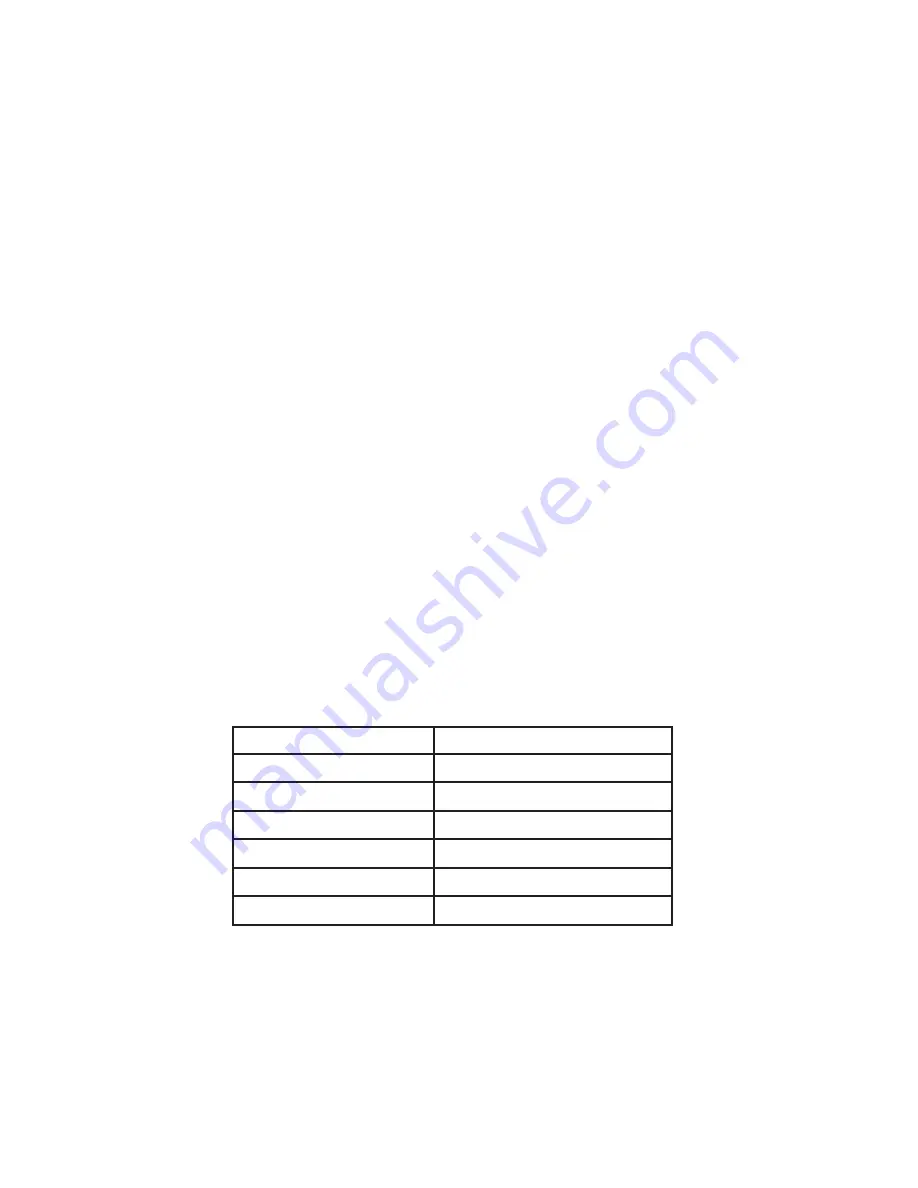
To re-assign other device keys to the 

AUX

 key, repeat steps 1 

through 4 by substituting the sequence from the following chart: 

To Re-Assign Device

Perform Sequence

AUX

 as 2nd 

TV

 key:

SET 

-

 9 

-

 9 

-

 2 

-

 TV 

-

 AUX

AUX

 as 2nd 

VCR

 key:

SET 

-

 9 

-

 9 

-

 2 

-

 VCR 

-

 AUX

AUX

 as 2nd 

CBL/SAT

 key:

SET 

-

 9 

-

 9 

-

 2 

-

 CBL/SAT 

-

 AUX

AUX

 as 2nd 

CD

 key:

SET 

-

 9 

-

 9 

-

 2 

-

 CD 

-

 AUX

AUX

 as 2nd 

PVR

 key:

SET 

-

 9 

-

 9 

-

 2 

-

 PVR 

-

 AUX

AUX

 as 2nd 

AUD

 key:

SET 

-

 9 

-

 9 

-

 2 

-

 AUD 

-

 AUX

You can also re-assign another unused device key by substituting 
an open key for the 

AUX

 key in the above chart and performing 

the sequence. For example, to re-assign an unused 

CBL/SAT

 key 

as a 2nd 

CD

 key, perform 

SET

 - 

9

 - 

9

 - 

2

 - 

CD


CBL/SAT

. When a re-

assignment is done, the LED (red light) will blink twice to confirm 
your choice. At that time, you will need to program the remote 
control for the new device (see “Setting Up Your Components”).

Summary of Contents for URC8820N

Page 1: ...oubleshooting 14 Additional Information 15 Care and Maintenance 15 Limited Lifetime Warranty 16 Contenido Introducci n 17 Instalaci n de las Bater as 17 Caracter sticas y Funciones 17 Funciones de las...

Page 2: ...and marks in the battery case then insert the new batteries 3 Slide the battery cover back into place The tab should click when the cover is locked 4 Test the remote control by first pressing POWER a...

Page 3: ...or guide In the RCVR AMP mode use OK to set the surround sound Use the up arrow or down arrow to adjust the volume higher or lower Use the left arrow or right arrow to adjust the balance left or right...

Page 4: ...have a PVR DVR device use SHOWS to access your list of recorded shows Use FORMAT to change the Aspect Ratio of your display 16 9 If you have a PVR DVR device use LIVE to return to live programming Us...

Page 5: ...control press a device key once i e TV CBL SAT VCR DVD CD PVR AUD or AUX 3 Press and hold SET until the LED red light blinks twice then release SET 4 Use the accompanying code lists to locate the type...

Page 6: ...LED red light blinks twice and then release SET 4 Use the setup codes under the TV DVD Combos heading use codes listed as Controlled by TV key Locate the brand name and then enter the first four digit...

Page 7: ...the LED blinks e g three blinks 3 and write down the number in the leftmost box in the TV code boxes NOTE If a code digit is 0 the LED will not blink 5 Repeat step 4 three more times for remaining dig...

Page 8: ...6 7 To learn functions onto other learning keys e g M1 and M2 repeat steps 3 through 6 8 To lock in new feature s on this remote press and hold SET until the LED blinks twice then release SET 9 To tes...

Page 9: ...e remote control press and hold SET until the LED red light blinks twice then release SET 2 Enter 9 9 3 and then press VOL once The LED will blink four times 3 Volume will again be independently contr...

Page 10: ...y e g AUD once 7 Repeat step 6 up to five more times to add the other desired devices to the power on sequence e g VCR DVD CD PVR and AUX 8 To save the settings and exit the program press and hold SET...

Page 11: ...allows you to still change modes while using the remote NOTE After executing the Device Key Macro the remote will return to the DVD mode to allow the control of the DVD device Clearing A Macro 1 Pres...

Page 12: ...nd TV VCR DVD player or other device For example to control a TV a cable box and two DVDs you will need to re assign the AUX key to operate the second DVD as follows 1 On the remote control press and...

Page 13: ...te to control the TV s volume and MUTE in the VCR mode as well as in the TV mode Restoring Keymoved Keys To Default Settings Restoring a Single Keymoved Key 1 Press a device key that has a keymoved ke...

Page 14: ...f remote controls before performing the procedure again Tried Searching For Your Code method and still could not find a working code Clear the device key as follows Press and hold SET until the LED re...

Page 15: ...fit your needs Please visit our Website at www Oneforall com to see our full product lineup ONE FOR ALL is the registered trademark of Universal Electronics Inc Audiovox Accessories Corporation is the...

Page 16: ...different battery types e g alkaline standard or rechargeable THE EXTENT OF THE COMPANY S LIABILITY UNDER THIS WARRANTY IS LIMITED TO THE REPAIR OR REPLACEMENT PROVIDED ABOVE AND IN NO EVENT SHALL TH...

Page 17: ...al manera a la indicada por los s mbolos de polaridad y en el interior 3 Vuelva a colocar la tapa La leng eta har clic para indicar que la tapa est cerrada 4 Presione POWER y luego cualquiera tecla de...

Page 18: ...y de las pantallas de men es Use OK para escoger las opciones en el men o en la gu a de su dispositivo En el modo RCVR AMP use OK para fijar el sonido envolvente Use el cursor hacia arriba o hacia ab...

Page 19: ...est disponible para todos los dispositivos Use CC para activar subtitulares cerrados Si usted tiene un dispositivo PVR DVR use SHOWS para entrar en su lista personal de programas grabados Use FORMAT p...

Page 20: ...s pasos 2 al 4 completamente Resalte o anote los nombres de los dispositivos y los n meros de los c digos que desea programar antes de comenzar con el paso 2 2 Presione una tecla de dispositivo una ve...

Page 21: ...ED no parpade dos veces repita los pasos 2 al 4 y vuelva a introducir el mismo c digo una vez m s 5 Apunte el control remoto al dispositivo y presione la tecla POWER una vez El dispositivo deber apaga...

Page 22: ...ivo en los espacios apropiados para el c digo Uso de la Funci n Aprendizaje Este control remoto incluye una funci n de Aprendizaje para que usted pueda a adir funciones que son nicas a los dispositivo...

Page 23: ...la funci n est guardada Borrar Funciones de las Teclas de Aprendizaje 1 Presione y mantenga presionada SET hasta que el LED luz roja parpadee dos veces 2 Introduzca 9 7 6 El LED parpadear dos veces 3...

Page 24: ...parpadear cuatro veces 3 El volumen se controlar de nuevo en forma independiente de acuerdo con los par metros de f brica de todos los dispositivos programados Uso de los Macros Usted puede programar...

Page 25: ...vo usted quiere incluir en la secuencia de encendida 7 Repita el paso 6 hasta cinco veces m s para a adir dispositivos a la secuencia de encendida v g VCR DVD CD PVR y AUX 8 Para guardar la funci n y...

Page 26: ...A Despu s de ejecutar el macro de tecla de dispositivo el control remoto volver al modo DVD para permitirle controlar el reproductor DVD Borrar un Macro 1 Presione y mantenga presionada SET hasta que...

Page 27: ...egundo televisor videograbadora reproductor DVD o otro dispositivo Por ejemplo para controlar un televisor una Caja de Cablevisi n y dos reproductores DVD usted puede reasignar la tecla AUX para opera...

Page 28: ...i n 8 Repita los pasos 1 al 7 dos veces m s para copiar el resto de las teclas del control del volumen sustituyendo VOL y MUTE como teclas de origen y destino en los pasos 4 y 6 Al terminar el procedi...

Page 29: ...mandos no est n trabajando adecuadamente Pruebe con todos los c digos en la lista para las marcas de los dispositivos que se est n configurando Aseg rese de que stos puedan operarse con un control re...

Page 30: ...le asista Informaci n Adicional Mientras usted actualiza su sistema del entretenimiento en el hogar One For All tiene un control remoto universal que le conviene Visite nuestra pagina de Internet www...

Page 31: ...as por ejemplo alcalinas t picas o recargables EL ALCANCE DE LA RESPONSABILIDAD DE LA COMPA A BAJO ESTA GARANT A EST LIMITADO A LA REPARACI N O EL REEMPLAZO PROVISTO ARRIBA Y EN NING N CASO DEBER LA R...

Page 32: ......

Page 33: ...C 0072 1294 Kenwood 0626 0028 0037 0190 KLH 1318 Koss 1317 Krell 0157 LG 1208 Linn 0157 LXI 0305 Magnavox 0157 0305 Marantz 0626 0029 0157 0180 Mark Levinson 1484 MCS 0029 Miro 0000 Mission 0157 MTC 0...

Page 34: ...ntrolado por la tecla DVD Akai 0695 Apex Digital 0830 Audiovox 1121 1122 Broksonic 0695 Citizen 0695 Emerson 0675 1268 ESA 1268 Funai 1268 GFM 1268 Hitachi 1247 Insignia 1268 Magnavox 1268 Panasonic 1...

Reviews: