POWER
OUT
MODE
H3CR
0
5
10
15
20
25
30
min
➀
➁
➂
➃
➄
➅
(A, B2,E,J)
(sec, min, hrs, 10h)
(1.2, 3, 12, 30)
48
t=1〜5
R0.5 max.
48
φ39
66.6
44.8
□
15
6
52.3
0.7
45
+
0.6
0
45
+
0.6
0
A
[mm]
X/b
T/a
X/a
T
X
x :
Relay(Model MY)
t
*1
*2
―
*4(power)
(Instantaneous output relay)
(Instantaneous output relay)
(power)
―
―
―
―
*3(Output relay)
(Output relay)
t
*1
*2
―
*4(power)
(Instantaneous output relay)
(Instantaneous output relay)
(power)
―
―
―
―
*3(Output relay)
(Output relay)
Mode
B2.
Signal ON
flicker, ON
start operation
* 1:
flicker
* 3:
Output indicator
* 4:
(power)indicator
Mode
J.
One-shot
output
operation
* 1:
flicker
* 2:
ON
* 3:
Output indicator
* 4:
(power)indicator
⑦
Sofortkontakte
⑧
verzögerte Kontakte
⑨
Arbeitsspannung
⑦
Contacts instantanés
⑧
Contacts temporisés
⑨
Tension d'alimentation
Modus
E.
Stromzufuhr
eigeschaltet
Intervallbetrieb
* 1:
blinkend
* 2:
beleuchtet
* 3:
Ausgangsanzeige
* 4:
Netzanzeige
Mode
E.
MIse sous tension
Fonctionnement
par intervalles
* 1:
Clignotant
* 2:
Eclairé
* 3:
Voyant de sortie
* 4:
Voyant
d'alimentation
t
t
t
*1
―
*4(power)
(Instantaneous output relay)
(Instantaneous output relay)
(power)
―
―
―
―
*3(Output relay)
(Output relay)
t
1s
±
0.6s(fixed)
*1
*2
―
*4(power)
(Instantaneous output relay)
(Instantaneous output relay)
(power)
―
―
―
―
*3(Output relay)
(Output relay)
⑩
0696884-2A
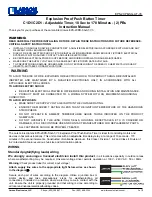
Nomenclature
Bezeichnungen der Teile
Nomenclature
UK/USA
D
F
①
Power indicator
②
Output indicator
③
Rated time selector
④
Time unit selector
⑤
Setting dial (setting time value)
⑥
Operation mode selector
Note:If pointer is turned counterclockwise
until overranged, instantaneous output
will be issued. (zero point instantaneous
operation)
①
Spannungsversorgungsanzeige
②
Ausgangsanzeige
③
Zeitbereichsschalter
④
Zeiteinheitwahlschalter
⑤
Einstellscheibe (eigestellte Zeitdauer)
⑥
Betriebsartwahlschalter
Hinweis: Sofortausgang(Sofortbetrieb)
kann durch Drehung der Einstellscheibe
auf 0 eigestellt werden.
①
Voyant d'alimentation en courant
②
Voyant de puissance de sortrie
③
Sélecteur de temps nominal
④
Sélecteur de temps
⑤
Cadran de réglage (réglage du temps)
⑥
Sélecteur du mode de fonctionnement
Remarque :Use sortie instantanée est pos-
sible en plaçant le cadran sur le réglage 0
(mode sortie instantanée).
Dimensions
Abmessungen
Dimensions
UK/USA
D
F
A
−
Panel cutout dimensions
Applicable socket
Model P2CF-08
Front connection socket
Model P3G-08
Back connection socket
A
−
Frontplattenausschnitt
Verwendbare Sockel
P2CF-08
Frontseitige Klemmen
P3G-08
Rückseitige Klemmen
A
−
Découpe du panneau
Socle
Modèle P2CF-08
Socle à connexion avant
Modèle P3G-08
Socle à connexion arrière
UK/USA
D
F
Timing charts
Zeitablauf
Tableaux de minutage
UK/USA
D
F
Timing charts
Zeitablauf
Tableaux de minutage
Mode
E.
Power ON Inter-
val Operation
* 1:
flicker
* 2:
ON
* 3:
Output indicator
* 4:
(power)indicator
Connections
Anschlußanordnung
Brochage
UK/USA
D
F
⑦
Instantaneous contacts
⑧
Delayed contacts
⑨
Operating power
UK/USA
D
F
Notice
Hinweis
Note
Bitte folgen Sie genau den folgenden Hinweisen.
Die gewährleisten eine sichere Funktion des Zeitrelais.
(1) Setzen Sie das Zeitrelais nicht unter den folgenden
Bedingungen ein :
• Erhebliche Temperaturschwankungen
• Hohe Luftfeuchtigkeit oder wenn Kondensation entstehen
könnte
• Vermeiden Sie starke Vibration oder Schock
• Korrosieves Gas oder staubige Umgebung
• Bei plätscherndem Wasser, Öl oder irgendwelche
Chemikalien
• Wenn in der Umgebung explosive oder entflammbare Gase
sind
(2)
Spannungsversorgung
Stellen Sie sicher, daß die Spannungsversorgung innerhalb
des angegebenen Bereiches liegt.
(3)
Handhabung
Demontieren, modifizieren und reparieren Sie bitte niemals
das Gerät.
(4)
Stellen Sie sicher, daß das Produkt den Anforderungen Ihrer
Anwendung entspricht.
(5)
Schließen Sie die Drähte mit der richtigen Polarität an.
(6)
Montieren Sie das Zeitrelais und die Eingangsverdrahtungen
soweit wie möglich von elektrischen Störungen oder
Starkstromschaltgeräten entfernt.
(7)
Verwenden Sie das Zeitrelais nur innerhalb des
Temperaturbereiches von -10 bis +55
°
C und bei einer
relativen Luftfeuchtigkeit zwischen 35 und 85%.
(8)
Reinigung
Verwenden Sie keine Verdünnung für Lacke o.ä., sondern nur
Reinigungsalkohole.
(9)
Ändern Sie niemals die Zeiteinheit, den Zeitbereich oder den
Arbeitsmodus während das Gerät arbeitet, andernfalls wird
eine Fehlfunktion daraus resultieren. Stellen Sie sicher, daß
bei derartigen Änderungen die Netzspannung abgeschaltet ist.
(10)
Anschluß der Netzspannung
Verwenden Sie eine Gleichspannungsversorgung mit einer
Restwelligkeit von 20% oder weniger und eine mittlere
Spannung, die innerhalb des angegebenen Bereiches für die
Betriebsspannung des Zeitrelais liegt.
Stellen Sie sicher, daß die Spannung über die ganze Zeit am
Zeitrelais ansteht. Verwenden Sie Kontakte, wie z.B. ein
Relais.
Andernfalls kann das Zeitrelais nicht ordentlich arbeiten.
Es könnte z.B. die Netzrückstellung oder der Endzeitpunkt
geschaltet werden, obwohl die Zeit noch nicht abgelaufen ist.
(11)
Überschreiten Sie bitte niemals die auf dem Zeitrelais
angegebene Nennspannung.
Wenn eine andere Spannung als die angegebene
Nennspannung angelegt wird, werden die internen
Komponenten beschädigt.
(12)
Bitte beachten Sie die nebenstehende Zeichnung.(
⑩
)
Verknüpfen Sie das Netz über ein Relais mit dem Zeitrelais, so
daß es niemals über eine längere Zeit (ein Monat oder länger)
in der Funktion „Zeit abgelaufen” stehen bleibt.
Es könnten sonst Bauteile wie z.B. Elektrolytkondensatoren
vorzeitig zerstört werden.
Veuillez suivre précisément les instructions suivantes afin d'utiliser
correctement la minuterie.
(1)
Pour une bonne utilisation de la minuterie, veuillez éviter les
conditions suivantes:
• Les fortes variations de température
• Les zones à forte humidité où de la condensation pourrait se
former
• Les chocs est les vibrations trop importantes.
• Les environnement poussiéreux ou contenant des gaz corrosifs,
• Les endroits où il y a des risques d'éclaboussures d'eau, d'huile
ou autres produits chimiques.
• Les ambiances explosives ou avec des gaz fortement
inflammables.
(2)
Alimantation
Vérifier que la tension d’alimentation correspond à celle du
produit.
(3)
Manipulations
Ne jamais désassembler, modifier ou réparer ce produit.
(4)
Assurez vous que le produit correspond à votre application.
(5)
Connectez les bornes avec la bonne polarité
(6)
Placez la minuterie et ses éléments de commande, à distance
de toute source de perturbation et d'alimentation haute ten-
sion.
(7)
Utilisez la minuterie avec une température ambiante entre -
10
°
et 55
°
et une humidité relative entre 35 et 85%.
(8)
Nettoyage
N'utilisez pas des solvants de peinture ou équivalents. Utilisez
des produits à base d'alcool.
(9)
Ne changez pas le temps, la gamme de temps ou la fonction
alors que la minuterie est en fonctionnement. Sinon un
dysfonctionnement pourrait survenir. Soyez sûr d’être en posi-
tion off.
(10)
Connexion de l'alimentation
Utilisez une alimentation Vc.c. avec un facteur d'ondulation
inférieur à 20% délivrant la tension nominale marquée sur le
produit.
Assurez vous d’alimenter la minuterie d’un coup en utilisant
des contacts tels que des relais ou des interrupteurs.
Sinon, la fonction remise à zéro ou le temps réglé pourrait être
altérés.
(11)
Veuillez ne pas dépasser la tension nominale indiquée sur la
minuterie. Si une tension supérieure à celle indiquée est
appliquée, le circuit interne du composant risque d'être
endommagé.
(12)
Veuillez vous référer au schéma de gauche.(
⑩
) Interfacez la
puissance et la minuterie avec un relais. Ainsi la minuterie ne
restera pas durant une longue période en position temporisation
finie. Le maintien dans cette position durant un mois ou plus
pourrait, spécialement dans une ambiance avec une haute
température, détériorer des composants internes tel que les
condensateurs.
Please comply strictly with the following instructions which
are intended to ensure safe operation of the controller.
(1)
For correct use, do not subject the timer to the following
conditions.
• Dramatic temperature fluctuations
• High humidity or where condensation may occur
• Severe vibration and shock
• Corrosive gas or dusty environments
• Where there is danger of splashing of water, oil or any
chemicals
• Where explosive or flammable gases may be present
(2)
Load power supply
Make sure that the load power supply is within the rating.
(3)
Handling
Never disassemble, modify or repair the product.
(4)
Make sure the proper product is specified for the applica-
tion.
(5)
Wire terminals with correct polarity.
(6)
Locate the timer, input devices and input signal wiring as
far as possible from noise sources and conductors carrying
high voltage.
(7)
Be sure to use the Timer at ambient temperature of -10 to
55
°
C and ambient humidity (relative humidity) of 35 to 85
%.
(8)
Cleaning
Do not use paint thinner or the equivalent. Use standard
grade alcohol to clean the product.
(9)
Do not change the time unit, time range or operation mode
while the Timer is in operation, otherwise malfunction could
result. Be sure to turn off the power before making such
changes.
(10)
Power supply connection
Use a DC power supply having a ripple factor of 20% or
less and supplying a mean voltage that is within the rated
operating voltage marked on the timer.
Make sure that the supply voltage is applied to the timer
all at once, using contacts such as of a switch or relay.
Otherwise, the timer may not be able to perform power
reset or its set time may be up when it should not.
(11)
Please do not exceed the voltage rating marked on the timer.
If voltage other than the rated voltage is applied, the inter-
nal components may be damaged.
(12)
Please refer to the diagram shown on the left.(
⑩
) Inter-
lock the power to the timer with a relay so that the timer
will not be left in a time-up condition for long periods. Leav-
ing the timer in a time-up condition for a month or longer,
especially in places with high temperatures, may result in
deterioration to internal parts, such as an electrolytic ca-
pacitor.
Modus
A.
Einschaltverz
ögerung
* 1:
blinkend
* 2:
beleuchtet
* 3:
Ausgangsanzeige
* 4:
Netzanzeige
Mode
A.
Retared à la mise
sous tension
* 1:
Clignotant
* 2:
Eclairé
* 3:
Voyant de sortie
* 4:
Voyant
d'alimentation
Mode
A.
Power ON delay
operation
* 1:
flicker
* 2:
ON
* 3:
Output indicator
* 4:
(power)indicator
Modus
B2.
EIN-Signal
blinkend, EIN
Betriebsbeginn
* 1:
blinkend
* 3:
Ausgangsanzeige
* 4:
Netzanzeige
Mode
B2.
Signal ON
clignote,
déclenchement
* 1:
Clignotant
* 3:
Voyant de sortie
* 4:
Voyant
d'alimentation
Model
H3CR-A8E
INSTRUCTION SHEET
Bedienungsanleitung
Manuel d'instructions
Bitte lesen Sie diese Betriebsanleitung
sorgfältig durch, bevor Sie mit dem Gerät
arbeiten.
Thank you for purchasing OMRON product.
This manual primarily describes precautions
required in installing and wiring the timer.
Before operating the product ,read this
manual thoroughly to acquire sufficient
knowledge of the product. Keep this manual
for future references.
Avant d'utiliser ce produit, veuillez, s'il vous
plait, lire attentivement ce manuel pour vous
familiariser avec le produit.
OMRON Corporation
SOLID-STATE TIMER
Karasuma Nanajo, Shimogyo-ku,
Kyoto 600, Japan
UK/USA
D
F
➆
➇
〜
(−)
(〜)
(+)
(〜)
}
➈
Modus
J.
Impulsausgang
* 1:
blinkend
* 2:
beleuchtet
* 3:
Ausgangsanzeige
* 4:
Netzanzeige
Mode
J.
Sortie un
coup
* 1:
Clignotant
* 2:
Eclairé
* 3:
Voyant de sortie
* 4:
Voyant
d'alimentation
When using the product for critical applications such as those listed below, please
be sure to maintain strict adherence to the limits of product ratings and functions.
These controllers are not intended for use as safety and limiting devices.
q
For use at any condition or environment not described in the manual.
w
For nuclear power control, railway, aircraft, vehicle, incinerator, medical
equipment, entertainment equipment, etc...
e
Where death or serious property damage is possible or where extensive safety
precautions are required.
Vorkehrungen beim Gebrauch des Produktes
Wenn Sie den Sensor in schwierigen Applikationen, wie z. B. den unten aufgeführ-
ten verwenden wollen, dann stellen Sie bitte sicher, dass Sie sich dabei in den
Grenzen der Produktklasse und dessen Funktionen bewegen. Diese Sensoren sind
nicht für Sicherheits-oder Endabschaltungs-Aufgaben geeignet.
q
Für Anwendungen in jeglicher Umgebung oder Zustand, der nicht im Hand-
buch beschrieben wird.
w
Für Anwendungen im Bereich: Regelung von Kernkraft, Schienenfahrzeuge, Luft-
fahrzeuge, Fahrzeuge, Verbrennungsöfen, medizinische Geräte, Zubehör der
Unterhaltungstechnik, etc. ...
e
Wo Tod oder ernsthafte Sachschäden möglich sind, oder umfangreiche Sicher-
heitsmaßnahmen erforderlich sind.
Lors de l'utilisation du produit dans les applications citées ci-après, veuillez
respecter les limites de fonctionnement du produit:
q
Pour toute utilisation non prévue dans ce manuel
w
Pour les applications de contrôle nucléaire, chemins de fer, véhicules, médi-
cal, etc...
e
En cas de risque de blessures importantes, voire de danger de mort: Dans ce
cas, des précautions particulières sont à prendre !
Precautions in using the product
Précautions d'utilisation du produit
OMRON ELECTRONICS.INC.
Phone: 1-800-55-OMRON
OMRON CANADA INC.
Phone: 1-416-286-6465
Phone: 1-514-636-6676 (French Language)
Contact address
Kontakt Adresse
EUROPEAN H.Q.
OMRON EUROPE B.V.
Phone: 31-23-5681300
GERMANY
OMRON ELECTRONICS G.m.b.H.
Phone: 49-2103-203-3
Adresse du contact
EUROPEAN H.Q.
OMRON EUROPE B.V.
Phone: 31-23-5681300
FRANCE
OMRON ELECTRONICS S.a.r.l
Phone: 33-1-49747000
UNITED KINGDOM
OMRON ELECTRONICS LTD.
Phone: 44-181-450-4646
UK/USA
D
F
UK/USA
D
F