Technical data for the OMRON A3 Complete Compressor with the
A3 Complete nebulizer kit:
Appropriate Medication
Quantities:
2 ml minimum - 12 ml maximum
Sound:
Noise level (at 1 m distance) 65 dB
Nebulizer
control ring in
position 1
Nebulizer
control ring in
position 2
Nebulizer
control ring in
position 3
Particle Size (MMAD):
Approx.
10 μm
Approx.
5 μm
Approx.
3 μm
Nebulization Rate
(by weight loss):
Approx.
0.7 ml/min
Approx.
0.5 ml/min
Approx.
0.3 ml/min
Aerosol Output
(3 ml, 1% NaF):
Approx.
0.45 ml
Approx.
0.53 ml
Approx.
0.36 ml
Aerosol Output Rate
(1% NaF):
Approx.
0.15 ml/min
Approx.
0.12 ml/min
Approx.
0.1 ml/min
MMAD = Mass Median Aerodynamic Diameter
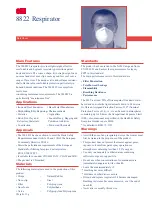
Result of cascade impactor measurements for particle size
100.0
10.0
1.0
0.1
0.0
10.0
20.0
30.0
40.0
50.0
60.0
70.0
80.0
90.0
100.0
Cumulative % particle mass of sodium fluoride undersize
Cumulative Undersize%
Particle Size Dp (μm)
Position 1
Position 2
Position 3
Notes:
•
Subject to technical modification without prior notice.
•
The device may not work if the temperature and voltage conditions are different to
those defined in the specifications.
•
The device fulfils the provisions of the EC directive 93/42/EEC (Medical Device
Directive) and the European Standard EN13544-1:2007+A1:2009, Respiratory
therapy equipment - Part1: Nebulizing systems and their components.
•
Performance may vary with drugs such as suspensions or high viscosity. See drug
supplier’s data sheet for further details.
•
See website of OMRON HEALTHCARE EUROPE for complete up to date information.
URL: www.omron-healthcare.com
Removing condensation from the air tube
If there is moisture or liquid remaining in the air tube, be sure to follow the
procedure below to remove any moisture from within the air tube.
1) Make sure that the air tube is connected to the air connector on the
compressor.
2) Remove the air tube from the nebulizer kit.
3) Turn on the compressor and pump air through the air tube to expel the
moisture.
Changing the air filter
If the air filter has changed colour, or has been used for more than 70
applications, replace it with a new one.
1.
Raise the air filter cover as shown in figure.
2.
Remove the old air filter with a sharp object, such as
a toothpick, and insert the new air filter.
3.
Fit the air filter cover into its housing making sure it
is flush to the surface.
Notes:
•
Use only OMRON air filters designed for this device. Do not operate without a filter.
•
Do not attempt to wash or clean the filter. If the air filter becomes wet, replace it. Damp
air filters can cause blockages and may increase risk of infection.
•
There is no front or back orientation for the air filters.
•
Check that air filters are clean and free of dust before inserting them.
Technical data
Product Description:
Compressor Nebulizer
Model (-code):
A3 Complete (NE-C300-E)
Rating:
230V ~ 50 Hz
Power Consumption:
140VA
Operating Temperature/
Humidity:
+10°C to +40°C / 10% to 95% RH
Storage and Transport
Temperature/Humidity/
Air Pressure:
-20°C to +70°C / 5% to 95% RH
690 - 1060hPa
Weight:
Approx. 1.3 Kg (compressor only)
Dimensions:
Approx. 130 (W) x 215 (H) x 190 (D) mm
Contents:
Compressor, Nebulizer Kit, Air tube (PVC,
100 cm), Mouthpiece, Nosepiece, Adult
Mask (PVC), Child Mask (PVC), 3 pcs Spare
Air Filters, Carrying Bag, Instruction Manual.
= Class ll
equipment
= Type BF
applied part
= Power off
Consult the
instructions for use
= Keep dry
= Power on
~
Alternating current
Cleaning and daily disinfecting
Cleaning
Clean the parts after each use to remove residual medication. This will
prevent inefficient nebulization and reduce risk of infection.
■
Washable parts
•
Nebulizer Kit, Mask (PVC)/Mouthpiece, Nosepiece
Wash them in warm water and mild detergent (neutral detergent). Rinse them
thoroughly with clean hot tap water, gently tap to remove excess water and
allow to air dry in a clean place.
It is advisable to replace the A3 Complete Nebulizer Kit after some 100 to
120 treatments on single patient or after about 20 boiling cycles.
■
Non-washable parts
•
Compressor, Air Tube (PVC)
Firstly, make sure that the power plug is unplugged from the power outlet.
Wipe clean with a soft cloth moistened with water or mild detergent
(neutral detergent).
•
Air Filter
Do not wash or clean the air filter. If the air filter becomes wet, replace it.
Damp air filters can cause blockages.
Disinfecting
Always disinfect the parts after the last treatment of the day. If the parts are
heavily stained, replace them with new ones.
To select a method for disinfection, refer to the table below.
o
: applicable
X
: not applicable
Disinfecting
method
Parts
Mouthpiece
Nosepiece
Nebulizer Kit
Adult Mask
(PVC)
Child Mask
(PVC)
Air T
ube
(PVC, 100cm)
Air Filter
Materials
PP
PP
PP
Mask: PVC
(Phthalate free)
PVC
(Phthalate free)
PP
A
Disinfecting ethanol
o
o
o
o
X
X
Sodium hypochlorite
o
o
o
o
X
X
Milton*
Quaternary ammonium
o
o
o
o
X
X
Osvan*
Chlorhexidine
o
o
o
o
X
X
Hibitane*
Amphoteric Surfactant
o
o
o
o
X
X
Tego*
B
Boiling
o
o
o
X
X
X
*
an example of commercially available disinfectant.
A.
Use a commercially available disinfectant. Follow the instructions
provided by the disinfectant manufacturer.
Note:
Never clean with benzene, thinner or a flammable chemical.
Note:
After having washed the Nebulizer Kit with the available disinfectant, please
rinse with clean warm water and dry thoroughly before using.
B.
Applicable parts may be boiled between 15 to
20 minutes.
After boiling, carefully remove the parts, shake off excess
water and allow to air dry in a clean environment.
Caution: Handling the Vaporiser Head
•
Always wash the vaporiser head after each use.
•
Do not use a brush or pin to clean the vaporiser head.
•
When disinfecting the parts by boiling, be sure to boil them in plenty of water.
•
Do not boil vaporiser head together with objects other than applicable nebulizer
accessories.
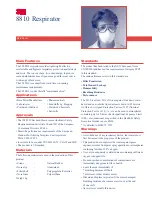
Technical Information about the Nebulizer Kit
The OMRON A3 Complete nebulizer is a medical device that generates an aerosol
with variable characteristics to adapt to the patient’s respiratory pathology. By
regulating the “Nebulization Control Ring” on the nebulizer’s inhalation top, it can
produce an aerosol with the granulometric characteristics that will deposit the
maximum amount of the drug in the respiratory tract being treated. The position of
“Nebulization Control Ring” is chosen based on the indication of the following figure.
Consult your doctor to recommend which position is best for your treatment.
Recommended use
With the “Nebulization Control Ring” in position 1:
Particle size is +7.5 μm and is to treat diseases
such as: rhinitis, sinusitis and pharyngitis, tonsillitis,
laryngitis.
With the “Nebulization Control Ring” in position 2:
Particle size is between 4.5 and 7.5 μm and is to treat
diseases such as: tracheitis and tracheobronchitis.
With the “Nebulization Control Ring” in position 3:
Particle size is between 2 and 4.5 μm and is to treat
diseases such as: asthma, bronchitis, bronchiolitis,
bronchiectasis, bronchopneumonia.
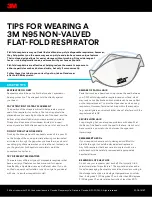
How to identify the position on the nebulizer
On the inhalation top, there are 3 dots; the small dot corresponds to position 3, the
medium dot to the position 2 while the big dot to the position 1. On the ring, there is a
bulging tooth which is correspondent to the chosen position.
How to modify the position of the nebulizer
Turn
Pull up
To modify the position of the Nebulization Control
Ring, pull up the inhalation air inlet up to its maximum
extension with one hand, while with the other hand
turn the ring to the desired position.
Then release the inhalation air inlet to fix the position.
Important:
It is not possible to turn the ring if
the inhalation air inlet is not pulled up. A locking
mechanism prevents accidental rotation.
How to use
1.
Make sure that the power switch is in the off (
) position.
2.
Plug the power plug into a power outlet.
3.
Remove the inhalation top from the medication tank by gently
pulling it up.
4.
Add the correct amount of prescribed
medication into the medication tank.
5.
Verify the presence of the vaporiser head
inside the medication tank.
6.
Put the inhalation top back inside the medication
tank.
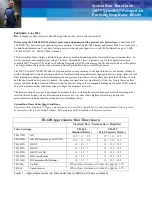
Attention:
To close the nebulizer, align the tooth of
the medication tank with the groove of the inhalation
top, as shown in figure.
7.
Attach the mask,
mouthpiece or nosepiece
to the nebulizer kit tightly.
8.
Attach the air tube. While twisting the air tube plug
slightly, push it firmly into the air tube connector.
9.
Hold the nebulizer kit as
indicated on the right.
Follow the instructions of
your doctor or respiratory
therapist.
Caution:
Do not tilt the nebulizer kit at an angle of greater than 45 degrees in all directions.
Medication may flow into the mouth or it may result in ineffective nebulization.
10.
Turn the power switch to the on (
) position. As the compressor starts,
nebulization begins and aerosol is generated. Inhale the medication.
Exhale through the nebulizer kit.
11.
When treatment is completed, turn the power off and unplug the
compressor from the power outlet.
Troubleshooting
Check the following if the device should fail during operation.
Problem
Cause
Remedy
Nothing happens when the
power switch is turned.
Is the power plug plugged into a
power outlet?
Check that the plug is inserted
in a power outlet. Unplug then
reinsert the plug if necessary.
No nebulization or low
nebulization rate, when the
power is on.
Is there medication in the
medication tank?
Add the correct amount of
medication to the medication tank.
Is there too much/little
medication in the medication
tank?
Is the vaporiser head missing
or not assembled correctly?
Attach the vaporiser head correctly.
Is the nebulizer kit assembled
correctly?
Assemble the nebulizer kit
correctly.
Is the nozzle blocked?
Make sure that the nozzle is free of
blockages.
Is the nebulizer kit tilted at a
sharp angle?
Make sure that the nebulizer kit is
not tilted at an angle of more than
45 degrees.
Is the air tube connected
correctly?
Make sure that the air tube
is correctly connected to the
compressor and nebulizer kit.
Is the air tube folded or
damaged?
Make sure that the air tube does
not contain kinks.
Is the air tube blocked?
Make sure that the air tube is free
of blockages.
Is the air filter dirty?
Replace the air filter with a new
one.
The compressor is
abnormally loud.
Is the air filter cover attached
correctly?
Attach the air filter cover correctly.
The compressor is very hot.
Is the compressor covered?
Do not cover the compressor with
any type of cover during use.
Are the ventilation slots
blocked?
Do not block the ventilation slots.
Note:
If the suggested remedy does not solve the problem, do not try to repair the device
- no parts of the device are user serviceable. Return the device to an authorized
OMRON retail outlet or distributor.
Groove
Tooth
Medication Tank
Vaporiser Head
Right angle
Warranty
Thank you for buying an OMRON product. This product is constructed of high quality
materials and great care has been taken in its manufacturing. It is designed to give you
every satisfaction, provided that it is properly operated and maintained as described in
the instruction manual.
This product is guaranteed by OMRON for a period of 3 years after the date of purchase.
The proper construction, workmanship and materials of this product is guaranteed by
OMRON. During this period of guarantee OMRON will, without charge for labour or
parts, repair or replace the defect product or any defective parts.
The guarantee does not cover any of the following:
a. Transport costs and risks of transport.
b. Costs for repairs and / or defects resulting from repairs done by unauthorised
persons.
c. Periodic check-ups and maintenance.
d. Failure or wear of optional parts or other attachments other than the main device
itself, unless explicitly guaranteed above.
e. Costs arising due to non-acceptance of a claim (those will be charged for).
f. Damages of any kind including personal caused accidentally or from misuse.
Should guarantee service be required please apply to the dealer whom the product
was purchased from or an authorised OMRON distributor. For the address refer to the
product packaging / literature or to your specialised retailer.
If you have difficulties in finding OMRON customer services, contact us for information.
Repair or replacement under the guarantee does not give rise to any extension or
renewal of the guarantee period.
The guarantee will be granted only if the complete product is returned together with the
original invoice / cash ticket issued to the consumer by the retailer. OMRON reserves
the right to refuse the guarantee service if any unclear information has been given.