Omnitronic BD-1380 User Manual Download Page 19


00042058.DOC, Version 1.0 

19/24

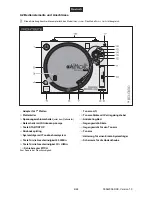
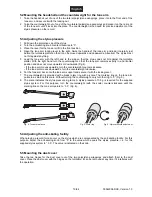
5.2 Mounting the headshell and the counterweight for the tone arm 

1  Take the headshell out of one of the two lateral polystyrene wrappings, place it onto the front end of the 

tone arm, and secure it with the locking nut. 

2  Take the counterweight out of one of the two lateral polystyrene wrappings and place it on the rear end 

of the tone arm until it locks into the place. The counterweight is then used for precise adjustment of the 
stylus pressure on the record. 


5.3 Adjusting the stylus pressure 

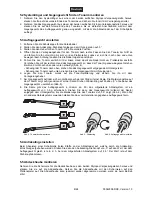
1  Pull down the protective cap of the stylus.  
2  Turn the anti-skating knob counter-clockwise to “0”. 
3  Place the lever for the tone arm lift in the front position. 
4  Open the tone arm locking lever to the right. Seize the handle of the tone arm and lead it carefully just 

before the turntable platter so that it can be moved upwards and downwards. Attention!


The stylus must 

not hit against anything. 

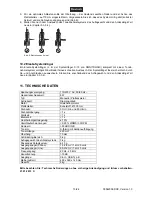
5  Lead the tone arm with the left hand to the side so that the stylus does not hit against the turntable 

platter. With the right hand turn the counterweight so that the tone arm remains exactly in a horizontal 
position and does not move upwards or downwards (Fig. 4). 

    •  If the tone arm moves upwards, turn the counterweight counter-clockwise. 
    •  If the tone arm moves downwards, turn the counterweight clockwise. 
6  Put the tone arm back onto the tone arm support and secure it with the locking lever. 
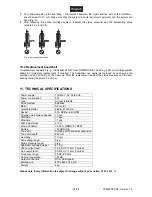
7  The counterweight is provided with a black rotary ring with a scale. The marking line on the tone arm 

points to a value on this scale. Without turning the counterweight, only turn the ring to “0” (Fig. 5). 

8  The scale indicates the stylus pressure in grams. A stylus pressure of 3.5 g is required for the supplied 

stylus system. For this purpose, turn the counterweight (with the scale) counter-clockwise until the 
marking line on the tone arm points to “ 3.5” (Fig. 6). 


Fig. 4: Tone arm balance                                                                    Fig. 5: Scale ring                   Fig. 6: Stylus pressure adjustment


5.4 Adjusting the anti-skating facility 

When playing a record, forces occur on the stylus which are compensated by the anti-skating facility. For this 
purpose, adjust the anti-skating knob from “0” to the value which equals the stylus pressure, i. e. for the 
supplied stylus system to “ 3.5”. The value is indicated on the knob. 
 

5.5 Mounting the dust cover 

Take the two hinges for the dust cover out of the two polystyrene wrappings and attach them to the dust 
cover. Place the dust cover with the hinges on the turntable. It can be removed at any time if it interferes with 
the operation. 
 

Summary of Contents for BD-1380

Page 1: ...Copyright Nachdruck verboten Reproduction prohibited F r weiteren Gebrauch aufbewahren Keep this manual for future needs BEDIENUNGSANLEITUNG USER MANUAL BD 1380 I BD 1390 USB TURNTABLE...

Page 2: ...14 3 OPERATING DETERMINATIONS 15 4 DESCRIPTION 16 5 ASSEMBLY AND BASIC ADJUSTMENTS 18 6 CONNECTIONS 20 7 OPERATION 21 8 OPERATION WITH A COMPUTER 22 9 CLEANING AND MAINTENANCE 23 10 ACCESSORIES 23 11...

Page 3: ...e Zeit Freude an Ihrem Kauf haben werden Nehmen Sie das Ger t aus der Verpackung Bitte berpr fen Sie vor der ersten Inbetriebnahme ob kein offensichtlicher Transportschaden vorliegt Sollten Sie Sch de...

Page 4: ...an der Griffl che an und ziehen Sie niemals an der Netzleitung ACHTUNG Endstufen immer zuletzt einschalten und zuerst ausschalten Beachten Sie bitte dass Sch den die durch manuelle Ver nderungen an di...

Page 5: ...dieser Bedienungsanleitung beschrieben kann dies zu Sch den am Produkt f hren und der Garantieanspruch erlischt Au erdem ist jede andere Verwendung mit Gefahren wie z B Kurzschluss Brand elektrischem...

Page 6: ...schalter mit Stroboskop Lampe 5 Taste START STOP 6 Stroboskop Ring 7 Systemtr ger mit Tonabnehmersystem 8 Taste f r die Geschwindigkeit 45 U Min 9 Taste f r die Geschwindigket 33 U Min 10 Schieberegle...

Page 7: ...enteller auf die Achse des Plattenspielers Abb 2 3 Drehen Sie den Plattenteller von Hand bis sich eines der L cher im oberen rechten Drittel befindet und die Antriebsachse des Motors zu sehen ist 4 De...

Page 8: ...gewicht entgegen dem Uhrzeigersinn Schwingt der Tonarm nach unten drehen Sie das Gegengewicht im Uhrzeigersinn 6 Legen Sie den Tonarm zur ck auf die Tonarm Halterung und sichern Sie ihn mit dem Verrie...

Page 9: ...HONO LINE beim Anschluss an Eingangsbuchsen f r Ger te mit Line Pegel den Schiebeschalter PHONO LINE in die Position LINE 2 Sollen Musikst cke von einer Schallplatte auf einen Computer berspielt werde...

Page 10: ...lplatte 7 Dr cken Sie die Taste START STOP Der Plattenteller beginnt zu rotieren Die Platte kann w hrend des Abspielens f r eine Unterbrechung mit der Taste START STOP an jeder Stelle gestoppt und wie...

Page 11: ...ion der Software 1 Installieren Sie die Audio Software Audacity auf Ihrem Computer 2 Verbinden Sie den Plattenspieler ber das mitgelieferte USB Verbindungskabel mit Ihrem Computer und schalten Sie das...

Page 12: ...Sollten einmal Ersatzteile ben tigt werden verwenden Sie bitte nur Originalersatzteile Sollten Sie noch weitere Fragen haben steht Ihnen Ihr Fachh ndler jederzeit gerne zur Verf gung 9 1 Transport So...

Page 13: ...das Auflagewicht und den Antiskating Wert neu ein Kapitel 5 3 5 4 11 TECHNISCHE DATEN Spannungsversorgung 115 230 V AC 50 60 Hz Gesamtanschlusswert 8 W Typ Manueller Plattenspieler Antriebsart Riemena...

Page 14: ...ollow the instructions given in this manual we can assure you that you will enjoy this device for many years Unpack your turntable Please make sure that there are no obvious transport damages Should y...

Page 15: ...he power cord by the plug Never pull out the plug by tugging the power cord CAUTION Turn the amplifier on last and off first Please note that damages caused by manual modifications on the device or un...

Page 16: ...ages and the guarantee becomes void Furthermore any other operation may lead to dangers like short circuit burns electric shock etc 4 DESCRIPTION 4 1 Features Belt drive DJ turntable with USB interfac...

Page 17: ...ath the platter 4 Power switch with stroboscope lamp 5 START STOP button 6 Stroboscope ring 7 Headshell with phono cartridge system 8 Button for the speed 33 RPM 9 Button for the speed 45 RPM 10 Slidi...

Page 18: ...e platter on the axle of the turntable Fig 2 3 Turn the platter by hand until one of the cutouts is near the top right corner and the driving axle of the motor is visible 4 The rubber driving belt is...

Page 19: ...ve upwards or downwards Fig 4 If the tone arm moves upwards turn the counterweight counter clockwise If the tone arm moves downwards turn the counterweight clockwise 6 Put the tone arm back onto the t...

Page 20: ...onnecting to input jacks for units with line level set the sliding switch PHONO LINE to position LINE 2 For copying music pieces from a record to a computer connect the USB port of the turntable to a...

Page 21: ...The tone arm is slowly lowered onto the record 7 Press the button START STOP The turntable platter starts to rotate While playing the record can be stopped at any place and be restarted with the butto...

Page 22: ...configuration of the software 1 Install the audio software Audacity on your computer 2 Connect the turntable with the supplied USB connection cable to your computer and switch on the turntable 3 Afte...

Page 23: ...ur dealer 9 1 Transport For dispatching the turntable pay attention that the tone arm weight and all other components of the unit are only packed in their original packing material and or are especial...

Page 24: ...ust the stylus pressure and the anti skating value chapters 5 3 and 5 4 11 TECHNICAL SPECIFICATIONS Power supply 115 230 V AC 50 60 Hz Power consumption 8 W Type manual turntable Drive method belt dri...

Reviews: