background image

11 of 19

888-45-280-W-01 rev.C • 11/12

6

A

B

C

D

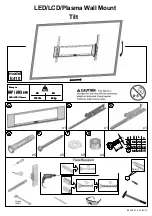
75x75mm

100x100mm

100x200mm

200x200mm

200x100mm

100mm (3-15/16”) 

75mm (2-15

/1

6”

)

10

0mm (3-15

/1

6”) 

75mm (2-15/16”)

100mm (3-15/16”) 

20

0mm (7-7/

8”) 

200mm (7-7/8”) 

20

0mm (7-7/

8”) 

10

0mm (3-15

/1

6”) 

200mm (7-7/8”) 

VESA Adapter 

Confi gurations

TV/Monitor Hole 

Pattern Sizes

Check size of 
TV/Monitor hole 
pattern

13

14

14

14

Summary of Contents for Play 25

Page 1: ...eiten geben oder das Produkt nicht am eingestellten Punkt fixiert bleiben ist die Einstellanleitung zu befolgen und die Spannung entsprechend zu lockern bzw anzuziehen um eine geschmeidige reibungslose Bewegung zu erhalten Je nach Produkt und Einstellung muss dies mehrmals wiederholt werden um einen Unterschied zu bemerken BELANGRIJK Bij dit product is spanningsaanpassing nodig wanneer de installa...

Page 2: ... de largueros de madera Stud Finder Auswahl von Montagematerial Positiebepaler balken Rilevatore di montanti スタッド ファインダー 螺栓探测器 스터드 파인더 Ø 3 8 10mm 5 70 180 180 20 508 mm 25 lbs 11 3 kg 0 or 360 Maximum Screen Size 42 Limited to 25 lbs maximum 13 mm Wood Stud Mounting ConcreteWall Mounting ...

Page 3: ...01 rev C 11 12 A B C D 1 2 3 4 5 6 M4 x 10mm M4x12 M5x12 M6x12 1x 4x 4x 4x 1x 5mm 4mm 1x 1x 1x 1x 1x 1x 2x 2x 4x 4x 2x M4 x 10mm M3 x 6 M8 x 80mm M8 1x 1x 1x 4x 4x M8 M5 Kit M8 M5 Reducer M6 M6 x 45mm M5x20mm 4x 4x M5 x 7mm ...

Page 4: ...te altezze di montaggio danno per scontato che i fori di montaggio del monitor si trovino al centro rispetto allo schermo del monitor Se i fori di montaggio del proprio monitor sono spostati dal centro verticalmente è possibile regolare l altezza del proprio attacco di conseguenza Ad es retro del monitor これらの取り付け高さは モニターの取り付け穴 がモニター画面に対して中央に位置しているこ とを前提にしています お使いのモニターの取り 付け穴が中央から外れた 縦方向 位置にある場 合 そ...

Page 5: ...esional si tiene dudas respecto de su caso particular ATTENTION Assurez vous que le mur sur lequel vous allez monter est capable de supporter 4 fois le poids total du matériel Un montage sur une surface critique peut générer une faiblesse dans l installation et causer des dommages corporels et ou matériels En cas de doute contactez un professionnel Achtung Stellen Sie sicher daß dieWand an der Sie...

Page 6: ...lock 2x CAUTION Make sure the wall mount bracket is level flush and snug to the wall surface DO NOT OVER TIGHTEN THE BOLTS 10 2 75 Ø 3 16 5mm 13 mm Stud Finder Localizador de largueros de madera Stud Finder Auswahl von Montagematerial Positiebepaler balken Rilevatore di montanti スタッド ファインダー 螺栓探测器 스터드 파인더 M8 x 80mm ...

Page 7: ...taggio siano inserite nel cemento 警告 マウントホールは最低3 1 8 80 mm の深さが必要です 外壁がモルタルやそ の他の材質で 内壁がコンクリートの壁にドリルで穴を開ける場合 両方のアン カーがコンクリート内壁に完全に挿入されるよう マウントホールを再調整しま す 警告 安装孔的深度至少 3 1 8 80mm 并且必须位于硬水泥墙面 而不是灰泥或覆盖 材料 如果钻孔碰到不牢固的水泥区 要重新找安装孔 直到锚拴能够完全嵌入硬 水泥中 WARNING Anchors that are not fully set in solid concrete will not support the applied load resulting in an unstable unsafe condition which could lead to per sona...

Page 8: ...80 W 01 rev C 11 12 4 3 a c b 13 mm Optional locking feature customer supplied lock 2x 2x x CAUTION Make sure the wall mount bracket is level flush and snug to the wall surface DO NOT OVERTIGHTEN THE BOLTS 10 M8 x 80mm ...

Page 9: ...ev C 11 12 4 a Sleeve on Bracket Rotation Stop on Bracket Slot in Sleeve b c Top View NOTE when sliding sleeve on to bracket align slot over rota tion stop Mount arm to wall bracket 4mm M6 M6 x 45mm Do Not Overtighten Cap Screw ...

Page 10: ...Portrait Landscape Options OPTION i If you want full 360 portrait landscape rotation skip to step 8 on the next page OPTION ii If you do not want your TV Monitor to rotate all all you can stop rotation by inseting the xx set screw i ii 6 12 M3 x 6 ...

Page 11: ...100x200mm 200x200mm 200x100mm 100mm 3 15 16 75mm 2 15 16 100mm 3 15 16 75mm 2 15 16 100mm 3 15 16 200mm 7 7 8 200mm 7 7 8 200mm 7 7 8 100mm 3 15 16 200mm 7 7 8 VESA Adapter Configurations TV Monitor Hole Pattern Sizes Check size of TV Monitor hole pattern 13 14 14 14 ...

Page 12: ...12 of 19 888 45 280 W 01 rev C 11 12 OR A 75x75mm 100x100mm 100mm 3 15 16 75mm 2 15 16 100mm 3 15 16 75mm 2 15 16 Mount Type A TV Monitor to Arm 7 8 16 M4 x 10mm M4 x 10mm 4x M4 x 10mm ...

Page 13: ...13 of 19 888 45 280 W 01 rev C 11 12 B C D Mount VESA Adapters to Arm based on TV Monitor hole pattern size B C or D 7 M5 x 7mm 4x ...

Page 14: ... 7 8 200mm 7 7 8 100mm 3 15 16 200mm 7 7 8 B C D M4x12 M5x12 M6x12 M4x12 M5x12 M6x12 Mount Type B C or D TV Monitor to Arm 7 8 16 NOTE To reduce M8 holes for use with M5 screws or if you have a model with Samsung holder rings follow the M8M5 KIT instructions on the next page 16 ...

Page 15: ... using the Samsung holder ring M5x20mm Monitor Screw M8M5 Reducer Bushing TV Monitor Mounting M8 size hole Holder Ring Not Included Samsung Only Attach top and bottom bracket covers 8 a a b b c c Top Cover Bottom Cover To remove covers a Wedge the blade of a flat screwdriver into the gap between the wall mount bracket and the cover Rotate the blade upward to pry the cover away b Repeat on the oppo...

Page 16: ...16 of 19 888 45 280 W 01 rev C 11 12 9 a b Organize and route cables 1x 1x ...

Page 17: ... Pourcetteraison NEPASretirervotre matérielàmoinsquelebrasn aitétémisàlapositionlaplusélevée Risquedeblessurecorporelleet oud endommagementdumatérielencasdenon respectdecetteinstruction WAARSCHUWING Rischiodaenergiaimmagazzinata ilmeccanismodelbraccioèsottotensioneesimuoverapidamentedasénonappenasitogliel apparecchiaturaacuiècollegato Per questomotivo NONrimuoverel apparecchioamenocheilbraccionons...

Page 18: ...muovere le viti Ciò potrebbe causare danno all apparecchiatura 注意 ネジは取り外さないようにしてください ネジを取り外すと 器具が破損する原因となります 小心 不要拆除螺丝 拆除螺丝可能会损坏设备 주의 나사를 제거하지 마십시오 나사를 제거하면 장비가 손상될 수 있습니다 4mm To adjust the TV monitor tilt 11 4mm NEED HELP PLEASE CALL NECESITA AYUDA LLÁMENOS BESOIN D AIDE VEUILLEZ APPELER BRAUCHEN SIE HILFE RUFEN SIE UNS BITTE AN HULP NODIG BEL DAN MET SEVE AIUTO CHIAMARE POTRZEBUJESZ POMOCY ZADZW...

Page 19: ...n liggen Altezza Posizionare la parte superiore dello schermo leggermente sotto il livello degli occhi Posizionare la tastiera circa all altezza dei gomiti in modo che i polsi siano piatti Distanza Posizionare lo schermo a un braccio di distanza dal viso almeno a 20 508 mm di distanza Posizionare la tastiera affinché sia abbastanza vicina da costringere i gomiti a un angolo di 90 Angolazione Incli...

Reviews: