Omegon Push+ Instruction Manual Download Page 6

Reproduction of part or all of the contents of this document in any form is expressly prohibited other than for individual use only. All text, images and labels are property of nimax Gmbh. 


7.3. Selecting COM port for apps such as SkyCharts (Cartes du ciel) 

When pairing a device to a computer via Bluetooth® a 
COM port is automatically assigned to the device so that 
the it “talks” to the computer and vice-versa. To 
determine which port corresponds to the Push+ please 
follow these steps. 
Step 1 
Select from the


Windows™ initial menu


the arrow 

pointing up (show hidden icons) as shown in 7.2 
Step 2 
Right-click on the Bluetooth® icon. Select “Open 
Definitions” – figure 9. 
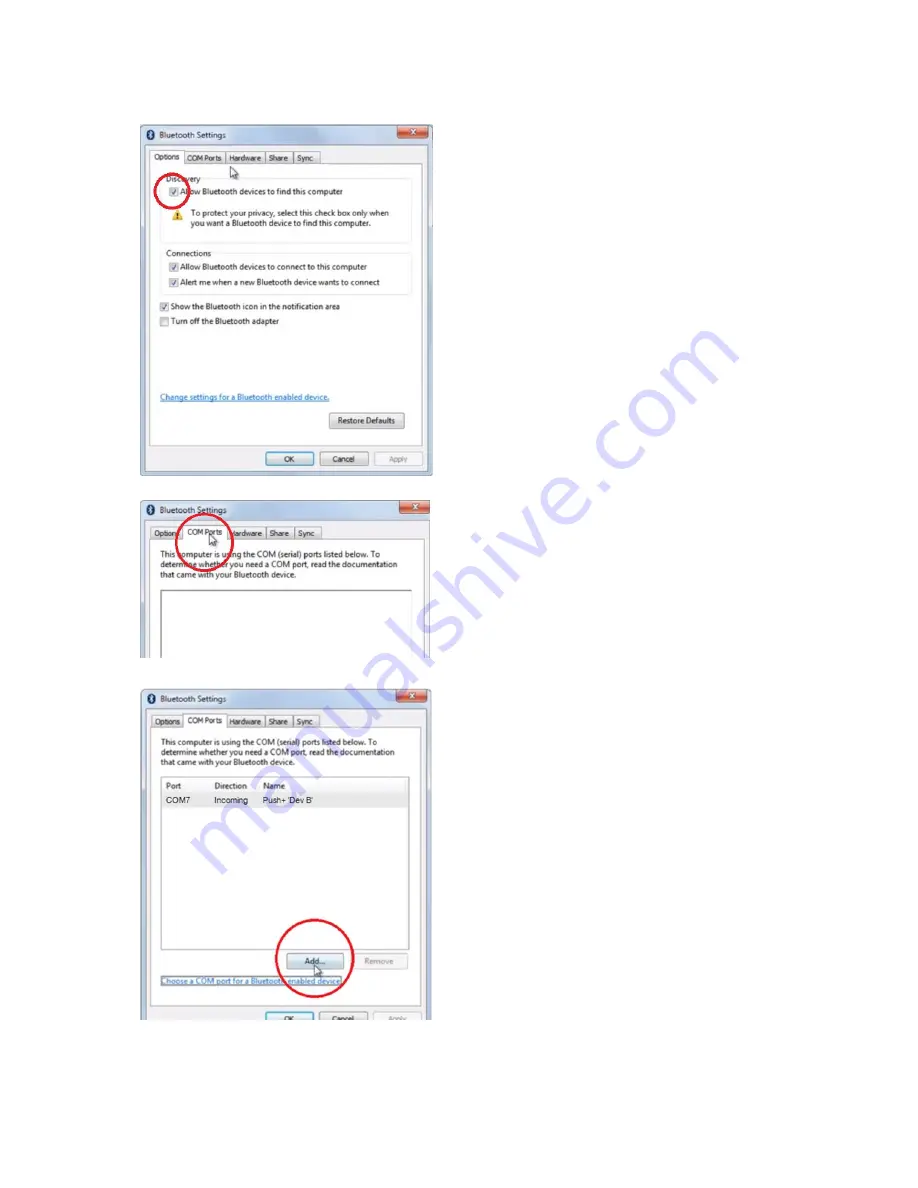
Step 3


Make sure the Discovery check box is checked as show in 
figure 9. Click “OK”. 


Step 4 
Select “COM Ports” – figure 10. 


Step 5 
An incoming COM port was already assigned to Push+. 
Select “Push+ Dev B” 
Click “Add” button– figure 31. 


Figure 9. Right-click “Open definitions” on the Bluetooth® symbol.


Figure 10. Click “COM” tab.


Figure 11. Click “Add”.


Summary of Contents for Push+

Page 1: ...or all of the contents of this document in any form is expressly prohibited other than for individual use only All text images and labels are property of nimax Gmbh Instruction Manual Omegon Push Min...

Page 2: ...and Azimuth indexes Please align indexes as shown on the right with the mount unpowered Only after the indexes alignment is made should you power your mount using the supplied cable 3 Mounting the te...

Page 3: ...Push with USB Powerbanks There are many USB powerbanks available that are used commonly to charge smartphones tablets and other 5Volt devices through a USB port These batteries vary in terms of capaci...

Page 4: ...the foot base part 10 if necessary so that the bubble shows horizontal levelling figure 4 Now without touching the level rotate the Push so that the level is aligned with the next foot set figure 5 A...

Page 5: ...ill also show either as Unknown Device or as Push Step 3 Select Push from the list and pair it by inserting the 4 digit pairing code Each Push has its own signature and when pairing it will remember t...

Page 6: ...r and vice versa To determine which port corresponds to the Push please follow these steps Step 1 Select from the Windows initial menu the arrow pointing up show hidden icons as shown in 7 2 Step 2 Ri...

Page 7: ...k OK Step 10 The two assigned COM ports will show up The Push Dev B COM port number should be used with softwares that require this setting information such as Cartes du Ciel 7 4 Cartes du Ciel Settin...

Page 8: ...l panel to configure the encoder pulses Step 5 Select the Encoder Configuration tab and change so that it reads as shown Type Intelliscope Steps Alpha 36000 Steps Delta 36000 Read Interval ms 100 Moun...

Page 9: ...so that it reads as shown Serial Port use the data from 7 3 Step 10 Speed 115200 Data bits 8 Parity N Stop bits 1 Timeout ms 1000 Interval Timeout 400 Step 8 Click on Save Settings when finished Step...

Page 10: ...d software which enables precision location of deep sky objects While SkySafari only uses two stars for calibration Cartes du Ciel can use every start or deep sky object as a calibration object This i...

Page 11: ...n Munich Univ Obs Munich Coordinates Horizon Tap Location insert your location please do not forget to choose your hemisphere N S and meridian position W E Most West European countries are GMT 1 excep...

Page 12: ...han 30 degrees but no less than 10 degrees both in Altitude Alt and Azimuth Az Avoid using alignment stars close to the horizon and zenith Step 1 Centre a bright star a star that you know or recognize...

Page 13: ...close first one I get pointing errors higher than 0 7degrees Make sure the two alignment stars are not separated more than 30 degrees Objects are completely off the FOV Wrong star used for alignment 1...

Reviews: