5
INSTRUCTIONS FOR THE INSTALLER
Important notice:
The operations indicated below must be followed by authorised personnel exclusively, in
conformity with the regulations in force.
The manufacturing firm refuses all responsibility for damages to people, animals or things,
resulting from the failure to comply with such provisions.
This appliance shall be installed only by authorised persons and in accordance with the
manufacturer’s installation instructions, local gas fitting regulations, municipal building codes,
electrical wiring regulations, and any other statutory regulations. For Australia and New Zealand
this appliance must be installed by an authorised person in compliance with AS/NZS 5601.1 Gas
installations part 1: general installations, and AS/NZS 5601.2 Gas installations part 2: LP GAS
installations in caravans and boats for nonpropulsive purposes. For outside of Australia/New
Zealand refer to the relevant installation code for gas appliances in your country.
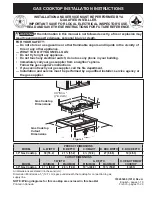
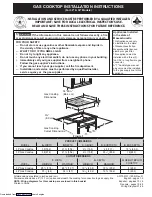
INSTALLATION
The installation kit contains the following:
– 1 natural gas regulator
– 1 elbow
– 1 manifold
– 2 fibre sealing washers
– 4 brackets for assembly
– 4 bracket screws
– 1 pack of cooktop to benchtop seals
– 1 duplicate rating label
– For conversion to LPG
– 1 Universal LPG sticker
– 4 or 5 injectors
Additional accessory for cooking with vessels
diameter 120mm or below
– 1 mini trivet
Installing the top
The appliance is designed to be embedded into heat-
resistant benchtop capable of withstanding 95°C.
INSTRUCTIONS FOR THE USER
CLEANING
Before any operation, disconnect the appliance from
the electrical supply.
Don’t use a steam cleaner for the cleaning the hob.
It is advisable to clean the appliance when it is cold.
Enamelled parts
The enamelled parts must be washed with a sponge and
soapy water or with a light detergent.
Do not use abrasive or corrosive products.
Do not leave substances, such as lemon or tomato juice,
salt water, vinegar, coffee and milk on the enamelled
surfaces for a long time.
Stainless steel parts
Stainless steel can be stained if it remains in contact
with highly alkaline water or aggressive detergents for an
extended period of time.
All grades of stainless steel may stain, discolour or
attain an adhering layer of grime in normal operation.
To achieve optimum surface appearance stainless steel
must be kept clean regularly using the following cleaning
procedures, this ensuring good performance and long
service life.
Wash with warm soapy water and rinse with clean water.
Where the stainless steel has become extremely dirty
with signs of surface discolouration (due to periods of
neglect or misuse) use a stainless steel cleaner
DO NOT use abrasive scourers or steel wool. When
removing these stains be sure to follow the polish of
brushing lines.
Burners and racks
These parts can be removed to make cleaning easier.
The burners must be washed with a sponge and soapy
water or with a light detergent, wiped well and placed in
their housing perfectly. Make sure that the flame-dividing
ducts are not clogged. Check that the feeler of the safety
valve and the start-up electrode are always cleaned, so
as to ensure optimum operation.
Gas taps
The possible lubrication of the taps must be carried out by
authorised personnel, exclusively.
In case of hardening or malfunctions in the gas taps,
apply to the Customer Service.