background image

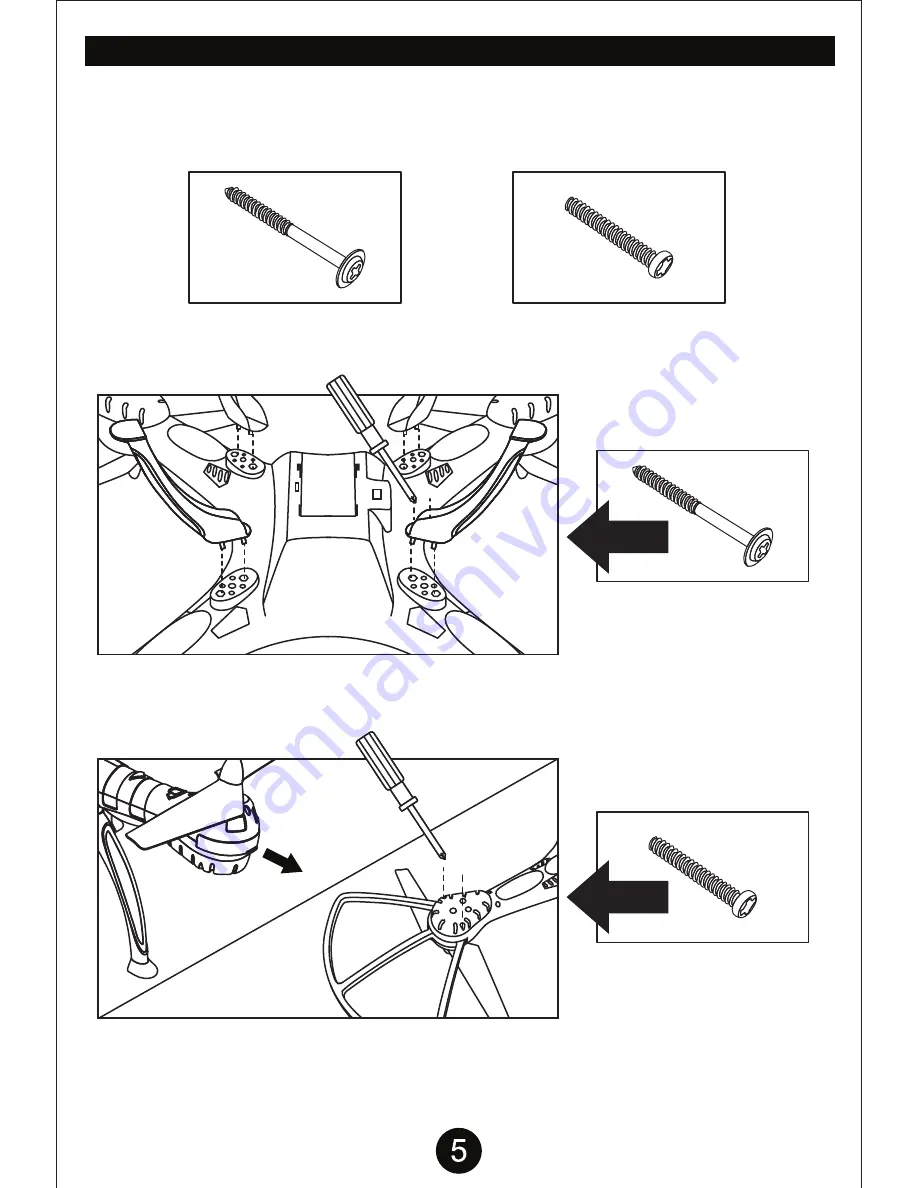
INSTALLING LANDING GEARS AND ROTOR GUARDS

LANDING GEARS:

 Flip drone over and insert landing gears/legs into slots lining up the two pegs on 

each leg. Firmly secure each landing gear with 2 of the 

(A) screws

.

The drone comes with 2 types of screws. (A) Screw and (B) Screw.  (A) Screw will be used for 

securing the 4 landing gears/legs to the bottom of the drone.  (B) Screw is used to secure the 4 rotor 

guards to the drone(optional). There may be extra screws included.  Please hold on to them for future 

use as spares.

ROTOR GUARDS:

 Pull out rotor guard covers as shown, replace with rotor guards. Flip over and use 

2 of the 

(B) screws 

to firmly secure each frame to the body as shown. Do not over tighten the screws, 

you may strip the plastic.

(A) SCREW

(A) SCREW

(B) SCREW

(B) SCREW

USED FOR LANDING GEAR/LEGS

USED FOR ROTOR GUARDS

Summary of Contents for 33746

Page 1: ...14 FOR AGES 14 AND UP ITEM NO 33746...

Page 2: ...ch present potential danger Fly away from people and animals high buildings high voltage wiring etc Avoid bad weather conditions wind rain thunder and other conditions to ensure a safe and fun flying...

Page 3: ...times Video Record Control Photo Control Speed Control Easy Mode Power Switch Antenna NO FUNCTION Forward Backward Left Right Sideways Flight Ascend Descend Left Right Turning Left Right Turning Trim...

Page 4: ...e or flammable materials Always use the original USB charging cable provided Promptly change and replace old or defective batteries Li Po Battery 7 4V 850mAh Flight Duration 7 minutes Charging Time 20...

Page 5: ...e 4 landing gears legs to the bottom of the drone B Screw is used to secure the 4 rotor guards to the drone optional There may be extra screws included Please hold on to them for future use as spares...

Page 6: ...to place Once the camera with the mount is correctly attached to the bottom of the drone you will need to connect the camera wire to the drone The camera wire port is located right next to the battery...

Page 7: ...er has successfully paired with the drone and control information appears on the LED screen Once the USB adaptor with the memory card is plugged in Windows AutoPlay will give you options to quickly ac...

Page 8: ...or the first time please read the instructions carefully and make sure you fully understand how to control your drone Left Spin Right Spin Left Spin Right Spin Move Right Move Left Move Right Move Lef...

Page 9: ...the MOVE RIGHT TRIM button until the drone stops moving left If the drone is moving right push the MOVE LEFT TRIM button until the drone stops moving right Left Trim Right Trim Forward Trim Backward T...

Page 10: ...s not on a flat surface Place the drone on a flat surface before attempting to take off Charge the drone s battery pack Drone s battery pack is drained Charge the drone s battery pack Install fresh ba...

Reviews: