background image


27

z

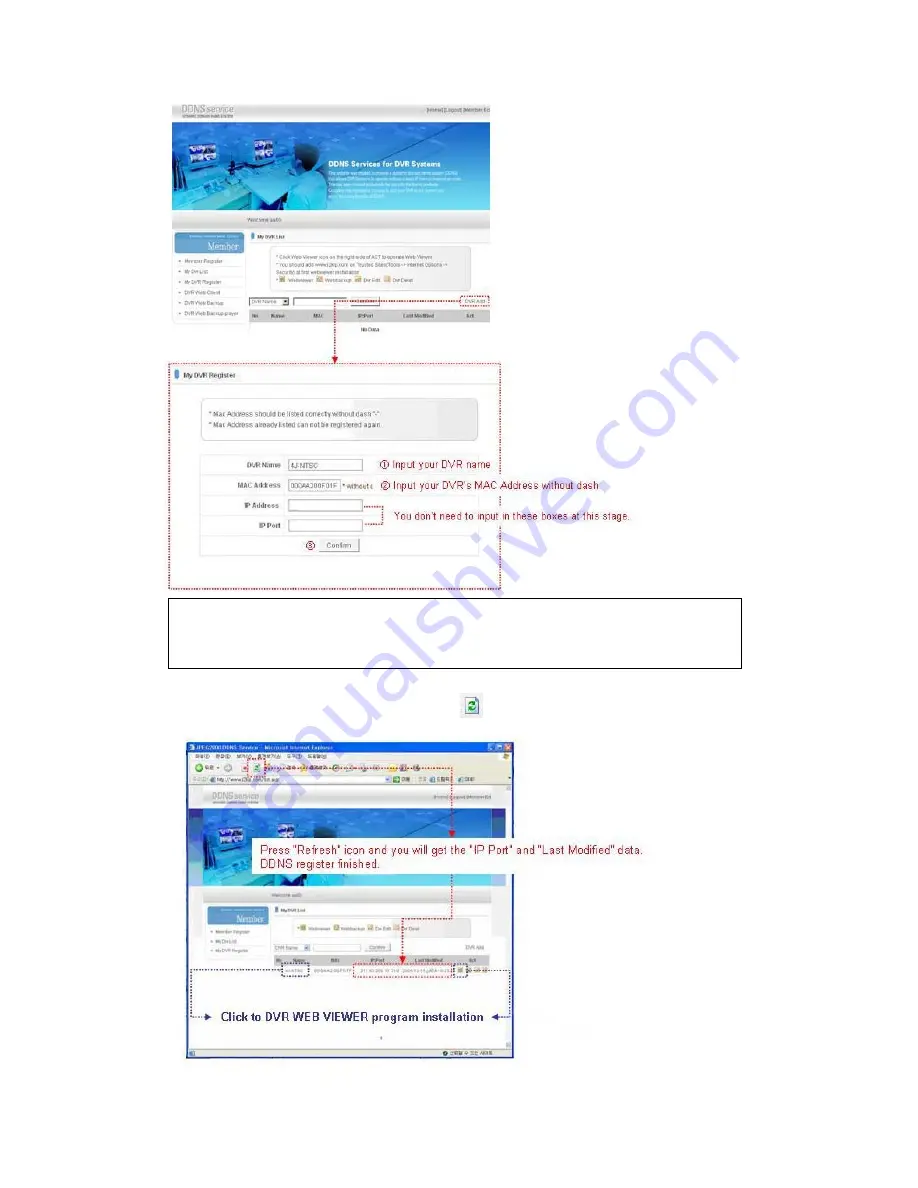
  After log-in, please click ‘DVR Add’ to register your DVR unit. 


z


Setup DDNS function on DVR. Refer to ‘6.6 EXTERNAL DEVICE > TCP/IP SETUP > DDNS SETUP’. 

z


Back to JPEG2000 DDNS SERVER website and click ‘        ‘ icon. Then you will get the ‘IP Port’ and ‘Latest Modified’ 
data. 


z


Now DDNS setup at DVR and registered on the web is finished. 


z


How to identify my Mac Address?

You can indentify your own Mac Address on your DVR unit as follows. 
MENU

ENTER (or input your password) 

EXTERNAL DEVICE

TCP/IP SETUP

IP CONFIG 

SETUP (Then you can indentify your Mac Address) 

Summary of Contents for JPEG2000 Triplex

Page 1: ...a an n nu u ua a al l l V1 98 R00 061003 5700 Standalone Type Digital Video Recorder JPEG2000 Triplex 4 4 4 8 8 8 1 1 16 6 6 c c ch h h D D Di i ig g gi i it t ta a al l lV V Vi i id d de e eo o oR R Re e ec c co o or r rd d de e er r r ...

Page 2: ......

Page 3: ...s should be routed so that they are not likely to be walked on or pinched by items placed upon or against them paying particular attention to cords and plugs convenience receptacles and the point where they exit from the appliance 13 Power Lines An outdoor system should not be located in the vicinity of overhead power lines or other electric light or power circuits or where it can fall into such p...

Page 4: ...erference Problems This booklet is available from the U S Government Printing Office Washington DC 20402 Stock No 004 000 00345 4 SAFETY PRECAUTIONS This label may appear on the bottom of the unit due to space limitations The lightning flash with an arrowhead symbol within an equilateral triangle is intended to alert the user to the presence of un insulated dangerous voltage within the product s e...

Page 5: ... Setup 12 6 3 7 Buzzer Setup 12 6 3 8 Password Setup 13 6 3 9 System information 13 6 4 RECORD SETUP 13 6 4 1 Record Configuration 13 6 4 2 Schedule Setup 14 6 4 3 Holiday Setup 14 6 5 BACK UP 15 6 6 EXTERNAL DEVICE 15 6 6 1 TCP IP Setup 15 6 6 2 RS 232C Setup 16 6 6 3 Pan Tilt Setup 16 6 7 FACTORY DEFAULT 17 6 8 LANGUAGE 17 7 OPERATION 18 8 NETWORK CONFIGURATION 21 9 REGISTRATION DVR at DDNS SERV...

Page 6: ... Maxtor and Hitachi HDD z Connect Main Board and HDD1 using IDE cable and HDD power cable z The jumper setting of HDD1 should be on Master if you install only one HDD z The jumper setting of HDD1 should be on Master and HDD2 should be on Slave if you install two HDDs z CD Writer model HDD must be Master CD Writer must be Slave z Example of HDD Jumper Setup Caution 1 When Hard Disk Add or Exchange ...

Page 7: ...ensor Input 13 12 Sensor Input 5 GND 13 Sensor Input 3 Sensor Input 12 14 Sensor Input 2 Sensor Input 11 15 Sensor Input 1 Sensor Input 10 16 Sensor Input 9 17 GND 18 Sensor Input 8 19 Sensor Input 7 20 Sensor Input 6 21 Sensor Input 5 22 GND 23 Sensor Input 4 24 Sensor Input 3 25 Sensor Input 2 26 Sensor Input 1 3 3 5 Connecting TCP IP Ethernet z Connect LAN to ETHERNET connector 3 3 6 Connecting...

Page 8: ...uous 120ips SUPER FINE size STOP Stop of Emergency Record Stop Playback PLAY Playback of recorded data on HDD ZOOM A Short Press Audio On Off only for Audio version Long Press Zooming an image FRZ Freezing an image Change playback speed Move cusor up down Change Playback direction Backward Forward Move cusor left right USB Firmware upgrade by connecting PC JOG SHUTTLE Jog left turning Move backwar...

Page 9: ...ch previously set password the DVR unit goes back to live display mode z Factory default passwords are as below ADMIN Blank ENTER key MANAGER 1 USER 1 USER 8 2 9 z Put in correct Password and press ENTER key to display SYSTEM MENU as below 6 2 DISPLAY SETUP z Select DISPLAY SETUP and press ENTER key will show as below 6 2 1 Screen Display z Setting up the screen display in LIVE mode and PLAYBACK m...

Page 10: ... the event time and date set by manufacturer is different from local time of user and user must set time and date exactly in the first operation z Set time date using keys and keys or Jog shuttle 6 3 3 Camera Setup z CAMERA TITLE Input title of each camera Move to channel you want to change using keys and then change the title using keys When modification is finished press ENTER key To exit to pre...

Page 11: ... at once RECORD DURATION Whenever motion is detected and it is set at Motion Recording mode DVR system records for RECORD DURATION from time motion is detected Latest setting of a channel changes the rest of channels to be one and same all at once 1sec 99 sec Default 5 sec NUMBER OF CELLS TO DETECT This is to adjust the number of motion cells per each channel separately within the range of detecti...

Page 12: ...6 Event Popup Setup z This Menu is to setup the images captured by the Event displayed in Full Screen z Select Event popup setup and press ENTER key to display following screen CHANNEL To select the camera number for Popup POPUP ON OFF To decide the use of Popup EVENT To select Popup Events A Alarm M Motion DURATION To select Popup time 6 3 7 Buzzer Setup z Set parameters for buzzer On or Off Use ...

Page 13: ... or stop recording when the HDD is full z MULTIPLEX DUPLEX Playback Networking TRIPLEX Playback Recording Networking z QUALITY Set recording picture quality Actually it is fixing maximum data size of image for each picture quality in 5 steps as follows BASIC NORMAL ENHANCED FINE SUPER FINE Record Duration Table 80GB 120GB 160GB 200GB BASIC 34 H 50 H 66 H 82 H NORMAL 24 H 37 H 49 H 61 H ENHANCED 20...

Page 14: ...on calendar to record just as setting for Sunday in SCHEDULE REC SETUP z Use MODE key to select a month and keys to move to a day and press ENTER key to set a holiday Then color of date shall be changed to red as Sunday EDIT HOLIDAY Set as holiday CLEAR MON DATA Cancel the holiday set per month CLEAR ALL DATA Cancel all holiday set SCHEDULE SETUP SUN MON TUE WED THU FRI SAT 00 02 M AM C C C C C 02...

Page 15: ...ND time in previous back up and you can copy images in series to many CDs as many as you want 6 6 EXTERNAL DEVICE z Set parameters of external devices connected to DVR like Ethernet PTZ camera RS 232C etc 6 6 1 TCP IP Setup z TCP IP function enables user to see live pictures and recorded pictures via the internet z IP CONFIG SETUP z Show the network information assigned to the DVR BACK UP CD R SET...

Page 16: ...ess ENTER to renew IP being registered in JPEG2000 DDNS SERVICE server 6 6 2 RS232C Setup z User can control the DVR via RS 232C port z Connect DVR to PC via RS 232C port and control DVR using keyboard of PC z This function is mainly for programmer who wants to control DVR as part of many devices connected to PC system as in SI project 6 6 3 Pan Tilt Setup z It is to set parameters for PTZ camera ...

Page 17: ...ew HDD or other changes in system to make all system ready for normal operation z Use keys to move and Press ENTER key to change parameters z Move to RUN and press ENTER key for actual Factory Default setting 6 8 LANGUAGE z The menu can be displayed in a number of languages z Press key to select your language COMMAND SETUP CHANNEL 01 MODEL PELCO D PTZ ID 000 BAUDRATE 2400 BPS CMD DELAY 1 MSEC COMM...

Page 18: ...king only by IR Remote Control 7 3 4 Freeze z Full display mode If you press the FRZ key the FRZ icon will be activated on the screen and F character will be shown beside camera title and live image will be frozen z Split display mode If you press the FRZ key the FRZ icon will be activated on the screen Press the Channel key which you want to freeze z To release frozen image press Channel key of f...

Page 19: ...ay the recorded data in 1x speed z For backward playback press PLAY key again z Use Jog Shuttle to pause and control playback speed z To stop playback press the STOP kety z Using Jog Shuttle Press the J SHUTTLE key in playback mode The Jog Shuttle is ready for use The J Shuttle LED will solid lit while you operate the Jog Shuttle For forward playback turn the Shuttle right and turn Shuttle left fo...

Page 20: ... stop backup press MENU key During burning CD it s impossible to cancel burning process z User can verify the back up CD on PC with BACK UP CD PLAYER Included in Package 7 9 RS 232C ASCII CODE z Following ASCII Codes Hexa Code are for programmers who want to control DVR unit via the RS232C Port using keyboard of PC z The following table is based on 16ch DVR z All ASCII Code is 1 Byte REC R PTZ T C...

Page 21: ...the units may display the IP addresses differently For simplicity sake 192 168 1 105 may have to be configured as 192 168 001 105 z PORT NUMBER 50000 4 channel 8 channel 16 channel This number is stated explicitly For most situations please use the default 50000 for simplicity z SUBNET MASK 255 255 255 0 example Assign the DVR the same exact subnet mask as your PC z GATEWAY 192 168 0 1 example Ass...

Page 22: ...e units may display the IP addresses differently For simplicity sake 24 106 1 195 may have to be configured as 24 106 001 195 z PORT NUMBER 50000 4 channel 8 channel 16 channel This number is stated explicitly For most situations please use the default 50000 for simplicity z SUBNET MASK 255 255 255 240 example Along with your static IP address you should have received your subnet mask from your In...

Page 23: ... the Remote Software for CASE C LOCALLY z To access the DVR locally that is from your local network on site from where the DVR is installed Open the remote viewing software and click on the Settings button z As far as TCP IP connectivity is concerned only 4 entries need to be made IP address Input the IP address that you assigned the DVR As in the above example I would input the private IP address...

Page 24: ...contact your service provider z GATEWAY 24 106 1 193 example Along with your static IP addresses you should have received your gateway or default gateway from your Internet provider Please use that gateway when configuring the DVR If you did not receive this information contact your service provider z Please DO NOT configure MAC ADDRESS or DHCP SETUP z Your DVR is now ready for access Accessing th...

Page 25: ... is just notifying you when the DVR will try to renew the IP address Typically it will try to receive the same IP but it is a good idea to check your IP on a continuous basis z Exit DHCP SETUP z Select IP ADDRESS to determine the IP address the unit has received z The DVR is now ready for access Accessing the DVR using the Remote Software for CASE E LOCALLY z You cannot physically access the unit ...

Page 26: ...e version is under v1 30 z DDNS function is available from 1 10 12 13 REMOTE VIEWER program version If your REMOTE VIEWER program is under this version or you don t know what version is we recommend latest program download at www j3kip com JPEG2000 DDNS SERVICE website z Please access www j2kip com and click Register to register member ID Fill in below boxes to register ...

Page 27: ...DNS SERVER website and click icon Then you will get the IP Port and Latest Modified data z Now DDNS setup at DVR and registered on the web is finished z How to identify my Mac Address You can indentify your own Mac Address on your DVR unit as follows MENU ENTER or input your password EXTERNAL DEVICE TCP IP SETUP IP CONFIG SETUP Then you can indentify your Mac Address ...

Page 28: ...p com in Windows as a trusted site at first installation as follows z Move to Tools Æ Internet Options z Move to Security Æ Trusted Sites Æ Then click Sites button z Put the site name www j2kip com into the address bar z Then click Add button z Leave the check box empty Leave this check box empty ...

Page 29: ...29 z Now you can see the web site name that you put in the box Click OK button z Click OK button to finish ...

Page 30: ... Screen Division view is enabled Status window Display s the current time and date based The date is in the format Year Month Day You will also see the status of your connection Setting Playback and Sequence buttons Setting Enables the software configuration screen Playback Enables the remote playback screen Sequence When in single channel view hitting the sequence button will sequence through all...

Page 31: ... address z PORT Enter the Port Number you assigned the DVR z ID Always enter admin z Password This must match the password on the DVR For simplicity just use numbers z It can add and save several IP Addresses for prompt multi site monitoring DDNS z Click DDNS radio button and then click DDNS tap as above z Input Member ID and Name Member ID Input DDNS Server www j2kip com registered member ID Name...

Page 32: ...the Baud Rate of your PTZ camera z Run in full screen mode When checked this will enable the program to re adjust the interface to completely fill your computer screen z Set Path to Save Downloaded image Determines the location and folder on your PC where the downloaded video clips are stored If you do not specify a valid location the viewer program will save all files in the default location of C...

Page 33: ...nnel selection Select each camera Time selection Select a time from which user want to see The playback will be started from this point drag the point using mouse Start and end time Indicate record starting time and end time of images on HDD 10 2 3 Playback Contorl Buttons 1 2 3 4 5 6 7 8 9 10 Stop playback Play fast backward Play forward 1X Play fast forward Play backward 1X Move to the start of ...

Page 34: ... images displayed Next select the date you wish to view and verify that it is a valid date on the hard drive and that the selected data is outlined with the box filled in Then select the time you wish to access for that particular date Finally hit the single arrow play or double arrow play button z To see continuous live view we recommend NOT setting the DVR for motion detection The remote viewer ...

Page 35: ... below Installation starts automatically z If you cannot installation program please add www j2kip com on Trusted Sites at first For more information please refer to 9 2 WEB BROWSER SETTINGS z After installation following program will display Click CONNECT button to connection z And you can see the live images ...

Page 36: ...ll see the screen DVR WEB VIWER below z If you cannot installation program please add www j2kip com on Trusted Sites at first For more information please refer to 9 2 WEB BROWSER SETTINGS z Type your IP PORT ID and Password in the box z Click CONNECT button to connection z And you can see the live images ...

Page 37: ... using these buttons a Move the slide bar to start position b Play fast backward in preset speed c Play backward at 1x speed d Pause e Play forward at 1x speed f Play fast forward in preset speed g Move the slide bar to end position Function buttons a OPEN Open the Back up CD Player b EDIT User can edit save and print recorded image on Edit mode This edit button will work when you selected one of ...

Page 38: ...k part of image darker b To reduce light and shade lower contrast a little Brightness a Make an image brighter b Make an image darker Sharpness give sharp edge effect Blur make an image soft Function button a Save User can save an image in JPEG format It is saved in the folder where you installed back up CD player b Print User can print current image user selected c EXIT Return to Back up CD Playe...

Page 39: ...ursor on FACTORY DEFAULT Please do not enter FATORY DEFAULT at this time 4 Hold to remain pressing PLAY SEARCH keys and then press ENTER key DVR will recognize CD and automatically renter EEPROM upgrade stage Entered this stage you can release ENTER key only 5 Upgrade will be progressed and please follow the message from DVR Note DVR which have V1 02 is NOT available with CD upgrade In this case p...

Page 40: ...ation Install Success window will pop up after installation Select OK button 3 Please connect DVR to PC with USB cable A type A type 4 Turn on DVR with pressing PLAY and SEARCH key at the same time You can hear beep sounds in short intervals 5 This window will pop up for USB Driver installation Note If old version of AUD was installed Please uninstall at this stage And install new version of AUD p...

Page 41: ...41 Click Next button Click Continue Anyway button Click Finish button Now USB Driver was installed in your PC successfully 6 Execute AUDTOTAL in AUD folder The following window will pop up ...

Page 42: ...sounds keep occurring during update After beep sounds 30 times DVR will be rebooted automatically Notice z Please do not turn off DVR during downloading It causes a fatal problem of DVR operation z Please do not change Firmware file name If you change file name upgrade program could not recognize firmware ...

Page 43: ...bnet Mask was 255 255 255 0 then use 192 168 0 x for your DVR s IP Address x meaning any number between 2 254 that you wish as long as it passes the PING test If your IP Address entry in PC s TCP IP Settings was 192 168 1 y and your Subnet Mask was 255 255 255 0 then use 192 168 1 x for your DVR s IP Address x meaning any number between 2 254 that you wish as long as it passes the PING test z Afte...

Page 44: ...our router This port is the Port Number specified in the DVR For most cases you should be able to leave the default at 50000 z Every router has a different procedure for forwarding ports Please consult your router s user guide on how to correctly configure Port Forwarding 16 7 CAN I CONFIGURE MY DVMR FOR REMOTE ACCESS USING A DIAL UP CONNECTION z Yes it is possible but not recommended With a live ...

Reviews: