Omcan CE-CN-KB-3 Instruction Manual Download Page 8

8

Operation

LIGHTING THE PILOT

The manifold units are equipped with standing pilots and each should be lit immediately after the gas is 

supplied to the equipment.

1. 

Before attempting to light the pilots, turn off the main gas valve to the equipment and wait 5 minutes to 

clear the gas.

2. 

Turn off all gas control knobs.

3.  Turn on control valve and light all pilots.

4. 

The pilot burner must be lit from the top. Hold an ignition source and light the pilot. When the flame is 

stable, remove ignition source.

5. 

Turn off the main gas valve to shut down the equipment.

There is one pilot for each burner. The broiler is equipped with standing, unmonitored pilots. Gas will flow from 

the pilots as soon as the main gas supply to the unit is turned on. Standing pilots should be adjusted to provide 

a slight yellow tip on the f lame. Air shutters on the main burners must be individually adjusted to provide a blue 

flame. All traces of yellow should be adjusted out of the burner flame. 

The broiler is a free vented appliance. All products of combustion and the heat generated by the burners pass 

through the grates. When meat is placed on the grates, this blocks the venting and causes a temperature 

build-up.

PILOT FLAME HEIGHT ADJUSTMENT

•  The pilot flame on the equipment has been factory adjusted. When adjustment is necessary, adjust the 

pilot flames as small as possible but high enough to light the burner immediately when the burner valve is 

turned to the highest setting. Access to the pilot flame adjustment screw is obtained through the holes in 

the front panel.

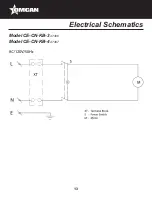
Turn the main power switch ON. Each power switch controls each spit independently. Allow the broiler to 

preheat for 30 minutes. Each spit is able to cook 5 chickens in 45 minutes. After 30 minutes of burn-in, 

equipment is ready for use.

OPERATION

1.  To ignite the burners, depress and turn the gas control knob to high position.

2.  Turn on the motor and chamber light switch when in need.

SHUTDOWN INSTRUCTIONS

After cooking is done, please turn the valve to off position and turn off the motor switch, light switch and main 

power switch, then cut off the gas and power supply.

Summary of Contents for CE-CN-KB-3

Page 1: ...Revised 09 02 2022 Toll Free 1 800 465 0234 Fax 905 607 0234 Email service omcan com www omcan com Natural Gas Broilers Models CE CN KB 3 KB 4 Items 47496 47497 Instruction Manual...

Page 2: ...Table of Contents Section General Information Safety and Warranty Technical Specifications Installation Operation Maintenance Troubleshooting Parts Breakdown Electrical Schematics Notes Warranty Regi...

Page 3: ...e It s of the utmost importance to save these instructions for future reference Also save the original box and packaging for shipping the equipment if servicing or returning of the machine is required...

Page 4: ...arton para asegurararse que todos los articulos solicitados sten dentro de la caja y no encuentre da os ocultos en la m quina Si el paquete ha sufrido un manejo de poco cuidado golpes o da os visible...

Page 5: ...low of combustion and ventilation air Do not spray controls or the outside of the equipment with liquids or cleaning agents Allow for hot parts to cool before cleaning or moving This equipment should...

Page 6: ...22 7 x 30 533 x 577 x 762mm 21 x 22 7 x 37 533 x 577 x 940mm Packaging Dimensions 30 x 25 x 37 762 x 635 x 940mm 30 x 25 x 44 762 x 635 x 1118mm Weight 66 lbs 29 9 kgs 70 lbs 31 8 kgs Packaging Weight...

Page 7: ...for safe and efficient operation The regulator provided for this equipment is adaptable for both Natural gas and LP gas Regulator specifications NPT inlet and outlet factory adjusted for 4 WC Natural...

Page 8: ...rner flame The broiler is a free vented appliance All products of combustion and the heat generated by the burners pass through the grates When meat is placed on the grates this blocks the venting and...

Page 9: ...gas sufficient to meet the full gas input of the equipment A manual shut off valve should be installed upstream from the manifold within 4 ft 1 2m of the equipment and in a position where it can be r...

Page 10: ...rly adjusted burner Uneven heat side to side Burner valves improperly adjusted Appliance is not level side to side Improperly adjusted burner Pilot outage Pilot flame is set too low Adjust pilot to al...

Page 11: ...11 Parts Breakdown Model CE CN KB 3 47496 Model CE CN KB 4 47497...

Page 12: ...6 47 AL131 Pipe Joint for 47496 15 AL143 Grease Collector for 47496 31 AL132 Sliding Column for 47496 16 AL144 Terminal for 47496 32 Item No Description Position Item No Description Position Item No D...

Page 13: ...13 Electrical Schematics Model CE CN KB 3 47496 Model CE CN KB 4 47497...

Page 14: ..._______________ ________________________________________________________________________________________ ________________________________________________________________________________________ ______...

Page 15: ...ter online by visiting OMCAN PRODUCT WARRANTY REGISTRATION 3115 Pepper Mill Court Mississauga Ontario Canada L5L 4X5 https omcan com warranty registration or email to service omcan com Purchaser s Inf...

Page 16: ...relations avec nos clients et les fabricants de valeur Aujourd hui avec des partenaires en Am rique du Nord Europe Asie et Am rique du Sud nous travaillons continuellement am liorer et d velopper l e...

Reviews: