background image

8

Maintenance

Troubleshooting

from operating correctly. It is recommended that the grinder body is cleaned with a compressed air 

jet or a dry brush.

6. 

Reassemble the grinding unit (15) and adjust the grinding gap to its minimum setting.

TAKE CARE: Before tightening the fastening nuts (16) on the grinding unit (15), check that the dial (4) 

of the grinding wheel adjuster button (6) is set to “COARSE”. This precaution is essential to prevent 

any risk of the grinding wheels being brought too close to each other, which could cause damage to 

the grinding unit.

ADJUSTING THE MINIMUM GAP BETWEEN THE GRINDING-WHEELS

This should be done after replacing the grinding wheels.

1. 

Plug the appliance in and run it empty.

2. 

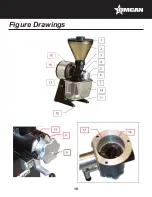
Unscrew hexagon socket screw (7) on the dial (4) using a 2-mm Allen wrench. Check that the dial (4) is 

free to rotate without turning button (6).

3. 

Turn button (6) counterclockwise until the grinding wheels come into contact (a slight sound of friction will 

be heard) then back one notch in the reverse direction.


ATTENTION This is a delicate operation, and prolonged contact between the grinding wheels 

should be avoided, since this could damage them.

4. 

Turn the appliance off by placing switch (13) on “0”.

5. 

Without moving the button (6), place the dial (4) on the “FINE” position then tighten the hexagon socket 

screw (7) fully home.

6. 

Run the machine empty to check that the grinding wheels rotate without touching each other on the finest 

setting. If this is not the case, repeat the above procedure.

Identify the exact reason the appliance stopped.

In every case: If the problem persists, switch off the power supply to the machine (unplug the cord from the 

mains socket) and call in the maintenance service or contact an Omcan approved dealer.

The machine will not start:

•  Check: the mains power supply and the condition of the power supply cord.

•  Note: the switch should be lit when on the “1” position.

•  Check that there are no foreign bodies stuck between the grinding wheels.

The machine stops because the motor has overheated:

(the metal casing around the motor unit is hot)

In the event of overheating, the motor stops.

The overheating protection system resets automatically; wait for the motor to cool (15 to 30 minutes), before 

restarting the machine.

Summary of Contents for 44116

Page 1: ...Revised 01 21 2020 Toll Free 1 800 465 0234 Fax 905 607 0234 Email service omcan com www omcan com Santos Poppy Seed Grinder Model Santos 01PV Items 44116 Instruction Manual...

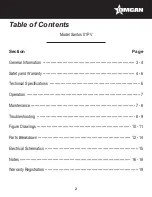
Page 2: ...5 16 18 19 Table of Contents Section General Information Safety and Warranty Technical Specifications Operation Maintenance Troubleshooting Figure Drawings Parts Breakdown Electrical Schematics Notes...

Page 3: ...e It s of the utmost importance to save these instructions for future reference Also save the original box and packaging for shipping the equipment if servicing or returning of the machine is required...

Page 4: ...paque exterior Habra el carton para asegurararse que todos los articulos solicitados sten dentro de la caja y no encuentre da os ocultos en la m quina Si el paquete ha sufrido un manejo de poco cuidad...

Page 5: ...a standard 2 pole ground electric socket The installation should be fitted with an RCD and a fuse rated at 16A The appliance must be grounded CARE Before connecting the machine check that the mains el...

Page 6: ...ed service depot in the area or to an Omcan Service warehouse to repair the equipment Unauthorized maintenance will void the warranty Warranty covers electrical and part failures not improper use Plea...

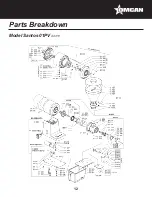
Page 7: ...he electric or other components refer to the parts list IMPORTANT It is prohibited to use spare parts other than those certified by Omcan For all spare part orders see references in the exploded view...

Page 8: ...ION This is a delicate operation and prolonged contact between the grinding wheels should be avoided since this could damage them 4 Turn the appliance off by placing switch 13 on 0 5 Without moving th...

Page 9: ...sconnect the appliance Correct the fault then press the excess current protection button 14 Press the On Off switch 13 position I If the problem persists check the following points Check that the grin...

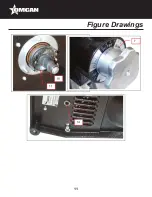
Page 10: ...10 Figure Drawings...

Page 11: ...11 Figure Drawings...

Page 12: ...12 Parts Breakdown Model Santos 01PV 44116...

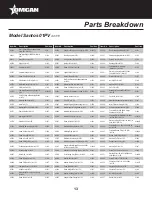
Page 13: ...6202 for 01PV 01340 AC577 Bearing Washer for 01PV 01205 AC609 Barista Graduated Ring for 01PV 01258 AC641 Complete Rotor with Shaft Single Phase and Pin for 01PV 01360 AC578 Bearing 6202 for 01PV 0120...

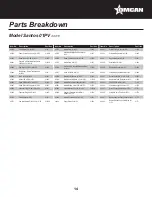
Page 14: ...e Bag Holder Axle for 01PV 01604 AC664 Nut H M4 Zn for 01PV 01441 AC678 Barista On Off Button for 01PV 01460 AC691 Rubber Buffer D12 H 7 5 for 01PV 01607 AC665 Washer AZ 4 ZN for 01PV 01442 AC679 Bari...

Page 15: ...15 Electrical Schematics Model Santos 01PV 44116...

Page 16: ..._______________ ________________________________________________________________________________________ ________________________________________________________________________________________ ______...

Page 17: ..._______________ ________________________________________________________________________________________ ________________________________________________________________________________________ ______...

Page 18: ..._______________ ________________________________________________________________________________________ ________________________________________________________________________________________ ______...

Page 19: ...ter online by visiting OMCAN PRODUCT WARRANTY REGISTRATION 3115 Pepper Mill Court Mississauga Ontario Canada L5L 4X5 https omcan com warranty registration or email to service omcan com Purchaser s Inf...

Page 20: ...relations avec nos clients et les fabricants de valeur Aujourd hui avec des partenaires en Am rique du Nord Europe Asie et Am rique du Sud nous travaillons continuellement am liorer et d velopper l e...

Reviews: