background image

4

Changing the f

older f

or pla

yback [Pla

y F
older]

52

EN

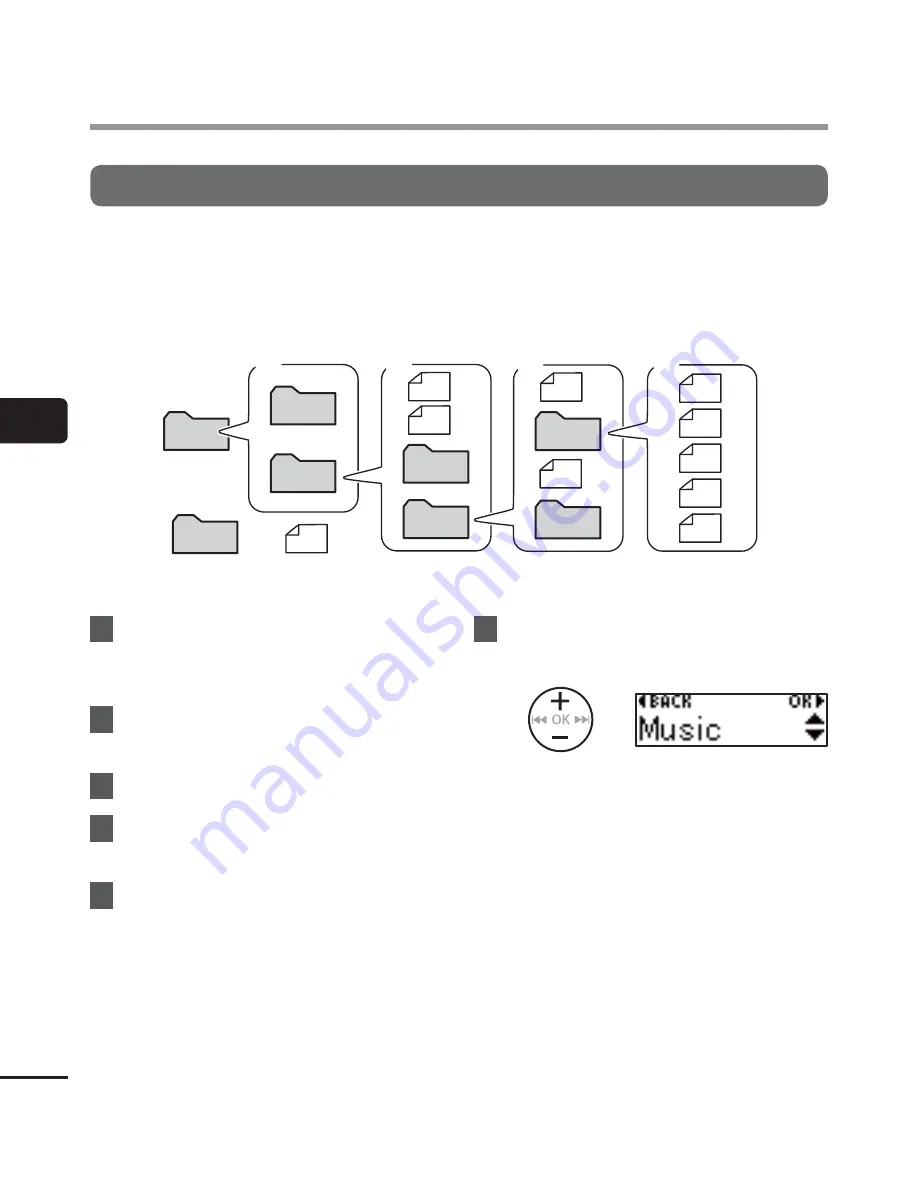
Changing the folder for playback [Play Folder]

You can switch the play folder to the [

Recorder

] folder containing the files recorded with the 

built-in microphone or the [

Music

] folder containing music files and study content transferred 

from a PC. The voice recorder can recognize folders up to the second level (

C

 in the figure) in 

the [

Music

] folder.

MUSIC

VP-10

RECORDER

A

B

C

D

First level

Second level

Third level

Folder

File


1

  While the voice recorder is in stop 

mode, press the 

MENU

/

SCENE


button.


2

 Press 

the 

+

 or 

 button to select 

[

Play Menu

].


3

 Press 

the 

OK

 button.


4

 Press 

the 

+

 or 

 button to select 

[

Play Folder

].


5

 Press 

the 

OK

 button.


6

 Press 

the 

+

 or 

 button to select 

[

Recorder

] or [

Music

] (Fig. 

A

).

[

Recorder

]: 

Select this for playing files recorded 
with the built-in microphone.

[

Music

]: 

Select this for playing files transferred 
from a PC.

• 

Press the 

0

 button to return to the 

previous screen.

When [

Recorder

] was selected

 Go to Step 

Ï

When [

Music

] was selected

☞ 

Go to Step 

 Changing the folder for playback [Play Folder]

Summary of Contents for VP-10

Page 1: ...structions for information about using the product correctly and safely Keep the instructions handy for future reference To ensure successful recording we recommend that you test the record function a...

Page 2: ...tesearchfunction 32 Erasingfiles 33 Erasingfiles 33 4 Menu Settingmenuitems 35 Basicoperation 35 Filemenu FileMenu 37 Preventingaccidentalfileerasure FileLock 37 Dividingfiles FileDivide 37 Displaying...

Page 3: ...e with a PC PCoperatingenvironment 56 PCconnection disconnection 58 ConnectingthevoicerecordertoaPC 58 DisconnectingthevoicerecorderfromaPC 60 LoadingafiletoaPC 61 UsageasexternalmemoryofthePC 63 List...

Page 4: ...Display 4 MENU SCENE button 5 PLAY 4STOP button 6 Built in speaker 7 Built in stereo microphone R 8 POWER HOLD switch 9 0 button 0 button button 9 button OK button Built in stereo microphone L Clip L...

Page 5: ...ayback P 23 Playback pause P 23 Fast forward P 24 Fast rewind P 24 Fast playback P 28 Slow playback P 28 3 Elapsed recording time 4 Current file number in folder Total number of recorded files in fold...

Page 6: ...the power ON Step 3 3 Selecting the battery setting Select the battery setting to match the inserted battery Select the setting for a nickel metal hydride rechargeable battery or the setting for an al...

Page 7: ...by force 2 Insert an AAA battery making sure its positive and negative terminals are placed correctly 2 1 Insert the battery s negative terminal first 3 Close the battery cover until it is completely...

Page 8: ...tion of the arrow POWER HOLD switch Setting the inserted battery 1 Press the or button to select the type of battery you inserted Ni MH Select if you inserted an Olympus nickel metal hydride rechargea...

Page 9: ...tton to change the number To change the setting of another item press the 9 or 0 button to move the blinking cursor then press the or button to change the number 3 Press the OK button to finalize the...

Page 10: ...se HOLD mode P 30 1 Start the PC 2 Remove the USB connector cover 1 2 Slide open the USB connector cover using the pad of your finger 3 After making sure the voice recorder is stopped connect the USB...

Page 11: ...P 30 1 Remove the USB connector cover 1 2 Slide open the USB connector cover using the pad of your finger 2 Connect the voice recorder to the USB connector on the AC adapter To USB connector of AC ada...

Page 12: ...harge the battery using the USB connector You cannot charge the battery when the power of PC is OFF or the PC is in standby sleep or auto power off mode Do not use a USB hub when charging the battery...

Page 13: ...n AAA alkaline dry cell battery or an Olympus nickel metal hydride rechargeable battery model BR404 Operation is not guaranteed If a battery from another manufacturer is used The Battery screen appear...

Page 14: ...is playback with the built in speaker at some volumes may result in a drop in battery output voltage causing the voice recorder to reset Lower the volume in this case The continuous battery usage time...

Page 15: ...mode When the voice recorder has been stopped for at least 5 minutes default setting after power ON the display disappears and the voice recorder automatically turns off P 46 To reuse the voice record...

Page 16: ...row a b c a Current file number in folder Total number of recorded files in folder b Recording indicator c Elapsed recording time The LED indicator light lights and appears in the display After replac...

Page 17: ...rding being cut off start recording after the LED indicator light has lit or mode indicator has appeared in the display When the remaining possible recording time is 60 seconds the LED indicator light...

Page 18: ...itivity Rec Mode P 38 Sets the recording sound quality Anti Rustle P 39 Reduce noise caused by the voice recorder rubbing against clothing rustling sounds when recording in your pocket Low Cut Filter...

Page 19: ...the recording level There will be no sound from the speaker when the earphones are connected NOTE To avoid unpleasantly loud sound set the volume to 00 before plugging in the earphone To prevent feed...

Page 20: ...or recording your own voice and other sounds that are extremely close Conference Suitable for recording conferences in a large space and other sounds over a wide area Meeting Suitable for recording me...

Page 21: ...Scene setting will be automatically set to OFF Preregistered Rec Scene settings Pocket Rec Level High Rec Mode MP3 128k ST Anti Rustle High Low Cut Filter OFF Dictation Rec Level Low Rec Mode MP3 128k...

Page 22: ...er in folder 2 Recording level meter screen The meter changes according to recording volume and recording function setting 3 Functions indicator screen You can display the indicator of functions and r...

Page 23: ...n to start playback d c c Playback indicator d Elapsed playback time appears in the display 3 Press the or button to adjust the volume to the desired level The volume can be adjusted to a setting betw...

Page 24: ...ops when the end of the file is reached Press and hold the 9 button again to fast forward from the beginning of the next file Rewinding 0 button Rewinding during playback 1 Press and hold the 0 button...

Page 25: ...p to the beginning of the previous file during playback press the 0 button twice consecutively TIP To skip the files continuously pressing the 0 or 9 button while the recorder is in stop mode NOTE If...

Page 26: ...Selects whether to play back individual files or all files in a folder Repeat P 42 Repeatedly plays back the range selected in Playback Range Skip Space P 42 A handy function for quickly moving the pl...

Page 27: ...events where multiple people speak Language study This is convenient for playing back conversations and language study content many times repeatedly 1 While the voice recorder is in stop mode press an...

Page 28: ...ck speed from x 0 5 slow to x 1 0 normal to x 2 0 fast 3 Press the OK button a a Playback speed display To return to the normal playback speed set the setting to x1 0 NOTE Altered playback speed setti...

Page 29: ...markings They are automatically erased when you select a different file transfer the file to a PC or move the file on a PC You can write up to 99 index marks temp marks in a single file The message I...

Page 30: ...e the POWER HOLD switch to the HOLD position Hold appears in the display and the recorder enters HOLD mode Releasing HOLD mode 1 Slide the POWER HOLD switch to position A shown below a NOTE When any b...

Page 31: ...yback time and current file number in folder 2 Recording time date screen Recorder folder is selected You can display the recording time and date of current file File name screen Music folder is selec...

Page 32: ...date All of the dates on which recordings were made are displayed Select the date you are searching for from the dates 5 Press the OK button 6 Press the or button to select the desired file a b a Fil...

Page 33: ...utton The voice recorder returns to the stopped mode if no operation is performed for 3 minutes 4 Press the OK button again 5 Press the or button to select One file or All in folder One file Erases on...

Page 34: ...that cannot be recognized by the recorder the file will not be erased The voice recorder must be connected to a PC to erase these files Before erasing a file charge or replace the battery to ensure i...

Page 35: ...n items that can be set during recording playback P 36 2 Press the or button to select the setting menu containing item you want to set 3 Press the OK button The setting item of the selected setting m...

Page 36: ...in this case For menu settings done during recording playback the voice recorder exits the menu if no operation is performed for 8 seconds 4 Menu items that can be set during recording Backlight LED 4...

Page 37: ...ng files File Divide Large files or files with long recording times can be divided for easier management and editing See Dividing files File Divide P 50 for the procedure Displaying file information P...

Page 38: ...the speaker s mouth 5 to 10 cm away NOTE The recording level is adjusted automatically Excessively loud sound input may generate noise Setting the recording mode Rec Mode You can prioritize sound qua...

Page 39: ...N Turns the low cut filter ON OFF The low cut filter is disabled Voice activated recording function VCVA The voice activated recording function VCVA automatically starts recording when a sound louder...

Page 40: ...e The setting can be adjusted in 23 steps TIP Each press of the 0 button increases the activation sensitivity level of VCVA and a high level will result in recording starting even with small sounds Ad...

Page 41: ...on adjusts low volume portions of recorded audio files to make them louder ON Adjusts low volume portions of audio files during playback making them louder OFF The voice balancer function is disabled...

Page 42: ...2 Press the or button to select the setting ON Repeatedly plays back the range selected in Playback Range OFF Cancels repeat playback Setting a skip space Skip Space This function skips forward or rev...

Page 43: ...yback starts after skipping forward or backward by the set amount Changing the folder for playback Play Folder You can switch the play folder to the Recorder folder containing the files recorded with...

Page 44: ...LED indicator light does not light The LED indicator light is lit or flashing during recording and charging and while files are being transferred between the voice recorder and a PC ON LED indicator...

Page 45: ...ut from the built in speaker OFF Sound is not output from the built in speaker even though the earphone is disconnected Playing the beginning of files automatically Intro Play Each time you select a f...

Page 46: ...r turns off completely Settingtherecordingstandbyduration Rec Standby Set the recording standby duration for after the power is turned off This allows you to start recording immediately from the power...

Page 47: ...IP When setting hours and minutes each time the MENU SCENE button is pressed the display changes between 12 hour and 24 hour display Example 10 38 PM 10 38 PM default format 22 38 When setting the mon...

Page 48: ...u Noise Cancel OFF Voice Balancer OFF Playback Range Recorder File Music Folder Repeat Recorder OFF Music OFF Skip Space Forward Skip File Skip Reverse Skip File Skip Play Scene OFF Playback Folder Re...

Page 49: ...emory from a menu screen NOTE Some memory capacity is used as a management area so the actual usable capacity will always be slightly less than the displayed capacity Confirming the voice recorder inf...

Page 50: ...and hold the 9 or 0 button to fast forward rewind Writing an index mark at the division point beforehand is handy 2 While the voice recorder is in stop mode press the MENU SCENE button 3 Press the OK...

Page 51: ...for the first half and File name_2 for the latter half NOTE Files cannot be divided if there are 999 files in the folder Locked files P 37 cannot be divided It may not be possible to divide some MP3 o...

Page 52: ...B C D First level Second level Third level Folder File 1 While the voice recorder is in stop mode press the MENU SCENE button 2 Press the or button to select Play Menu 3 Press the OK button 4 Press th...

Page 53: ...n to return to the previous screen When the file was selected Go to Step When the sub folder was selected Go to Step 9 Press the OK button 10 Press the or button to select the file or sub folder Fig C...

Page 54: ...ton to select Device 3 Press the OK button 4 Press the or button to select Format 5 Press the OK button 6 Press the button to select Start 7 Press the OK button 8 Press the button again to select Star...

Page 55: ...ting process can sometimes take over 10 seconds to complete To prevent the risk of damage to data never remove the battery before a formatting process has finished Doing so may damage the data Even wh...

Page 56: ...ista 7 8 8 1 standard installation PC Windows PC with at least one available USB port Macintosh Operating system Mac OS X 10 5 to 10 9 standard installation PC Apple Macintosh series PC with at least...

Page 57: ...u disconnect the connector before the drive has stopped Do not format initialize the voice recorder s drive from a PC Formatting done from a PC will not be done correctly To perform formatting use the...

Page 58: ...ss the OK button To cancel the battery charging press the any button other than OK While connected to USB Remote is displayed on the voice recorder You can transfer files to the PC while charging the...

Page 59: ...he way Operation will not be normal if the connection is not made properly Connecting the voice recorder through a USB hub may result in unstable operation Do not use a USB hub if operation is unstabl...

Page 60: ...heck that the LED indicator light of the voice recorder has stopped blinking and then disconnect the USB cable Macintosh 1 Drag and drop the removable disk icon for the voice recorder shown on the des...

Page 61: ...recorded with the built in microphone to a PC VP 10 RECORDER Recordings made with the microphone are saved here MUSIC 001 002 999 Folder File The folder can store up to 999 files Copy these files to t...

Page 62: ...older including a Music folder itself The voice recorder can only recognize two folder sublevels NOTE To prevent the risk of data damage never disconnect the voice recorder from the USB port while the...

Page 63: ...voice recorder from the PC P 60 Macintosh 1 Connect the voice recorder to the PC P 58 When connected to a Mac OS the voice recorder is recognized on the desktop by the drive letter that includes the p...

Page 64: ...of the voice recorder beforehand P 61 The voice recorder cannot recognize any folders at the third level in the Music folder 1 Select the desired file to playback Use the Play Folder menu function to...

Page 65: ...MP3 format MPEG 1 Layer 3 32 kHz 44 1 kHz 48 kHz MPEG 2 Layer 3 16 kHz 22 05 kHz 24 kHz 8 to 320 kbps WMA format 8 kHz 11 kHz 16 kHz 22 kHz 32 kHz 44 1 kHz 48 kHz 5 to 320 kbps MP3 files with variable...

Page 66: ...rred Contact the Olympus Customer Support Center back cover Memory Full There is no remaining memory Erase unneeded files P 33 No File There are no files in the folder Record a new file or select anot...

Page 67: ...Off Rec Scene or Play Scene function is enabled Rec Scene or Play Scene function turns off automatically P 20 P 27 x 1 0 Play The playback speed function is set to other than x1 0 The playback speed f...

Page 68: ...e earphones OFF has been selected for Speaker To output the playback through the built in speaker select ON for Speaker P 45 The volume is set to 00 Adjust the volume P 23 The recording is too quiet L...

Page 69: ...e you can erase it P 37 The file is a read only file Unlock the file or undo the read only setting on a PC Unable to charge the battery Alkaline has been selected for Battery To use the rechargeable b...

Page 70: ...d for Playback Range Set the Playback Range setting to Folder P 41 ON has been selected for Repeat Set the Repeat setting to OFF P 42 The Skip Space is set to other than File Skip Set the Skip Space s...

Page 71: ...hen wipe it with a dry cloth s Display Wipe gently with a soft cloth NOTE Do not use benzene alcohol or other strong solvents or chemical cleaning cloths Accessories optional BR404 nickel metal hydrid...

Page 72: ...rademarks IBM and PC AT are trademarks or registered trademarks of International Business Machines Corporation Microsoft Windows and Windows Media are registered trademarks of Microsoft Corporation Ma...

Page 73: ...recorder safety precautions f WARNING s Do not use the voice recorder in an atmosphere that might contain flammable or explosive gases It may cause fire or explosion s Do not attempt to disassemble re...

Page 74: ...ttery s positive and negative electrodes It may cause fire ruptures combustion or overheating s Do not solder connections directly onto the battery Do not deform modify or disassemble the battery s Do...

Page 75: ...d If swallowed go to doctor immediately s If you notice abnormal sound heat burning odor or smoke from the voice recorder during use 1Remove the battery immediately taking care not to injure yourself...

Page 76: ...oyed or lost due to reasons such as operating errors device failure or repair Also when content is saved in the memory for long period of time or is used repeatedly operations such as writing to readi...

Page 77: ...e capacity will always be slightly less than the displayed capacity 4 Speaker Built in 10 mm round dynamic speaker 4 Earphone jack 3 5 mm impedance 8 or more Specifications 4 Power source Standard vol...

Page 78: ...its 19 hours approx 16 hours approx MP3 format 128 kbps 21 hours approx 18 hours approx WMA format 32 kbps mono 24 hours approx 19 hours approx 5 kbps mono 24 hours approx 19 hours approx During earph...

Page 79: ...at Recording mode Internal memory 4 GB MP3 format 128 kbps 66 hours approx 4 WMA format Recording mode Internal memory 4 GB WMA format 32 kbps mono 258 hours approx 5 kbps mono 1620 hours approx NOTE...

Page 80: ...PCM format 22 05 kHz 16 bits 6 hours 40 minutes approx 4 MP3 format Recording mode Recording time MP3 format 128 kbps 66 hours approx 4 WMA format Recording mode Recording time WMA format 32 kbps mon...

Page 81: ...ng antenna Increase the separation between the equipment and receiver Connect the equipment into an outlet on a circuit different from that to which the receiver is connected Consult the dealer or an...

Page 82: ...484 896 5000 Technical Support USA 24 7 online automated help http www olympusamerica com support Phone customer support Tel 1 888 553 4448 Toll free Our phone customer support is available from 9 am...

Reviews: