background image

U-DA

4

Fig. 7

Fig. 6

Fig. 5

@

7

(Fig. 5)

Adjusting the Brightness Balance of

Drawn Image and Specimen Image

²

³

|

@

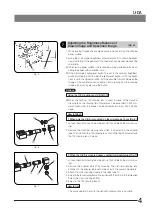
  2. When the U-DA is mounted above another intermediate tube (Fig. 7)

1. Loosen the mirror housing clamping knob @ and detach the mirror hous-

ing.

2. Remove the adapter tube ² by screwing. The standard drawing lens

attached to the adapter tube will not be used in the present procedure.

3. Attach the mirror housing directly to the relay tube ƒ.
4. Screw in the lens adapter frame …, provided with the U-DA, into the threaded

hole at the mirror housing bottom.

5. Screw in the 10X drawing lens ³.
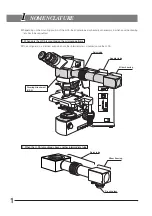
  How to Use

The same operation as with the standard drawing lens is possible.

²

³

ƒ

@

²

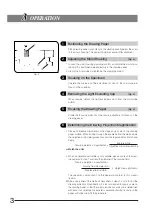
1. While looking through the eyepiece, place a pencil, etc. on the drawing

paper surface.

2. Using the microscope’s brightness adjustment knob @, adjust the bright-

ness until the tip of the pencil and the specimen can be seen clearly at the
same time.

}If the drawing paper surface is dark, drawing will be made easier by illumi-

nating the paper with an electric lamp.

}If the microscope’s light preset button ² is set to the optimum brightness

position for drawing and if, when the light preset button is OFF, the bright-
ness is set to the darkest position, it will be possible to switch between the
image of the superimposed specimen and drawing and the drawing
image alone just by pressing the button.

Options

  Using the 10X Drawing Lens (U-DAL10X)

}When the optional 10X drawing lens is used in place of the standard

drawing lens, the drawing field diameter can be expanded to 220 mm,
which means that the image can be projected to almost fill an A4-size
page.

  How to Attach

  1. When only the U-DA is mounted on the microscope frame (Fig. 6)

1. Loosen the mirror housing clamping knob @ and detach the mirror hous-

ing.

2. Remove the standard drawing lens which is screwed into the adapter

tube ², and attach the 10X drawing lens ³ and the ring | provided with
the 10X drawing lens in place.

Summary of Contents for U-DA

Page 1: ...To ensure the safety obtain optimum performance and to familiarize yourself fully with the use of this attachment we recommend that you study this manual thoroughly before operating the microscope Ret...

Page 2: ......

Page 3: ...erating humidity range is from 30 to 85 3 Applicable microscopes BX40 BX50 BX60 BX41 BX45 BX51 BX52 4 Applicable observation tubes UIS widefield binocular or trinocular tubes When using a UIS super wi...

Page 4: ...ample electrical equipment that is being switched on or off Also remember to always use it only in a well ventilated room 2 Never wipe the mirror with gauze etc Fine dust accumulated on the surface sh...

Page 5: ...U DA 1 2 1 NOMENCLATURE 2 ASSEMBLY 2 1 Mounting the Drawing Attachment on the Microscope 2 2 2 Mounting the Observation Tube 2 3 OPERATION 4 SPECIFICATIONS 3 5 CONTENTS...

Page 6: ...iate is mounted above the U DA Relay tube Mirror housing Drawing Attachment U DA 2 When the U DA is mounted above another intermediate tube Drawing lens Adapter tube Depending on the mounting position...

Page 7: ...ew and remove the adapter tube The removed adapter tube is not used in this mounting procedure 4 Screw the lens adapter frame provided with the U DA into the threaded hole at the bottom of the mirror...

Page 8: ...Projection Magnification 1 Place an objective micrometer on the stage and a scale on the drawing paper surface While looking through the eyepiece find the place where the objective micrometer graduat...

Page 9: ...en can be seen clearly at the same time If the drawing paper surface is dark drawing will be made easier by illumi nating the paper with an electric lamp If the microscope s light preset button is set...

Page 10: ...when the U DAL10X is used 5 Focusing on paper Focusing collar system 6 Optical axis height BX40 BX50 330 5 mm When an additional intermediate tube is com bined add the thickness of the intermediate t...

Page 11: ......

Page 12: ...AX5890 04 8F Olympus Tower 446 Bongeunsa ro Gangnam gu Seoul Korea 135 509 Distributed by Shinjuku Monolith 2 3 1 Nishi Shinjuku Shinjuku ku Tokyo 163 0914 Japan Manufactured by...

Reviews: