background image

DMTA

10007

01EN


[U8778365],


Rev. B,


June


2010

24


Chapter


1


7.

Install


the


battery


compartment


cover


at


the


back


of


the


instrument,


and


then


tighten


the


two


thumb


screws.

When


alkaline


batteries


are


installed


in


the


instrument,


the


battery


indicator


in


the


user


interface


displays


ALK

.


The


AC


charger/adaptor


does


not


recharge


the


batteries


installed


in


the


alkaline


battery


holder.

1.5

Installing the MicroSD Card

The


2

GB


MicroSD


card


is


included


with


every


EPOCH 600


shipment.

To install the MicroSD removable memory card

1.

Remove


the


card


from


its


packaging.

2.

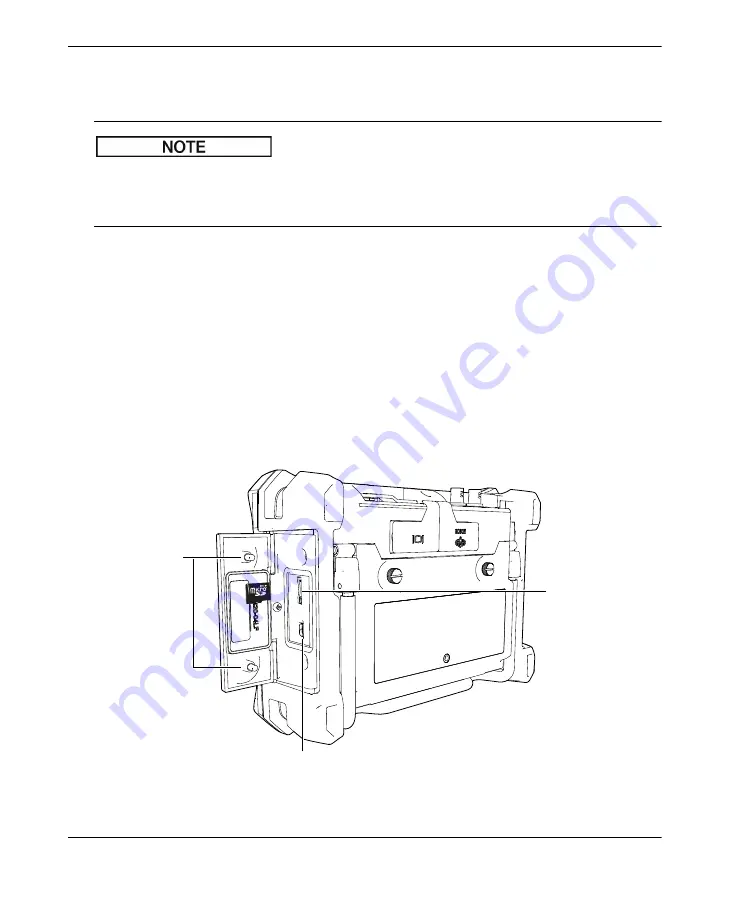
Loosen


the


two


thumb


screws,


and


then


open


the


EPOCH 600


side


door


(see


Figure 1

12


on


page 24).

Figure 1

12


The


side


door

USB port

Thumb screws

(2)

MicroSD card slot

Summary of Contents for EPOCH 600

Page 1: ...DMTA 10007 01EN U8778365 Revision B June 2010 EPOCH 600 Basic Operation Manual ...

Page 2: ...us All rights reserved This document was prepared with particular attention to usage to ensure the accuracy of the information contained therein It corresponds to the version of the product manufactured prior to the date appearing on the title page There could however be some differences between the manual and the product if the product has been modified thereafter The information contained in thi...

Page 3: ...ification 6 Safety Symbols 6 Safety Signal Words 7 Notes Signal Words 8 Safety 8 Warnings 8 WEEE Directive 9 China RoHS 10 EMC Directive Compliance 10 Warranty Information 11 Technical Support 11 1 Instrument Overview 13 1 1 What s In the Box 13 1 2 EPOCH 600 Instrument Configurations 14 1 3 Connectors 15 1 4 Power Requirements 18 1 4 1 Lithium Ion Battery 18 1 4 2 AC Charger Adaptor 19 1 4 3 Alka...

Page 4: ...2 1 6 Submenus 33 2 2 Pulser and Receiver Settings 33 2 2 1 Sensitivity 33 2 2 2 Reference Gain 34 2 2 3 Pulser 34 2 2 4 Receiver 35 2 3 Gates 36 2 3 1 Quickly Adjusting Basic Gate Parameters 36 2 3 2 Gate 1 and Gate 2 36 2 3 3 Gate Setup 37 2 3 4 Alarm Indications 38 2 4 Calibration 39 2 4 1 Measurement calibration 39 2 4 2 Angle Beam Calibration 43 2 5 Data Logger 43 2 5 1 Calibration Files 44 2...

Page 5: ...ons AC alternating current AC alternative current BIP beam index point DC direct current EFUP environmental friendly usage pe riod EMC electromagnetic compatibility R receive RoHS restriction of hazardous substan ces T R transmit receive WEEE waste electrical and electronic equipment ...

Page 6: ...DMTA 10007 01EN U8778365 Rev B June 2010 vi List of Abbreviations ...

Page 7: ...ting label with safety related symbols is attached to the instrument at the location shown in the following figure The serial number label is located at the bottom of the instrument If labels are missing or illegible please contact Olympus Location of rating label see Table 1 on page 2 ...

Page 8: ...the product complies with the applicable standard and establishes a traceable link between the equipment and the manufacturer importer or their agent responsible for compliance and for placing it on the Australian market The China RoHS mark indicates the product s Environmental Friendly Usage Period EFUP The EFUP is defined as the number of years for which listed controlled substances will not lea...

Page 9: ... number in the following format yynnnnnmm where yy Production year nnnnn Unit number manufactured that month mm Production month For example the 100000504 serial number indicates that the fifth unit 00005 was produced in April 2010 Table 1 Contents of the rating and the serial number labels continued ...

Page 10: ...onnectors to avoid risks of an electric shock Up to 400 V can be present on the inner conductor The warning symbol between the Transmit Receive T R and the Receive R BNC connectors shown in the figure below indicates this electric shock risk Warning symbol BNC connector inner conductor LEMO 01 series also available ...

Page 11: ...trument for any purpose other than its intended use Instruction Manual This instruction manual contains essential information on using this Olympus product safely and effectively Before use thoroughly review this instruction manual and use the product as instructed Keep this instruction manual in a safe accessible location Instrument Compatibility Only use the EPOCH 600 instrument with the followi...

Page 12: ...t in a malfunction and or in equipment damage Repair and Modification The EPOCH 600 instrument does not contain any user serviceable parts Do not disassemble modify or attempt to repair the instrument to prevent human injury and or equipment damage Safety Symbols The following safety symbols may appear on the instrument and in the instruction manual General warning symbol This symbol is used to al...

Page 13: ...NGER signal word until the indicated conditions are fully understood and met The WARNING signal word indicates a potentially hazardous situation It calls attention to a procedure practice or the like which if not correctly performed or adhered to could result in death or serious personal injury Do not proceed beyond a WARNING signal word until the indicated conditions are fully understood and met ...

Page 14: ...he TIP signal word calls attention to a type of note that helps you apply the techniques and procedures described in the manual to your specific needs or that provides hints on how to use effectively the capabilities of the product Safety Before applying power to the EPOCH 600 verify that the correct safety precautions have been taken see the following warnings In addition note the external markin...

Page 15: ...ect the protective earth terminal of the charger adaptor to the protective conductor of the mains power cord The mains plug shall only be inserted in a socket outlet provided with a protective earth contact Never negate the protective action by using an extension cord power cable without a protective conductor grounding Whenever it is likely that the ground protection is impaired you must turn off...

Page 16: ...uency energy and if not installed and used in accordance with the instruction manual may cause harmful interference to radio communications Operation of this equipment in a residential area is likely to cause harmful interference in which case you will be required to correct the interference at your own expense ICES 003 Canada Compliance This Class A digital apparatus complies with Canadian ICES 0...

Page 17: ...ary This instruction manual attempts to teach the proper operation of your Olympus product The information contained herein is intended solely as a teaching aid and shall not be used in any particular application without independent testing and or verification by the operator or the supervisor Such independent verification of procedures becomes more important as the criticality of the application ...

Page 18: ...DMTA 10007 01EN U8778365 Rev B June 2010 12 Important Information Please Read Before Use ...

Page 19: ... s In the Box The EPOCH 600 instrument comes standard with several key accessories see Figure 1 1 on page 14 2 GB MicroSD removable memory card and adaptors P N MICROSD ADP 2GB U8779307 AC charger adaptor P N EP MCA X Varies by configuration must select power cord Power cord Alkaline battery holder P N 600 BAT AA U8780295 Instrument transport case P N 600 TC U8780294 Getting Started leaflet P N DM...

Page 20: ...page 47 1 2 EPOCH 600 Instrument Configurations The EPOCH 600 instrument is configured according to the customer s preferences in several ways Available configurations include Lock Alkaline battery holder Basic Operation Manual AC charger adaptor Power cord Getting Started leaflet Memory card and adaptors EPOCH 600 unit Transport case User s Manual on CD ROM ...

Page 21: ...o comes standard with a rechargeable lithium ion battery an adjustable pipe stand and a flexible display protector 1 3 Connectors Figure 1 2 on page 15 illustrates the connections of the EPOCH 600 with the AC charger adaptor the MicroSD card and a PCL5 USB printer Figure 1 2 The EPOCH 600 connections Use only the AC power cord supplied with the EPOCH 600 Do not use this AC power cord with other pr...

Page 22: ...ed on the top end of the EPOCH 600 see Figure 1 3 on page 16 Figure 1 3 The top end connectors The USB On The Go port and the external MicroSD memory card slot are located on the right side of the instrument hidden behind the side door see Figure 1 4 on page 17 DC power connector Transmit Receive transducer connector Receive transducer connector ...

Page 23: ...r The RS232 Alarms and the VGA Out connectors are located at the back of the instrument in the upper section see Figure 1 5 on page 17 A rubber cover protects each connector Figure 1 5 The RS232 Alarms and VGA Out connectors USB port MicroSD card slot Side door The VGA Out connector The RS232 Alarms connector ...

Page 24: ...um Ion Battery The lithium ion Li ion battery is the primary method for powering the EPOCH 600 This battery comes installed in every instrument When properly maintained and when the instrument is operated under typical inspection conditions the lithium ion battery should provide between 12 and 13 hours of continuous operation To install or replace the lithium ion battery 1 Unfold the instrument pi...

Page 25: ...y 1 4 2 AC Charger Adaptor The EPOCH 600 AC charger adaptor is provided with every instrument This charger adaptor allows you to power the EPOCH 600 with or without a battery installed as well as to charge the lithium ion rechargeable battery when installed in the instrument A power indicator on the front panel of the unit displays the current status of the AC charger adaptor To connect the AC cha...

Page 26: ...er cord with other products Figure 1 8 Connecting the charger adaptor 2 Lift the rubber seal that covers the AC adaptor connector on top of the EPOCH 600 instrument 3 Connect the DC output power cable from the AC charger adaptor to the adaptor connector see Figure 1 9 on page 21 To power outlet DC power plug EP MCA X AC power cord ...

Page 27: ... on the front panel of the EPOCH 600 as well as in the user interface see Table 2 on page 21 Table 2 AC charger adaptor power indicator status Power indicator status AC line power connected Indicator meaning Battery indicator Green Yes Internal battery fully charged Red Yes Internal battery is charging Off No AC charger adaptor not connected DC power plug DC adaptor connector rubber seal not shown...

Page 28: ...ine batteries will provide 3 hours of continuous operation To install the alkaline battery holder 1 Unfold the instrument pipe stand 2 Loosen the two thumb screws securing the battery compartment cover at the back of the instrument and then remove the battery compartment cover see Figure 1 10 on page 23 3 Remove the lithium ion battery if installed see Figure 1 10 on page 23 Green Yes AC charger a...

Page 29: ...lkaline batteries into the alkaline battery holder 5 Connect the alkaline battery holder connector into the instrument 6 Position the alkaline battery holder in the battery compartment see Figure 1 11 on page 23 Figure 1 11 The alkaline battery holder Battery Battery compartment cover Thumb screws 2 Battery holder with alkaline batteries 8 Battery holder connector ...

Page 30: ...erface displays ALK The AC charger adaptor does not recharge the batteries installed in the alkaline battery holder 1 5 Installing the MicroSD Card The 2 GB MicroSD card is included with every EPOCH 600 shipment To install the MicroSD removable memory card 1 Remove the card from its packaging 2 Loosen the two thumb screws and then open the EPOCH 600 side door see Figure 1 12 on page 24 Figure 1 12...

Page 31: ...toward the rear of the instrument 4 Carefully slide the card into the MicroSD slot until it clicks see Figure 1 12 on page 24 To remove the MicroSD card carefully push the card into the instrument and release A spring mechanism will partially eject the card and then you can grasp and remove it from the instrument ...

Page 32: ...DMTA 10007 01EN U8778365 Rev B June 2010 26 Chapter 1 ...

Page 33: ... 36 Calibration on page 39 Data Logger on page 43 2 1 User Interface The EPOCH 600 uses a blend of direct access keys and software menus to achieve full control over the instrument The direct access keypad provides instant control over functions that are commonly used during inspections The software menus provide access to the majority of instrument functions such as pulser receiver settings autom...

Page 34: ...rs functions or submenus see Figure 2 1 on page 28 Each menu or parameter can be selected for adjustment by pressing its corresponding F n or P n key on the instrument keypad see Figure 2 1 on page 28 Figure 2 1 Software main display elements There are five groups of menus on the EPOCH 600 Each menu group is identified with a number 1 5 2 5 3 5 4 5 and 5 5 To scroll through all menu groups use the...

Page 35: ... using the adjustment knob You can adjust most parameters in either coarse or fine increments To toggle between coarse and fine adjustment press the CHECK key Coarse adjustment selection is indicated by brackets around the parameter key see Figure 2 3 on page 29 Fine adjustment is selected when no brackets are displayed Figure 2 3 Coarse and fine adjustment selection NEXT GROUP key 1 5 2 5 3 5 4 5...

Page 36: ...rs in either coarse or fine increments The up and down arrows adjust in coarse increments and the left and right arrows adjust in fine increments Figure 2 4 Arrow keys on the navigation pad 2 1 4 Direct Access Keys To facilitate fast adjustment of common parameters the EPOCH 600 features a set of direct access keys see Figure 2 5 on page 31 When pressed the software interface jumps directly to the...

Page 37: ...lso offered in an international symbol version see Figure 2 6 on page 31 Figure 2 6 The direct access keys Both configurations international symbols Navigation pad configuration Adjustment knob configuration Direct access keys Direct access keys Navigation pad configuration Adjustment knob configuration Direct access keys Direct access keys ...

Page 38: ...oup using the ESCAPE key or the NEXT GROUP key Pressing the ESCAPE key from any menu group will return the user to the Basic menu which is the default menu at start up The LOCK key knob configuration only automatically locks adjustment of all parameters to prevent any unwanted parameter modifications due to an accidental movement of the knob see Figure 2 7 on page 32 Figure 2 7 Adjustment knob con...

Page 39: ...eiver Settings The EPOCH 600 allows access to most of its pulser and receiver settings through the Pulser and the Rcvr menus System sensitivity gain and reference gain are controlled exclusively using the direct access keys 2 2 1 Sensitivity The system sensitivity gain is adjusted using the dB direct access key To adjust the system sensitivity 1 Press dB 2 Adjust the value Using the navigation pad...

Page 40: ...g gain is lost 6 dB Increases the scanning gain by 6 dB 6 dB Decreases the scanning gain by 6 dB Figure 2 9 The reference and scanning gains 2 2 3 Pulser The EPOCH 600 main pulser functions are accessible by selecting the Pulser menu Each individual pulser parameter is displayed above the parameter keys and can be adjusted by pressing the corresponding P n parameter key The following pulser functi...

Page 41: ... above the parameter keys and can be adjusted by pressing the corresponding P n parameter key The following receiver parameters are available for live adjustments in the Rcvr menu Filter Receiver filter setting Rect Waveform rectification Full fullwave Half halfwave positive Half halfwave negative RF no rectification Reject Percent reject from 0 to 80 The eight filters available on the EPOCH 600 a...

Page 42: ...s pressed the box above the first menu displays the gate 1 start position see Figure 2 10 on page 36 Once selected the knob or arrows can increase or decrease this value in coarse or fine increments Figure 2 10 The Gate 1 start position adjustment Pressing the GATES key repeatedly will scroll through the start width and level setting of every active gate Pressing ESCAPE or NEXT GROUP returns the u...

Page 43: ...nu allows more advanced settings for each gate to be adjusted prior to inspection These settings are visible above the P n parameter keys The following gate settings are available in the Gate Setup menu G1 Mode Sets the measurement trigger mode of gate 1 Peak 1stPeak Edge G1 RF Sets the polarity of the gate 1 when the instrument is operating in RF rectification Dual Positive Negative G1 Amp Used o...

Page 44: ...igure 2 11 on page 38 Figure 2 11 Measurement trigger in Edge Peak and 1stPeak modes 2 3 4 Alarm Indications Whenever an alarm is triggered on either measurement gate the operator is alerted in two different ways An audible tone is emitted from the EPOCH 600 One of two alarm indicators LEDs is illuminated on the front panel of the EPOCH 600 see Figure 2 12 on page 38 Figure 2 12 Gate 1 and gate 2 ...

Page 45: ...tailed information on calibration can be found in the EPOCH 600 User s Manual P N DMTA 10006 01EN 2 4 1 Measurement calibration Calibration for accurate digital measurements is typically accomplished using two known thicknesses of a representative material In this section the terms THIN and THICK will be used to refer to either two thicknesses of a block or plate straight beam calibrations or two ...

Page 46: ...r 2 Figure 2 13 The Auto Cal menu 5 Use the Mode parameter to select the appropriate calibration mode Thickness for straight beam or Soundpath for angle beam are the most common 6 Press Cal Zero see Figure 2 14 on page 40 Figure 2 14 The Cal Zero value ...

Page 47: ...n step 9 Couple the transducer to the thick step of material 10 Position gate 1 around the resulting indication on screen 11 Bring the indication to 80 full screen height using the AUTO XX function see Figure 2 15 on page 41 12 Press ESCAPE to return to the Auto Cal menu Figure 2 15 The gate 1 start 13 Press Cal Vel 14 Use the knob or arrow keys to adjust the displayed value to the appropriate thi...

Page 48: ...apter 2 Figure 2 16 The Velocity Cal value 15 Press Done to accept the adjusted value and complete the calibration process 16 Press RANGE and then adjust the screen range to the desired setting see Figure 2 17 on page 42 Figure 2 17 The Range value ...

Page 49: ...ng on the reflector type 4 Set the sensitivity by capturing sensitivity hole or notch in gate 1 bringing the indication to 80 screen height using AUTO XX and then setting the reference gain by pressing 2ND F REF dB see Figure 2 18 on page 43 Figure 2 18 Reference gain setting 2 5 Data Logger The EPOCH 600 features an onboard data logging system that allows standard storage of inspection files Inc ...

Page 50: ...ypes see the EPOCH 600 User s Manual P N DMTA 10006 01EN 2 5 1 Calibration Files To setup and save a calibration file on the EPOCH 600 first complete all ultrasonic and software setups that will be saved within the calibration To complete all ultrasonic and software setups 1 Select the File menu 2 Press the Create key to enter the file creation screen The Create screen appears see Figure 2 19 on p...

Page 51: ...age 45 7 Insert a character by pressing INS see Figure 2 20 on page 45 Figure 2 20 The virtual keypad 8 Use the NEXT GROUP key to complete the file naming process For creation of an incremental Inc file you must first create a Start Point 9 Press the NEXT GROUP key until the Create button is highlighted 10 Press Save see Figure 2 21 on page 46 ...

Page 52: ...are described below Create Creates the file in memory but does not open this file as the active storage location Typically used when creating several files at once without saving data Open Creates the file in memory and then opens it as the active storage locations but does not save any file parameters to the file until you press 2ND F SAVE Typically used for inspection files where the file is cre...

Page 53: ...representative for further information EP MCA X See note AC charger adaptor NOTE The part number vary according to the instrument configuration You must specify the power cord type 600 BAT L U8760056 EPOCH 600 lithium ion rechargeable battery 600 TC U8780294 EPOCH 600 instrument transport case EP600 MANUAL CD U8778381 EPOCH 600 User s Manual CD Rom DMTA 10007 01EN U8778365 EPOCH 600 Basic Operatio...

Page 54: ...ta logger software option EP600 AVERAGE U8140151 EPOCH 600 waveform averaging software option GAGEVIEWPRO U8140075 GageView Pro PC interface software GAGEVIEWPRO KIT USB A AB U8140076 GageView Pro PC interface software with USB A AB cable 6 feet Table 5 EPOCH 600 optional accessories Part Number U8 Number Description EPXT EC X See note EPOCH external charger NOTE The part number vary according to ...

Page 55: ...ation cable mini AB to TYPE B CLIENT 600 C VGA 5 U8780298 5 feet EPOCH 600 VGA cable 1 5 meter EP1000 C 9OUT 6 U8779017 6 feet standard 9 pin communication cable 1 8 meter 600 C RS232 5 U8780299 5 feet EPOCH 600 RS232 cable 1 5 meter EP600 WARRANTY U8780300 EPOCH 600 extended warranty 1 additional year Table 5 EPOCH 600 optional accessories continued Part Number U8 Number Description ...

Page 56: ...DMTA 10007 01EN U8778365 Rev B June 2010 50 Appendix ...

Page 57: ...gure 2 1 Software main display elements 28 Figure 2 2 The menu groups and their level numbers 29 Figure 2 3 Coarse and fine adjustment selection 29 Figure 2 4 Arrow keys on the navigation pad 30 Figure 2 5 The direct access keys Both configurations English 31 Figure 2 6 The direct access keys Both configurations international symbols 31 Figure 2 7 Adjustment knob configuration LOCK key 32 Figure 2...

Page 58: ...DMTA 10007 01EN U8778365 Rev B June 2010 52 List of Figures Figure 2 19 The Create screen 44 Figure 2 20 The virtual keypad 45 Figure 2 21 The Save dialog box 46 ...

Page 59: ...st of Tables Table 1 Contents of the rating and the serial number labels 2 Table 2 AC charger adaptor power indicator status 21 Table 3 EPOCH 600 basic kit spares can be purchased 47 Table 4 EPOCH 600 software options 48 Table 5 EPOCH 600 optional accessories 48 ...

Page 60: ...DMTA 10007 01EN U8778365 Rev B June 2010 54 List of Tables ...

Page 61: ... battery holder alkaline 22 battery li ion charge status 21 replacement 18 BNC connector 4 C calibration 39 angle beam 43 measurement 39 calibration files 44 Canada ICES 003 compliance 10 caution note do not service instrument 6 signal word 7 use compatible equipment 6 caution notes AC power cord 15 20 CE mark 2 charger adaptor AC connection 19 China RoHS 2 10 compatibility with instrument 5 compl...

Page 62: ...bol 7 holder alkaline battery 22 I ICES 003 Canada compliance 10 important note signal word 8 indicator power 18 input output connectors 17 installing alkaline batteries 22 li ion battery 18 MicroSD card 24 instruction manual 5 instrument accessories 13 angle beam calibration 43 basic kit 47 calibration 39 compatibility 5 configurations 14 data logger 43 direct access keys 30 filters 35 gain adjus...

Page 63: ...ter adjustment 30 NEXT GROUP key 33 note signal word 8 O Olympus office address ii technical support 11 ON OFF key 18 options software 48 output connector 17 overview instrument 13 P parameter adjustment knob 29 navigation pad 30 parameter keys 28 parameters basic gate 36 instrument 28 parts list 47 power indicator 18 status 21 power key 18 power requirements instrument 18 Pulser menu 34 pulser se...

Page 64: ...k 2 direct current 2 high voltage warning note 7 international 31 RoHS 2 10 safety 6 warning note 6 WEEE 2 T T R transducer connector 16 technical support 11 tip signal word 8 trademark disclaimer ii U ultrasonic setup 44 USA FCC compliance 10 USB connector 17 24 USB On The Go port 16 user interface 27 V VGA out connector 17 W warning note electrical 9 general 8 high voltage symbol 7 signal word 7...

Reviews: