background image

39

EN

Basic operations

2

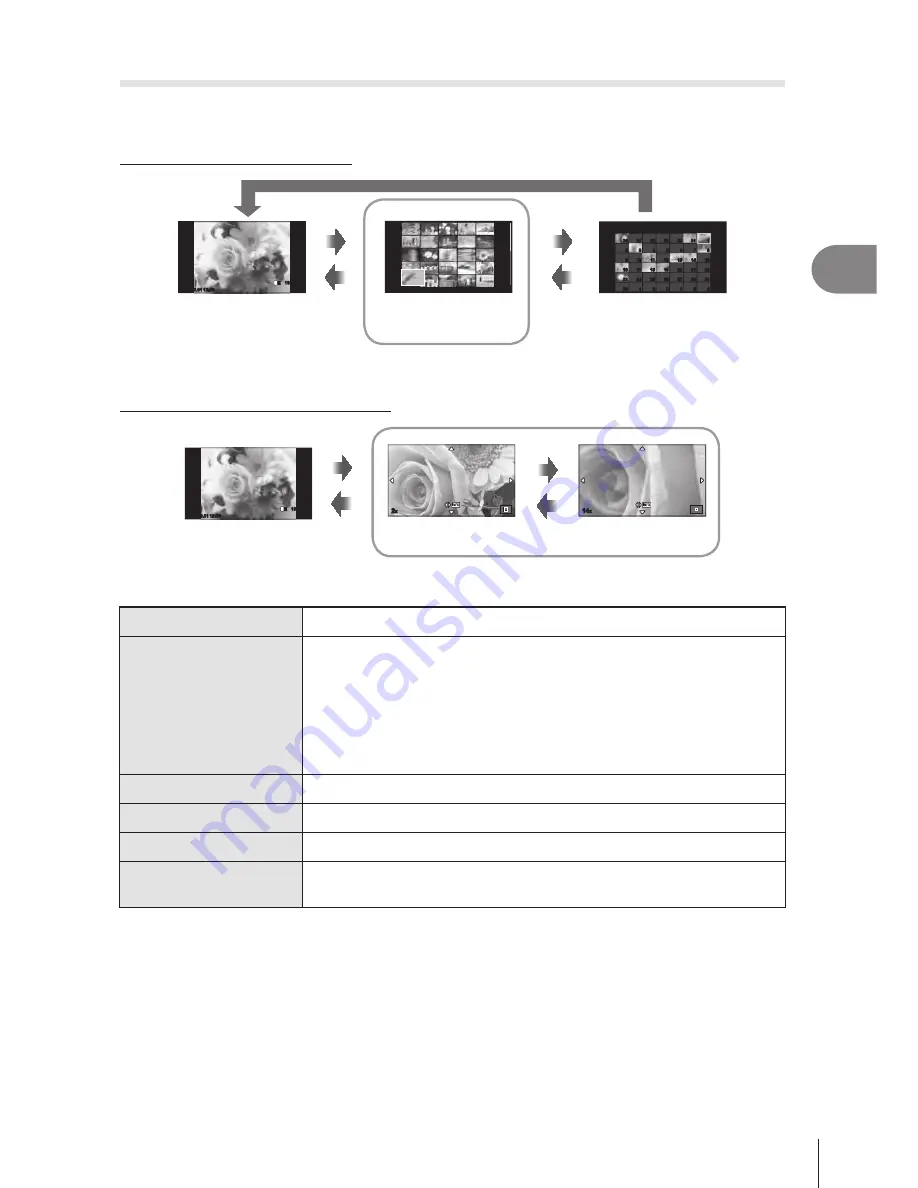
Single-frame playback

 Press the 

q

 button to view pictures full frame. Press the shutter button halfway to 

return to shooting mode.

  Index display/calendar display

25 frames

Index display

Q

G

U

G

U

Single-frame 

playback

Calendar display

2013.6

Sun

Mon

Tue

Wed

Thu

Fri

Sat

 26 27 28 29 30 31  1


2 3 4 5 6 7 8


9 10 11 12 13 14 15

16 17 18 19 20 21 22

 23 24 25 26 27 28 29

 30 1 2 3 4 5 6

 26 27 28 29


30 31


1


2 3 4 5 6 7 8


9 10 11 12 13 14 15

 16 17 18 19 20 21 22

 23 24 25 26 27 28 29

 30 

1 2 3 4 5 6

2013.06.01 12:30

21

2013.06.01 12:30

20

100-0020

L

N

 Playback zoom (close-up playback)

2× zoom

close-up playback

Single-frame 

playback

14× zoom

2

x

G

G

U

U

2013.06.01 12:30

20

100-0020

L

N

14

x

Control dial (

j

)

Previous (

l

)/Next (

m

)

Arrow pad

(

FGHI

)

Single-frame playback: Next (

I

)/previous (

H

)/playback volume 

(

FG

)

Close-up playback:  Scroll image

You can display the next frame (

I

) or the 

previous frame (

H

) during close-up playback 

by pressing the 

INFO

 button.

Index/calendar playback: Highlight image

INFO

View image info

H

Select picture (P. 21)


Delete picture (P. 21)

Q

View menus (in calendar playback, press this button to exit to 
single-frame playback)

Summary of Contents for E-PL6

Page 1: ...ons carefully to enjoy optimum performance and a longer service life Keep this manual in a safe place for future reference We recommend that you take test shots to get accustomed to your camera before taking important photographs The screen and camera illustrations shown in this manual were produced during the development stages and may differ from the actual product The contents in this manual ar...

Page 2: ...ectric shock do not immerse this ash in water or other liquids To reduce the risk of electric shock do not disassemble this ash but take it to quali ed service personnel when service or repair work is required Incorrect reassembly can cause electric shock when the ash is used subsequently The use of an accessory attachment not recommended by the manufacturer may cause a risk of re electric shock o...

Page 3: ...y 23 Focus lock 23 Using the shooting modes 24 Point and shoot photography P program mode 24 Choosing aperture A aperture priority mode 25 Choosing shutter speed S shutter priority mode 26 Choosing aperture and shutter speed M manual mode 26 Using movie mode n 27 Using art lters 28 Shooting in scene mode 29 Using shooting options 31 Using live guides 31 Controlling exposure exposure compensation 3...

Page 4: ...etting the self timer j Y 62 Varying settings over a series of photographs bracketing 62 Recording multiple exposures in a single image multiple exposure 64 Shooting automatically with a xed interval time lapse shooting 65 Wireless remote control ash photography 66 Digital Zoom Digital Tele converter 66 Playback Menu 67 Displaying images rotated R 67 Editing still images 67 Canceling all protectio...

Page 5: ... Viewer 3 98 Other 99 Shooting tips and information 99 Error codes 101 Cleaning and storing the camera 103 Cleaning the camera 103 Storage 103 Cleaning and checking the image pickup device 103 Pixel Mapping Checking the image processing functions 104 Battery and charger 105 Battery and charger 105 Using your charger abroad 105 Card basics 106 Usable cards 106 Interchangeable lenses 107 M ZUIKO DIG...

Page 6: ...mera will not focus on your subject Focusing on one area AF Area 35 Zoom frame AF zoom AF 36 Focusing on a small spot in the frame con rming focus before shooting Zoom frame AF zoom AF 36 Recomposing photographs after focusing Focus lock 23 C AF TR AF tracking 55 Turning off the beep speaker 8 Beep sound 75 Taking photos without the ash ISO DIS Mode 56 29 Reducing camera shake Image Stabilizer 47 ...

Page 7: ...ending the useful life of the battery Sleep 75 Increasing the number of pictures that can be taken Record mode 52 Playback Retouch g Viewing images on a TV Playback on TV 82 Viewing slideshows with background music Slideshow 42 Brightening shadows Shadow Adj JPEG Edit 68 Dealing with red eye Redeye Fix JPEG Edit 68 Printing made easy Direct printing 93 Commercial prints Creating a print order 92 S...

Page 8: ...rk P 13 6 Mount Remove the body cap before attaching the lens 7 Hot shoe cover 8 Stereo microphone P 57 69 9 Self timer lamp AF illuminator P 35 P 73 0 Lens release button P 13 a Lens lock pin b Tripod socket c Battery card compartment cover P 11 d Battery card compartment lock P 11 e Connector cover f Multi connector P 82 93 96 g HDMI micro connector type D P 82 Preparing the camera and ow of ope...

Page 9: ... 46 58 Control dial j P 20 Rotate to choose an option 1 Erase button P 21 2 q Playback button P 20 39 3 Accessory port P 72 89 4 Monitor P 22 38 5 Speaker 6 Hot shoe P 113 7 Fn G button P 81 P 20 39 8 U button P 20 36 39 86 9 H R Movie button P 21 P 19 21 81 0 INFO Information display button P 23 32 38 a MENU button P 58 b Arrow pad Control dial j P 20 In this manual the j icon represents operatio...

Page 10: ...S 86 FDEOH 86 9 FDEOH 0RQDXUDO 9 ODVK FDVH RPSXWHU VRIWZDUH 520 QVWUXFWLRQ PDQXDO DUUDQW FDUG DPHUD JULS 0 ODVK 0 LWKLXP LRQ EDWWHU 6 LWKLXP LRQ FKDUJHU 6 WWDFKLQJ WKH VWUDS 7KUHDG WKH VWUDS LQ WKH GLUHFWLRQ RI WKH DUURZV DVWO SXOO WKH VWUDS WLJKW PDNLQJ VXUH WKDW LW LV IDVWHQHG VHFXUHO WWDFK WKH RWKHU HQG RI WKH VWUDS WR WKH RWKHU H HOHW LQ WKH VDPH ZD WWDFKLQJ WKH JULS 8VH D FRLQ RU VLPLODU REMH...

Page 11: ...arger when charging is complete 2 Loading the battery 2 1 3 Battery card compartment lock Battery card compartment cover Direction indicating mark Removing the battery Turn off the camera before opening or closing the battery card compartment cover To remove the battery rst push the battery lock knob in the direction of the arrow and then remove Cautions Contact an authorized distributor or servic...

Page 12: ...y card compartment cover Close the cover and slide the battery card compartment lock in the direction shown by the arrow 2 1 Cautions Be sure the battery card compartment cover is closed before using the camera Removing the card Press the inserted card lightly and it will be ejected Pull out the card Cautions Do not remove the battery or card while the card write indicator P 22 is displayed FlashA...

Page 13: ...ff Do not press the lens release button Do not touch internal portions of the camera 2 Remove the lens cap 2 1 1 Using lenses with an UNLOCK switch Retractable lenses with an UNLOCK switch cannot be used while retracted Turn the zoom ring in the direction of arrow 1 to extend the lens 2 To store turn the zoom ring in the direction of arrow 4 while sliding the UNLOCK switch 3 4 1 2 3 Removing the l...

Page 14: ...ttach the ash to the camera Slide the ash unit all the way in stopping when it contacts the back of the shoe and is securely in place 2 1 UNLOCK switch 2 To use the ash raise the ash head Lower the ash head when the ash is not in use Removing the ash unit Press the UNLOCK switch while removing the ash unit 2 1 UNLOCK switch ...

Page 15: ...d on 8 green Low battery 9 blinks red Charge the battery Number of storable still pictures Available recording time Using the monitor 2 1 3 You can adjust the angle of the monitor When set to the angle to take your own picture the monitor display up down direction inverts Camera sleep operation If no operations are performed for a minute the camera enters sleep stand by mode to turn off the monito...

Page 16: ...4 3 j D 2 1 Shooting Menu 1 Card Setup Reset Myset Picture Mode Image Aspect Back Set On Digital Tele converter 2 Select X in the d setup tab Use FG on the arrow pad to select d and press I Select X and press I X j 0 k 0 W 2 1 Setup Menu English 5sec c Menu Display Firmware Rec View Back Set d tab 3 Set the date and time Use HI to select items Use FG to change the selected item Use FG to select th...

Page 17: ...You control shutter speed You can express the motion of moving subjects or freeze motion without any blur M You control aperture and shutter speed You can shoot with long exposures for reworks or other dark scenes ART Select an art lter SCN Select a scene according to the subject n Shoot movies using shutter speed and aperture effects and movie special effects Taking photographs First try taking p...

Page 18: ...speed and aperture value that have been set automatically by the camera are displayed If the AF con rmation mark blinks the subject is not in focus P 99 Pressing the shutter button halfway and all the way down The shutter button has two positions The act of lightly pressing the shutter button to the rst position and holding it there is called pressing the shutter button halfway that of pressing it...

Page 19: ...d colored fog may also appear in images recorded at high ISO sensitivity settings If the temperature rises further the camera will turn off automatically Taking photographs during movie recording Press the shutter button during movie recording to pause movie recording and take a photograph Movie recording restarts after the photograph is taken Press the R button to end recording Three les will be ...

Page 20: ...dar display To view multiple frames press G during single frame playback To start calendar playback press the G button repeatedly Press the Q button to view the currently selected picture full frame Calendar display 2013 6 Sun Mon Tue Wed Thu Fri Sat 26 27 28 29 30 31 1 2 3 4 5 6 7 8 9 10 11 12 13 14 15 16 17 18 19 20 21 22 23 24 25 26 27 28 29 30 1 2 3 4 5 6 26 27 28 29 30 31 1 2 3 4 5 6 7 8 9 10...

Page 21: ...ressing F or G during single frame and movie playback 00 00 02 00 00 14 Erasing images Display an image you want to delete and press the button Select Yes and press the Q button button Erase Yes No Back Set Selecting images Select the image You can also select multiple images for protection or deletion Press the H button to select an image a v icon will appear on the image Press the H button again...

Page 22: ...ion mark P 18 e Image stabilizer P 47 f Art lter P 28 Scene mode P 29 Picture mode P 48 g White balance P 50 h Sequential shooting self timer P 35 i Aspect ratio P 51 j Record mode still images P 52 k Record mode movies P 53 l Available recording time m Number of storable still pictures P 110 n Highlight Shadow Control P 32 o Top Flash intensity control P 53 Bottom Exposure compensation indicator ...

Page 23: ...auge display Indicate the orientation of the camera The tilt direction is indicated on the vertical bar and the horizon direction on the horizontal bar Use the indicators on the level gauge as a guide Focus lock If the camera is unable to focus on the subject with the desired composition use focus lock to focus on the subject and then recompose the photograph 1 Position the subject to be focused o...

Page 24: ...subject is too bright The metered range of the camera is exceeded A commercially available ND lter for adjusting the amount of light is required The aperture value at the moment when its indication blinks varies with the lens type and focal length of the lens When using a xed ISO setting change the setting g ISO P 56 Program shift In P and ART modes you can press the F button F and then use FG to ...

Page 25: ...ing aperture value F2I F3 5I F5 6 JF8 0 JF16 The shutter speed display will blink if the camera is unable to achieve optimal exposure Warning display example blinking Status Action 30 30 F5 6 F5 6 The subject is underexposed Decrease the aperture value 4000 4000 F5 6 F5 6 The subject is overexposed Increase the aperture value If the warning display does not disappear the metered range of the camer...

Page 26: ...peed slower 125 125 F22 F22 The subject is overexposed Set the shutter speed faster If the warning display does not disappear the metered range of the camera is exceeded A commercially available ND lter for adjusting the amount of light is required The aperture value at the moment when its indication blinks varies with the lens type and focal length of the lens When using a xed ISO setting change ...

Page 27: ...owing features are not available during long exposures Sequential shooting self timer shooting AE bracket shooting image stabilizer ash bracketing multiple exposure An option other than Off is selected for Live BULB or Live TIME Noise in images While shooting at slow shutter speeds noise may appear on screen These phenomena occur when the temperature rises in the image pickup device or image picku...

Page 28: ...the v option to choose lters Art effects Art lters can be modi ed and effects can be added Pressing I in the art lter menu displays additional options Modifying lters Option I is the original lter while options II and on add effects that modify the original lter Adding effects Soft focus pin hole frames white edges starlight lter tone The effects available vary with the selected lter Cautions If R...

Page 29: ...Photo J Macro 2 Shoot To choose a different setting press Q to display the scene menu Cautions In e Portrait mode two images are recorded an unmodi ed image and a second image to which e Portrait effects have been applied Recording may take some time n Fisheye Effect n Wide Angle and n Macro are for use with optional converter lenses Movies cannot be recorded in e Portrait Panorama or 3D Photo mod...

Page 30: ...guides overlap with the previous picture 2 250 250 F5 6 38 M ISO 200 3 Exit Exit A panorama may include up to 10 images A warning indicator g is displayed after the tenth shot 6 After taking the last shot press Q to end the series Cautions During panorama shooting the image previously taken for position alignment will not be displayed With the frames or other markers for display in the images as a...

Page 31: ...ll return to normal but the selected effect will be visible in the nal photograph 4 Shoot Press the shutter button to shoot To clear the live guide from the display press the MENU button Cautions Live guides are not available when Panorama or 3D Photo is selected in SCN mode If RAW is currently selected for image quality image quality will automatically be set to YN RAW Live guide settings are not...

Page 32: ... Negative No compensation 0 Positive Cautions Exposure compensation is not available in A M or SCN mode Changing the brightness of highlights and shadows To display the tone control dialog press the F button F and press the INFO button Use HI to choose a tone level Choose low to darken shadows or high to brighten highlights 250 250 F5 6 ISO 200 L N P 01 02 03 01 02 03 1234 1234 j HD 2 0 2 0 0 0 S ...

Page 33: ...always res SLOW Slow synchronization 1st curtain Slow shutter speeds are used to brighten dimly lit backgrounds SLOW Slow synchronization 1st curtain Red eye reduction ash Combines slow synchronization with red eye reduction SLOW2 2nd Curtain Slow synchronization 2nd curtain The ash res just before the shutter closes to create trails of light behind moving light sources FULL 1 4 etc Manual For use...

Page 34: ...urtain 2nd curtain S M Fill in ash 1st curtain Always res 60sec 1 250sec Fill in ash red eye reduction Flash off k k k 2nd C Fill in ash Slow synchronization 2nd curtain 2nd curtain Always res 60sec 1 250sec AUTO can be set in A mode 1 200 sec when using an separately sold external ash unit Minimum range The lens may cast shadows over objects close to the camera causing vignetting or be too bright...

Page 35: ...ton and use FG All Targets Single Target Standard size small size Group Target The camera automatically chooses from the full set of focus targets Select the focus target manually Set the target size to o small to further limit the focus position The camera automatically chooses from the targets in the selected group Sequential shooting using the self timer Keep the shutter button pressed all the ...

Page 36: ...O button and rotate the dial Notes To cancel the activated self timer press the jY G button In S AF and MF focus modes focus and exposure will be xed at the values for the rst frame in each sequence Cautions During sequential shooting if the battery check blinks due to low battery the camera stops shooting and starts saving the pictures you have taken on the card The camera may not save all of the...

Page 37: ...to zoom in on the zoom frame Use FGHI to position the zoom frame Rotate the control dial to choose the zoom ratio 3 Press the shutter button halfway to initiate autofocus Notes Autofocus is available and pictures can be taken both when the zoom frame is displayed and when the view through the lens is zoomed in You can also perform AF operation with the view through the lens zoomed in g LV Close Up...

Page 38: ...io P 51 68 b 3D image P 29 c Date and time P 16 d Aspect border P 51 e AF target P 35 f Shooting mode P 17 24 30 g Exposure compensation P 32 h Shutter speed P 24 26 i Aperture value P 24 26 j Focal length P 109 k Flash intensity control P 53 l White balance compensation P 50 m Color space P 78 n Picture mode P 48 o Compression rate P 52 p Pixel count P 52 q ISO sensitivity P 56 r White balance P ...

Page 39: ...9 20 21 22 23 24 25 26 27 28 29 30 1 2 3 4 5 6 2013 06 01 12 30 21 2013 06 01 12 30 20 100 0020 L N Playback zoom close up playback 2 zoom close up playback Single frame playback 14 zoom 2x G G U U 2013 06 01 12 30 20 100 0020 L N 14x Control dial j Previous l Next m Arrow pad FGHI Single frame playback Next I previous H playback volume FG Close up playback Scroll image You can display the next fr...

Page 40: ...Rotate D m Slideshow D D Erase D D Performing operations on a movie frame Movie Play Q Pause or resume playback You can perform the following operations while playback is paused HIor Control dial Previous Next Press and hold HI to continue the operation F Display the rst frame G Display the last frame H I Advance or rewind a movie F G Adjust volume Cautions We recommend using the supplied PC softw...

Page 41: ...nd press Q Audio recording is not available with protected images Audio recording is also available in the playback menu 2 Select R and press Q To exit without adding a recording select No JPEG m R Rotate JPEG Edit Back Set 3 Select R Start and press Q to begin recording To stop recording part way through press Q 4 Press Q to end recording Images with audio recordings are indicated by a H icon To ...

Page 42: ...l Select Full to include full length movie clips in the slideshow Short to include only the opening portion of each clip Movies are not displayed when an effect other than Fade is selected 3 Select Start and press Q The slideshow will start Press Q to stop the slideshow Volume Press FG during the slideshow to adjust the overall volume of the camera speaker Press HI to adjust the balance between th...

Page 43: ... A 200 Tab Shooting mode You can focus and shoot by tapping the monitor Tap to cycle through touch screen settings This function is not available when Movie Effect is On in n mode 250 250 F5 6 0 0 0 0 ISO 200 P 01 02 03 01 02 03 30 30 L N HD Touch screen operations disabled Tap a subject to focus and automatically release the shutter This function is not available in n mode Tap to display an AF ta...

Page 44: ...left to view later frames right to scroll view earlier frames Playback zoom Slide the bar up or down to zoom in or out Use your nger to scroll the display when the picture is zoomed in Tap F to display Index playback For calendar playback tap F until the calendar is displayed Index Calendar Playback Page ahead Page back Slide your nger up to view the next page down to view the previous page Use t ...

Page 45: ... Normal i WB NORM AUTO 4 3 AEL AFL 01 02 03 01 02 03 1023 1023 2 0 2 0 S IS 3 Rotate the dial to choose an option Cautions The situations in which touch screen operations are not available include the following Panorama 3D e portrait multiple exposure during bulb or time photography one touch white balance dialog when buttons or dials are in use In self timer mode the timer can be started by tappi...

Page 46: ...ct ratio P 51 Record mode P 52 Flash mode P 33 Flash intensity control P 53 Metering mode P 54 AF mode P 55 ISO sensitivity P 56 Face priority P 56 Movie sound record P 57 1 Press Q to display the live control To hide the live control press Q again 2 Use FG to select the settings use HI to change the selected setting and press Q The selected settings take effect automatically if no operations are ...

Page 47: ...uto image stabilization camera shake that occurs when shooting while walking is also reduced M IS2 Auto Image stabilization applies to camera shake in all directions Choosing a focal length Micro Four Thirds Four Thirds System lenses excluded Use focal length information to reduce camera shake when shooting with lenses that are not Micro Four Thirds or Four Thirds system lenses Select Image Stabil...

Page 48: ... 4 4 j 5 5 j j 2 Select an option with FG and press Q h i Enhance Produces more impressive looking results suited to the scene i Vivid Produces vivid colors j Natural Produces natural colors Z Muted Produces at tones a Portrait Produces beautiful skin tones Monotone Produces black and white tone Custom Select one picture mode set the parameters and register the setting j Pop Art Choose an art lter...

Page 49: ...ect appears Use FG to adjust the shutter speed Shutter speed can be set to values between 1 30s and 1 4000s M You control both aperture and shutter speed Use HI to choose the aperture FG to select the shutter speed from values between 1 30 s and 1 4000 s Sensitivity can be set manually to values between ISO 200 and 3200 auto ISO sensitivity control is not available Cautions When recording a movie ...

Page 50: ...itions Auto white balance AUTO k Used for most light conditions when there is a white portion framed on the monitor Use this mode for general use Preset white balance 5 5300K For shooting outdoors on a clear day or to capture the reds in a sunset or the colors in a reworks display N 7500K For shooting outdoors in the shadows on a clear day O 6000K For shooting outdoors on a cloudy day 1 3000K For ...

Page 51: ... The new value is stored until one touch white balance is measured again Turning the power off does not erase the data Tips If the subject is too bright or too dark or visibly tinted the message WB NG Retry will be displayed and no value will be recorded Correct the problem and repeat the process from Step 1 Setting the image aspect You can change the aspect ratio horizontal to vertical ratio when...

Page 52: ...Choose a RAW JPEG option to record both a RAW and a JPEG image with each shot JPEG modes combine image size Y X and W and compression ratio SF F N and B Image size Compression rate Application Name Pixel count SF Super Fine F Fine N Normal B Basic Y Large 4608 3456 YSF YF YN YB Select for the print size X Middle 3200 2400 XSF XF XN XB 2560 1920 1920 1440 1600 1200 W Small 1280 960 WSF WF WN WB For...

Page 53: ...to 29 minutes long 2 Files may be up to 2GB in size Adjusting ash output ash intensity control Flash output can be adjusted if you nd that your subject to appears overexposed or is underexposed even though the exposure in the rest of the frame is just right 1 Display the live control and select the Flash intensity control item using FG 2 Choose the compensation value with HI and press Q ISO AUTO I...

Page 54: ...for general use H Center weighted averaging metering This metering mode provides the average metering between the subject and the background lighting placing more weight on the subject at the center I Spot metering Choose this option to meter a small area about 2 of the frame with the camera pointed at the object you wish to meter Exposure will be adjusted according to the brightness at the metere...

Page 55: ... the subject is in focus the AF con rmation mark lights up on the monitor and the beep sounds when the focus is locked at the rst and second time Even if the subject moves or you change the composition of the picture the camera continues trying to focus Four Thirds system lenses focus using S AF MF manual focus This function allows you to manually focus on any subject Near Focus ring S AF MF simul...

Page 56: ...ion and press Q S AF S AF P i i iR iR iL iL ISO AUTO ISO ISO ISO AUTO AUTO AUTO R R S AF S AF Face Priority On J Face Priority Off Face priority off I Face Priority On Face priority on K Face Eye Priority On The autofocus system selects the pupil of the eye closest to the camera for face priority AF L Face R Eye Priority On The autofocus system selects the pupil of the eye on the right for face pr...

Page 57: ...s Notes Face priority is also available in MF Faces detected by the camera are indicated by white frames Movie sound options recording sound with movies 1 Display the live control and select the Movie R item using FG 2 Switch ON OFF using HI and press Q ON ON R R n R R OFF OFF ON ON Movie R On i i ISO AUTO ISO ISO ISO AUTO AUTO AUTO R R Cautions When recording sound in a movie the sound made by th...

Page 58: ...igital Tele converter Back Set Press Q to con rm the setting Operation guide Press the MENU button to go back one screen Tab 2 Use FG to select a tab and press Q 3 Select an item using FG and press Q to display options for the selected item Off 2 1 j Y o Shooting Menu 2 Off Image Stabilizer Bracketing Multiple Exposure Back Set Off RC Mode Time Lapse Settings Off The current setting is displayed F...

Page 59: ...ard including protected images is erased when the card is formatted When formatting a used card con rm there are no images that you still want to keep on the card g Card basics P 106 1 Select Card Setup in W Shooting Menu 1 2 Select Format All Erase Format Card Setup Back Set 3 Select Yes and press Q Formatting is performed Restoring default settings Reset Myset Camera settings can be easily resto...

Page 60: ...s that can be saved to Myset g Menu directory P 115 Using Myset Sets the camera to the settings selected for Myset 1 Select Reset Myset in W Shooting Menu 1 2 Select the desired settings Myset1 Myset4 and press Q 3 Select Set and press Q Reset Myset Reset Myset1 Myset2 Myset3 Myset4 Set Set Set Set Basic Back Set Processing options Picture Mode Make individual adjustments to contrast sharpness and...

Page 61: ...k subject Effect i Enhance Sets the extent that the effect will be applied D k k D B W Filter Monotone Creates a black and white image The lter color is brightened and the complementary color is darkened k k D D N Neutral Creates a normal black and white image Ye Yellow Reproduces clearly de ned white cloud with natural blue sky Or Orange Slightly emphasizes colors in blue skies and sunsets R Red ...

Page 62: ... YC custom and press Q 3 Use FG to select the item and press I Use FG to select the setting and press Q Frame Sets the number of frames to be shot Y Timer Sets the time after the shutter button is pressed until the picture is taken Interval Time Sets the shooting interval for the second and subsequent frames Varying settings over a series of photographs bracketing Bracketing refers to the act of v...

Page 63: ...ng Off Back Set WB BKT WB bracketing Three images with different white balances adjusted in speci ed color directions are automatically created from one shot starting with the value currently selected for white balance WB bracketing is available in P A S and M modes White balance can be varied by 2 4 or 6 steps on each of the A B Amber Blue and G M Green Magenta axes The camera brackets the value ...

Page 64: ... time ART BKT cannot be combined with WB BKT or ISO BKT ART BKT Pop Art Off Off Off Off Off Pin Hole Soft Focus Grainy Film Diorama Back Set Off Off Light Tone Pale Light Color Off On HDR BKT HDR bracketing The camera records multiple images each with a different exposure suitable for HDR imaging The images are recorded in sequential shooting mode The camera continues to take the selected number o...

Page 65: ...et to a mode other than P A S M The battery power runs out Any cable is connected to the camera You switch between the monitor and electronic view nder When a RAW image is selected using Overlay the JPEG image for the image recorded in JPEG RAW is displayed When shooting multiple exposures using bracketing priority is given to multiple exposure shooting While the overlay image is being saved brack...

Page 66: ...e on the card the time lapse movie will not be recorded Time lapse shooting will cancelled if any of the following is operated Mode dial MENU button q button lens release button or connecting the USB cable If you press the ON OFF button during the time before shooting while the monitor is on time lapse shooting will be cancelled and the camera power will turn off If there is not enough charge left...

Page 67: ...ck Menu and press Q 2 Use FG to select Sel Image and press Q 3 Use HI to select the image to be edited and press Q RAW Data Edit is displayed if the picture is a RAW image JPEG Edit if it is a JPEG image If the image was recorded in RAW JPEG format both RAW Data Edit and JPEG Edit will be displayed Select the menu for the image to be edited 4 Select RAW Data Edit or JPEG Edit and press Q RAW Data ...

Page 68: ...with an aspect ratio other than 4 3 standard are converted to the closest image le size e Portrait Makes skin look smooth and translucent You may not be able to compensate depending on the image if face detection fails 5 When the settings are complete press Q The settings will be applied to the image 6 Select Yes and press Q The edited image is stored in the card Cautions Movies and 3D photos cann...

Page 69: ...f images speci ed in Step 3 the overlay will be displayed 5 Adjust gain RAW RAW RAW RAW RAW RAW RAW Image Overlay Back Set Use HI to select an image and use FG to adjust gain Gain can be adjusted in the range 0 1 2 0 Check the results in the monitor 1 5 1 5 0 3 0 5 Image Overlay Back Set 6 Press Q A con rmation dialog will be displayed select Yes and press Q Tips To overlay 4 or more frames save t...

Page 70: ... characters long The message Initial setting completed will be displayed and the settings are complete Connecting 1 Select Connection to Smartphone in the q Playback Menu and press Q 2 Select the connection method and press Q Private Connection Connect using the same preset password each time One Time Connection Connect using a password that is valid for only one connection Set the 8 digit number ...

Page 71: ...l Press the INFO button to switch between Natural and Vivid monitor color display Rec View Choose whether pictures are displayed immediately after shooting and for how long This is useful for making a brief check of the picture you have just taken Pressing the shutter button halfway while checking the picture lets you resume shooting immediately 0 3sec 20sec Selects the number of seconds to displa...

Page 72: ... button to display the menus and display the d Setup Menu tab 2 Select c Menu Display and set c Menu Display or Menu Display to On The c Custom Menu or Accessory Port Menu tab will be displayed in the menu Custom Menu R AF MF P 73 2 1 c R S T U V W X Custom Menu Back Set AF MF Button Dial Release j Disp 8 PC Exp p ISO Custom K Color WB S Button Dial P 73 T Release j P 74 U Disp 8 PC P 74 V Exp p I...

Page 73: ...ow the lens adjusts to the focal point by selecting the rotational direction of the focus ring MF Assist Select On to automatically magnify the image for precise focus when the focus ring is rotated in manual focus mode P Set Home Choose the AF target position that will be saved as the home position p appears in the AF target selection display while you choose a home position AF Illuminat Select O...

Page 74: ...ted priority is given to the lens function operation when using a lens with an image stabilization function Release Lag Time If Short is selected the time lag between fully pressing the shutter button and the shot being taken can be shortened This will shorten the battery life Also make sure that the camera is not subject to sharp impacts while in use Such impacts may cause the monitor to stop dis...

Page 75: ...fects are not visible in the monitor while the shutter button is pressed halfway Choose for a smooth display Flicker reduction Reduce the effects of icker under some kinds of lighting including uorescent lamps When icker is not reduced by the Auto setting set to 50Hz or 60Hz in accordance with the commercial power frequency of the region where the camera is used LV Close Up Mode mode1 Pressing the...

Page 76: ... ISO High Limit Choose the upper limit for auto ISO sensitivity selection Default Choose the default value for auto ISO sensitivity selection ISO Auto Choose the shooting modes in which Auto ISO sensitivity is available P A S Auto ISO sensitivity selection is available in all modes except M ISO sensitivity is xed at ISO200 in mode M All Auto ISO sensitivity selection is available in all modes Mete...

Page 77: ...4 and use FG to change 2 Press Q 1 SF Y 2 F X 3 N W 4 SF W F D Set Pixel Count Back Set Compression rate Image size 52 Pixel Count Choose the pixel count for X and W size images 1 Select Pixel Count in the c Custom Menu tab X 2 Select Xiddle or Wmall and press I 3 Choose a pixel count and press Q Xiddle Wmall 2560 1920 1280 960 Pixel Count Back Set 52 Shading Comp Choose On to correct peripheral i...

Page 78: ...k P 21 JPEG Only the JPEG copy is erased RAW Only the RAW copy is erased RAW JPEG Both copies are erased Both the RAW and JPEG copies are deleted when selected images are deleted or when All Erase P 59 is selected 52 File Name Auto Even when a new card is inserted the le numbers are retained from the previous card File numbering continues from the last number used or from the highest number availa...

Page 79: ...el Delete Set 1 2 OLYMPUS does not accept liability for damages arising from disputes involving the use of Copyright Settings Use at your own risk Z Movie Option Description g nMode Choose a movie record mode This option can also be selected using the live control 49 Movie R Choose Off to record silent movies This option can also be selected using the live control 57 Movie Effect Choose On to enab...

Page 80: ...is prohibited remove the Eye Fi card from the camera or select Off for Eye Fi The camera does not support the endless Eye Fi mode AEL AFL MENU c R AEL AFL Autofocus and metering can be performed by pressing the button to which AEL AFL has been assigned Choose a mode for each focus mode AEL AFL Mode Shutter button function Button function Half press Full press When holding down AEL AFL Focus Exposu...

Page 81: ... cancel the lock RREC Press the button to record a movie Preview Aperture is stopped down to the selected value while the button is pressed k The camera measures white balance when the button is pressed P 51 P Choose the AF target P Home Pressing the button selects the AF target position saved with P Set Home P 73 The home AF target position is indicated by a p icon Press the button again to retur...

Page 82: ...en set to Off the aperture shutter speed exposure compensation and other items can be set directly using the dial Press and hold the button to set to On Off No function is assigned to the button Viewing camera images on TV Use the AV cable provided with the camera to playback recorded images on your TV Connect the camera to an HD TV using an HDMI cable available from third party suppliers to view ...

Page 83: ...p is used when PAL is selected for Video Out P 74 You cannot shoot pictures or movies when the HDMI cable is connected Do not connect the camera to other HDMI output devices Doing so may damage the camera HDMI output is not performed while connected via USB to a computer or printer Using the TV remote control The camera can be operated by a TV remote control when connected to a TV that supports HD...

Page 84: ... 36 36 Super Fine Off mall NORM ISO AUTO AUTO WB AUTO RAW RAW 4 3 Metering AEL AFL S IS INFO INFO INFO INFO INFO LV super control panel P 85 250 250 F5 6 P 36 36 Super Fine Off mall NORM ISO AUTO AUTO WB AUTO RAW RAW 4 3 Metering AEL AFL S IS Live control AUTO AUTO P WB Auto AUTO AUTO WB AUTO WB WB WB AUTO AUTO AUTO L F 4 3 j WB AUTO WB WB WB AUTO AUTO AUTO HD S IS S IS WB WB INFO Art lter menu Po...

Page 85: ...8 8 Sharpness N P 61 Contrast J P 61 Saturation T P 61 Gradation z P 61 B W Filter x P 61 Picture tone y P 61 9 Color space P 78 0 Button function assignment P 81 a Face priority P 56 b Metering mode P 54 c Aspect ratio P 51 d Record mode P 52 e AF mode P 55 AF target P 35 f Image stabilizer P 47 Cautions Not displayed in movie record mode 1 After displaying the LV super control panel select the d...

Page 86: ...ing playback information displays The added displays are displayed by repeatedly pressing the INFO button during playback You can also choose to not show displays that appear at the default setting Highlight Shadow display Light box display Histogram display 16 15 15 Shadow Highlight 2013 06 01 12 30 15 10 10 Light box display q Close Up Mode in the custom menu must be set to mode2 to show this di...

Page 87: ... timing synchronous Upper limit Lower limit P The slower of 1 lens focal length 2 and the X Sync settings X Sync setting Slow Limit setting A S The set shutter speed No lower limit M 1 200 seconds when using a separately sold external ash Adding effects to a movie Movie Effect You can add effects to a movie using Movie Effect Set Movie Effect to On in the menu before selecting the effects 1 Rotate...

Page 88: ...n the zoom frame to the center of the monitor 2 Press the U button again The display zooms in on the area inside the zoom frame Press the U button again to return to the original display Press Q to exit the movie tele converter mode Cautions The frame rate will drop slightly during recording The 2 effects cannot be applied simultaneously Use a memory card with an SD speed class of 6 or better Movi...

Page 89: ...es for and displays Bluetooth devices in range or in Address Book 3 Select the destination and press Q The image will be uploaded to the receiving device If prompted to provide a PIN code enter 0000 and press Q JPEG Erase Send A Picture Back Set Send Picture Sending Cancel Receiving images adding a host Connect to the transmitting device and download JPEG images 1 Select OLYMPUS PENPAL Share in Ac...

Page 90: ...s Q again and edit the current name in the rename dialog Creating albums Your favorite JPEG pictures can be resized and copied to an OLYMPUS PENPAL 1 Display the picture you wish to copy full frame and press Q 2 Select z and press Q To copy images from an OLYMPUS PENPAL to the memory card select y and press Q JPEG Erase Send A Picture Back Set Cautions The OLYMPUS PENPAL can be used only in the re...

Page 91: ...mber of additional pictures that can be stored at Size 2 Medium 90 Album Mem Setup All Erase Delete all pictures in the album Format Album Format the album 90 Picture Copy Size Choose the size at which images are copied Size 1 Large Copied images are not resized Size 2 Medium Images are copied at a size equivalent to 1920 1440 90 C Electronic View nder Option Description g EVF Adjust Adjust the br...

Page 92: ...rint reservation then press FG to set the number of prints To set print reservation for several pictures repeat this step Press Q when all the desired pictures have been selected ALL Print Order Setting Back Set All pictures Select U and press Q 3 Select the date and time format and press Q No The pictures are printed without the date and time Date The pictures are printed with the shooting date T...

Page 93: ...elect Set and press Q Direct printing PictBridge By connecting the camera to a PictBridge compatible printer with the USB cable you can print out recorded pictures directly 1 Connect the camera to the printer using the supplied USB cable and turn the camera on USB port Smaller terminal USB cable Multi connector Use a fully charged battery for printing When the camera is turned on a dialog should b...

Page 94: ... modes are as shown below Print Prints selected pictures All Print Prints all the pictures stored in the card and makes one print for each picture Multi Print Prints multiple copies of one image in separate frames on a single sheet All Index Prints an index of all the pictures stored in the card Print Order Prints according to the print reservation you made If there is no picture with print reserv...

Page 95: ...ot to print it For operation refer to Setting printing data in the next section Setting printing data Select whether to print printing data such as the date and time or le name on the picture when printing When the print mode is set to All Print and Option Set is selected the following options appears Sets the number of prints Date Prints the date and time recorded on the picture File Name Prints ...

Page 96: ... 7 from the start menu Double click the CD ROM OLYMPUS Setup icon to open the OLYMPUS Setup window and then double click LAUNCHER EXE If a User Account Control dialog is displayed click Yes or Continue 2 Follow the on screen instructions on your computer Cautions If nothing is displayed on the camera screen even after connecting the camera to the computer the battery may be exhausted Use a full ch...

Page 97: ...line help for information on using the software Macintosh 1 Insert the supplied CD in a CD ROM drive The disk contents should automatically be displayed in the Finder If they are not double click the CD icon on the desktop Double click the Setup icon to display the Setup dialog 2 Install OLYMPUS Viewer 3 Check the system requirements before beginning installation Click the OLYMPUS Viewer 3 button ...

Page 98: ...omputer s manual 2 Turn on the camera The selection screen for the USB connection is displayed 3 Press FG to select Storage Press Q USB MTP Storage Print Exit Set 4 The computer recognizes the camera as a new device Cautions If you are using Windows Photo Gallery for Windows Vista Windows 7 or Windows 8 choose MTP in Step 3 Data transfer is not guaranteed in the following environments even if your...

Page 99: ...ill turn off automatically The ash is charging On the monitor the mark blinks when charging is in progress Wait for the blinking to stop then press the shutter button Unable to focus The camera cannot focus on subjects that are too close to the camera or that are not suited to autofocus the AF con rmation mark will blink in the monitor Increase the distance to the subject or focus on a high contra...

Page 100: ...orrect Set functions are restored to their factory default settings When you rotate the mode dial or turn off the power in a shooting mode other than P A S or M functions with changes made to their settings are restored to the factory default settings Image taken appears whitish This may occur when the picture is taken in backlight or semi backlight conditions This is due to a phenomenon called ar...

Page 101: ...Card cannot be read Card may not have been formatted Select Clean Card press Q and turn off the camera Remove the card and wipe dry the metallic surface with a soft dry cloth Select Format Yes and then press Q to format the card Formatting the card erases all data on the card No Picture There are no pictures on the card The card contains no pictures Record pictures and play back Picture Error The ...

Page 102: ...e printer has run out of ink Replace the ink cartridge in the printer Jammed The paper is jammed Remove the jammed paper Settings Changed The printer s paper cassette has been removed or the printer has been manipulated while making settings on the camera Do not manipulate the printer while making settings on the camera Print Error There is a problem with the printer and or camera Turn off camera ...

Page 103: ...o lens is attached Be sure to replace the front and rear lens caps before putting the lens away Clean the camera after use Do not store with insect repellent Cleaning and checking the image pickup device This camera incorporates a dust reduction function to keep dust from getting on the image pickup device and to remove any dust or dirt from the image pickup device surface with ultrasonic vibratio...

Page 104: ...r or taking continuous shots wait for at least one minute before using the pixel mapping function to ensure that it operates correctly 1 Select Pixel Mapping in c Custom Menu P 79 tab b 2 Press I then press Q The Busy bar is displayed when pixel mapping is in progress When pixel mapping is nished the menu is restored Cautions If you accidentally turn the camera off during pixel mapping start again...

Page 105: ...e normal charging time using the provided charger is approximately 3 hours 30 minutes estimated Do not attempt to use chargers not speci cally designated for use with the supplied battery or to use batteries not speci cally designated for use with the supplied charger Cautions There is a risk of explosion if the battery is replaced with the incorrect battery type Dispose of the used battery follow...

Page 106: ...eleting the data When discarding destroy the card to prevent leakage of personal information FlashAir cards cannot be formatted Use the software supplied with the FlashAir card to format the card Use the FlashAir or Eye Fi card in compliance with the laws and regulations of the country where the camera is used Remove the FlashAir or Eye Fi card from the camera or disable the card functions in airp...

Page 107: ...lens attached to the camera toward the sun This may cause the camera to malfunction or even ignite due to the magnifying effect of sunlight focusing through the lens Be careful not to lose the body cap and rear cap Attach the body cap to the camera to prevent dust from getting inside when no lens is attached M ZUIKO DIGITAL lens speci cations Names of parts 1 Front cap 2 Filter mount thread 3 Focu...

Page 108: ...ing to the set aperture value We recommend setting the aperture to at least F5 6 You can shoot at the selected distance irrespective of the AF mode on the camera Cap lens control BCL 1580 Use the MF lever to open and close the lens barrier and adjust the focus between in nity and close up There is no data communication between camera and lens Some functions of the camera cannot be used Set the foc...

Page 109: ... 83mm l63 5 83mm Filter mount thread diameter 37mm 58mm 58mm Lens hood LH 40 LH 61D LH 61C Items ED12 50mm f3 5 6 3EZ 17mm f1 8 BCL 1580 15mm f8 Mount Micro Four Thirds mount Focal length 12 50mm 17 mm 15 mm Max aperture f 3 5 6 3 f 1 8 f 8 Image angle 84 24 64 72 Lens con guration 9 groups 10 lenses 6 groups 9 lenses 3 groups 3 lenses Iris control f 3 5 22 f 1 8 22 Fixed to f 8 Shooting range Foc...

Page 110: ...56 XB 1 12 Approx 0 5 1968 XSF 1600 1200 1 2 7 Approx 1 3 678 XF 1 4 Approx 0 9 984 XN 1 8 Approx 0 5 1906 XB 1 12 Approx 0 4 2653 WSF 1280 960 1 2 7 Approx 0 9 1034 WF 1 4 Approx 0 6 1488 WN 1 8 Approx 0 4 2773 WB 1 12 Approx 0 3 3813 WSF 1024 768 1 2 7 Approx 0 6 1564 WF 1 4 Approx 0 4 2260 WN 1 8 Approx 0 3 4068 WB 1 12 Approx 0 2 5547 WSF 640 480 1 2 7 Approx 0 3 3589 WF 1 4 Approx 0 2 5085 WN...

Page 111: ...ns the view nder may not switch off automatically When in sleep mode when shooting using movie 3D multiple exposure live bulb live time etc when the shutter button is pressed halfway when the monitor is pulled out The view nder may also fail to turn on automatically when viewed in certain situations such as when wearing glasses or under strong sunlight Change to manual settings Attaching and remov...

Page 112: ...ch and press the Q button The same menu can also be displayed by pressing and holding the u button on the VF 4 3 Select Off and press the Q button Press the u button on the external view nder to switch between the display between the view nder and monitor Main Speci cations VF 4 Display pixels Approx 2 360 000 dots Field of view 100 View nder magni cation Approx 1 48 1 m 1 50 mm lens in nity Eye p...

Page 113: ...600R TTL AUTO AUTO MANUAL FP TTL AUTO FP MANUAL GN36 85mm GN20 24mm D FL 300R TTL AUTO MANUAL GN20 28mm D FL 14 TTL AUTO AUTO MANUAL GN14 28mm RF 11 TTL AUTO MANUAL GN11 TF 22 GN22 The focal length of the lens that can be used Calculated based on 35 mm lm camera Wireless remote control ash photography External ash units that are designated for use with this camera and have a remote control mode ca...

Page 114: ...a single group of up to three remote ash units Remote ash units cannot be used for second curtain slow synchronization or anti shock exposures longer than 4 seconds If the subject is too close to the camera the control ashes emitted by the supplied ash may affect exposure this effect can be reduced by reducing the output of the supplied ash by for example using a diffuser The upper limit of ash sy...

Page 115: ...ode jNatural D D D 48 K Still Picture YN D D D 52 Movie X Image Aspect 4 3 D D D 51 Digital Tele converter Off D D D 66 X j Y o D D D 35 Image Stabilizer S IS1 D D D 47 M IS2 D D D Bracketing AE BKT Off D D D 63 WB BKT A B Off 63 G M FL BKT Off 63 ISO BKT Off 64 ART BKT Off 64 HDR BKT Off 64 Multiple Exposure Frame Off D D 64 Auto Gain Off Overlay Off Time Lapse Settings Off 65 Frame 99 D D 65 Sta...

Page 116: ...tup Menu Tab Function Default 1 2 3 g d X ʊ 16 W ʊ 71 i j 0 k 0 Vivid D D 71 Rec View 0 5sec D D D 71 c Menu Display c Menu Display Off D 71 Menu Display Off Firmware ʊ 71 Settings differ depending on the region where the camera is purchased c Custom Menu Tab Function Default 1 2 3 g c R AF MF AF Mode Still Picture S AF D D D 73 Movie C AF Full time AF Off D D D AEL AFL S AF mode1 D D D C AF mode2...

Page 117: ...IS Off On D Lens I S Priority Off D D D Release Lag Time Normal D U Disp 8 PC HDMI HDMI Out 1080i D 74 HDMI Control Off D Video Out ʊ KControl Settings iAUTO Live Guide D P A S M Live Control D ART Art Menu D SCN Scene Menu D G Info Settings q Info Image Only Overall D D D 75 LV Info Image Only u D D G Settings O Calendar D D Displayed Grid Off D D Picture Mode Settings On D D Histogram Settings H...

Page 118: ...X Sync 1 250 D D D 77 Slow Limit 1 60 D D D w F Off D D D X K Color WB K Set D D D 77 Pixel Count Xiddle 2560 1920 D D D Wmall 1280 960 Shading Comp Off D D D WB Auto A 0 G 0 D D D All All Set D D 78 All Reset D W Keep Warm Color On D D D WB WB Auto D D D Color Space sRGB D D D Y Record Erase Quick Erase Off D D D 78 RAW JPEG Erase RAW JPEG D D D File Name Reset D Edit Filename Off D Priority Set ...

Page 119: ...Eye Fi On D Accessory Port Menu Tab Function Default 1 2 3 g A OLYMPUS PENPAL Share Please Wait 89 90 Address Book Address List 90 Search Timer 30sec D New Pairing My OLYMPUS PENPAL 91 Picture Send Size Size 1 Small D B OLYMPUS PENPAL Album Copy All 91 Reset Protect Album Mem Usage Album Mem Setup Picture Copy Size Size 2 Medium D C Electronic View nder EVF Adjust j 0 k 0 D D 91 EVF Auto Switch On...

Page 120: ...xposure control Metering system TTL metering system imager metering Digital ESP metering Center weighted averaging metering Spot metering Metered range EV 0 20 Digital ESP metering Center weighted averaging metering Spot metering Shooting modes A iAUTO P Program AE Program shift can be performed A Aperture priority AE S Shutter priority AE M Manual ART Art lter SCN Scene n Movie ISO sensitivity LO...

Page 121: ...LFHQVLQJ 0 ODVK XLGH QXPEHU 62 P 62 P LULQJ DQJOH RYHUV WKH SLFWXUH DQJOH RI D PP OHQV HTXLYDOHQW WR PP LQ PP IRUPDW LPHQVLRQV SSUR PP î PP î PP î î HLJKW SSUR J E LWKLXP LRQ EDWWHU 02 12 6 3URGXFW W SH 5HFKDUJHDEOH LWKLXP LRQ EDWWHU 1RPLQDO YROWDJH 9 1RPLQDO FDSDFLW P K 1R RI FKDUJH DQG GLVFKDUJH WLPHV SSUR WLPHV YDULHV ZLWK XVDJH FRQGLWLRQV PELHQW WHPSHUDWXUH FKDUJLQJ LPHQVLRQV SSUR PP î PP î PP...

Page 122: ...O PSXV 2IILFLDO HE 6LWH 9LHZILQGHU DPHUD ULS 0 0 0 35 3RZHU 6XSSO 6 L LRQ DWWHU 6RIWZDUH 2 0386 9LHZHU LJLWDO 3KRWR 0DQDJLQJ 6RIWZDUH 9 2SWLFDO 9LHZ LQGHU 9 OHFWURQLF 9LHZ LQGHU 5HPRWH 2SHUDWLRQ 50 8 5HPRWH DEOH FFHVVRU SRUW GHYLFHV 0 0 52 50 7 2 0386 3 13 33 RPPXQLFDWLRQ 8QLW 6 6 6 H L ODVK LU 0HPRU DUG 6 0 0LFURSKRQH 6HW 8QGHUZDWHU 6 VWHP RQQHFWLRQ DEOH 8QGHUZDWHU FDVH 86 DEOH 9 DEOH 0 DEOH DVH ...

Page 123: ... M ZUIKO DIGITAL 75 300mm f4 8 6 7 II Flash STF 22 Twin Flash Set FC 1 Macro Flash Controller FL 600R Electronic Flash FL 14 Electronic Flash FL 300R Electronic Flash Converter Lens 2 FCON P01 Fisheye WCON P01 Wide MCON P01 Macro MMF 2 MMF 3 1 Four Thirds Adapter Commercially available products 3 The OLYMPUS PENPAL can be used only in the region in which it was purchased Depending on the areas the...

Page 124: ...k and easy sh eye or macro photography See the OLYMPUS website for information on the lenses that can be used Use the appropriate lens attachment for SCN mode f w or m Macro arm light MAL 1 Use to illuminate subjects for macro photography even at ranges at which vignetting would occur with the ash Microphone set SEMA 1 The microphone can be placed at a distance from the camera to avoid recording a...

Page 125: ...ver use any type of liquid or aerosol cleaner or any type of organic solvent to clean this product Attachments For your safety and to avoid damaging the product use only accessories recommended by Olympus Water and Moisture For precautions on products with weatherproof designs read the weatherproo ng sections Location To avoid damage to the product mount the product securely on a stable tripod sta...

Page 126: ...te batteries Take precautions when carrying or storing batteries to prevent them from coming into contact with any metal objects such as jewelry pins fasteners etc Never store batteries where they will be exposed to direct sunlight or subjected to high temperatures in a hot vehicle near a heat source etc To prevent causing battery leaks or damaging their terminals carefully follow all instructions...

Page 127: ...t the camera Do not leave the camera pointed directly at the sun This may cause lens or shutter curtain damage color failure ghosting on the image pickup device or may possibly cause res Do not touch electric contacts on cameras and interchangeable lenses Remember to attach the body cap when removing the lens Before storing the camera for a long period remove the battery Select a cool dry location...

Page 128: ...t to the use of the information contained in these written materials or software or for damages resulting from the use of the information contained therein Olympus reserves the right to alter the features and contents of this publication or software without obligation or advance notice FCC Notice Radio and Television Interference Changes or modi cations not expressly approved by the manufacturer m...

Page 129: ...H FXVWRPHU LV OLDEOH DQG VKDOO SD IRU VKLSPHQW RI WKH 3URGXFWV WR WKH GHVLJQDWHG 2O PSXV 5HSDLU 6HUYLFH HQWHU 2O PSXV VKDOO QRW EH REOLJDWHG WR SHUIRUP SUHYHQWLYH PDLQWHQDQFH LQVWDOODWLRQ GHLQVWDOODWLRQ RU PDLQWHQDQFH 2O PSXV UHVHUYHV WKH ULJKW WR L XVH UHFRQGLWLRQHG UHIXUELVKHG DQG RU VHUYLFHDEOH XVHG SDUWV WKDW PHHW 2O PSXV V TXDOLW DVVXUDQFH VWDQGDUGV IRU ZDUUDQW RU DQ RWKHU UHSDLUV DQG LL PDNH...

Page 130: ...6 25 6 28 5 2 7 3266 7 2 68 327 17 266 25 0 5HSUHVHQWDWLRQV DQG ZDUUDQWLHV PDGH E DQ SHUVRQ LQFOXGLQJ EXW QRW OLPLWHG WR GHDOHUV UHSUHVHQWDWLYHV VDOHVSHUVRQV RU DJHQWV RI 2O PSXV ZKLFK DUH LQFRQVLVWHQW RU LQ FRQÀLFW ZLWK RU LQ DGGLWLRQ WR WKH WHUPV RI WKLV OLPLWHG ZDUUDQW VKDOO QRW EH ELQGLQJ XSRQ 2O PSXV XQOHVV UHGXFHG WR ZULWLQJ DQG DSSURYHG E DQ H SUHVVO DXWKRUL HG RI FHU RI 2O PSXV 7KLV OLPLWH...

Page 131: ...LQ LUHFWLYH QQH LQGLFDWHV VHSDUDWH FROOHFWLRQ RI ZDVWH EDWWHULHV LQ WKH 8 FRXQWULHV 3OHDVH GR QRW WKURZ WKH EDWWHULHV LQWR WKH GRPHVWLF UHIXVH 3OHDVH XVH WKH UHWXUQ DQG FROOHFWLRQ V VWHPV DYDLODEOH LQ RXU FRXQWU IRU WKH GLVSRVDO RI WKH ZDVWH EDWWHULHV 3URYLVLRQV RI ZDUUDQW Q WKH XQOLNHO HYHQW WKDW RXU SURGXFW SURYHV WR EH GHIHFWLYH DOWKRXJK LW KDV EHHQ XVHG SURSHUO LQ DFFRUGDQFH ZLWK WKH ZULWWHQ Q...

Page 132: ...I GDWD LV H FOXGHG RPSHOOLQJ UHJXODWLRQV E ODZ UHPDLQ XQDIIHFWHG E WKLV RU FXVWRPHUV LQ 7KDLODQG 7KLV WHOHFRPPXQLFDWLRQ HTXLSPHQW FRQIRUPV WR 17 WHFKQLFDO UHTXLUHPHQW RU FXVWRPHUV LQ 0H LFR 7KH RSHUDWLRQ RI WKLV HTXLSPHQW LV VXEMHFW WR WKH IROORZLQJ WZR FRQGLWLRQV LW LV SRVVLEOH WKDW WKLV HTXLSPHQW RU GHYLFH PD QRW FDXVH KDUPIXO LQWHUIHUHQFH DQG WKLV HTXLSPHQW RU GHYLFH PXVW DFFHSW DQ LQWHUIHUHQFH...

Page 133: ...t 77 8 Beep sound 75 R Audio recording 41 i Monitor brightness adjustment 71 m Slideshow 42 A A Aperture priority mode 25 Address Book 90 AEL AFL 73 80 AEL Metering 76 AF Illuminat 73 AF Mode 55 73 Album Mem Usage 91 All 78 Anti Shock z 76 ART Art lter mode 28 Art Fade 88 Art LV Mode 75 Aspect 51 B Backlit LCD 75 Bracketing 62 BULB 27 BULB TIME Focusing 73 BULB TIME Timer 76 Button Function 73 C C...

Page 134: ...ing 26 Metering 54 MF 81 MF Assist 73 Mode Dial Function 74 Mode Guide 75 Movie R 57 79 Movie Play 40 Movie Tele converter 88 MTP 98 Multi Echo 88 Multiple Exposure a 64 My OLYMPUS PENPAL 91 N Noise Filter 76 Noise Reduct 76 O OLYMPUS PENPAL Album 91 OLYMPUS PENPAL Share 89 90 One Shot Echo 88 P P Program shooting 24 Picture Copy Size 91 Picture Mode 48 60 Picture Mode Settings 75 Pixel Count 77 P...

Page 135: ...135 EN S S Shutter priority shooting 26 Shading Comp 77 Sleep 75 Storage 98 T Time Lapse Settings 65 Touch Screen Settings 80 U USB Mode 75 V Video Out 74 W WB 50 77 ...

Page 136: ...US MALAYSIA Sdn Bhd 10 8 Menara 1 MK Kompleks 1 Mont Kiara No 1 Jalan Kiara Mont Kiara 50480 Kuala Lumpur Malaysia Tel 603 6411 OOOO Fax 603 6411 0003 E mail service oml olympus ap com BRANCHES PENANG OFFICE Suite 3A 6 Levei3A Wisma Great Eastern No 25 Lebuh Light 10200 Penang Tel 604 262 2832 Fax 604 262 5832 http www olympus com my ...

Page 137: ...ch Republic Denmark Finland France Germany Luxemburg Netherlands Norway Poland Portugal Russia Spain Sweden Switzerland United Kingdom Please note some mobile phone services I provider do not permit access or request an additional prefix to 800 numbers For all not listed European Countries and in case that you can t get connected to the above mentioned number please make use ofthe following CHARGE...

Page 138: ... ces instructions L appareil photo que vous avez achete est livre avec le manuel d instructions sur CD ROM Pour des informations detaillees sur toutes les caracteristiques et les conditions d obtention de Ia garantie reportez vous au CD ROM Adobe Reader est requis pour afficher le manuel d instructions i Manual basico 62 Le agradecemos que haya adquirido una camara digital Olympus Lea atentamente ...

Page 139: ...ouching hot parts Do not operate if the flash has been dropped or damaged until it has been examined by qualified service personnel Let flash cool completely before putting away To reduce the risk of electric shock do not immerse this flash in water or other liquids To reduce the risk of electric shock do not disassemble this flash but take it to qualified service personnel when service or repair ...

Page 140: ... micro connector type D P 82 Stereo microphone P 57 69 Self timer lamp AF illuminator P 35 P 73 Indications used in this manual The following symbols are used throughout this manual Important information on factors which may lead to a malfunction or operational problems Also warns of operations that should be absolutely avoided Points to note when using the camera Useful information and hints that...

Page 141: ...oting Self timer button P 35 CD 1i Erase button P 21 button P 20 36 39 86 E Playback button P 20 39 D Movie button P 21 P 19 21 81 Accessory port P 72 89 INFO Information display button Monitor P 22 38 P 23 32 38 Speaker Hot shoe P 113 j Fn button P 81 P 20 39 MENU button P 58 Arrow pad Control dial 0 P 20 In this manual the 0 icon represents operations performed using the control dial ...

Page 142: ...y cap Camera grip MCG 4 Attaching the strap Strap Flash FL LM1 1 Thread the strap in the direction of 2 the arrows USB cable CB USB6 Lithium ion battery BLS 50 AV cable Monaural CB AVC3 Lithium ion charger BCS 5 Lastly pull the strap tight making sure that it is fastened securely Attach the other end of the strap to the other eyelet in the same way Attaching the grip Use a coin or similar object t...

Page 143: ...urn off the camera before opening or closing the battery card compartment cover To remove the battery first push the battery lock knob in the direction of the arrow and then remove Cautions AC wall outlet r ll t Battery card compartment cover Battery card compartment lock Contact an authorized distributor or service center if you are unable to remove the battery Do not use force Notes It is recomm...

Page 144: ... FlashAir and Eye Fi Cards FiashAir cards cannot be formatted Use the software supplied with the FlashAir card to format the card Use the FlashAir or Eye Fi card in compliance with the laws and regulations of the country where the camera is used Remove the FlashAir or Eye Fi card from the camera or disable the card functions in airplanes and other locations where use is prohibited Using the Smartp...

Page 145: ...button Do not touch internal portions of the camera 2 Remove the lens cap Using lenses with an UNLOCK switch Retractable lenses with an UNLOCK switch cannot be used while retracted Turn the zoom ring in the direction of arrow G to extend the lens To store turn the zoom ring in the direction of arrow while sliding the UNLOCK switch Removing the lens from the camera While pressing the lens release b...

Page 146: ...ash unit all the way in stopping when it contacts the back of the shoe and is securely in place UNLOCK switch 2 To use the flash raise the flash head Lower the flash head when the flash is not in use Removing the flash unit Press the UNLOCK switch while removing the flash unit UNLOCK switch EN 9 ...

Page 147: ...1J blinks red Charge the battery Available recording time Number of storable still pictures You can adjust the angle of When set to the angle to take your the monitor own picture the monitor display up down direction inverts Camera sleep operation If no operations are performed for a minute the camera enters sleep stand by mode to turn off the monitor and to cancel all actions The camera activates...

Page 148: ...menus Press the MENU button to display the menus MENU button 2 Select in the t setup tab Use V on the arrow pad to select t and press t Select e and press t 3 Set the date and time Use lt to select items Use V to change the selected item Use V to select the date format 4 Save settings and exit t Shooting Menu 1 Card Setup Y MD TlmA l The time is displayed using a 24 hour clock Press to set the cam...

Page 149: ...en or soften background details s You control shutter speed You can express the motion of moving subjects or freeze motion without any blur M You control aperture and shutter speed You can shoot with long exposures for fireworks or other dark scenes ART Select an art filter SCN Select a scene according to the subject 9 Shoot movies using shutter speed and aperture effects and movie special effects...

Page 150: ...camera are displayed If the in focus indicator blinks the subject is not in focus P 99 Pressing the shutter button halfway and all the way down The shutter button has two positions The act of lightly pressing the shutter button to the first position and holding it there is called pressing the shutter button halfway that of pressing it all the way down to the second position pressing the shutter bu...

Page 151: ... in images recorded at high ISO sensitivity settings If the temperature rises further the camera will turn off automatically Taking photographs during movie recording Press the shutter button during movie recording to pause movie recording and take a photograph Movie recording restarts after the photograph is taken Press the button to end recording Three files will be recorded to the memory card t...

Page 152: ...next frame lode display Calendar di a p l aY Still image Movie To view multiple frames press during single frame playback To start calendar playback press the button repeatedly Press the button to view the currently selected picture full frame Index display il i ewiog atiU ri m agea Close up playback In single frame playback press to zoom in up to 14x press to return to single frame playback Calen...

Page 153: ...r V during single frame and movie playback Erasl ng images Display an image you want to delete and press the 1ii button Select Yes and press the button D button Selecting images Select the image You can also select multiple images for protection or deletion Press the Dbutton to select an image a icon will appear on the image Press the D button again to cancel the selection Press to display the del...

Page 154: ...51 Record mode still images P 52 Record mode movies P 53 Available recording time Number of storable still pictures P 11 0 Highlight Shadow Controi P 32 Top Flash intensity control P 53 Bottom Exposure compensation indicator P 32 Exposure compensation value P 32 Aperture value P 24 26 Shutter speed P 24 26 Histogram P 23 AE Lock P 73 81 Shooting mode P 17 24 30 Myset P 59 Shooting using touch scre...

Page 155: ...d on the vertical bar and the horizon direction on the horizontal bar Use the indicators on the level gauge as a guide Focus lock If the camera is unable to focus on the subject with the desired composition use focus lock to focus on the subject and then recompose the photograph 1 Position the subject to be focused on in the center of the monitor and press the shutter button halfway Make sure that...

Page 156: ...t setting press to display the art filter menu bggting lD i oe ano de y i 1 Rotate the mode dial to SCN 2 A menu of scene menu will be displayed Select a scene using 1 V Press or press the shutter button halfway to select the highlighted item and exit the scene menu Types of scene modes Portrait Nature Macro e Portrait rm Candle ii1 Landscape Sunset iii Landscape Portrait Em Documents Sport Panora...

Page 157: ...ffect will be visible in the final photograph 4 Shoot Press the shutter button to shoot To clear the live guide from the display press the MENU button f Cautions Live guides are not available when Panorama or 30 Photo is selected in SCN mode If RAW is currently selected for image quality image quality will automatically be set to IIN RAW Live guide settings are not applied to the RAW copy Pictures...

Page 158: ...nS and M modes the flash always fires Slow shutter speeds are used to brighten dimly lit backgrounds Combines slow synchronization with red eye reduction The flash fires just before the shutter closes to create trails of light behind moving light sources For users who prefer manual operation If you press the INFO button you can use the dial to adjust the flash level 4 Press the shutter button all ...

Page 159: ...3 Image selected P 21 White balance compensation P 50 j File number P 78 Color space P 78 Frame number Picture mode P 48 Storage device P 106 Compression rate P 52 Record mode P 52 Pixel count P 52 Aspect ratio P 51 68 ISO sensitivity P 56 3D image P 29 White balance P 50 Date and time P 16 Metering mode P 54 Aspect border P 51 AF target P 35 Histogram P 23 Switching th e info lnatlon d i p lay Yo...

Page 160: ...b o ot i n g im ode You can focus and shoot by tapping the monitor Tap j lijj to cycle through touch screen settings This function is not available when Movie Effect is On in fi9 mode Touch screen operations disabled Tap a subject to focus and automatically release the shutter This function is not available in 9 mode Tap to display an AF target and focus on the subject in the selected area You can...

Page 161: ... to view later frames right to scroll view earlier frames Playback zoom Slide the bar up or down to zoom in or out Use your finger to scroll the display when the picture is zoomed in Tap I to display Index playback For calendar playback tap until the calendar is displayed Index Calendar Playback Page ahead Page back Slide your finger up to view the next page down to view the previous page Use ig o...

Page 162: ... situations in which touch screen operations are not available include the following Panorama 30 e portrait multiple exposure during bulb or time photography one touch white balance dialog when buttons or dials are in use In self timer mode the timer can be started by tapping the display Tap again to stop the timer Do not touch the display with your fingernails or other sharp objects Gloves or mon...

Page 163: ...live control To hide the live control press again 2 Use V to select the settings use l to change the selected setting and press The selected settings take effect automatically if no operations are performed for about 8 seconds Cautions Functions Settings Record mode P 52 Flash mode P 33 Flash intensity controi P 53 Metering mode P 54 AF mode P 55 ISO sensitivity P 56 Face priority P 56 Movie sound...

Page 164: ... Tab Picture Mode Operation guide iia m m 4 3 On Press the MENU button to go back one screen Press to confirm the setting 2 Use V to select a tab and press 3 Select an item using V and press to display options for the selected item The current setting is displayed I Function _l l 7r n f na_M_en_u_ 2 n 1 EJ Multiple Exposure Off s Time Lapse Settings Off RC Mode Off arackating Multiple Exposure IE ...

Page 165: ...HOCK DO NOT OPEN CAUTION TO REDUCE THE RISK OF ELECTRICAL SHOCK DO NOT REMOVE COVER OR BACK NO USER SERVICEABLE PARTS INSIDE REFER SERVICING TO QUALIFIED OLYMPUS SERVICE PERSONNEL it DANGER An exclamation mark enclosed in a triangle alerts you to important operating and maintenance instructions in the documentation provided with the product If the product is used without observing the information ...

Page 166: ...d by the moving parts of the camera Do not look at the sun or strong lights with the camera Do not use or store the camera in dusty or humid places Do not cover the flash with a hand while firing LtCAUTION Stop using the camera immediately if you notice any unusual odors noise or smoke around it Never remove the batteries with bare hands which may cause a fire or burn your hands Never hold or oper...

Page 167: ... the camera before storing the camera for a long period This camera uses a lithium ion battery specified by Olympus Do not use any other type of battery There is a risk of explosion if the battery is replaced with the incorrect battery type Dispose of the used battery following the instructions When the camera will not be used for an extended period store it in a cool place Please recycle batterie...

Page 168: ...l Limited Slideshow transition technology supplied by HI Corporation All other company and product names are registered trademarks and or trademarks of their respective owners Micro Four Thirds and the Micro Four Thirds logo are trademarks or registered trademarks of OLYMPUS IMAGING Corporation in Japan the United States the countries of the European Union and other countries PENPAL is used in ref...

Page 169: ... support Phone customer support Tel 1 800 260 1625 Toll free Our phone customer support is available from 9 am to 9 pm Monday to Friday ET E mail distec olympus com To find the nearest Service Centers please visit http olympusamerica com repair U S A I CANADA Tel 1 800 260 1625 http www olympusamerica com repair 2013 OLYMPUS IMAGING CORP Printed in China Service Centers Mexico Tel 001 877 2560976 ...

Page 170: ...e OLYMPUS Viewer 3l i llil e Camera Instruction Manual E PL6 ...

Page 171: ...uatemala 120 60 A Italy 220 50 c Honduras 110 60 A Luxemburg 230 50 c Jamaica 110 50 A Netherlands 230 50 c Mexico 120 127 60 A Norway 230 50 c Nicaragua 120 240 60 A Poland 220 50 c Panama 110 220 60 A Portugal 230 50 c Romania 220 50 c South America Russia 220 50 c Voltaae Fre Hz Plua tvoe Slovak 220 50 c Argentina 220 50 C BF 0 Spain 127 230 50 c Brazil 127 220 60 A C Sweden 230 50 c Chile 220 ...

Page 172: ...NS For connection to a supply not in the U S A use an attachment plug adapter of the proper configuration for the power outlet if needed This power unit is intended to be correctly orientated in a vertical or floor mount position Battery to be recharged for this product is follows Brand Name OLYMPUS Battery Type BLS 5 Rating DC7 2V 1080mAh 4 260 148 01 ...

Page 173: ...r service information IF YOU HAVE QUESTIONS OR NEED HELP If you have questions about the use or performance of your Products or if you have any questions or comments regarding services performed by Olympus or an Olympus Authorized Repair Service Center which have not been resolved to your satisfaction please write directly to Olympus Imaging America Inc 3500 Corporate Parkway P O Box 610 Center Va...

Page 174: ...e al Consumidor de Olympus que le corresponde y d6nde enviar el Producto para su reparaci6n asf como para obtener informaci6n general sobre el servicio de reparaciones Sl TIENE ALGUNAS PREGUNTAS 0 NECESITAAYUDA Si tiene alguna pregunta acerca del uso o el funcionamiento de sus Productos o si tiene alguna pregunta o comentario que hacer en relaci6n con los servicios realizados por Olympus o por un ...

Page 175: ...er countries SDHC Logo is a trademark of SD 3C LLC Introduction Thank you for purchasing Toshiba FlashAirTM Producf To ensure proper use please check your device which the Product is inserted into If your device supports FiashAir please read your device manual carefully and entirely before using the Product The Product can be used with the devices which are compatible with 8GB SDHC memory cards Be...

Page 176: ...CARD ICARTE DE MEMOIRE SANS FIL Transfer photos and videos wirelessly from camera to mobile devices Transferer sans filles photos et videos apartir de Ia camera aux dispositifs mobiles FlashAir I I Wireless LAN 8GB TOSHIBA GB ...

Page 177: ...ners Product specifications are subjectto change without notice Made in Japan Toshiba America Information Systems Inc 2012 Tous droits reserves FlashAir est une marque de commerce de Toshiba Corporation Toutes autres marques de commerce sont Ia propriete de leurs proprietaires respectifs Les specifications du produit sont sujettes ades changements sans preavis Fabrique au Japon 2012Toshiba America...

Page 178: ... of purchase and Product description may be required for warranty service Toshiba may elect to replace defective Product by shipment of new or remanufactured Product equivalent or superior to original factory specifications on an exchange basis Toshiba will pay for shipment of the replacement Product to Customer via standard ground service The replacement Product is warranted to be free from defec...

Page 179: ... presentar el comprobante de compra donde aparezca el precio Ia fecha de compra ellugar de compra y Ia descripci6n del Producto Toshiba puede decidir reemplazar el Producto defectuoso enviando a cambio un Producto nuevo o remanufacturado equivalente o superior a las especificaciones originates de fabrica Toshiba pagara los gastos de envfo del Producto de reposici6n al Cliente a traves de un servic...

Reviews: