background image

73

5

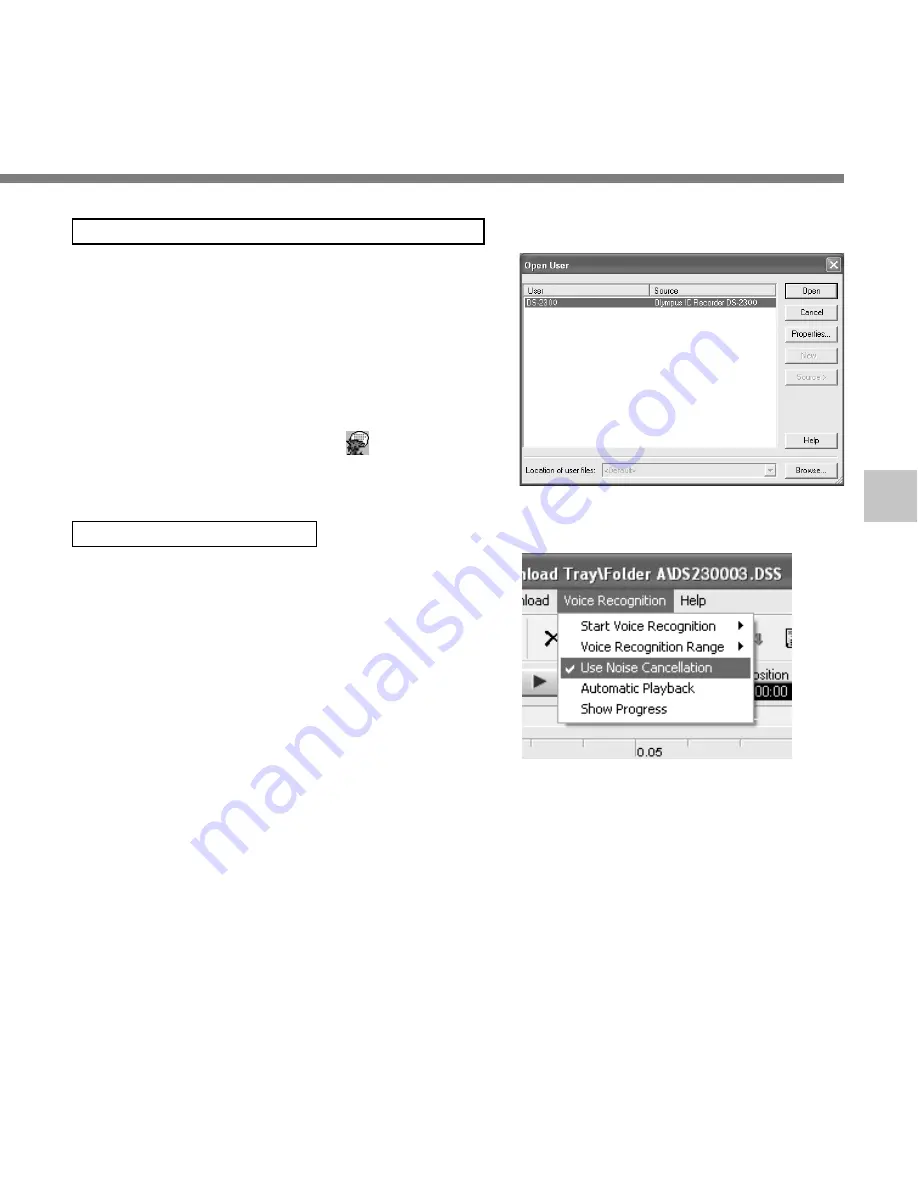
When Dragon NaturallySpeaking is Selected

The [Open User] dialog will be displayed, and select
the user created in procedure 3 on P.70, then click
the [Open] button.  The [Transcription Options]
dialog will be displayed, and select the option
according to the purpose, then click the [Transcribe]
button.

The text conversion will start.  However, if the voice
recognition software is not installed, the voice
recognition software start icon 

 becomes an

invalid display.

Noise Canceling Function

Check [Use Noise Cancellation] in the [Voice
Recognition] menu to output voice using the noise
canceling function to the voice recognition software.

Using V

oice Recognition Software

....................................................................................................................................................

Note

The voice recognition of the file recorded in LP mode cannot be recognized.

Summary of Contents for DS-2300

Page 1: ...n Olympus Digital Voice Recorder Please read these instructions for information about using the product correctly and safely Keep the instructions handy for future reference To ensure successful recordings we recommend that you test the record function and volume before use EN ...

Page 2: ...ng the Card FORMAT 35 Hold 37 LCD Contrast Adjustment CONTRAST 38 Backlight BACKLIGHT 39 System Sounds BEEP 40 Menu Setting Method 41 4 Preparation Before Using DSS Player Using DSS Player Software 42 Operating Environment 43 Installing Software 44 Uninstalling Software 47 Using Online Help 49 Connection to Your PC 50 Running DSS Player 52 Window Names 54 5 Managing Files on Your PC Download Voice...

Page 3: ...6 7 6 Other Practical Use Methods Using the Recorder as a Reader Writer 80 7 Other Information Alarm Message List 81 Troubleshooting 82 Accessories optional 83 Specifications 84 Technical Assistance and Support 85 ...

Page 4: ... alcohol and lacquer thinner to clean the unit Do not place the recorder on top of or near electric appliances such as TVs or refrigerators Avoid recording or playing back near cellular phones or other wireless equipment as they may cause interference and noise If you experience noise move to another place or move the recorder further away from such equipment Avoid sand or dirt These can cause irr...

Page 5: ...mal noise heat smoke or a burning odor 1 remove the batteries immediately while being careful not to burn yourself and 2 call your dealer or local Olympus representative for service Do not operate the unit while operating a vehicle such as a bicycle motorcycle or go cart Keep the unit out of the reach of children Warning regarding data loss Recorded content in memory may be destroyed or erased by ...

Page 6: ...der to a computer you can use it as a USB microphone or USB speaker P 63 1 Getting Started Main Features Main Features The DSS Player can be upgraded to DSS Player Plus which is equipped with enhanced functionality paid option P 65 Plus In a quiet environment it is necessary to set this recorder to SP mode and that the person whose voice is registered in the speech recognition software speak with ...

Page 7: ...osh iMac Mac and PowerMac are trademarks or registered trademarks of Apple Computer Inc Intel and Pentium are registered trademarks of Intel Corporation CORTOLOGIC is a registered trademark of Ruwisch Kollegen GmbH Other product and brand names mentioned herein may be the trademarks or registered trademarks of their respective owners ScanSoft and Dragon NaturallySpeaking are the trademarks or regi...

Page 8: ...Available recording time may be shorter if many short recordings are made 2 Total recording time of two files The maximum recording time per file is 99 hours Notes When initializing formatting a card confirm that no necessary data is stored on the card beforehand Initialization completely erases the existing data on the card Cards used in a recorder must be formatted in the same recorder first unl...

Page 9: ... Rewind button 8 FF Fast Forward button 9 INDEX button 0 FOLDER MENU button Built in speaker STOP button Identification of Parts Identification of Parts PLAY button ERASE button DISPLAY button Display LCD panel Record Play indicator lamp POWER ON OFF switch VOLUME button VOLUME button Card cover Card cover lock q Battery cover w PC USB terminal ...

Page 10: ... 4 Total number of recorded files in the folder 5 Character Information display 6 Erase lock indicator 7 Microphone sensitivity display 8 VCVA Variable Control Voice Actuator indicator 9 Record mode indicator Identification of Parts Identification of Parts Display LCD Panel ...

Page 11: ...for the recorder P 83 Notes Be sure to turn OFF the recorder before replacing the batteries Removing the batteries while the recorder is in use may corrupt the card If you are recording into a file and the batteries run out you will lose your currently recorded file since the file header will not be written It is crucial to replace the batteries when one hash mark in shown in the battery icon Be s...

Page 12: ...er switch on the back of the recorder is in the OFF position none of the buttons or switch on the recorder will be active Slide the power switch to the ON position to activate the recorder PowerSaveMode When the recorder is ON but not in use for 10 minutes it will switch to power save mode automatically To reactivate the recorder again press any of the buttons on the recorder ...

Page 13: ...ATE Setting Time Date TIME DATE REC button Accepts a choice and moves on to the next item FF REW button Alters a choice DISPLAY button Switching the data displayed 1Set the hour 1 Press the FF button or REW button to set the hour 2 Press the REC button to accept the hour You can choose between 12 and 24 hour display by pressing the DISPLAY button while setting the hour and minute Example 5 45 P M ...

Page 14: ...e month 2 Press the REC button to accept the month 5Set the date 1 Press the FF button or REW button to set the date 2 Press the REC button to accept the date Setting Time Date TIME DATE REC button Accepts a choice and moves on to the next item FF REW button Alters a choice DISPLAY button Switching the data displayed You can choose the order of the year month day by pressing the DISPLAY button whi...

Page 15: ... 41 3Press the FF or REW button until TIME DATE flashes on the display 4Press the REC button Time Date screen appears The hour indicator flashes indicating the start of the Time Date setup process Follow the same steps starting at step 1 in Setting Time Date P 13 5Press the FOLDER MENU button to close the menu Setting Time Date TIME DATE SUB MENU REC MODE REC MODE MIC SENSE VCVA REC MODE SUB MENU ...

Page 16: ...the card to jam If the card is not inserted all the way data may not be written to the card 3Close the card cover securely 1 2 3 Inserting and Ejecting a Card Card inserted fully into the slot The message PLEASE WAIT on the display flashes for seconds Card not inserted fully into the slot When the card cover is closed the message INSERT CARD on the display flashes for a few seconds Pressing any bu...

Page 17: ...ppears on the display When this message appears the power is switched off automatically 3Push the card inward to unlock it and let it eject partially The card is visibly out of the slot and can be removed safely 4Hold the card straight and pull it out Inserting and Ejecting a Card Note Releasing your finger quickly after pushing the card inward may cause it to eject forcefully out of the slot ...

Page 18: ...owever that can be changed to any of the following settings Append Appends the recording to the end of the current file Insert Inserts the recording at the current position in the file Overwrite Overwrites the recording starting at the current position in the file Recording 2 Basic Operations 1Press the FOLDER MENU button to choose a folder The folder name is displayed for 2 seconds 2Press the NEW...

Page 19: ...playback The recorder plays up to the end of file then stops You can overwrite or append additional recordings in the same file from that point Notes A beep will sound when remaining recording time reaches 60 seconds 30 seconds and 10 seconds while recording MEMORY FULL or FOLDER FULL will be displayed when the memory or folder capacity is full Delete any unnecessary files before recording any fur...

Page 20: ...want to overwrite 3Press the PLAY button to play the file a Current playback time b Total recording time of the file being played 4Press the STOP button where you want to start overwriting 5Press the REC button to start overwriting The record play indicator lamp glows red 6Press the STOP button to stop overwriting AUTHOR A 00M00S LENGTH 27M58S 2 1 3 4 6 5 14M00S AUTHOR A 10M25S AUTHOR A 00M05S LEN...

Page 21: ... folder name is displayed for 2 seconds 2Press the FF or REW button to choose the file into which you want to insert additional recordings 3Press the PLAY button to start playback 4While playing the file press the FOLDER MENU button to insert an additional recording INSERT appears on the display 5Press the REC button to start inserting additional recording The record play indicator lamp glows red ...

Page 22: ...ophone sensitivity setup process begins 4Press the FF or REW button to choose between CONF and DICT CONF High sensitivity mode that records sounds in all directions DICT Low sensitivity mode suited for dictation 5Press the REC button to complete the setup screen 6Press the FOLDER MENU button to close the menu SUB MENU MIC SENSE MIC SENSE EXIT REC MODE CONF CONF DICT MIC SENSE MIC SENSE Note If you...

Page 23: ...nd or longer REC MODE will be displayed on the screen P 41 2Press the REC button The recording mode setup process begins 3Press the FF or REW button to choose between SP and LP 4Press the REC button to complete the setup screen 5Press the FOLDER MENU button to close the menu EXIT REC MODE MIC SENSE VCVA SP LP REC MODE REC MODE Note Choose SP mode for recording meetings or lectures with crisp clari...

Page 24: ...mode 5Press the REC button to complete the setup screen 6Press the FOLDER MENU button to close the menu When ON is selected a VCVA indication will be displayed on the screen ON ON OFF VCVA MIC SENSE VCVA REC MODE SUB MENU When the microphone senses that sounds have reached a preset threshold volume level the built in Variable Control Voice Actuator VCVA starts recording automatically and stops whe...

Page 25: ...on the display The record play indicator lamp glows when recording starts and flashes when recording pauses 2 1 Adjust the start stop actuation level 1Press the FOLDER MENU button during recording The VCVA level screen displayed 2Press the FF or REW button to adjust the pause sound level The VCVA level can be set to any of 15 different values The higher the value the more sensitive the recorder to...

Page 26: ...ecording Monitor If you start recording after inserting the earphone into the EAR jack on the recorder you can hear the sound being recorded The sound volume on the recording monitor can be adjusted by pressing the VOLUME or VOLUME button VOLUME button Notes Recording level cannot be controlled using the volume button When using the earphones do NOT set the volume too high Listening at very high v...

Page 27: ... Current playback time b Total recording time of the file being played 4Press the VOLUME or VOLUME button to select the proper sound volume The display shows the volume level You can choose between 0 to 30 5Press the STOP button at any point you want to stop the playback Resume playback by pressing PLAY button again 2 1 5 3 AUTHOR A 00M00S LENGTH 27M58S AUTHOR A 00M05S LENGTH 27M58S a b Playing Pl...

Page 28: ...essed within 2 seconds the recorder skips to the beginning of the previous file Playback functions Fast Forward FF Rewind REW Cue CUE Review REV Operation Press the FF button once while stopped Press the REW button once while stopped Hold the FF button while stopped or playing a file Hold the REW button while stopped or playing a file How to Cancel Press the PLAY button The recorder starts the ope...

Page 29: ...SE flashes on the display for approximately 8 seconds FOLDER A F I LE ERASE Erasing FOLDER A ERASE DONE 4Press the ERASE button once more while FILE ERASE is flashing The display changes to FILE ERASE and erasing will start ERASE DONE is displayed when the file is erased File numbers will be reassigned automatically FOLDER A F I LE ERASE Notes An erased file cannot be restored The file set to eras...

Page 30: ...SE is flashing The display changes to ALL ERASE and erasing will start ERASE DONE is displayed when the files are erased Locked files are reassigned file numbers in ascending order FOLDER A ALL ERASE FOLDER A ERASE DONE FOLDER A ALL ERASE Notes An erased file cannot be restored The file set to erase lock will not be erased P 31 Completion of erasing may take 10 seconds Never do anything during thi...

Page 31: ...EEP SUB MENU SUB MENU Locking Files LOCK Locking a file keeps important data from being accidentally erased Locked files are not erased when you choose to erase all files from a folder P 29 Locked files are never erased except when the card is formatted P 35 REC MODE SUB MENU SUB MENU VCVA EXIT 5Press the FF or REW button to choose between ON and OFF ON Locks the file and prevents it from being ed...

Page 32: ...mark you want to clear 4Press the ERASE button while the index number appears for approximately 2 seconds on the display The index mark is erased Index marks can be placed in a file during recording or playback to provide and quick and easy way of keeping track of important sections in the file AUTHOR A 12M05S I NDEX 08 CLEAR AUTHOR A 12M05S I NDEX 08 SET Notes Up to 16 index marks can be set in a...

Page 33: ...stamp Shows the year month and date that the file was recorded 3 Time stamp Shows the time that the file was recorded 6 Current time and date Shows the current time and date During playback the TIME DATE or the counter appears 5 Memory remaining Shows remaining recording time 4 File comment Shows comment added to a file If there is no comment will appear If a comment contains many characters it wi...

Page 34: ...in bar mode and countdown mode AUTHOR A 25M01S 2H33M25S AUTHOR A E F 25M01S 2H33M25S While recording in VCVA mode AUTHOR ID 10M25S 14M00S AUTHOR ID 10M25S 14M00S E F 1 Recording level meter Displays the sound input level graphically the current time and the length of the file 2 Remaining memory bars Displays the remaining time available for recording in bar mode and the current time and length of ...

Page 35: ... the REC button DATA WILL BE CLEARED appears for approximately 2 seconds FORMAT EX I T CONTRAST CANCEL START DATA W I LL BE CLEARED 3 5 1 2 4 6 Formatting the Card FORMAT Formatting the Card FORMAT Cards that have been used on non Olympus devices or cards that are not recognized by the recorder must be formatted before they can be used with the recorder The Olympus xD Picture Card delivered with t...

Page 36: ...quired to format cards differs depending on the capacity of cards For example formatting may take about 1 minute for 512 MB card Do not interrupt the formatting process by opening the card cover or the battery cover Doing so will damage the data or card When the card is formatted all the stored data including locked files are erased If an unformatted card is inserted the recorder automatically dis...

Page 37: ...e carried in a bag or pocket Remember to reset the HOLD switch when using the recorder Notes The display will flash if the switch is moved to hold in the stop status At this time if any button is pressed the clock display will flash for about 2 seconds but will not operate If the switch is moved to hold during playback or recording the playback recording status will stay and cannot be operated Whe...

Page 38: ...d or longer The menu appears P 41 2Press the FF or REW button to choose SUB MENU and press the REC button The sub menu appears P 41 3Press the FF or REW button until CONTRAST flashes on the display 4Press the REC button The LCD display contrast setup process begins 5Press the FF or REW button to set the contrast level You can adjust the LCD display contrast level from 1 to 12 Initial setting 6 6Pr...

Page 39: ...FF or REW button to choose SUB MENU and press the REC button The sub menu appears P 41 3Press the FF or REW button until BACKLIGHT flashes on the display 4Press the REC button The backlight setup process begins 5Press the FF or REW button to choose between ON and OFF ON Backlight is enabled OFF Backlight is disabled 6Press the REC button to complete the setup screen 7Press the FOLDER MENU button t...

Page 40: ...e SUB MENU and press the REC button The sub menu appears P 41 3Press the FF or REW button until BEEP flashes on the display 4Press the REC button The system sound setup process begins 5Press the FF or REW button to choose between ON and OFF ON System sounds are enabled OFF System sounds are disabled 6Press the REC button to complete the setup screen 7Press the FOLDER MENU button to close the menu ...

Page 41: ...ay P 13 Recorder formatting P 35 LCD contrast adjustment Select the level from 1 to 12 P 38 System sounds setting Select ON enabled or OFF disabled P 40 Backlight setting Select ON enabled or OFF disabled P 39 Press and hold the FOLDER MENU button for 1 second or longer Press the FF button or REW button VCVA setting Select ON enabled or OFF disabled P 24 Microphone sensitivity setting Select betwe...

Page 42: ...If the USB cable is removed before the drive is stopped data may not be successfully transferred On a PC do not format the drive of the recorder Initialization is not successfully achieved on a PC For initialization follow the instructions in the menu screen of the recorder P 41 Folder directory names displayed by file management tools such as Explorer attached to Microsoft Windows and Finder atta...

Page 43: ...56 colors or more One free port Earphone output or speakers The mouse or similar to a pointing device Environment where the Internet can be utilized PC Operating System CPU RAM Hard drive space Drive Sound card Browser Display USB port Audio I O terminals Others Power Mac G3 233 MHz class processor or faster iMac iBook eMac Power Mac PowerBook The computer must support a standard USB port Processo...

Page 44: ...the included Software CD Applications included with DSS Player DSS Player Recorded voice files can be downloaded to the PC for complete file management and playback solution Acrobat Reader is installed on your PC It is required to view the accompanying manual in PDF format Be sure to confirm the following before installation Exit all running applications Eject the floppy disk if you are using one ...

Page 45: ...he Licensing Agreement You must accept the terms of the Licensing Agreement to install DSS Player If you accept them click Yes 7Select where to install DSS Player This lets you specify the folder in which to install DSS Player Click Browse to find the desired installation folder To accept the default folder click Next Note If the installation folder does not exist a confirmation dialog box opens t...

Page 46: ... for the serial number After the input has ended click OK to complete the registration Installing Software 1Insert DSS Player into the CD ROM drive 2Double click CD icon Double click the desired language to select it 3Double click the following icon 4Click Continue when the DSS Player opening screen appears 5Confirm your acceptance of the terms of the Licensing Agreement You must accept the terms ...

Page 47: ...uninstalling An additional message may appear if so read it carefully and follow the instructions given 7When the Maintenance Complete screen is displayed click Finish to complete uninstalling Uninstalling Software To uninstall any of the software component of the DSS player software installed on your PC follow the steps below Windows Note The voice files you made are stored in the MESSAGE folder ...

Page 48: ...er file in the location where you installed the file 4Delete the Help File Delete the DSS Player Help file in the following location System Folder Help Uninstalling Software Note The voice files you made are stored in the MESSAGE folder If you don t need them delete them You can confirm the location of the MESSAGE folder by clicking on Options in the Tools menu before uninstalling Uninstalling Sof...

Page 49: ...nning press F1 on the keyboard Macintosh While DSS Player is running choose DSS Player Help from the Help menu Search by Contents 1Once the Online Help screen appears click the Contents tab 2Double click the icon of the desired topic heading The title of the topic is displayed 3Double click the icon of the desired topic An explanation of the topic is displayed Search by Key word 1Once the Online H...

Page 50: ...to your PC the recorder will be powered through the USB cable The batteries will not be in use REMOTE Connection to Your PC Be sure to install the DSS Player software before connecting the recorder to a PC You can directly connect the recorder s USB terminal to your PC Windows Macintosh When the recorder is connected and My Computer is opened a removable disk drive is displayed If Add New Hardware...

Page 51: ...rag and drop 2Disconnect the USB cable Notes NEVER remove the card or disconnect the USB cable while the record play indicator lamp is flashing If you do the data on the card will get destroyed When the recorder is connected to a PC the power will be supplied from the USB cable Refer to the user s manual for your PC regarding the USB port or USB hub on your PC Be sure that you connect the USB cabl...

Page 52: ...tting will be displayed by dialog 2Click the of the DSS Player Version 6 The check mark on DSS Player Version 6 disappears For automatic start select and click DSS Player to reinstate again Windows 3 2 2 Running DSS Player Manual start 1Start Windows 2Click the start button select All Programs then Olympus DSS Player 3Click Olympus DSS Player Note You cannot run more than one DSS Player program or...

Page 53: ...o automatic start function To start open the DSS Player folder created upon installation and double click the icon When it starts for the first time after installation user information needs to be registered Please see P 46 for details Running DSS Player ...

Page 54: ...ctory structure of the DSS WMA WAVE Windows only and AIFF Macintosh only format files stored on your PC s hard disk 3 Device Manager Window Will display the directory structure of the folders in the recorder 4 Voice File List Box Will display the voice files in the folder selected in 2 and 3 Main screen displayed when DSS Player is started Windows Macintosh ...

Page 55: ...on of Download Selected Files For explanations of Download Folders and Download All refer to Online Help 1Select the folder From the Device Manager window select the folder that contains the voice file you would like to download The illustration shows that Folder A has been selected 2Select the voice file Select the voice file you would like to download from the Voice File List Box To select more ...

Page 56: ...ct the USB cable while the record play indicator lamp is flashing If you do the data on the card will get destroyed Depending on the size of the voice file and your PC it may take some time to download the files The downloaded files will be stored in the download tray folder that corresponds to the folder in the recorder Example A voice file downloaded from Folder A will be stored in download tray...

Page 57: ...playback control such as Rewind Fast Forward Stop Speed Control Volume Control Time Axis and Index Skip are available from the Play Control Bar Extension File number A serial number automatically assigned by a Digital Voice Recorder User ID The name that has been set on the Digital Voice Recorder The default name on the Digital Voice Recorder is DS23 The user ID can be modified with DSS Player P 6...

Page 58: ...le List Box 3Select the folder to upload Windows From the Download menu select Upload Files or click the Upload icon Once the folder list box where the file is to be uploaded is displayed select the folder from which the file is to be uploaded Macintosh From the Tools menu click Upload Files Once the folder list box where the file is to be uploaded is displayed select the folder from which the fil...

Page 59: ... and drop files from the Voice File List Box to the Device Manager window Upload Voice Files to the Recorder Notes NEVER remove the card or disconnect the USB cable while the record play indicator lamp is flashing If you do the data on the card will get destroyed If a file with the same name exists in the folder of this recorder it cannot be transferred ...

Page 60: ...he main screen will switch the recorder back to storage class device displayed as a removable drive You cannot edit WAV files The maximum recording time per file is 99 hours Direct Recording Editing on PC Mac Windows Macintosh Editing existing files 1From the DSS Player main window select the file you want to edit from the Voice File List Box 2Click the File menu then select Edit File or click the...

Page 61: ...file can be replayed with DSS Player Lite even though the recipient does not have DSS Player Free DSS Player Lite can be downloaded from Olympus homepage http www olympusamerica com cpg_section cpg_downloads asp http olympus europa com consumer 2590_software cfm Send Voice Files with E mail The user ID is used in file names that are recorded on a Digital Voice Recorder Changing User ID 1Enter the ...

Page 62: ...names consist of a string of 12 or fewer single byte alphanumeric characters Changing a Folder Name You can use a PC to create or edit file comments in DSS Player in the Edit Comments window and transfer them from the PC to the recorder You can also edit file comments imported from the recorder to a PC Choose the Edit Comments command from the Tools menu Files comments can use up to 100 alphanumer...

Page 63: ...change the output destination Uses as a USB Speaker USB Microphone USB Speaker The recorder can be used as a USB speaker or microphone when connected to a PC If you use the recorder as a USB speaker you can output voice through the recorder instead of using the PC speaker When used as a microphone you can record voice on your PC using your favorite application 1Click the icon in the toolbar to cha...

Page 64: ... Audio tab and select the USB Audio Device from the recording device Windows XP Select Control Panel Sound and Audio Device Audio tab and select the Microphone Control DVR from the recording device Uses as a USB microphone Notes If you switch the recorder to Audio device the recorder does not function as Storage device and it is not displayed as a removable drive Changing the USB speaker can be ex...

Page 65: ...grade To purchase DSS Player Plus and upgrading from DSS Player is operated in the following procedures Upgrade Function Plus Windows Macintosh 1Start the DSS Player Please see P 52 for the starting method 2Click the button or select Purchase a new license for DSS Player Plus in the Help menu The web browser will start and the purchase site of the DSS Player Plus will be displayed Please operate a...

Page 66: ...S Player Plus Upgrading to DSS Player Plus When upgraded the title of the main menu changes to DSS Player Plus Also you can confirm the upgrade by selecting About DSS Player from the Help menu on the tool bar In the About DSS Player window the DSS Player Plus should be displayed Upgrade Function Notes To purchase the license number it requires an environment where the Internet can be utilized Plea...

Page 67: ...ware ViaVoice Please contact ScanSoft for support information on ScanSoft Dragon NaturallySpeaking Plus Using Voice Recognition Software Using Voice Recognition Software Note Voice recognition can only be used with Windows In conjunction with ViaVoice of IBM Corp or Dragon NaturallySpeaking of ScanSoft Inc which are on the market the files recorded in this recorder can be transferred to a computer...

Page 68: ...procedure to record the voice accurately acquired from the built in microphone or speaker Voice Recognition in ViaVoice Audio set up Using Voice Recognition Software 3From the IBM ViaVoice VoiceCenter select ViaVoice Tools then Analyze My Voice The ViaVoice User Wizard window appears 4From the Device list box select Olympus DSS File or Olympus WMA File Select Olympus DSS File or Olympus WMA File i...

Page 69: ...Windows XP 7Proceed with the AUDIO Setup according to the instruction on screen During audio setup enrollment please input voice data from the recorder It is recommended that you enroll while in your normal surrounding environment settings This will help improve the voice recognition by registering your voice characteristics and your environment Using Voice Recognition Software ...

Page 70: ...turallySpeaking 8 Click the start button select in the order of All Programs Dragon NaturallySpeaking 8 Dragon NaturallySpeaking 8 If the DSS Player Plus has started please close it in advance 2 New User Wizard will be displayed If the user is already registered in Dragon NaturallySpeaking 8 the Open User dialog will be displayed In this case click the New button and display New User Wizard 3Creat...

Page 71: ...ng is finished click the Next button 6Transferring the Recorded Voice Click Olympus DSS Player button displayed on the screen The DSS Player Plus will startup and then follow the instructions displayed on the screen to execute the transfer of the recorded voice After finishing click the Next button 7Adding a User Click the button displayed on the screen After this operation is finished follow the ...

Page 72: ...ow select the folder in which the file to be converted to text is stored 2Select the voice file From the Voice File List Box select the file to be converted to text 3Start of voice recognition Clicking the arrow at the right side of the voice recognition icon displays the voice recognition software Select and click ViaVoice or Dragon NaturallySpeaking as the software to be used Executing Voice Rec...

Page 73: ...click the Transcribe button The text conversion will start However if the voice recognition software is not installed the voice recognition software start icon becomes an invalid display Noise Canceling Function Check Use Noise Cancellation in the Voice Recognition menu to output voice using the noise canceling function to the voice recognition software Using Voice Recognition Software Note The vo...

Page 74: ...gnition software using the recorder Record in a relatively quiet environment Have the recorder microphone 5 to 10 cm 2 to 4 inches away from your chin The file recorded in the next condition will be a low rate of recognition which can not be used for voice recognition A conference or meeting where many voices are recorded Seminar or lecture where high level ambient noise tends to be recorded Speak...

Page 75: ... From the Dictation Folder Window select the folder which contains the files to be joined 2Select the voice files From the Voice File List Box select more than one file to be joined 3Select Join from the Edit menu or press the button The dialog to join files will be displayed listing the files selected in step 2 Joining Files Plus 3 2 1 ...

Page 76: ...n buttons 5Input File Names The file name is created automatically after joining and also it enables input optionally 6Press the Join button The resulting file is saved under the name specified in step 5 and stored in the selected folder Note If the files to be joined have different recording modes the mode of the file listed at the top is selected Joining Files 5 4 6 Joining Files ...

Page 77: ...e folder Select the folder containing the file to be split from the Dictation Folder Window 2Select the voice files Select one file to split from the Voice File List Box 3Select Split from the Edit menu or press the button The setting dialog of the file to be split will be displayed Splitting Files Plus 3 2 1 ...

Page 78: ...plit 5Input File Names The file name is created automatically after splitting and also it enables input optionally 6Press the Split button The splitting of the file will complete and the file name designated in procedure 5 will be saved Splitting Files Playback Stop button The display will change whenever the button is pressed Split position Time axis Playback slider Shows the current playback pos...

Page 79: ... recorder menu from the Download menu The Configure recorder menu dialog will be displayed 2Execute Menu Setting Click the radio button to be changed and input a check 3Press the OK button The set contents will be transferred to this recorder After the finishing the menu setting of this recorder will be changed by removing the USB connection of this recorder from the computer Plus 3 1 ...

Page 80: ... PC to Card Using Explorer or Finder Using the Recorder as a Reader Writer 6 Other Practical Use Methods 1Start Windows 2Connecting the recorder to your PC For connection procedure refer to Connecting to Your PC Using the USB Cable P 50 3Open Windows Explorer or Finder window The recorder will appear as a removable drive icon 4Copy data to card While the data are being written or copied the record...

Page 81: ...ard cover securely until it click P 16 This is a malfunction Contact the place of purchase or Olympus Service Center for repair Explanation Battery power is getting low Tried to delete a locked file The file is full of index marks maximum of 16 marks The folder is full of files maximum of 199 files The destination folder already has the maximum number of files 199 An incompatible card was inserted...

Page 82: ...r was placed near a cell phone or fluorescent lamp while recording or during playback The microphone sensitivity is too low The maximum number of index marks 16 has been reached The file is locked Wrong folder Sometimes a connection cannot be made with some PCs running Windows XP Action Verify polarity is correct P 11 Replace with new batteries P 11 Turn the recorder ON P 12 Turn the recorder ON P...

Page 83: ... External microphone ME15 A lavalier omnidirectional microphone that clips to clothing Used to record your own voice or people near you Ni MH Rechargeable Battery Charger BU 400 Europe only Charger for AA batteries 1 to 4 or 1 to 2 AAA batteries Ni MH Rechargeable Battery BR401 High efficiency rechargeable long life batteries Connecting cord KA333 Use to connect the microphone jack of this unit to...

Page 84: ...ox 10 hours Speaker Built in ø28 mm round dynamic speaker MIC jack ø3 5 mm mini jack impedance 2kΩ or more EAR jack ø3 5 mm mini jack impedance 8Ω or more Maximum working output 3 V DC 220 mW or more 8 Ω speaker Input power requirement Rated voltage 3 V Batteries Two AAA batteries LR03 or R03 or Two Ni MH rechargeable batteries BR 401 External dimensions 110 2 x 50 0 x 17 2 mm without protrusions ...

Page 85: ... in the U S and Canada distec olympus com Technical Hotline Number in Europe Toll free number 00800 67 10 83 00 available for Austria Belgium Denmark Finland France Germany Italy Luxemburg Netherlands Norway Portugal Spain Sweden Switzerland United Kingdom Charged numbers for the Rest of Europe 49 180 567 1083 49 40 23773 899 User Support E mail address in Europe dss support olympus europa com Tec...

Page 86: ...es émissions de bruit radio émanant d appareils numériques tel que prévu dans les Règlements sur l Interférence Radio du Département Canadien des Communications CE mark indicates that this product complies with the European requirements for safety health environment and customer protection Shinjuku Monolith 3 1 Nishi Shinjuku 2 chome Shinjuku ku Tokyo 163 0914 Japan Tel 03 3340 2111 Two Corporate ...

Reviews: