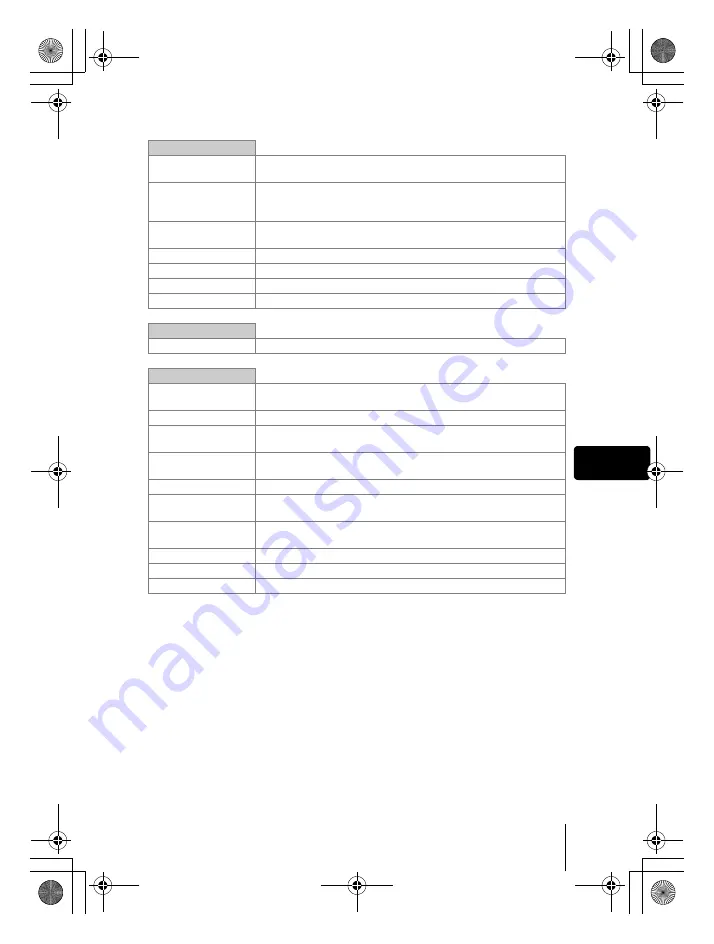
background image

En

En

21

PICTURE tab

WB

Sets the appropriate white balance according to the light source. 
Also adjusts and saves the white balance.

K

Sets the image quality and resolution.
Still pictures : RAW, TIFF, SHQ, HQ, SQ1, SQ2
Movies

: SHQ, HQ, SQ

SCENE MODES

Lets you take pictures suited to the situation and the desired effect 
(

I

L

m

).

SHARPNESS

Adjusts the sharpness of the image.

CONTRAST

Adjusts the contrast of the image.

HUE

Adjusts the overall tint of the picture.

SATURATION

Adjusts the level of color depth without changing the tint.

CARD tab
CARD SETUP

Formats a card.

E

 tab

ALL RESET

Selects whether to keep the current camera settings when you 
turn off the power.

REC VIEW

Displays the picture on the monitor while recording it to a card.

BEEP

Sets the beep sound used for button operations and adjusts the 
volume.

SHUTTER SOUND

Sets the sound made when the shutter button is pressed and 
adjusts the volume.

DIAL

Changes the control dial, arrow pad and direct button functions.

EV STEP

Selects whether to set the shutter speed, aperture value and 
exposure compensation, etc. in 1/3EV steps or in 1/2EV steps.

CUSTOM BUTTON

Lets you assign a frequently used function to the camera’s custom 
button.

SHORT CUT

Lets you assign frequently used functions as shortcut menus.

MY MODE SETUP

Customizes settings which are activated in the 

r

 mode.

CONTROL PANEL

Displays the settings in the shooting mode on the monitor.

basic_e_d4155_6.fm  Page 21  Monday, December 8, 2003  10:02 AM

Summary of Contents for CAMEDIA C-8080 Wide Zoom

Page 1: ...HOTO NUM RIQUE DIGITALKAMERA C MARA DIGITAL C 8080 Wide Zoom BASIC MANUAL MANUEL DE BASE EINFACHE ANLEITUNG MANUAL B SICO ENGLISH 2 FRAN AIS 48 DEUTSCH 94 ESPA OL 140 basic_e_d4155_6 fm Page 1 Tuesday...

Page 2: ...r 33 ADVANCED SHOOTING 34 PLAYBACK 36 Viewing still pictures 36 Viewing movies 37 Protecting pictures 39 Erasing pictures 39 Formatting CARD SETUP 40 Playback on TV 41 PRINT RESERVATION DIRECT PRINT 4...

Page 3: ...anual are the Design Rule for Camera File System DCF standards stipulated by the Japan Electronics and Information Technology Industries Association JEITA CE mark indicates that this product complies...

Page 4: ...k MONO DC IN jack USB connector Flash Self timer Remote control button Y Viewfinder Control dial QUICK VIEW button OK Menu button e Arrow pad acbd Card button CF xD Card cover Card access lamp Monitor...

Page 5: ...Exposure compensation button F Information display button INFO AF Macro MF button AF MF Protect button 0 Flash mode button Rotation button y Metering button 4 Print button Diopter adjustment ring Spe...

Page 6: ...posure differential 2 0 to 2 0 3 0 to 3 0 5 Battery check e f 6 Green lamp 7 Flash stand by Camera movement warning Flash charge Lights Blinks 8 Macro mode Super macro mode Manual focus MF 9 Noise red...

Page 7: ...ring target mark 18 Number of storable still pictures Remaining recording time 30 04 00 19 AE lock AE memory B C 20 Metering mode 5 4 21 ISO ISO50 ISO100 ISO200 ISO400 etc 22 White balance 2 3 5 4 w t...

Page 8: ...number of prints Movie 10 n 4 Sound record H 5 Protect 9 6 Record mode RAW TIFF SHQ HQ SQ1 SQ2 7 Resolution 3264 2448 2048 1536 640 480 320 240 etc 8 Aperture value F2 4 to F8 0 9 Shutter speed 8 to...

Page 9: ...e f BATTER EMPTY is displayed Lights green Goes off after a while Blinks red Remaining power level high Remaining power level low If you intend to use the camera for a long period of time charge the b...

Page 10: ...ctions provided with the charger 1 Plug the power cord into the charger 2 Plug the other end of the power cord into a household electrical outlet 3 Remove the protection cap from the battery Place the...

Page 11: ...mera is turned off 2 Slide the battery compartment lock from to and open the battery compartment cover 3 Inserting a battery Make sure that it is correctly oriented as shown in the illustration The ba...

Page 12: ...rted at an angle the contact area may be damaged or the card may become jammed If the card is not inserted fully it may not be able to record data CompactFlash Microdrive Hold the card straight and in...

Page 13: ...n position before closing the card cover Switching cards The card currently in use is indicated in the viewfinder or on the monitor Choose the card you want to record the picture on before taking the...

Page 14: ...mode The camera turns on in the playback mode and the monitor turns on C mode The menu is displayed on the monitor You can change the mode with the camera turned on or off 4 Press the power switch aga...

Page 15: ...tor can be positioned in the down position at an angle of 45 degrees and in the up position at an angle of 22 45 or 90 degrees To take high angle shots position the monitor in the down position J SELE...

Page 16: ...rocedure used when the date and time settings are set to Y M D 5 Press ac to set the year then press d to move to the month setting To move back to the previous setting press b The first two digits of...

Page 17: ...registered in the shortcut menus can also be accessed from the MODE MENU You can change the shortcut menus in any mode other than nq modes Categorizes the settings into tabs Displays the associated m...

Page 18: ...de dial turn the dial other than C to exit the MODE MENU Shortcut menus Shooting mode Selects a shooting mode from o single frame shooting i high speed sequential shooting j sequential shooting k AF s...

Page 19: ...an indexed view of a movie in 9 frames EDIT Edits a movie Displays guidelines on the image Copies pictures to and from cards Lets you select whether to copy all frames or only a selected frame Adds s...

Page 20: ...al shooting j sequential shooting k AF sequential shooting and BKT auto bracketing B Selects the self timer or remote control function ISO Selects the ISO value from AUTO or in the range of ISO 50 to...

Page 21: ...when you turn off the power REC VIEW Displays the picture on the monitor while recording it to a card BEEP Sets the beep sound used for button operations and adjusts the volume SHUTTER SOUND Sets the...

Page 22: ...y a selected frame The EDIT tab is not displayed during movie playback CARD tab CARD SETUP Erases all image data stored on the card or formats a card E tab ALL RESET Selects whether to keep the curren...

Page 23: ...s the number of frames in the index display SETUP tab W Selects a language for on screen display X Sets the date and time 8 Sets the beep sound used for warnings and adjusts the volume SLEEP Sets the...

Page 24: ...adjusted manually Program shift Program shift allows you to change the combination of aperture value and shutter speed set by the camera without altering the exposure Press ac to change the aperture...

Page 25: ...the aperture by turning the control dial while holding down F Turn to the left to decrease the aperture value F number Turn to the right to increase the aperture value F number Turn the control dial t...

Page 26: ...od l Landscape shooting Suitable for taking pictures of landscapes and other outdoor scenes Both the foreground and the background are in focus Since blues and greens are vividly reproduced in this mo...

Page 27: ...holding down to select the flash mode The setting screen is displayed on the monitor At the moment you release your finger from the button the flash mode setting is made If the operation guide is disp...

Page 28: ...onization and flash off Press at the same time w flash intensity control buttons Adjusts the amount of light emitted by the flash AF MF AF Macro MF button Selects a focus mode from AF auto focus macro...

Page 29: ...the last picture taken on the monitor AEL AE Lock button Fixes the exposure The lock function is alternately activated and canceled each time you press the button INFO information display button Displ...

Page 30: ...ll the way fully The camera takes the picture The card access lamp blinks while the picture is stored on the card You can check the picture you have taken by pressing the QUICK VIEW button Indication...

Page 31: ...s to the focus position When the green lamp blinks the focus and exposure are not locked Release your finger from the shutter button re position your subject and press the shutter button halfway again...

Page 32: ...the digital zoom zoom magnification can be increased to a maximum of approximately 15 Camera movement is likely to occur at higher magnifications Stabilize the camera with a tripod etc to avoid camera...

Page 33: ...r the shutter opens 2nd curtain rear curtain SLOW2 The flash fires just before the shutter closes 1st curtain with red eye reduction HSLOW1 The flash fires right after the shutter opens and minimizes...

Page 34: ...ically for each frame while holding down the shutter button The exposure differential and number of frames can be selected in the menus The focus and white balance are locked at the first frame gMENU...

Page 35: ...0 cm to 80 cm 0 7 ft to 2 6 ft from your subject gMODE DIAL AND DIRECT BUTTON FUNCTIONS Direct buttons J SUPER MACRO MODE SHOOTING This mode lets you shoot from as close as 5 cm 2 0 from your subject...

Page 36: ...shooting quickly 1 Press the QUICK VIEW button in the shooting mode 2 Press the QUICK VIEW button again to return to the shooting mode Close up playback Pictures displayed on the monitor can be enlar...

Page 37: ...rol dial to display the picture with n you want to play back 3 Press e The top menu is displayed 4 Press a to select MOVIE PLAY 5 Press ac to select MOVIE PLAYBACK then press e The movie is played bac...

Page 38: ...holding the button down b Displays the previous frame The movie can be played continuously in reverse by holding the button down e Displays the MOVIE PLAYBACK menu If you selected CAPTURE Play back t...

Page 39: ...rase erases only the picture displayed on the monitor and all frame erase erases all the pictures on the card Once erased pictures cannot be restored Check each picture before erasing to avoid acciden...

Page 40: ...confirm there are no pictures that you still want to keep on the card 1 In the top menu select MODE MENU CARD CARD SETUP and press d P A S M r n m l j i The I FORMAT screen is displayed q The CARD SE...

Page 41: ...ruction manual 3 Set the mode dial to q and turn the camera on The last picture taken is displayed on the TV Use the arrow pad to select the picture you want to display The close up playback index dis...

Page 42: ...ect the desired number of prints Resetting the print reservation data This function allows you to reset all the print reservation data for pictures stored on the card J DIRECT PRINT By connecting the...

Page 43: ...ed on a home built PC system or PCs with no factory installed OS You can view images using graphics applications that support the JPEG file format Paint Shop Pro Photoshop etc Internet browsers Netsca...

Page 44: ...puter have a built in PC card slot Consult your nearest Olympus representative Is your OS one of the following Windows 98 Windows 2000 Windows Me Windows XP Mac OS 9 X Yes No No Use the optional USB r...

Page 45: ...place the card or erase unwanted pictures Before erasing download important images to a PC NO PICTURE There are no pictures on the card The card contains no pictures Record pictures PICTURE ERROR Ther...

Page 46: ...1024 768 pixels TIFF SQ2 640 480 pixels TIFF SQ2 No of storable pictures When a 32 MB card is used without sound Approx 2 frames RAW 3264 2448 Approx 1 frames TIFF 3264 2448 Approx 8 frames SHQ 3264 2...

Page 47: ...to 2099 Operating environment Temperature 0 C to 40 C 32 F to 104 F operation 20 C to 60 C 4 F to 140 F storage Humidity 30 to 90 operation 10 to 90 storage Power supply Only an Olympus BLM 1 lithium...

Reviews: