background image

83

Ad
va

nce

d

 sho

o

tin

g

5

Self-timer shooting

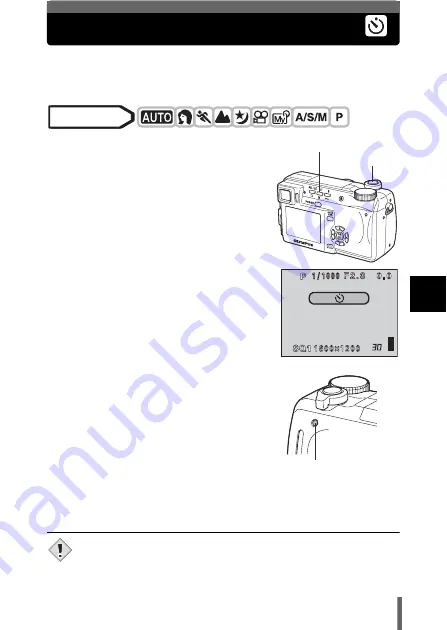
This function lets you take pictures using the self-timer. Fix the camera 
securely on a tripod for self-timer shooting. This function is useful for taking 
pictures where you want to be included in the photograph.

1

Select 

Y

 by repeatedly pressing 

Y

.

• If no operation is performed for about 3 

seconds, the selected mode is set and the 
mode selector screen is automatically 
exited.

2

Press the shutter button fully to 
take the picture.

• Pressing the shutter button halfway locks 

the focus and exposure.

• The self-timer lamp lights for approximately 

10 seconds, then starts blinking. After 
blinking for approximately 2 seconds, the 
picture is taken.

• To stop shooting while in 

n

 mode, press 

the shutter button fully again.

• To cancel the self-timer, press 

Y

.

• The self-timer mode is automatically canceled after one shot.

• If sequential shooting is attempted in self-timer mode, the camera 

shoots max. 5 frames regardless of the setting.

Mode dial

Shutter button

Y

 Self-timer button

Self-timer lamp

Note

Summary of Contents for CAMEDIA C-460 Zoom

Page 1: ...ERENCE MANUAL Click Here Explanation of digital camera functions and operating instructions Explanation of how to download images between your digital camera and PC DIGITAL CAMERA PC CONNECTION OPERAT...

Page 2: ...a longer service life Keep this manual in a safe place for future reference We recommend that you take test shots to get accustomed to your camera before taking important photographs In the interest o...

Page 3: ...mplies with the European requirements for safety health environment and customer protection CE mark cameras are intended for sales in Europe For customers in USA Declaration of Conformity Model Number...

Page 4: ...Adjusting the image quality and exposure Useful functions Print setting Direct printing For playing back and editing pictures Settings that make the camera easier to operate Printing pictures Trouble...

Page 5: ...ry 18 Card basics 19 Inserting and removing the battery and card 20 Using an AC adapter optional 23 Power on off 24 Startup Shutdown screen 25 If the card is not recognized card check 25 Selecting a l...

Page 6: ...ced shooting 64 A S M mode 64 Aperture priority shooting 65 Shutter priority shooting 66 Manual shooting 67 Using My Mode 68 Focusing applications 69 AF MODE Changing the focus range 69 FULLTIME AF A...

Page 7: ...ound with movies 94 6 Adjusting the image quality and exposure 95 Record mode 95 3 2 Resolution 96 ENLARGE SIZE 96 Selecting a record mode 98 ISO sensitivity 100 Exposure compensation 101 White balanc...

Page 8: ...otected pictures 131 Erasing pictures 132 Single frame erase 132 All frame erase 133 8 Useful functions 134 ALL RESET Saving the camera s settings 134 CUSTOM BUTTON 136 Setting the custom button 137 U...

Page 9: ...printing 168 Using the direct printing function 168 Connecting the camera to a printer 169 Printing pictures 170 Easy printing 171 PRINT mode MULTI PRINT mode 173 ALL PRINT mode 177 ALL INDEX mode PR...

Page 10: ...rtant information on factors which may lead to a malfunction or operational problems Also warns of operations that should be absolutely avoided Useful information and hints that will help you get the...

Page 11: ...p eyelet gP 17 Self timer lamp gP 83 Microphone gP 93 94 126 DC IN jack gP 23 Flash gP 56 A V OUT jack MONO gP 124 USB connector gP 169 Connector cover gP 23 124 169 Mode dial gP 43 Shutter button gP...

Page 12: ...d access lamp gP 47 Arrow pad acbd gP 32 112 OK Menu button e gP 32 Monitor gP 12 47 Flash mode button gP 56 Diopter adjustment dial gP 30 Self timer button Y gP 83 Protect button 0 gP 130 Rotation bu...

Page 13: ...m Indications Ref Page 1 Shooting modes P A S M N m L J I s P P 43 2 Shutter speed 15 1 1000 P 66 3 Aperture value F2 8 F8 0 P 65 4 Exposure compensation Exposure differential 2 0 2 0 3 0 3 0 P 101 P...

Page 14: ...8 1536 1280 960 640 480 etc P 97 17 AF target mark P 47 18 Number of storable still pictures Time remaining 30 00 36 P 97 P 52 19 AE lock AE memory B C P 79 20 Spot metering n P 76 21 ISO ISO 100 ISO...

Page 15: ...10 n P 159 P 118 4 Sound record H P 93 5 Protect 9 P 130 6 Record mode TIFF SHQ HQ SQ1 SQ2 P 95 7 Resolution 2048 1536 1280 960 640 480 320 240 etc P 97 8 Aperture value F2 8 F8 0 P 65 9 Shutter speed...

Page 16: ...cation changes as follows when the camera is turned on or while the camera is in use F2 8 F2 8 1600 1200 1600 1200 SQ1 SQ1 Memory gauge Battery check Before shooting Gauge is off No more pictures can...

Page 17: ...fer from the actual page in this manual Set the mode dial to any of the marks shown here Follow the arrows to perform menu operations For details on operating procedures see How to use the menus P 33...

Page 18: ...nd stopper as indicated by the arrows Adjust the strap to the desired length 5 Thread the end of the strap again through the stopper as indicated by the arrow Pull the strap through the stopper B to m...

Page 19: ...r more information read the manual supplied with the battery charger 1 Connect the power cord to the power connector on the battery charger 2 Plug the power cord into an AC wall outlet 3 Insert the ba...

Page 20: ...rmance of the battery charger however you are recommended to use it between 10 C and 30 C When using the battery charger in a foreign country be sure to use a travel converter that matches the wall ou...

Page 21: ...t in injury 3 Loading the battery Align the battery as shown and insert it into the battery compartment until the battery is locked in position with the battery lock knob Removing the battery Slide th...

Page 22: ...of time Repeated zoom adjustments Repeated auto focus by depressing the shutter button halfway When the FULLTIME AF mode is turned on When connected to a computer or printer If the camera is left for...

Page 23: ...ot press on the card with hard or pointed items such as ballpoint pens Never open the battery compartment card cover or remove the card or the battery while the camera is turned on Doing so could dest...

Page 24: ...is connected to a computer or printer the image data may be lost or damaged It is recommended you use the AC adapter when connected to a computer or printer Do not connect or disconnect the AC adapter...

Page 25: ...turns on 3 To turn the camera off press the power switch again TIPS To save battery power the camera automatically enters the sleep mode and stops the operation after about 3 minutes of non operation...

Page 26: ...ion Corrective action q NO CARD There is no card in the camera or the card is not inserted properly Insert a card If a card is already inserted remove it and insert it again correctly The card cannot...

Page 27: ...the area where you purchased this camera 1 Set the mode dial to P and press the power switch to turn the camera on 2 Press e The top menu is displayed 3 Press d on the arrow pad to select MODE MENU 4...

Page 28: ...selected item 6 Press ac to select a language then press e 7 Press e again to exit the menu 8 To turn the camera off press the power switch CAM PIC CARD SEtUP ALL RESEt ON ON ENGLISH ENGLISH ON ON 3 M...

Page 29: ...4 Press ac to select the SETUP tab then press d 5 Press ac to select X then press d The green frame moves to the selected item Arrow pad OK button Mode dial Power switch Top menu MODE MENU ESP CARD SE...

Page 30: ...he date and time are completely set The time is displayed in the 24 hour format Consequently 2 p m is displayed as 14 00 9 Press e For a more accurate setting press e when the time signal hits 00 seco...

Page 31: ...mode dial to h and press the power switch The camera and the monitor turn on 2 Press f The monitor turns off and the viewfinder turns on 3 While looking through the viewfinder slowly turn the diopter...

Page 32: ...s in the vertical position hold the camera so that the flash is higher than the lens Keep your fingers and the strap away from the lens and flash Clear pictures cannot be obtained if the camera moves...

Page 33: ...the menu selections to set the ISO sharpness etc Categorizes the settings into 4 tabs Press ac to select a tab and display the associated menu items There is no mode menu in h mode Use the arrow pad...

Page 34: ...OFF SEtUP 1Press e to display the top menu Press d Top menu CAMERA tab PICTURE tab CARD tab SETUP tab 2Press ac to select a tab then press d Press b to return to the tab selection screen CARD SEt PIC...

Page 35: ...ESP OFF OFF AUtO AUtO CARD SEt PIC CAMERA DRIVE ISO OFF A S M ESP CARD SEt PIC CAMERA DRIVE ISO OFF A S M ESP CAMERA 4Press acto select a setting Press e to complete setting Press e again to exit the...

Page 36: ...ng i high speed sequential shooting k AF sequential shooting and 7 auto bracketing P 84 Selects the metering method ESP 5 or MULTI P 76 Extends telephoto capability beyond maximum optical zoom P 55 Se...

Page 37: ...36 Shortcut menus 2 Using the menus Sets the appropriate white balance according to the light source P 102 Sets the date and time P 28 Formats a card P 145 WB X CARD SETUP...

Page 38: ...Still picture Movie Runs through all saved pictures one after another P 117 MOVIE PLAYBACK Plays back movies P 118 INDEX Creates an index picture of a movie in 9 frames P 120 EDIT Edits a movie P 122...

Page 39: ...sitivity from AUTO 100 200 and 400 P 100 A S M Selects the shooting mode from A Aperture priority shooting S Shutter priority shooting and M Manual shooting P 64 r1 2 3 4 Selects a mode to be activate...

Page 40: ...CK WHITE SEPIA WHITE BOARD BLACK BOARD P 92 AF AREA Changes the position of the AF target mark using the arrow pad P 71 INFO Selects whether to display all the information such as shutter speed and wh...

Page 41: ...P 150 MY MODE SETUP Customizes settings which are activated in the r mode P 142 FILE NAME Changes how file names are assigned P 153 PIXEL MAPPING Checks the CCD and image processing functions for erro...

Page 42: ...maller and saves it as a new file P 127 P Crops part of a picture and saves it as a new file P 128 2 The EDIT tab is not displayed during movie playback CARD tab CARD SETUP Erases all image data store...

Page 43: ...s Adjusts the brightness of the viewfinder or monitor P 148 X Sets the date and time P 28 VIDEO OUT Selects NTSC or PAL according to your TV s video signal type TV video signal types differ depending...

Page 44: ...g the camera on Situation related modes h Full auto shooting Allows you to take still pictures using no special functions or manual adjustments The camera sets the optimal focusing and exposure This i...

Page 45: ...roduced in this mode it is excellent for shooting natural scenery The camera automatically sets the optimal shooting conditions m Night Scene shooting Suitable for shooting pictures in the evening or...

Page 46: ...speed automatically By decreasing the aperture value F number the camera will focus within a smaller range producing a picture with a blurred background Increasing the value forces the camera to focu...

Page 47: ...for retrieving by this mode g MY MODE SETUP P 142 g Using My Mode P 68 n Movie record Allows you to record movies The camera sets the aperture and shutter speed automatically Even if the subject moves...

Page 48: ...l to h i j l m r p P and press the power switch g Power on off P 24 The monitor turns on 2 Decide the composition of the picture Mode dial Shutter button Mode dial Card access lamp Power switch f butt...

Page 49: ...way fully The camera takes the picture The card access lamp blinks while the picture is stored on the card TIPS The subject cannot be focused on g If correct focus cannot be obtained P 50 The green la...

Page 50: ...the image in the monitor or viewfinder This does not affect recorded pictures To check the area the camera is focusing on If you press f while pressing the shutter button halfway the area you are focu...

Page 51: ...ra at an object about the same distance away as the subject 2 Press the shutter button halfway until the green lamp lights When the focus and exposure are locked the green lamp lights The AF target ma...

Page 52: ...focus lock recompose your shot and then take the picture If the subject has no vertical lines hold the camera vertically and focus the camera using the focus lock function by pressing the shutter butt...

Page 53: ...ur subject 3 Press the shutter button fully to start recording You can adjust the zoom during movie recording The card access lamp blinks while the movie is stored on the card During movie recording N...

Page 54: ...ng To use the zoom during recording set DIGITAL ZOOM to ON g DIGITAL ZOOM Using the digital zoom P 55 In n mode the flash and manual focus MF cannot be used This camera cannot play back sound Note Rec...

Page 55: ...m of approximately 30 by combining the optical zoom with the digital zoom During movie recording the digital zoom magnification is 2 5 Camera movement is likely to occur at higher magnifications Stabi...

Page 56: ...of the zoom indicator indicates the optical zoom If the digital zoom is set to ON a red area appears on the zoom indicator When you reach the limit of the optical zoom the digital zoom is enabled Pict...

Page 57: ...et the flash mode by repeatedly pressing The flash mode changes in the sequence shown below when all modes are available If no operation is performed for about 3 seconds the flash mode is set and the...

Page 58: ...range W max Approx 0 3 m to 4 5 m 1 0 ft to 14 8 ft T max Approx 1 2 m to 3 5 m 3 9 ft to 11 5 ft Function restrictions according to mode F2 8 F2 8 1600 1200 1600 1200 SQ1 SQ1 mark Available Not avail...

Page 59: ...om magnification is increased the camera will increase the locked shutter speed accordingly The flash does not fire in the following situations In the movie record mode during auto bracketing during s...

Page 60: ...on After the pre flashes it takes about 1 second before the shutter is released Hold the camera firmly to avoid camera movement Effectiveness may be limited if the subject is not looking directly at t...

Page 61: ...r slow shutter speeds Normally when shooting with a flash shutter speeds cannot go below a certain level to prevent camera movement But when shooting a night scene background fast shutter speeds can m...

Page 62: ...S m mode 4 sec 1st curtain with red eye reduction HSLOW1 This mode is for when you want to use slow synchronization yet also reduce the red eye phenomenon For instance when shooting a person against...

Page 63: ...In the top menu select MODE MENU CAMERA SLOW SLOW1 HSLOW SLOW2 and press e g How to use the menus P 33 Press e again to exit the menu Mode dial Arrow pad OK button CARD SEt PIC CAMERA SLO W1 SLO W2 S...

Page 64: ...3 EV steps 1 In the top menu select MODE MENU CAMERA w and press d g How to use the menus P 33 2 Press ac to adjust the exposure then press e a Light emission is increased by 1 3 EV each time you pre...

Page 65: ...he shooting mode to be used when the mode dial is set to p 1 In the top menu select MODE MENU CAMERA A S M A S or M and press e g How to use the menus P 33 Press e again to exit the menu Mode dial Arr...

Page 66: ...eps When the aperture value is displayed in green the setting will provide optimum exposure Aperture range Toward W f2 8 to f8 0 Toward T f3 7 to f8 0 When the flash is set to the auto flash mode the...

Page 67: ...tting is unsuitable for the conditions Take the following steps When the shutter speed is displayed in green the setting will provide optimum exposure Shutter speed range 1 to 1 1000 Shutter speeds th...

Page 68: ...tter speed compared to the exposure level considered optimal by the camera is displayed If the exposure differential appears in red it indicates that the exposure differential is less than 3 0 EV or m...

Page 69: ...can create and save up to 4 different patterns g MY MODE SETUP P 142 1 In the top menu select MODE MENU CAMERA MY MODE MY MODE 1 to MY MODE4 and press e g How to use the menus P 33 Press e again to e...

Page 70: ...ect is not in the center of the screen focusing is possible SPOT Focus selection is based on the subject within the AF target mark 1 In the top menu select MODE MENU CAMERA AF MODE iESP or SPOT and pr...

Page 71: ...tter button halfway When ON is selected the focusing time is reduced letting you take successive snapshots 1 In the top menu select MODE MENU CAMERA FULLTIME AF ON and press e g How to use the menus P...

Page 72: ...w to use the menus P 33 3 Use the arrow pad to move the AF target mark to the area you want to focus on The AF target mark at the center of the screen can be moved vertically or horizontally 4 Take th...

Page 73: ...et mark on the subject you want to focus on and press x The focus is locked and the AF LOCK mark is displayed To reset the AF LOCK press x again to cancel the AF LOCK Each time you press x AE lock is...

Page 74: ...Do not operate any of the buttons or the mode dial after performing AF LOCK AF LOCK will be canceled The camera had emerged from sleep mode or the power was turned off The focus may be compromised by...

Page 75: ...the focus position During operation the area you are focusing on is enlarged This lets you check whether the focus is in the right position The distance indicator on the left of the monitor is for re...

Page 76: ...hen you perform focus lock 1 Position the AF target mark on a subject at the desired distance and press the shutter button halfway 2 Keeping the shutter button half pressed press e The distance indica...

Page 77: ...can be shot with optimal exposure regardless of the background light gP 76 Multi metering Meters the brightness of the subject at up to 8 different points to set the optimal exposure based on the aver...

Page 78: ...top menu the setting can be made in the same way as selecting MODE MENU CAMERA ESP 5 MULTI g How to use the menus P 33 Press e again to exit the menu 3 Position the AF target mark on the area you wan...

Page 79: ...sing x twice The aperture and shutter speed as calculated from the average values obtained by metering at 2 points These values are recalculated every time another metering point is added The average...

Page 80: ...e your shot again with the sky in the frame and take the picture 1 When using the camera in the A S M mode AE lock is not available in the M mode Set to any mode except M g A S M mode P 64 If a functi...

Page 81: ...p 2 or 3 hold down x for more than 1 second C appears While C is displayed the exposure is saved Press x again to cancel the AE memory AE lock was canceled Do not operate any of the buttons or the mod...

Page 82: ...can fill the entire frame with your subject If the center of the frame within the AF target mark is metered when you are close to the subject and you shoot with the optimal exposure the picture will t...

Page 83: ...ot be changed 1 In the top menu select and press e In the top menu the setting can be made in the same way as selecting MODE MENU CAMERA g How to use the menus P 33 Press e again to exit the menu TIPS...

Page 84: ...exited 2 Press the shutter button fully to take the picture Pressing the shutter button halfway locks the focus and exposure The self timer lamp lights for approximately 10 seconds then starts blinki...

Page 85: ...frame Approx 11 frames at approx 1 5 frames sec in HQ mode i Pictures can be taken at a faster speed than normal sequential shooting The sequential shooting speed varies depending on the record mode s...

Page 86: ...the exposure setting considered optimal by the camera When auto bracketing is set the exposure is changed automatically for each frame when you start shooting The exposure differential and number of f...

Page 87: ...ing is not possible in M mode The flash does not fire in 7 mode In modes other than S and M since the shutter speed is set to max 1 30 sec exposure is decreased when shooting a dark subject In 7 mode...

Page 88: ...ocked on you The camera automatically sets the optimal shooting conditions The zoom is fixed in the wide position and cannot be changed 1 In the top menu select MODE MENU CAMERA o and press d g How to...

Page 89: ...enu select MODE MENU CAMERA PANORAMA and press d g How to use the menus P 33 The PANORAMA mode is set 2 Use the arrow pad to choose at which edge you want to connect the pictures d The next picture is...

Page 90: ...ential shooting are not available Images are saved in JPEG format when panorama shooting is done in the TIFF mode The size of the image does not change If the mode dial is operated during panorama sho...

Page 91: ...g How to use the menus P 33 The 2 IN 1 picture mode is set 2 Take the first shot The subject will be positioned on the left in the combined picture 3 Take the second shot The subject will be position...

Page 92: ...shooting and self portrait modes are not available To cancel the 2 IN 1 picture mode after the first shot has been taken press e The first shot will not be saved Operating the mode dial will exit 2 I...

Page 93: ...a black background emphasized to make them easier to read 1 In the top menu select MODE MENU CAMERA FUNCTION then select a mode and press e g How to use the menus P 33 WHITE BOARD and BLACK BOARD are...

Page 94: ...In the top menu select MODE MENU CAMERA R ON and press e g How to use the menus P 33 Press e again to exit the menu 2 When recording starts turn the camera microphone towards the source of the sound...

Page 95: ...be possible if there is insufficient space in the card memory Sound can be recorded while shooting a movie 1 In the top menu select MODE MENU CAMERA R ON and press e g How to use the menus P 33 2 Reco...

Page 96: ...pictures that can be saved will be fewer Compression In record modes other than TIFF image data are compressed The higher the compression the less clear the image will be Resolution and picture size...

Page 97: ...creased to the equivalent of approx 8 million pixels 3200 2400 This allows you to make quality prints in larger sizes such as A3 297 mm 420 mm 11 7 16 5 However file sizes also become larger ENLARGE S...

Page 98: ...pressed TIFF 1 3 2048 1360 1 3 1600 1200 2 5 1280 960 4 8 1024 768 6 13 640 480 16 33 SHQ 2048 1536 Low com pression JPEG 8 16 2048 1360 8 17 ENLARGE SIZE3200 2400 2 5 HQ 2048 1536 High com pression 2...

Page 99: ...et to PAL and the AV cable connected the movie recording time will differ from the time listed in the Movie Record Modes table Selecting a record mode 1 In the top menu select MODE MENU PICTURE K and...

Page 100: ...TIFF SHQ HQ SQ1 and SQ2 then press d 3 Press ac to select the resolution If you selected SQ1 or SQ2 press d after selecting the resolution then select HIGH or NORMAL by pressing ac 4 Press e Press e...

Page 101: ...r shutter speeds with the same amount of light 1 In the top menu select MODE MENU CAMERA ISO then choose the most suitable ISO sensitivity and press e g How to use the menus P 33 AUTO is not available...

Page 102: ...o select a setting Adjust toward Press d to adjust up to 2 0 in 1 3 EV steps Adjust toward Press b to adjust up to 2 0 in 1 3 EV steps TIPS Often bright subjects such as snow will turn out darker than...

Page 103: ...DE MENU PICTURE WB and press d g How to use the menus P 33 1 In the top menu press c to select WB 2 Press ac to select AUTO PRESET or V according to the shooting conditions AUTO Press e Press e again...

Page 104: ...mps etc y For shooting under a cool white fluorescent lamp This type of lamp is generally used in offices etc TIPS You can also preview different color tones by trying the different PRESET WB settings...

Page 105: ...e correct setting may not be obtained if the light reflected by the paper is too bright or too dark White balance may not be effective under some special light sources After setting a white balance ot...

Page 106: ...o use the menus P 33 The white balance adjustment indicator appears on the screen 2 The color becomes bluer each time you press a and redder each time you press c depending on the original white balan...

Page 107: ...age contours are emphasized making the image appear sharper and more vivid Use this setting when you want to print pictures To reduce the sharpness Press c The image contours are softened Use this set...

Page 108: ...e the menus P 33 2 Press ac to adjust the contrast between 5 and 5 To increase the contrast Press a The light and dark areas are defined more clearly making the image look crisper To reduce the contra...

Page 109: ...s d g How to use the menus P 33 2 Press ac to adjust the saturation between 5 and 5 To increase the saturation Press a Colors become darker and more intense To reduce the saturation Press c Colors bec...

Page 110: ...AMERA NOISE REDUCTION ON or OFF and press e g How to use the menus P 33 Press e again to exit the menu Noise reduction is always fixed to ON in the m mode When noise reduction is set to ON the camera...

Page 111: ...owing the brightness and contrast of recorded pictures The histogram display can be set separately for shooting mode and playback mode Ex When a histogram is displayed in P mode When the image is brig...

Page 112: ...again to exit the menu The histogram is not displayed in the following situations even if histogram display is set to ON During M mode panorama shooting 2 IN 1 shooting multi metering and self portrai...

Page 113: ...picture taken Single frame playback 2 Use the arrow pad to play back other pictures If the camera is not used for over 3 minutes the camera enters the sleep mode and the monitor turns off Mode dial Po...

Page 114: ...ly Functions available in normal playback mode are also available in QUICK VIEW 1 Press the QUICK VIEW button in the shooting mode The camera immediately enters the playback mode and displays the last...

Page 115: ...l the zoom lever toward T U Each time you pull the zoom lever the picture is enlarged gradually By using the arrow pad while the enlarged picture is displayed you can shift the picture in the desired...

Page 116: ...playback mode push the zoom lever toward W G g Viewing still pictures P 112 Use the arrow pad to select the picture b Moves to the previous frame d Moves to the next frame a Jumps to the previous ind...

Page 117: ...tion lets you select the number of pictures in an index display from 4 9 and 16 1 In the top menu select MODE MENU SETUP G 4 9 or 16 and press e g How to use the menus P 33 Press e again to exit the m...

Page 118: ...2 Press a to start the slideshow 3 Press e to stop the slideshow The slideshow will not stop until you cancel it by pressing e You are recommended to use the optional AC adapter when running a slidesh...

Page 119: ...then press e The movie is played back When playback ends the display automatically returns to the beginning of the movie Fast forward fast rewind functions are available during playback d Fast forward...

Page 120: ...by holding the button down b Displays the previous frame The movie can be played continuously in reverse by holding the button down e Displays the MOVIE PLAYBACK menu TIPS Movies can also be played b...

Page 121: ...w the movie at a glance Indexes can be stored on the card as a still picture EDIT This function lets you erase parts of the movie that you do not want 1 Use the arrow pad to select a picture with n g...

Page 122: ...OK then press e The 9 frames extracted from the movie appear as an index display then the camera returns to the playback mode The index is stored as a new picture If you want to select different frame...

Page 123: ...of the part you want to keep and press e a Jumps to the first frame of the movie c Jumps to the last frame of the movie d Displays the next frame The movie can be played continuously by holding the b...

Page 124: ...new movie OVERWRITE Stores the edited movie with the same name as the original The original movie is not stored The edited movie is stored and the screen returns to the playback mode You cannot edit...

Page 125: ...taken is displayed on the TV Use the arrow pad to select the picture you want to display The close up playback index display and slideshow functions can also be used on a TV screen TIPS You are recomm...

Page 126: ...o that they are displayed vertically 1 In the single frame playback mode press y g Viewing still pictures P 112 Each pressing rotates the image in the following sequence 90 degrees counterclockwise 90...

Page 127: ...ard the sound you want to record and press e to start recording The BUSY bar is displayed during recording If the microphone is placed farther than 1 m 3 3 ft from the subject sound may not be recorde...

Page 128: ...NU EDIT then choose each item g How to use the menus P 33 Select Q gP 127 Select P gP 128 Resizing 3 Select Q then press d 4 Press ac to select the picture size then press e The BUSY bar is displayed...

Page 129: ...al to vertical and vice versa when the maximum or minimum size is reached 6 Press e 7 Press ac to select OK then press e The BUSY bar is displayed during trimming After the image is saved the camera r...

Page 130: ...llowing cases Movies when there is insufficient memory space on the card or when the picture was taken with the record mode set to ENLARGE SIZE It may not be possible to trim pictures taken with anoth...

Page 131: ...annot be erased by the single frame all frame erase function 1 Use the arrow pad to display the picture you want to protect g Viewing still pictures P 112 2 Press 0 To cancel protection press 0 again...

Page 132: ...Only protected pictures are played back When ALL is selected all pictures stored in the card are played back Images selected from 0 and played back are protected and cannot be erased To erase a pictu...

Page 133: ...g back only protected pictures P 131 Once erased pictures cannot be restored Check each picture before erasing to avoid accidentally erasing pictures you want to keep g Protecting pictures P 130 Singl...

Page 134: ...menu select MODE MENU CARD CARD SETUP and press d g How to use the menus P 33 2 Press ac to select R ALL ERASE then press e 3 Press ac to select YES then press e All the pictures are erased Mode dial...

Page 135: ...settings are returned to the factory default settings after the power is turned off Factory default settings Example If ALL RESET is set to ON and the record mode is changed to SQ1 the record mode re...

Page 136: ...0 0 P 101 FUNCTION OFF P 92 FLASH MODE AUTO P 56 INFO OFF P 147 w 0 0 P 63 u OFF P 110 AF MF AF P 74 R still pictures OFF P 93 Y OFF P 83 R movies OFF P 94 LCD ON lights K HQ P 95 OPTICAL ZOOM 42mm P...

Page 137: ...le functions Settings Ref Page AE LOCK factory default setting P 79 AF LOCK P 72 5 ESP 5 P 76 OFF P 81 DRIVE o j i k 7 P 84 ISO AUTO 100 200 400 P 100 A S M A S M P 64 SLOW SLOW1 HSLOW1 SLOW2 P 62 NOI...

Page 138: ...m button 1 In the top menu select MODE MENU SETUP CUSTOM BUTTON and press d g How to use the menus P 33 2 Press ac to select a function then press e Press e again to exit the menu Mode dial Arrow pad...

Page 139: ...om button TIPS When ISO is set to the custom button but you want to use AE lock The AE lock function cannot be used when a different function is set to the custom button Reset AE lock to the custom bu...

Page 140: ...nu Ref Page Functions that can be set in the shortcut menu Ref Page ESP 5 P 76 PANORAMA P 88 P 81 2 IN 1 P 90 DRIVE P 84 FUNCTION P 92 ISO P 100 AF AREA P 71 A S M P 64 INFO P 147 r1 2 3 4 P 68 u P 11...

Page 141: ...In the top menu select MODE MENU SETUP SHORT CUT and press d g How to use the menus P 33 2 Press ac to select A B or C then press d 3 Press ac to select a function then press e The shortcut menu is s...

Page 142: ...tcut menu you have set appears on the top menu 2 Press a b or c to select the shortcut menu The monitor jumps directly to the setting screen for that function Ex When is set in shortcut menu A You can...

Page 143: ...0mm 200mm and 420mm these numbers are based on the focal length of a 35mm camera Functions that can be set in MY MODE Default setting Ref Page Functions that can be set in MY MODE Default setting Ref...

Page 144: ...ttings one by one The MY MODE SETUP screen appears 3 Select a MY MODE number Press ac to select MY MODE number from 1 to 4 then press e When selecting CURRENT in Step 2 4 Press ac to select SET then p...

Page 145: ...g then press e The setting is saved You can also change the other custom settings 5 When you have made all the settings you want press e The screen displayed in Step 2 appears Press e again to exit th...

Page 146: ...pictures are erased when the card is formatted Make sure that you save or transfer important data to a PC before formatting a card 1 In the top menu select MODE MENU CARD CARD SETUP and press d g How...

Page 147: ...e The BUSY bar is displayed and the card is formatted Never do the following during formatting as they may cause the card to malfunction Open the battery compartment card cover Remove the battery Conn...

Page 148: ...ormation on the monitor ON To turn INFO off press e to display the top menu and press b again Ex Playback mode If the picture has been taken with a different camera setting INFO to ON in q mode may st...

Page 149: ...In the top menu select MODE MENU SETUP s and press d g How to use the menus P 33 2 Press ac to adjust the brightness while looking in the monitor or viewfinder and when you have set the desired level...

Page 150: ...u have just taken Pressing the shutter button halfway during Rec View lets you resume shooting immediately OFF The picture being recorded to the card is not displayed This is useful when you want to p...

Page 151: ...he top menu select MODE MENU SETUP SLEEP 30 SEC 1 MIN 3 MIN 5 MIN or 10 MIN and press e g How to use the menus P 33 Press e again to exit the menu The sleep mode is not activated when using the AC ada...

Page 152: ...It is also possible to register your favorite picture g SCREEN SETUP P 152 OFF No picture is displayed 1 Factory default setting 2 Selects a picture already registered If there is no picture registere...

Page 153: ...een is displayed asking if you want to cancel the currently registered picture and register a new one To register a new picture select RESET and press e If you select KEEP the screen returns to the me...

Page 154: ...o No 100 and the file number returns to No 0001 This method is useful when grouping files on separate cards AUTO Even if a new card is inserted the folder number and file number are retained from the...

Page 155: ...mage processing functions It is not necessary to operate this function frequently Approximately once a year is recommended Wait at least one minute after taking or viewing pictures to allow for proper...

Page 156: ...us mode m At long ranges the camera measures in meters and at shorts ranges in centimeters ft At long ranges the camera measures in feet and at short ranges in inches 1 In the top menu select MODE MEN...

Page 157: ...efore connecting the AV cable If you select the wrong video signal type you will not be able to play back the recorded pictures properly on the TV 1 In the top menu select MODE MENU SETUP VIDEO OUT NT...

Page 158: ...mation from digital cameras You can print out pictures automatically at home or in a print shop by storing such data as which pictures you wish to print and the number of prints on a card Pictures tak...

Page 159: ...by this camera Make changes using the original device If a card contains DPOF reservations set by another device entering reservations using this camera may overwrite the previous reservations If the...

Page 160: ...ou cannot make the print reservation for pictures with n 2 In the top menu select MODE MENU PLAY and press d g How to use the menus P 33 If print reservation data is already stored on the card the PRI...

Page 161: ...ber Set the date time printing data Press ac to select NO DATE or TIME then press e NO The pictures are printed without the date and time DATE All the pictures are printed with the shooting date TIME...

Page 162: ...rint reservation for pictures with n 2 In the top menu select MODE MENU PLAY and press d g How to use the menus P 33 If data is already stored on the card the PRINT ORDER SETTING screen appears giving...

Page 163: ...t reservation Go to Step 11 6 Press ac to select number of prints X date time or P trimming then press d 7 Perform each setting Set the number of prints Press ac to set the desired number of prints th...

Page 164: ...he screen in Step 4 The icon appears on the displayed picture Repeat Steps 4 to 8 to make print reservations for other images 9 Press e to display the single frame reservation menu 10 Press b to selec...

Page 165: ...If trimming has already been set the P screen appears Press ac to select RESET then press e 2 Use the arrow pad and zoom lever to decide the trimming position and size Press acbd to move the trimming...

Page 166: ...until the playback screen appears The size of the printed picture varies depending on the printer settings If the trimmed picture size is small printing magnification increases accordingly resulting i...

Page 167: ...the print reservation data for all the pictures 1 In the top menu select MODE MENU PLAY and press d g How to use the menus P 33 2 Press ac to select RESET then press e If there is no print reservation...

Page 168: ...he frame for which you want to reset the print reservation using the arrow pad and press e The single frame reservation menu is displayed 5 Press c to select CANCEL The print reservation data is cance...

Page 169: ...erent makers and printing out pictures directly STANDARD All printers that support PictBridge have standard print settings Selecting STANDARD on the settings screens g P 173 to 179 images are printed...

Page 170: ...cable into the camera s USB connector 3 Press the power switch to turn the camera on The monitor turns on and the selection screen for the USB connection is displayed 4 Press ac to select PRINT then p...

Page 171: ...one picture in multiple layout format g PRINT mode MULTI PRINT mode P 173 ALL INDEX Prints an index of all the pictures stored on the card g ALL INDEX mode PRINT ORDER mode P 179 PRINT ORDER Prints th...

Page 172: ...RINT PAPER screen is displayed 2 Press ac to select the paper size then press d When the PRINT PAPER screen is not displayed SIZE BORDERLESS and PICS SHEET are set to STANDARD Go to Step 4 3 Use ac to...

Page 173: ...is displayed 5 Press ac to select OK then press e Printing starts To cancel printing select CANCEL and press e The PRINT MODE SELECT screen is displayed When printing is finished the screen returns to...

Page 174: ...o Step 3 MULTI PRINT mode Go to Step 4 When the PRINT PAPER screen is not displayed SIZE BORDERLESS and PICS SHEET are set to STANDARD Go to step 5 3 Use ac to select framed or unframed then press e G...

Page 175: ...the index 6 Select the print reservation method SINGLE PRINT Makes a single frame print reservation for the selected picture according to standard settings MORE Sets the number of prints of the select...

Page 176: ...t of a recorded picture so that only the enlarged section is printed g Trim the picture P 181 DATE and FILE NAME are not available in MULTI PRINT mode When you have finished all the settings for MORE...

Page 177: ...PRINT MODE SELECT screen When printing is finished the monitor returns to the PRINT MODE SELECT screen g Exiting direct printing P 183 To cancel printing Pressing e during print data transfer display...

Page 178: ...printed filling the entire page Print information settings screen is displayed 4 Press ac to select the item you want to set then press d Press ac to select the item then press e If PRINT INFO cannot...

Page 179: ...nitor returns to the PRINT MODE SELECT screen When printing is finished the monitor returns to the PRINT MODE SELECT screen g Exiting direct printing P 183 To cancel printing Pressing e during print d...

Page 180: ...inside a blank frame ON The image is printed filling the entire page The print screen is displayed BORDERLESS is not available in ALL INDEX mode Press e and go to Step 4 4 Print the pictures Press ac...

Page 181: ...t printing To cancel printing Pressing e during print data transfer displays the screen for selecting whether to continue or cancel printing To cancel printing press ac to select CANCEL then press e G...

Page 182: ...ame changes from horizontal to vertical and vice versa when the maximum or minimum size is reached If trimming has already been set the P screen appears Press ac to select RESET then press e 2 Press e...

Page 183: ...varies depending on the printer settings If the trimmed picture size is small printing magnification increases accordingly resulting in a printed picture with lower resolution For the best results in...

Page 184: ...isconnect the camera from the printer 1 In the PRINT MODE SELECT screen select b The message is displayed 2 Press the power switch to turn the camera off 3 Remove the USB cable from the camera 4 Remov...

Page 185: ...ectly Disconnect the camera and connect it again correctly NO PAPER There is no paper in the printer Load some paper in the printer NO INK The printer has run out of ink Replace the ink cartridge in t...

Page 186: ...and cancel the read only setting CARD FULL The card is full No more pictures movies or information such as print reservations can be recorded Replace the card or erase unwanted pictures Before erasing...

Page 187: ...s pressed The battery is exhausted Charge the battery P 18 The camera is in the playback mode Set the mode dial to any position except q P 47 The flash has not finished charging Remove your finger fro...

Page 188: ...d with the image data is wrong The date time is not set Set the date time The clock adjustment is not factory preset P 28 The camera has been left with the battery removed If the camera is left for on...

Page 189: ...fire in the auto bracketing mode Set another mode in the DRIVE menu P 85 The camera is in the movie mode The flash does not fire in the movie mode Set a different shooting mode P 52 FUNCTION is set t...

Page 190: ...P 56 The lens was dirty Clean the lens Use a commercially available blower blush and then wipe with a lens cleaner to remove dust Mold may form on the lens surface if the lens is left dirty P 205 The...

Page 191: ...4 The center of the subject is too bright If the center of the subject is too bright the image as a whole emerges darker Adjust the exposure compensation toward plus P 101 The aperture value setting i...

Page 192: ...r switch to turn the camera on P 112 The camera is in the shooting mode Press the QUICK VIEW button or set the mode dial to q P 112 113 There are no pictures on the card NO PICTURE appears on the moni...

Page 193: ...step 1 of Connecting the camera to a printer P 169 The printer does not support PictBridge Refer to the printer s instruction manual or contact the manufacturer The camera is not recognized by the PC...

Page 194: ...193 Miscellaneous 11 List of menus h mode Top menu Setting Ref Page DRIVE o j i k P 84 K SHQ 2048 1536 HQ 2048 1536 SQ1 1280 960 SQ2 640 480 P 95 X P 28 CARD SETUP YES NO P 145...

Page 195: ...LOW SLOW2 P 62 NOISE REDUCTION 4 OFF ON P 109 DIGITAL ZOOM 6 OFF ON P 55 FULLTIME AF OFF ON P 70 AF MODE iESP SPOT P 69 o 5 P 87 PANORAMA 6 P 88 2 IN 1 P 90 FUNCTION OFF BLACK WHITE SEPIA WHITE BOARD...

Page 196: ...r mode Top menu Tab Function Setting Ref Page MODE MENU SETUP ALL RESET 8 OFF ON P 134 W ENGLISH FRANCAIS DEUTSCH ESPA OL ITALIANO PORTUGUES P 26 PW ON OFF SETUP OFF 1 2 P 151 REC VIEW OFF ON P 149 SL...

Page 197: ...SEPIA P 92 R OFF ON P 94 PICTURE 7 7 P 105 SHARPNESS 5 5 P 106 CONTRAST 5 5 P 107 SATURATION 5 5 P 108 CARD CARD SETUP YES NO P 145 SETUP ALL RESET OFF ON P 134 W ENGLISH FRANCAIS DEUTSCH ESPA OL ITA...

Page 198: ...Q 640 480 320 240 CANCEL P 127 P NEW FILE CANCEL P 128 CARD CARD SETUP ALL ERASE FORMAT P 133 145 SETUP ALL RESET OFF ON P 134 W ENGLISH FRANCAIS DEUTSCH ESPA OL ITALIANO PORTUGUES P 26 PW ON OFF SET...

Page 199: ...5 SETUP ALL RESET OFF ON P 134 W ENGLISH FRANCAIS DEUTSCH ESPA OL ITALIANO PORTUGUES P 26 PW ON OFF SETUP OFF 1 2 P 151 s P 148 X P 28 VIDEO OUT NTSC PAL P 156 G 4 9 16 P 116 8 OFF ON P 151 MOVIE PLAY...

Page 200: ...e F No F2 8 SHUTTER 1 1000 ZOOM 42mm LCD ON F 0 0 FLASH AUTO S M SLOW1 n AF MF AF Y OFF 5 ESP OFF DRIVE o 7 1 0 EV 3 ISO AUTO A S M 100 p A r1 2 3 4 MY MODE 1 w 0 0 SLOW SLOW1 NOISE REDUCTION OFF m fi...

Page 201: ...es OFF R movies OFF K HQ 2048 1536 n 320 240 TIFF 2048 1536 SHQ 2048 1536 HQ 2048 1536 SQ1 1280 960 NORMAL SQ2 640 480 NORMAL WB AUTO None SHARPNESS 0 CONTRAST 0 SATURATION 0 REC VIEW ON SLEEP 3 MIN F...

Page 202: ...s 11 Playback mode Others Settings differ according to the region where the camera is sold SWITCH FRAME ALL INFO OFF u OFF 0 OFF y 0 OFF G 9 R OFF ALL RESET ON W ENGLISH PW ON OFF SETUP 1 s NORMAL X Y...

Page 203: ...ions In r mode available functions vary depending on the modes set in the MY MODE SETUP menu Mode h ijlm p P n Function A S M p Zoom DIGITAL ZOOM AF MODE FULLTIME AF AF AREA Manual focus FLASH MODE AU...

Page 204: ...j i k 2 7 2 o 3 PANORAMA 2 IN 1 FUNCTION BLACK WHITE SEPIA WHITE BOARD BLACK BOARD R R movie K ISO F WB SHARPNESS CONTRAST SATURATION NOISE REDUCTION INFO u ALL RESET 4 W PW ON OFF SETUP REC VIEW SLE...

Page 205: ...ailable Not available 1 Cannot be selected in M n mode 2 Cannot be selected in m mode 3 Can be selected only in i mode 4 Cannot be selected in r mode FILE NAME PIXEL MAPPING s X m ft VIDEO OUT SHORT C...

Page 206: ...each use a cloth soaked in clean water and well wrung Viewfinder and monitor Wipe gently with a soft cloth Lens Blow dust off the lens with a commercially available blower then wipe gently with a lens...

Page 207: ...SQ1 1024 768 pixels TIFF SQ2 640 480 pixels TIFF SQ2 No of storable pictures when using a 16 MB card Without sound Approx 1 frame TIFF 2048 1536 Approx 8 frames SHQ 2048 1536 Approx 20 frames HQ 2048...

Page 208: ...nvironment Temperature 0 C to 40 C 32 F to 104 F operation 20 C to 60 C 4 F to 140 F storage Humidity 30 to 90 operation 10 to 90 storage Power supply Only an Olympus LI 10B lithium ion battery AC ada...

Page 209: ...Method This is used to measure the distance to the subject The camera determines if the image is focused by the level of contrast in the subject Conventional Photograph This refers to recording images...

Page 210: ...users can edit them using graphics application software or view the images using an Internet web browser M Manual Mode The user sets both the aperture and shutter speed NTSC National Television Syste...

Page 211: ...le Format A format used for saving highly detailed black and white or color image data TIFF image files can be handled by software programs for scanners and graphics applications This camera uses an u...

Page 212: ...33 112 Auto bracketing 7 85 Auto white balance 102 Auto flash 59 AV cable 124 B Battery 18 Battery check 15 Battery compartment card cover 11 20 Battery lock knob 20 Beep sound 8 151 BKT 85 BLACK WHI...

Page 213: ...Halfway pressed 48 HIGH 95 High speed sequential shooting i 84 Histogram display u 110 HQ 97 I iESP 69 Index display G 115 Information display INFO 147 ISO sensitivity 100 209 J JPEG 97 209 L Landscap...

Page 214: ...Recording sound R 93 94 126 Recording sound with still pictures R 93 Recording sound with movies R 94 Red eye reduction flash 59 Resizing Q 127 Resolution 95 209 Rotation button y 11 125 S SATURATION...

Page 215: ...TIFF 97 Time remaining 52 Top menu 32 Trimming P 164 181 Tripod socket 11 Tungsten light 1 103 U USB 169 USB cable 169 USB connector 10 169 V VIDEO OUT 156 Viewfinder 11 12 30 47 148 Viewing still pic...

Page 216: ...20097 Hamburg Germany Tel 49 40 23 77 3 0 Fax 49 40 23 07 61 Letters Postfach 10 49 08 20034 Hamburg Germany European Technical Customer Support Please visit our homepage http www olympus europa com o...

Page 217: ...ra Thank you for purchasing an Olympus digital camera This manual provides instructions on how to install the USB driver To ensure correct installation refer only to these installation procedures DIGI...

Page 218: ...e its accuracy However if you find any errors or incomplete information please contact your local Olympus representative It is prohibited by copyright laws to duplicate in part or in whole the informa...

Page 219: ...3 Macintosh Windows INDEX Flowchart 4 Identifying the OS 6 Windows 98 Me 2000 XP 8 Macintosh OS 9 X 23 Downloading image files using other OS For other OS users 31...

Page 220: ...on USB connector extension card etc Windows 95 NT 4 0 Windows 98 98 SE upgrade from Windows 95 Mac OS 8 6 or lower except Mac OS 8 6 equipped with USB MASS Storage Support 1 3 5 installed at the facto...

Page 221: ...he AC adapter disconnect the camera from the computer and make sure that the camera is turned off To avoid computer malfunctions do not turn off the camera when the camera is connected to a computer I...

Page 222: ...your desktop When the My computer icon is not on your desktop click Control Panel from the Start menu 2 Double click the Control Panel icon 3 Double click the System icon The way the file icons inside...

Page 223: ...ose the window If your OS is Windows 98 98 SE proceed to Installing the USB driver for Windows 98 p 9 Users running Windows Me 2000 XP p 11 Users running other OS p 31 Mac OS Macintosh Select About Th...

Page 224: ...camera the camera will turn off in the middle of the operation and this could destroy image files data If you are using batteries make sure that there is sufficient remaining battery power Installing...

Page 225: ...necting the camera to the computer p 11 1 Insert the provided software CD into your CD ROM drive 2 The Olympus Windows Installer should automatically launch Click USB Driver If the USB driver is alrea...

Page 226: ...Continue The installation of the USB driver will start 4 Click OK to restart your computer and the installation is complete 5 When the computer has restarted installation is complete If the Olympus W...

Page 227: ...e marked end of the provided USB cable into the USB port on your computer as shown below 3 After making sure that the camera is turned off connect the end of the USB cable to the USB connector on the...

Page 228: ...s a mode dial turn the power switch to ON 5 Some camera models display this screen shown right on the monitor When this screen appears use the arrow pad to select PC and press the OK button 6 The comp...

Page 229: ...en follow the on screen instructions You may also select take no action to bypass the Microsoft Scanner and Camera Wizard You may then use a more advanced image viewing editing program such as Olympus...

Page 230: ...be other Removable Disk icons for other devices such as a removable media drive or USB SmartMedia Reader Writer In this case the digital camera is recognized as another Removable Disk If you cannot fi...

Page 231: ...e Disk follow the procedure below to check whether the USB driver has been fully installed 1 Open My Computer and double click the Control Panel icon For users running Windows XP open Control Panel fr...

Page 232: ...nd start again Users running Windows 98 98 SE start again from Confirming the USB driver is installed and Users running Window Me 2000 XP start from Connecting the camera to the computer If the USB dr...

Page 233: ...as a Removable Disk 3 Double click the Dcim folder If an error message appears when you double click the icon there may be a problem with one of the following the camera s power source the AC adapter...

Page 234: ...he My Documents icon The camera automatically assigns folder names and file names according to the following rules Serial numbers of image files run from 0001 to 9999 Serial numbers of folders run fro...

Page 235: ...ge files downloaded to your computer The files will be opened in the default image viewer of the operating system If you want to view the image a different size or process it you will need to open the...

Page 236: ...the viewfinder or the card access lamp is not blinking Some camera models have either a lamp on the right of the viewfinder or a card access lamp and the location varies depending on the model Refer...

Page 237: ...then the cable can be removed 5 Remove the USB cable from the camera 6 Remove the USB cable from your computer Windows Me 2000 XP 1 Make sure that the lamp on the right of the viewfinder or the card...

Page 238: ...rs 3 Click on the message The Unplug or Eject Hardware window appears 4 When a message appears click OK 5 Remove the USB cable from the camera 6 Remove the USB cable from your computer If the window r...

Page 239: ...age files data If you are using batteries make sure that there is sufficient remaining battery power If you are running Mac OS X the connection to the computer and downloading the image data are verif...

Page 240: ...puter as shown below 3 After making sure that the camera is turned off connect the end of the USB cable to the USB connector on the camera The location of the USB connector or multi connector varies d...

Page 241: ...models display this screen shown right on the monitor When this screen appears use the arrow pad to select PC and press the OK button 6 The computer recognizes the camera as a new device The computer...

Page 242: ...ror message appears when you double click the icon there may be a problem with one of the following the camera s power source the AC adapter is not properly connected or the battery power is low the c...

Page 243: ...names according to the following rules Serial numbers of image files run from 0001 to 9999 Serial numbers of folders run from 100 to 999 When file number 9999 is reached a new folder is created and a...

Page 244: ...les in the Hard Disk folder The files will be opened in the default image viewer of the operating system If you want to view the image a different size or process it you will need to open the image wi...

Page 245: ...Capture software dialog appears 1 From the Download To menu select a destination folder 2 To download all images click Download All To selectively download images click Download Some and highlight the...

Page 246: ...ng 2 Drag the untitled icon on the desktop to Trash 3 Make sure that the lamp on the right of the viewfinder or the card access lamp is not blinking The green lamp lights on some models If the lamp is...

Page 247: ...mputer have a USB interface Is there a port marked on your computer Does your computer have a built in PC card slot Consult your nearest Olympus representative Is your OS one of the following Windows...

Page 248: ...20097 Hamburg Germany Tel 49 40 23 77 3 0 Fax 49 40 23 07 61 Letters Postfach 10 49 08 20034 Hamburg Germany European Technical Customer Support Please visit our homepage http www olympus europa com o...

Reviews: