background image

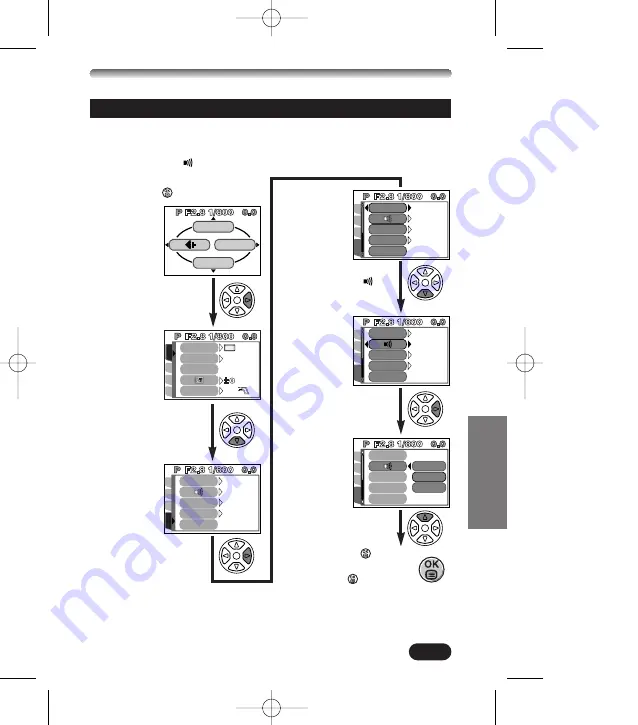
Einstellungsbeispiel für eine Funktion

119

Hier werden in einem Beispiel alle erforderlichen Bedienungsschritte einzeln
aufgelistet, wenn das MODE MENU verwendet wird (in diesem Beispiel ist
die Programmwählscheibe auf P gestellt und es soll die Warntonfunktion
deaktiviert werden (

OFF)).

1

Die Programmwählscheibe auf P
stellen und 

drücken, um das

Hauptmenü 
aufzurufen.

DRIVE

WB

MODE MENU

2

Mit der Pfeiltaste 

í

MODE MENU
wählen.

PIC

SET

CARD

ISO

A/S/M

FLASH

DRIVE

AUTO

IN+

CAMERA

Das hierauf
gezeigte Menü
enthält an der
linken Seite
Menüanzeiger.

3

Die Pfeiltaste 

ñ

gedrückt halten, bis
der Menüanzeiger
SETUP gewählt wird.

SETUP

CAM

CARD

PIC

LOW

LOW

ON

ON

ON

ON

RESET

RESET

REC VIEW

REC VIEW

FILE NAME

FILE NAME

PIXEL MAPPING

PIXEL MAPPING

ALL RESET

ALL RESET

4

Mit der Pfeiltaste 

í

SETUP wählen.

SETUP

CAM

CARD

PIC

LOW

LOW

ON

ON

ON

ON

RESET

RESET

REC VIEW

REC VIEW

FILE NAME

FILE NAME

ALL RESET

PIXEL MAPPING

PIXEL MAPPING

SETUP

CAM

CARD

PIC

LOW

LOW

ON

ON

ON

ON

RESET

RESET

REC VIEW

REC VIEW

FILE NAME

FILE NAME

ALL RESET

ALL RESET

PIXEL MAPPING

PIXEL MAPPING

5

Mit der Taste 

ñ

die

Einstelloption 
wählen.

6

Mit der Pfeiltaste 

í

die Optionen OFF/
LOW/HIGH aufrufen.

SETUP

CAM

CARD

PIC

REC VIEW

REC VIEW

FILE NAME

FILE NAME

ALL RESET

ALL RESET

HIGH

OFF

LOW

PIXEL MAPPING

PIXEL MAPPING

Die
Grundeinstellung
ab Werk ist
LOW.

7

Mit der Pfeiltaste 

Ñ

OFF wählen.

8

Mit der Taste 

die 

Einstellung sichern. 
Nochmals drücken, 
um das Menü zu schließen.

Das Symbol 

å

wird neben den
gewählten
Menüanzeiger
gesetzt. Der
gewählte
Menüanzeiger
leuchtet auf.

Hinweis:

Die für einen Kamera-Aufnahmemodus gewählte Einstellung gilt

auch für die anderen Kamera-Aufnahmemodi. Die Menüfunktion-
Einstellungen können dementsprechend nicht selektiv einem einzelnen
Kamera-Aufnahmemodus zugewiesen werden.

 3 C-4040ZBasic-D98  01.6.25 11:43 AM  Page 119

Summary of Contents for CAMEDIA C-4040ZOOM

Page 1: ...s sur les fonctions d crites ici se r f rer aux instructions du CD logiciel sur le CD ROM FRAN AIS EINFACHE ANLEITUNG DEUTSCH Bitte lesen Sie vor Gebrauch dieser Kamera sorgf ltig diese Bedienungsanle...

Page 2: ...rference that may cause undesired operation For customers in Canada This Class B digital apparatus meets all requirements of the Canadian Interference Causing Equipment Regulations For customers in Eu...

Page 3: ...G BASICS 20 ADVANCED SHOOTING 33 PLAYBACK 36 PRINT SETTINGS 41 TRANSFERRING PICTURES TO A COMPUTER 42 OPTIONAL ACCESSORIES 44 ERROR CODES 45 SPECIFICATIONS 47 CONTENTS These instructions are only for...

Page 4: ...button Control panel Flash Microphone A V OUT jack MONO Card cover Strap eyelet refer to the Package contents included in the package Lens Connector cover 5 pin external flash socket Unscrew to remov...

Page 5: ...Flash mode button Macro Spot button Print button Mode dial A S M P OFF Viewfinder Monitor OK Menu button Manual focus button Monitor button Card access lamp Arrow pad Battery compartment lock Battery...

Page 6: ...st after you change from the flash override mode to another mode or after you shoot with the flash it means that the flash is recharging Wait until the lamp stops blinking then press the shutter butto...

Page 7: ...maining battery power is low the battery check indication changes as follows Be aware that the time when the battery check indication appears varies depending on the type of batteries used 1 3 4 2 0 5...

Page 8: ...mode Displayed when self timer shooting or remote control shooting is set Record mode TIFF SHQ HQ SQ1 SQ2 Displays the record mode If SHQ or HQ is set higher than 2272 x 1704 factory default setting...

Page 9: ...1 Shooting mode Displays the shooting mode P Program mode A Aperture priority mode S Shutter priority mode M Manual mode Movie mode 2 Aperture value Displays the current aperture value 3 Shutter spee...

Page 10: ...used by the pictures stored in the built in memory If you take pictures continuously the indication changes as shown below The memory gauge changes depending on the number of storable pictures or sec...

Page 11: ...ght Fluorescent One touch white balance ISO Displays the ISO AUTO 100 200 or 400 selected on the menus When set to AUTO the ISO changes to 100 when the Mode dial is set to A S M When AUTO is selected...

Page 12: ...ed eye reduction flash Fill in flash SLOW1 SLOW2 SLOW1 Slow synchronization flash Off flash override Spot metering Macro mode Displayed when the Spot metering Macro mode is selected by pressing the Ma...

Page 13: ...reserve is set 3 Number of prints Displays the number of prints 4 Sound record Displayed when sound is recorded 5 Protect Displayed when the picture is protected 6 Record mode 7 Frame number 8 Time 9...

Page 14: ...Movie play function 1 Battery check 2 Movie mark 3 Sound record Displayed when sound is recorded 4 Protect Displayed when the picture is protected 5 Frame number 6 Date The year 2001 is displayed as...

Page 15: ...as part of the step Set the mode dial to the position shown in the illustration In this example you would set P Means Press this button and used in instructions correspond to the buttons on the arrow...

Page 16: ...only and are not guaranteed 1 Number of pictures Approx 400 frames 2 Display time Approx 360 minutes Using the AC power adapter optional Use an AC adapter designed for the area where the camera is use...

Page 17: ...ammed Push in the card lightly to unlock it then pull it out Make sure the camera is turned off i e the mode dial is set to OFF Close the cover tightly 1 2 3 3 4 Inserting the card Ejecting the card I...

Page 18: ...lens moves out when the mode dial is not set to 3 Set the mode dial to OFF The camera turns off 1 Power on off Date time setting 2 3 Press on the arrow pad to select MODE MENU DRIVE WB MODE MENU m SET...

Page 19: ...e and time are completely set To move back to the previous setting press screen 9 Press The camera returns to the menu screen If is pressed again the menu will disappear and the screen will enter the...

Page 20: ...anually When the mode dial is set to A S M the following items can be set with the menus A Aperture priority shooting You set the aperture and the camera sets the shutter speed S Shutter priority shoo...

Page 21: ...menu PICTURE CAM SET CARD WB CONTRAST SHARPNESS SHARPNESS HQ SQ1 SQ2 TIFF SHQ PIC SET CARD ISO A S M FLASH CAMERA DRIVE BKT CAM SET CARD WB CONTRAST SHARPNESS SHARPNESS PRESET AUTO PICTURE DRIVE setti...

Page 22: ...the tabs on the left of the screen by using as shown below PICTURE CAM SET CARD AUTO HQ BLUE RED WB CONTRAST SHARPNESS SHARPNESS PIC SET CARD ISO A S M FLASH DRIVE AUTO IN CAMERA CAM SET PIC CARD SETU...

Page 23: ...PIC LOW LOW ON ON ON ON RESET RESET REC VIEW REC VIEW FILE NAME FILE NAME ALL RESET PIXEL MAPPING PIXEL MAPPING SETUP CAM CARD PIC LOW LOW ON ON ON ON RESET RESET REC VIEW REC VIEW FILE NAME FILE NAM...

Page 24: ...sensitivity Assigns the mode to the mode dial position A S M Controls the flash intensity When using an external flash you can choose whether to use it with the built in flash or by itself Allows you...

Page 25: ...NESS CONTRAST Function Sets the record mode Adjusts the white balance according to the light source Makes the color bluer redder Sets the level of picture sharpness Sets the picture contrast Setting T...

Page 26: ...e names on the card Selects whether to perform Automatic pixel mapping when the power is turned on Adjusts the brightness of the monitor Sets the date time Sets the measurement units during manual foc...

Page 27: ...AYBACK EDIT INDEX ALL ERASE FORMAT Setting methods on the playback menu are similar to the shooting menu Changes camera settings T SETUP menu MODE MENU 1 Available only during still picture playback 2...

Page 28: ...hooting 1 In the top menu select MODE MENU T CAMERA T A S M T S 2 To set the shutter speed faster press To set the shutter speed slower press 1 In the top menu select MODE MENU T CAMERA T A S M T M 2...

Page 29: ...amera begins storing pictures on the card Green lamp NEVER open the card cover eject the card remove the batteries or pull the plug of an optional AC adapter when the card access lamp is blinking Doin...

Page 30: ...the displayed seconds remaining shooting finishes automatically and the camera starts writing the movie to the card 3 4 5 Seconds remaining Remove the lens cap and set the mode dial to The monitor tu...

Page 31: ...ent to 35 mm 260 mm on a 35 mm camera is possible How to shoot using the monitor TPress the monitor button Zoom lever Focus lock If the subject of your composition is not within the AF target mark and...

Page 32: ...ct AF then press Using the flash Auto flash No display factory default setting Automatically fires in low light and backlight conditions Red eye reduction flash Significantly reduces the phenomenon of...

Page 33: ...s of the same picture each with a different exposure value Focus and white balance are locked at the first frame In the top menu select MODE MENU T CAMERA T DRIVET select a mode Metering modes There a...

Page 34: ...he Spot metering mode 3 In the top menu select MODE MENU T CAMERA T MULTI METERING T ON 4 Point the AF target mark where you want to meter the exposure The subject s brightness can be metered at up to...

Page 35: ...era sets is compensated adjusted manually You can adjust between 2 0 in 1 3 steps Adjusts towards images become brighter Adjusts towards images become darker AE lock Suitable for situations when optim...

Page 36: ...R Press monitor button twice quickly while in the shooting mode Quick View The monitor turns on and the recorded picture appears 1 To return to the shooting mode quickly available only when the camera...

Page 37: ...LAY The card access lamp blinks while movie data is accessed Press to select MOVIE PLAYBACK on the MOVIE PLAY screen 3 MODE MENU MOVIE PLAY INFO MOVIE PLAYBACK INDEX EDIT MOVIE PLA MOVIE PLAY CANCEL S...

Page 38: ...S 4 Press to erase the picture To cancel erasing select NO in step 3 and press or press the button again All Frame Erase This function erases all still pictures and movies in the card except protected...

Page 39: ...deo input refer to your TV s instruction manual 4 Select an image by using the arrow pad The selected image will be displayed on the TV Connect to the TV s video input yellow and audio input white ter...

Page 40: ...played back on a TV Normal playback of a vertically oriented picture Picture rotated 90 counter clockwise from normal playback position Picture rotated 90 clockwise from normal playback position HQ 0...

Page 41: ...pictures on the card as well as allowing you to choose how many prints you want Trimming print reserve You can print an enlarged part of a recorded picture Resetting print reserve This resets all the...

Page 42: ...he card Even if your computer has a USB connector data transfer may not function correctly if you are using one of the operating systems listed below or if you have an add on USB connector extension c...

Page 43: ...er equipped with a PC card slot PCMCIA or an external PC card reader writer Personal computer equipped with a USB port Required devices Floppy disk adapter PC card adapter SmartMedia reader writer Not...

Page 44: ...8 16 32 64MB FL 40 external flash Flash bracket Bracket cable Floppy disk adapter PC card adapter USB SmartMedia Reader Writer NiMH battery NiMH battery charger Visit the Olympus home page for the la...

Page 45: ...his camera Corrective action Insert the card correctly Insert a different card Replace the card or erase unneeded pictures If you are taking pictures remove the write protect adhesive seal If the card...

Page 46: ...is no empty space in the card so it cannot record new information such as print data and sound The card cover is open Corrective action Format the card Insert a card which contains images Replace the...

Page 47: ...80 NORMAL Image pickup element 1 1 8 CCD solid state image pickup 4 130 000 pixels gross Recording image 2272 x 1704 pixels TIFF SHQ HQ 2048 x 1536 pixels TIFF SQ1 1600 x 1200 pixels TIFF SQ1 1280 x 9...

Page 48: ...to 2031 system Operating environment Temperature 0 C to 40 C 32 F to104 F operation 20 C to 60 C 4 F to 140 F storage Humidity 30 to 90 operation 10 to 90 storage Power supply For batteries use 2 CR...

Page 49: ...49 1 C 4040ZBasic E2 01 6 25 11 17 AM Page 49...

Page 50: ...e Apple Computer Inc Tous les autres noms de soci t s et appellations de produits sont des marques d pos es et ou des marques de fabrique des propri taires respectifs Le standard pour les syst mes de...

Page 51: ...S D IMPRESSION 88 TRANSFERT D IMAGE VERS UN ORDINATEUR 90 ACCESSOIRES EN OPTION 92 CODES D ERREUR 93 FICHE TECHNIQUE 95 TABLE DES MATI Ces instructions ne sont que pour une r f rence rapide Pour plus...

Page 52: ...Flash Microphone Prise de sortie A V MONO Couvercle du logement de carte Oeillet de courroie se r f rer au Contenu de l emballage inclus dans l emballage Objectif Couvercle de connecteur Prise de fla...

Page 53: ...che gros plan spot Touche d impression Molette Mode A S M P OFF Viseur cran ACL Touche OK Menu Touche de mise au point manuelle Touche de l cran Voyant d acc s de carte Molette de d filement Verrou du...

Page 54: ...du mode flash d bray en un autre mode de flash ou apr s une prise de vue avec le flash cela signifie que le flash est en cours de recharge Attendre que le voyant s arr te de clignoter puis appuyer su...

Page 55: ...les Lorsque l nergie restante des piles est faible l indication de contr le des piles change comme suit Le moment o l indication de contr le des piles appara t varie en fonction du type de piles utili...

Page 56: ...de retardateur t l commande Affich lorsque la prise de vue en utilisant le retardateur ou une t l commande est r gl e Mode d enregistrement TIFF SHQ HQ SQ1 SQ2 Affiche le mode d enregistrement Si SHQ...

Page 57: ...est r gl e sur P 1 Mode de prise de vues Affiche le mode de prise de vues P Mode programm A Mode priorit l ouverture S Mode priorit la vitesse M Mode manuel Mode cin ma 2 Valeur de l ouverture Affiche...

Page 58: ...d espace utilis e par les images enregistr es dans la m moire incorpor e Si vous prenez des photos de fa on continue l indication change comme montr ci dessous Le bloc m moire d image change en foncti...

Page 59: ...lancs manuelle Sensibilit ISO Affiche la sensibilit ISO AUTO 100 200 ou 400 s lectionn e dans le menu R gl e sur AUTO la sensibilit ISO passe sur 100 lorsque la molette Mode est r gl e sur A S M Lorsq...

Page 60: ...et yeux rouges Flash d appoint SLOW1 SLOW2 SLOW1 Flash synchronis vitesse lente Arr t Flash d bray Mode mesure ponctuelle gros plan Affich lorsque le mode mesure ponctuelle gros plan est s lectionn en...

Page 61: ...ages Affiche le nombre de tirages 4 Enregistrement du son Affich lorsque le son est enregistr 5 Protection Affich lorsque la vue est prot g e 6 Mode d enregistrement 7 Num ro de vue 8 Heure 9 Date L a...

Page 62: ...chage de film 1 Contr le des piles 2 Image cin ma 3 Enregistrement du son Affich lorsque le son est enregistr 4 Protection Affich lorsque la vue est prot g e 5 Num ro de vue 6 Date L ann e 2001 est af...

Page 63: ...touches de la molette de d filement comme montr R gler les fonctions dans les menus en suivant l ordre des fl ches Avant d utiliser les menus lire Utilisation des menus pour des d tails Dans le menu...

Page 64: ...ur con u pour la r gion o l appareil est utilis Consulter le revendeur Olympus le plus proche ou un centre de service pour des d tails Mise en place des piles Les piles au lithium CR V3 ne peuvent pas...

Page 65: ...pour la d verrouiller puis la tirer pour la sortir S assurer que l alimentation de l appareil est coup e c d la molette Mode est r gl e sur OFF Refermer correctement le couvercle 1 2 3 3 4 Introducti...

Page 66: ...RIVE WB MODE MENU m SETUP CAM CARD PIC BA BATTER TTERY SA Y SAVE VE SHORT CUT m ft m ft 01 01 01 00 00 SETUP CAM CARD PIC LOW LOW ON ON ON ON RESET RESET REC VIEW REC VIEW FILE NAME PIXEL MAPPING PIXE...

Page 67: ...ient r gl es compl tement Pour revenir au r glage pr c dent appuyer sur cran 9 Appuyer sur L appareil revient l cran de menu Si la touche est press e de nouveau le menu dispara t et l cran passe en mo...

Page 68: ...l r gle la vitesse d obturation S Prise de vues priorit la vitesse Vous r glez la vitesse d obturation et l appareil r gle l ouverture M Prise de vues manuelle Vous r glez la fois l ouverture et la vi...

Page 69: ...ur le menu principal Ils peuvent tre remplac s par vos postes favoris mais uniquement lorsque la molette Mode est r gl e sur P ou A S M Simplement en appuyant sur les touches de la molette de d fileme...

Page 70: ...es avec les languettes sur la gauche de l cran en utilisant comme montr ci dessous PICTURE CAM SET CARD AUTO HQ BLUE RED WB CONTRAST SHARPNESS SHARPNESS PIC SET CARD ISO A S M FLASH DRIVE AUTO IN CAM...

Page 71: ...ESET RESET REC VIEW REC VIEW FILE NAME FILE NAME ALL RESET PIXEL MAPPING PIXEL MAPPING SETUP CAM CARD PIC LOW LOW ON ON ON ON RESET RESET REC VIEW REC VIEW FILE NAME FILE NAME ALL RESET ALL RESET PIXE...

Page 72: ...eur Ajuste la sensibilit ISO Affecte le mode la position A S M de la molette Mode Commande l intensit de l clair du flash En utilisant un flash externe vous pouvez choisir de l utiliser avec le flash...

Page 73: ...HITE BOARD BLACK BOARD OFF ON Affichage WB SHARPNESS CONTRAST Fonction R gle le mode d enregistrement Ajuste la balance des blancs en fonction de la source de lumi re Rend la teinte plus bleut e rouge...

Page 74: ...de fichier sur la carte S lectionne d effectuer ou non le Cadrage de pixels automatique lorsque l alimentation est mise en marche Ajuste la luminosit de l cran ACL R gle la date heure R gle les unit s...

Page 75: ...FORMAT Les m thodes de r glage sur le menu d affichage sont similaires celles sur le menu de prise de vues Change les r glages de l appareil T Menu SETUP MODE MENU 1 Disponible uniquement pendant l af...

Page 76: ...Pour r duire la valeur de l ouverture valeur F appuyer sur 1 Dans le menu principal s lectionner MODE MENU T CAMERA T A S M T S 2 Pour augmenter la vitesse d obturation appuyer sur Pour r duire la vit...

Page 77: ...nger la vue sur la carte Voyant vert Ne JAMAIS ouvrir le couvercle du logement de carte jecter la carte retirer les piles ni tirer la fiche d un adaptateur secteur en option lorsque le voyant d acc s...

Page 78: ...ez toutes les secondes restantes affich es la prise de vues se termine automatiquement et l appareil commence crire le film sur la carte 3 4 5 Secondes restantes Retirer le bouchon d objectif et r gle...

Page 79: ...to 35 mm est possible Pour prendre des vues en utilisant l cran ACL TAppuyer sur la touch monitor button Levier de zoom M morisation de la mise au point Si le sujet de votre composition n est pas dans...

Page 80: ...onner AF puis appuyer sur Utilisation du flash Flash automatique Pas d affichage r glage initial par d faut effectu en usine Se d clenche automatiquement en situations de faible clairage ou de contre...

Page 81: ...ur d exposition diff rente La mise au point et la balance des blancs sont m moris es pour la premi re vue Dans le menu principal s lectionner MODE MENU T CAMERA T DRIVET s lectionner un mode Modes de...

Page 82: ...u principal s lectionner MODE MENU T CAMERA T MULTI METERING T ON 4 Pointer les rep res de mise au point automatique o vous voulez mesurer l exposition La luminosit du sujet peut tre mesur e sur un ma...

Page 83: ...nuellement Vous pouvez ajuster entre 2 0 par pas de 1 3 M morisation AE Convient pour des situations lorsque l exposition optimale est difficile atteindre tel le cas d un contraste excessif entre le s...

Page 84: ...eux fois sur la touche cran ACL en mode de prise de vues Contr le rapide L cran ACL s allume et la vue enregistr e appara t 1 Pour revenir rapidement au mode de prise de vues disponible uniquement lor...

Page 85: ...de carte clignote pendant que les donn es du film sont en cours d acc s Appuyer sur pour s lectionner MOVIE PLAYBACK sur l cran MOVIE PLAY 3 MODE MENU MOVIE PLAY INFO MOVIE PLAYBACK INDEX EDIT MOVIE P...

Page 86: ...l effacement s lectionner NO dans l tape 3 et appuyer sur ou appuyer de nouveau sur la touche Effacement de toutes les vues Cette fonction efface toutes les vues fixes et les films sur la carte sauf...

Page 87: ...entr e vid o se r f rer au mode d emploi du t l viseur 4 S lectionner une vue en utilisant la molette de d filement La vue s lectionn e sera affich e sur l cran du t l viseur Raccorder le c ble AV aux...

Page 88: ...ectu e pour une image affich e avec AFFICHAGE Suite Les images ne peuvent tre tourn es que lorsqu elles sont affich es sur un t l viseur HQ 01 12 23 21 56 24 Affichage normal d une vue en format verti...

Page 89: ...impression avec rognage Vous pouvez imprimer une partie agrandie d une image enregistr e Annulation de la r servation Cette fonction annule tous les r glages de r servation d impression des images sau...

Page 90: ...de la carte D branchement du c ble M me si votre ordinateur dispose d un connecteur USB le transfert de donn es peut ne pas fonctionner correctement si vous utilisez l un des syst mes d exploitation...

Page 91: ...osant d une case carte PC PCMCIA ou d un lecteur enregistreur de carte PC externe Ordinateur personnel disposant d un port USB Mat riel n cessaire Adaptateur de disquette Adaptateur de carte PC Unit d...

Page 92: ...64 Mo Flash externe FL 40 Support de flash Cordon de support Adaptateur de disquette Adaptateur de carte PC Unit de lecture criture SmartMedia USB Batteries NiMH Chargeur de batterie NiMH Visiter le...

Page 93: ...Introduire correctement la carte Introduire une autre carte Remplacez la carte ou supprimez les vues inutiles Si vous prenez des vues retirez le sceau adh sif de protection contre l criture Si la cart...

Page 94: ...s possible d enregistrer de nouvelles informations telles que des donn es d impression ou du son Le couvercle du logement de carte est ouvert Action corrective Formatez la carte Ins rez une carte qui...

Page 95: ...vues environ SHQ 2272 x 1704 16 vues environ HQ 2272 x 1704 49 vues environ SQ1 1280 x 960 NORMAL 165 vues environ SQ2 640 x 480 NORMAL Capteur d image Capteur CCD de 1 1 8 pouce 4 130 000 pixels brut...

Page 96: ...au point 0 2 m l infini Connecteurs externes Prise d entr e CC DC IN prise de sortie A V connecteur USB compatible USB 1 0 prise de flash externe 5 broches Calendrier automatique Jusqu l an 2031 Cond...

Page 97: ...97 2 C 4040ZBasic F50 01 6 25 11 33 AM Page 97...

Page 98: ...sen Dies schlie t St reinstreuungen ein welche Beeintr chtigungen der Funktionsweise oder Betriebsst rungen verursachen k nnen In Kanada Dieses Ger t wurde als Digitalger t der Klasse B in bereinstimm...

Page 99: ...KBEZOGENE EINSTELLUNGEN 137 BILD BERTRAGUNG AUF EINEN PERSONAL COMPUTER 138 SONDERZUBEH R 140 FEHLERMELDUNGEN 141 TECHNISCHE DATEN 143 INHALT Diese Kurzanleitung dient dem ersten Kennenlernen Ihrer Ka...

Page 100: ...g Ausl ser LCD Feld Blitz Mikrofon AV Ausgang MONO Kartenfachabdeckung Riemen se Siehe Liefer umfang der Kamera packung Objektiv Buchsenabdeckung 5 pol Blitzsynchronbuchse Die Abdeckung abschrauben be...

Page 101: ...L schtaste Blitztaste Nahaufnahmetaste Spotmesstaste Drucktaste Programmw hlscheibe A S M P OFF Sucher LCD Monitor OK Men Taste MF Taste LCD Monitor Taste Schreibanzeige Pfeiltasten Batteriefachriegel...

Page 102: ...ung eines Blitzprogrammes au er zwangsabgeschalteter Blitz oder nach einer Blitzaufnahme blinkt wird der Blitz aufgeladen Zur erneuten Blitzaufnahme warten bis die LED nicht mehr blinkt und dann den A...

Page 103: ...adezustand Wenn der Batterieladezustand unzureichend ist wechselt diese Anzeige wie folgt Die Dauer bis die Batteriewarnanzeige erscheint schwankt in Abh ngigkeit von der verwendeten Batterieausf hrun...

Page 104: ...sl ser Fernausl sermodus Erscheint wenn im Selbstausl se oder Fernausl semodus fotografiert wird Bildaufnahmemodus TIFF SHQ HQ SQ1 SQ2 Zeigt den Bildaufnahmemodus an Falls f r den SHQ oder HQ Modus di...

Page 105: ...auf P gestellt ist 1 Kameramodus Zeigt den Kameramodus an P Programmautomatik A Belichtungsautomatik mit Blendenvorwahl S Belichtungsautomatik mit Verschlusszeitvorwahl M Manuelle Einstellung Movie A...

Page 106: ...die Belegung des eingebauten Speichers an Werden mehrere Bilder in Folge aufgenommen wechselt die Anzeige wie unten dargestellt 9 Belichtungsspeicher AEL AE Speicher Die ermittelte Belichtung wird bi...

Page 107: ...ampenlicht Wei abgleich Soforteinstellung ISO Zeigt die im Men gew hlte ISO Empfindlichkeit an AUTO 100 200 oder 400 Wird die Programmw hlscheibe bei ISO Einstellung AUTO auf A S M gestellt wechselt d...

Page 108: ...eduzierung Aufhellblitz SLOW1 SLOW2 SLOW1 Blitzsynchronisation mit langer Verschlusszeit Deaktivierter Blitz Spotmessung Nahaufnahmemodus Erscheint wenn mit der Taste Spotmessung Nahaufnahme die Spotm...

Page 109: ...ahl der Ausdrucke pro Bild an 4 Tonaufnahme Erscheint wenn zum Bild eine Tonaufnahme geh rt 5 Schreibschutz Erscheint wenn das Bild schreibgesch tzt ist 6 Bildaufnahmemodus 7 Bildnummer 8 Zeit 9 Datum...

Page 110: ...dezustand 2 Movie Symbol 3 Tonaufnahme Erscheint wenn zum Bild eine Tonaufnahme geh rt 4 Schreibschutz Erscheint wenn das Bild schreibgesch tzt ist 5 Bildnummer 6 Datum Das Jahr 2001 wird mit 01 angez...

Page 111: ...r den beschriebenen Vorgang erforderlich Die Programmw hlscheibe auf die in der Abbildung gezeigte Position stellen In diesem Beispiel wurde P gew hlt Bedeutet Diese Taste dr cken Die in diesem Handb...

Page 112: ...erden 1 Anzahl der Aufnahmen Ca 400 Bilder 2 Wiedergabedauer Ca 360 Minuten Verwendung des Netzteils gesondert erh ltlich Achten Sie darauf dass Sie ein f r die jeweilige Region das jeweilige Land gee...

Page 113: ...rauf entnehmen Vergewissern Sie sich dass die Kamera ausgeschaltet ist die Programmw hlscheibe muss auf OFF gestellt sein Die Kartenfachabdeckung einwandfrei schlie en 1 2 3 3 4 Einlegen einer Karte A...

Page 114: ...eingeschaltet Wird eine andere Einstellung als gew hlt wird das Objektiv ausgefahren 3 Die Programmw hlscheibe auf OFF stellen Die Kamera wird ausgeschaltet 1 Ein und Ausschalten der Kamera Einstellu...

Page 115: ...die vorherige Einstellung zu w hlen die Pfeiltaste dr cken Men anzeige 9 dr cken Die Kamera wechselt erneut auf die Men anzeige Durch nochmaliges Dr cken der Taste wird das Men geschlossen und es ers...

Page 116: ...ellter Programmw hlscheibe k nnen die folgenden Funktionen men bezogen eingestellt werden A Belichtungsautomatik mit Blendenvorwahl Sie bestimmen die Blende die Kamera w hlt die Verschlusszeit S Belic...

Page 117: ...E MENU Beispiel Hauptmen im Kameramodus P PICTURE CAM SET CARD WB CONTRAST SHARPNESS SHARPNESS HQ SQ1 SQ2 TIFF SHQ PIC SET CARD ISO A S M FLASH CAMERA DRIVE BKT CAM SET CARD WB CONTRAST SHARPNESS SHAR...

Page 118: ...k nnen mittels der links im Men angeordneten Men anzeiger mit den Pfeiltasten wie nachfolgend gezeigt gew hlt werden PICTURE CAM SET CARD AUTO HQ BLUE RED WB CONTRAST SHARPNESS SHARPNESS PIC SET CARD...

Page 119: ...D PIC LOW LOW ON ON ON ON RESET RESET REC VIEW REC VIEW FILE NAME FILE NAME ALL RESET PIXEL MAPPING PIXEL MAPPING SETUP CAM CARD PIC LOW LOW ON ON ON ON RESET RESET REC VIEW REC VIEW FILE NAME FILE NA...

Page 120: ...eit Dient der Kameramoduswahl wenn die Programmw hlscheibe auf A S M gestellt ist Dient der Einstellung der Blitzhelligkeit Dient bei Verwendung eines Zusatzblitzes der Wahl der Blitzkombination nur Z...

Page 121: ...CK BOARD OFF ON Anzeige WB SHARPNESS CONTRAST Funktion Dient der Wahl des Aufnahmemodus Dient der Wahl des Wei abgleichmodus Dient der Farbtemperaturkorrektur verst rkt bl ulicher oder r tlicher Farbt...

Page 122: ...mt ob bei der Einschaltung der Kamera eine oder keine automatische Pixelaustastung erfolgt Dient der LCD Monitor Helligkeitseinstellung Dient der Datum und Zeiteinstellung Dient der Wahl der Ma einhei...

Page 123: ...LAYBACK EDIT INDEX ALL ERASE FORMAT Die Einstellungsschritte f r das Wiedergabemen entsprechend weitgehend den Einstellungsschritten f r das Aufnahmemen Dient der Kameraeinstellung T SETUP Men MODE ME...

Page 124: ...einer gr eren Blendenzahl dr cken Zur Wahl einer kleineren Blendenzahl dr cken 1 Vom Hauptmen ausgehend MODE MENU T CAMERA T A S M T S w hlen 2 Zur Wahl einer k rzeren Verschluss zeit w hlen Zur Wahl...

Page 125: ...D und die Schreibanzeige blinken zur Best tigung dass die Kamera die Bilddaten auf die Karte schreibt Gr ne Sucher LED Bei blinkender Schreibanzeige NIEMALS die Kartenfachabdeckung ffnen die Karte aus...

Page 126: ...estopp automatisch und die Kamera beginnt die Bilddaten auf die Karte zu schreiben 3 4 5 Restzeitanzeige in Sekunden Die Objektivkappe entfernen und die Programmw hlscheibe auf stellen Der LCD Monitor...

Page 127: ...ner Kleinbildkamera Fotografieren bei Verwendung des LCD Monitors THierzu die Taste LCD Monitor dr cken Zoomregler Sch rfespeicher Wenn bei der gew hlten Bildkomposition nicht auf das bildwichtige Mot...

Page 128: ...rogrammwahl Automatische Blitzabgabe Keine Anzeige Grundeinstellung Automatische Blitzabgabe bei unzureichender Umgebungshelligkeit und bei Gegenlicht Blitzabgabe mit Vorblitz zur Unterdr ckung des Ro...

Page 129: ...e Bild mehrmals wiederholt wobei jedesmal automatisch eine andere Belichtungseinstellung gew hlt wird Entfernungseinstellung und Wei abgleich des ersten Bildes werden f r alle weiteren Bilder beibehal...

Page 130: ...om Hauptmen ausgehend MODE MENU T CAMERA T MULTI METERING T ON w hlen 4 Die AF Markierung auf den Bereich der Bildkomposition ausrichten f r den die Belichtung gemessen werden soll Diese Messung ist f...

Page 131: ...ltnissen eine besser geeignete Belichtung zu erzielen In Plusrichtung Aufhellung In Minusrichtung Abdunkelung AE Speicher Geeignet f r Aufnahmesituationen in denen eine optimale Belichtung nur schwie...

Page 132: ...abe stellen ODER Im Aufnahme Kamera modus zweimal kurz die Taste dr cken Schnellwiedergabe Der LCD Monitor schaltet sich ein und die zuletzt hergestellte Aufnahme wird gezeigt 1 Zur direkten Umschaltu...

Page 133: ...w hrend die Kamera die zugeh rigen Bilddaten erfasst Mit den Pfeiltasten im MOVIE PLAY Men MOVIE PLAYBACK w hlen 3 MODE MENU MOVIE PLAY INFO MOVIE PLAYBACK INDEX EDIT MOVIE PLA MOVIE PLAY CANCEL SELEC...

Page 134: ...unterbleiben soll bei Schritt 3 NO w hlen und dann dr cken Oder nochmals die Taste dr cken L schung aller Bilder Bei dieser L schfunktion werden alle auf der eingelegten Karte gespeicherten Einzelbil...

Page 135: ...he die zum Fernsehger t geh rige Bedienungsanleitung 4 Mit den Pfeiltasten ein Bild zur Wiedergabe aufrufen Das gew hlte Bild wird auf dem Fernsehbildschirm gezeigt Das AV Kabel am Videoeingang gelb u...

Page 136: ...nsehbildschirm m glich Normale Wiedergabe einer Hochformat aufnahme Bilddrehung der normalen Bildposition um 90 Grad gegen den Uhrzeigersinn Bilddrehung der normalen Bildposition um 90 Grad im Uhrzeig...

Page 137: ...men Druckvorauswahl f r eine Ausschnittsvergr erung Die Ausschnittsvergr erung eines Bildes kann ausgedruckt werden R ckstellung der Druckvorauswahldaten Die auf einer Karte gespeicherten Druckvorausw...

Page 138: ...Auch wenn der verwendete Personal Computer eine USB Schnittstelle hat kann die Daten bertragung ggf nicht ausgef hrt werden wenn der Personal Computer unter einem der nachfolgend aufgelisteten Betrieb...

Page 139: ...it PC Karteneinschub PCMCIA oder einem externen PC Karten Lese Schreibger t Personal Computer mit USB Schnittstelle Erforderliches Zubeh r Diskettenadapter PC Kartenadapter SmartMedia Karten Lese Schr...

Page 140: ...litzhalterung Blitzsynchronkabel Diskettenadapter PC Kartenadapter USB SmartMedia Schreib Leseger t NiMH Batterie Ladeger t f r NiMH Batterie Besuchen Sie die Olympus Homepage um aktuelle Informatione...

Page 141: ...e eingelegte Karte ist nicht m glich Abhilfema nahmen Die Karte einwand frei einsetzen Eine andere Karte verwenden Die Karte aus wechseln oder nicht ben tigte Aufnahmen l schen Zur Aufnahme das Schrei...

Page 142: ...oder Tonaufnahme daten speichern Die Kartenfach abdeckung ist nicht geschlossen Abhilfema nahmen Das Bild mittels Computer Software laden Falls dies nicht m glich ist ist die Bilddatei teilweise besch...

Page 143: ...Ca 16 Bilder HQ 2 272 x 1 704 Ca 49 Bilder SQ1 1 280 x 960 NORMAL Ca 165 Bilder SQ2 640 x 480 NORMAL Bildwandler 1 1 8 Zoll CCD Chip 4 130 000 Pixel brutto Bildaufl sung bei 2 272 x 1 704 Pixel TIFF...

Page 144: ...chspannungseingang AV Ausgang USB Buchse unterst tzt USB 1 0 5 pol Blitzsynchronisationsbuchse Automatischer Kalender Bis zum Jahre 2031 Umgebungsbedingungen Temperatur 0 bis 40 C Betrieb 20 bis 60 C...

Page 145: ...145 3 C 4040ZBasic D98 01 6 25 11 44 AM Page 145...

Page 146: ...ompa as y productos son marcas registradas y o marcas comerciales de sus respectivos propietarios Las normas para sistemas de archivos de c maras referidas en este manual son las normas de la Reglamen...

Page 147: ...IMPRESI N 184 TRANSFERENCIA DE IM GENES A UN ORDENADOR 186 ACCESORIOS OPCIONALES 188 C DIGOS DE ERROR 189 ESPECIFICACIONES 191 Estas instrucciones son s lo de referencia r pida Para m s detalles acer...

Page 148: ...urador Panel de control Flash Micr fono Jack A V OUT MONO Tapa de la tarjeta Enganche para correa refi rase al contenido del paquete incluido en el paquete Objetivo Tapa del conector Enchufe hembra de...

Page 149: ...de modo de flash Bot n de macro puntos Bot n de impresi n Disco de modo A S M P OFF Visor Monitor Bot n OK Men Bot n de enfoque manual Bot n del monitor L mpara de control de la tarjeta Teclas de cont...

Page 150: ...del modo de anulaci n de flash a otro modo o despu s de fotografiar con el flash sto significa que el flash est se recargando Espere hasta que la l mpara deje de parpadear luego presione el bot n del...

Page 151: ...as pilas Si la carga restante de las pilas est baja la indicaci n de verificaci n de pilas cambia como a continuaci Tenga en cuenta que cuando la indicaci n de verificaci n de pilas aparece el tiempo...

Page 152: ...disparador autom tico mando a distancia Aparece cuando se ajusta la toma con disparador autom tico o la toma con mando a distancia Modo de grabaci n TIFF SHQ HQ SQ1 SQ2 Muestra el modo de grabaci n Si...

Page 153: ...P Modo programado A Modo de prioridad de abertura S Modo de prioridad del obturador M Modo manual Modo de im genes de v deo 2 Valor de abertura Muestra el valor actual de la abertura 3 Velocidad del o...

Page 154: ...tilizado por las im genes almacenadas en la memoria incorporada Si toma im genes continuamente la indicaci n cambia como se muestra a continuaci n El bloque de memoria cambia dependiendo del n mero de...

Page 155: ...un toque ISO Muestra el ISO AUTO 100 200 400 seleccionado en el men Cuando est ajustado en AUTO el ISO cambia a 100 cuando el disco de modo est ajustado en A S M Cuando AUTO est seleccionado el ISO a...

Page 156: ...lleno SLOW1 SLOW2 SLOW1 Sincronizaci n lenta del flash Desactivado anulaci n de flash Modo de medici n de puntos macro Aparece cuando el modo de medici n de puntos macro es seleccionado a trav s de la...

Page 157: ...impresi n est ajustada 3 N mero de impresiones Muestra el n mero de impresiones 4 Grabaci n del sonido Aparece cuando el sonido es grabado 5 Protecci n Aparece cuando la imagen est protegida 6 Modo de...

Page 158: ...aparecen cuando la imagen de v deo es mostrada empleando la funci n de reproducci n de im genes de v deo 1 Verificaci n de pilas 2 Marca de im genes de v deo 3 Grabaci n del sonido Aparece cuando el s...

Page 159: ...l disco de modo en la posici n mostrada en la ilustraci n Seg n este ejemplo estar a ajustado en P Significa Presionar este bot n Las flechas y utilizadas en las instrucciones corresponden a las tecla...

Page 160: ...zadas 1 N mero de fotos 400 cuadros aprox 2 Tiempo de indicaci n 360 minutos aprox Uso del adaptador de alimentaci n CA opcional Use un adaptador CA dise ado para el rea donde la c mara ser utilizada...

Page 161: ...la tarjeta para desengancharla luego ret rela Aseg rese que la c mara est apagada esto es que el disco de modo est ajustado en OFF Cierre la tapa firmemente 1 2 3 3 4 Inserci n de la tarjeta Expulsi n...

Page 162: ...o se mueve cuando el disco de modo no est ajustado en 3 Ajuste el disco de modo en OFF La c mara se apaga 1 Encendido apagado de la alimentaci n Ajuste de la fecha hora 2 3 Presione en las teclas de c...

Page 163: ...y la hora est n completamente ajustadas Para volver al ajuste anterior presione Pantalla 9 Presione La c mara vuelve a la pantalla de men Si se presiona nuevamente el men desaparece y la pantalla ing...

Page 164: ...uando el disco de modo es ajustado en A S M los siguientes tems pueden ser ajustados con los men s A Toma con prioridad de abertura Usted ajusta la abertura y la c mara ajusta la velocidad del obturad...

Page 165: ...del men principal PICTURE CAM SET CARD WB CONTRAST SHARPNESS SHARPNESS HQ SQ1 SQ2 TIFF SHQ PIC SET CARD ISO A S M FLASH CAMERA DRIVE BKT CAM SET CARD WB CONTRAST SHARPNESS SHARPNESS PRESET AUTO PICTUR...

Page 166: ...ng etas en la izquierda de la pantalla utilizando como se muestra abajo PICTURE CAM SET CARD AUTO HQ BLUE RED WB CONTRAST SHARPNESS SHARPNESS PIC SET CARD ISO A S M FLASH DRIVE AUTO IN CAMERA CAM SET...

Page 167: ...D PIC LOW LOW ON ON ON ON RESET RESET REC VIEW REC VIEW FILE NAME FILE NAME ALL RESET PIXEL MAPPING PIXEL MAPPING SETUP CAM CARD PIC LOW LOW ON ON ON ON RESET RESET REC VIEW REC VIEW FILE NAME FILE NA...

Page 168: ...ia los modos de accionamiento o ajusta la toma con soporte autom tico o toma con mando a distancia disparador autom tico Ajusta la sensibilidad del ISO Asigna el modo en la posici n A S M del disco de...

Page 169: ...NTRAST Funci n Ajusta el modo de grabaci n Ajusta el balance del blanco de acuerdo a la fuente de luz Hace los colores m s azulados rojizos Ajusta el nivel de nitidez de la imagen Ajusta el contraste...

Page 170: ...del archivo en la tarjeta Selecciona si ejecuta Mapeo de pixel autom tico al encender la alimentaci n Ajusta el brillo del monitor Ajusta la fecha hora Ajusta las unidades de medida durante el enfoque...

Page 171: ...NDEX ALL ERASE FORMAT Los m todos de ajuste del men de reproducci n son similares al del men de toma Cambia los ajustes de la c mara T Men SETUP MODE MENU 1 Disponible nicamente durante la reproducci...

Page 172: ...men principal seleccione MODE MENU T CAMERA T A S M T S 2 Para aumentar la velocidad del obturador presione Para disminuir la velocidad del obturador presione 1 En el men principal seleccione MODE ME...

Page 173: ...raf as fijas L mpara verde NUNCA abra la tapa del compartimiento de tarjetas expulse la tarjeta retire las pilas ni desconecte el enchufe de un adaptador CA opcional mientras la l mpara de control de...

Page 174: ...a Si utiliza todos los segundos restantes mostrados la toma finaliza autom ticamente y la c mara empieza a grabar las im genes de v deo en la tarjeta 3 4 5 Segundos restantes Retire la tapa del objeti...

Page 175: ...c mara de 35 mm C mo tomar utilizando el monitor TPresione el bot n monitor Mando de zoom Bloqueo de enfoque Si el sujeto de la composici n no est dentro de la marca del objeto AF y el enfoque no es p...

Page 176: ...ione para selecccionar AF luego presione Uso del flash Flash autom tico Sin indicaci n ajuste inicial Dispara autom ticamente en condiciones de poca iluminaci n y a contraluz Flash de reducci n de ojo...

Page 177: ...misma fotograf a cada una con un valor de exposici n diferente El enfoque y el balance del blanco son bloqueados en el primer cuadro En el men principal seleccione MODO MENU T CAMERA T DRIVET seleccio...

Page 178: ...incipal seleccione MODE MENU T CAMERA T MULTI METERING T ON 4 Apunte la marca de objeto de enfoque autom tico AF sobre el punto donde desea medir la exposici n El brillo del sujeto puede ser medido ha...

Page 179: ...justa hacia las im genes se oscurecen Bloqueo de exposici n autom tica AE Adecuado para situaciones cuando la exposici n ptima es dif cil de lograr tales como cuando hay demasiado contraste entre el s...

Page 180: ...m s adelante Ajuste el disco de modo en reproducci n O Presione bot n del monitor dos veces r pidamente durante el modo de toma Visualizaci n r pida El monitor se enciende y la fotograf a grabada apa...

Page 181: ...datos de las im genes de v deo son ingresados Presione para seleccionar MOVIE PLAYBACK en la pantalla MOVIE PLAY 3 MODE MENU MOVIE PLAY INFO MOVIE PLAYBACK INDEX EDIT MOVIE PLA MOVIE PLAY CANCEL SELEC...

Page 182: ...a cancelar el borrado seleccione NO en el paso 3 y presione o presione el bot n nuevamente Borrado de todos los cuadros Esta funci n borra todas las fotograf as fijas e im genes de v deo de la tarjeta...

Page 183: ...se al manual de instrucci n de su TV 4 Seleccione una imagen empleando las teclas de control La imagen seleccionada ser mostrada en el TV Conecte el cable AV a los conectores de entrada de video amari...

Page 184: ...puede ser ejecutada para una fotograf a mostrada con Las fotograf as pueden ser giradas s lo cuando son reproducidas en un TV Reproducci n normal de una fotograf a orientada verticalmente Fotograf a g...

Page 185: ...le imprimir una parte ampliada de una fotograf a grabada Cancelaci n de la reserva de impresi n Esto cancela todos los ajustes de la reserva de impresi n para las im genes conservadas en una tarjeta P...

Page 186: ...el cable Aunque su ordenador posea un conector USB la transferencia de datos puede no funcionar correctamente si est empleando uno de los sistemas operativos listados abajo o si usted posee un conecto...

Page 187: ...una unidad lectora escritora de tarjeta para PC externa Ordenador personal equipada con un puerto USB Required devices Adaptador de disco flexible Adaptador de tarjeta para PC Unidad lectora escritor...

Page 188: ...externo FL 40 Soporte de flash Cord n de soporte exclusivo Adaptador de disco flexible Adaptador de tarjeta PC Unidad lectora escritora SmartMedia USB Pila NiMH Cargador de pilas NiMH Visite el home...

Page 189: ...es correctivas Inserte una tarjeta O inserte una tarjeta distinta Reemplace la tarjeta o borre las fotograf as que no se necesiten Si est tomando fotograf as quite el sello adhesivo de protecci n cont...

Page 190: ...eta de modo que no puede grabarse ninguna informaci n nueva tal como datos de impresi n y sonido La tapa de la tarjeta est abierta Acciones correctivas Formatee la tarjeta Inserte una tarjeta que cont...

Page 191: ...uadros aprox SQ2 640 x 480 NORMAL Elemento captor de CCD de 1 1 8 pulgada captor de imagen estado imagen s lido 4 130 000 pixels bruto Imagen de grabaci n 2272 x 1704 pixels TIFF SHQ HQ 2048 x 1536 pi...

Page 192: ...5 pin Sistema de calendario Hasta el 2031 autom tico Ambiente de funcionamiento Temperatura 0 C 40 C funcionamiento 20 C 60 C almacenamiento Humedad 30 90 funcionamiento 10 90 almacenamiento Alimentac...

Page 193: ...193 4 C 4040ZBasic S146 01 6 25 11 53 AM Page 193...

Page 194: ...194 MEMO 4 C 4040ZBasic S146 01 6 25 11 53 AM Page 194...

Page 195: ...195 MEMO 4 C 4040ZBasic S146 01 6 25 11 53 AM Page 195...

Page 196: ...ort olympus europa com OLYMPUS OPTICAL CO LTD San Ei Building 22 2 Nishi Shinjuku 1 chome Shinjuku ku Tokyo Japan Customer support Tel 0426 42 7499 Tokyo OLYMPUS AMERICA INC Two Corporate Center Drive...

Reviews: