

2
Press
to select the flash
mode, and press
.
3
When the shutter button is pressed halfway, the mark lights or
blinks.
lights: The flash is ready to fire when the shutter button is fully
depressed.
blinks: The flash is charging. Wait until the mark changes from
brinking status to steady.
Not all flash modes are available depending on the shooting mode
selected. Refer to the Reference Manual for more information.
Icon
Flash Mode
Description
No
indication
Auto flash
The camera automatically decides if the flash is
needed.
Red-eye Reduction
Flash
Reduces incidence of red eyes by emitting pre-
flashes.
Fill-in Flash
The flash always fires with every picture.
Flash Off
The flash does not fire regardless of the light
conditions.
TIPS
b.
Erasing Pictures
Deletes only the picture currently
displayed in the monitor.
Once erased, pictures cannot
be restored. Check each
picture before erasing to avoid
accidentally erasing pictures
you want to keep.
1
Display the picture you want to
erase.
2
Press
.
3
Select [YES], and press
.
• The picture will be erased.
The “all-frame erase” function erases all frames stored in the camera. Refer
to the Reference Manual for more information.
Erase button (
)
Arrow pad
(
)
OK button (
)
Note
TIPS
CONNECTING THE CAMERA TO A COMPUTER
Olympus makes it simple to connect your camera to a
computer and download pictures.
Olympus recommends using the optional AC adapter to ensure a
consistent power supply when downloading images.
a.
Installing OLYMPUS Master
1
Insert the CD-ROM into the CD-
ROM drive.
• The OLYMPUS Master installation
screen is displayed.
2
Click the [OLYMPUS Master] button.
• Installation starts.
• Follow the on-screen instructions
to complete the installation.
For more information on operating environment and installation
procedure of OLYMPUS Master, refer to the Reference Manual.
b.
Connecting to a computer
Make sure that the camera is turned off before
connecting it to your computer.
1
Make sure the camera is turned off.
• The monitor is off.
• The green lamp and the orange lamp on the camera are off.
• The lens is not extended.
2
Plug the USB cable provided with the camera into the USB port
on your computer.
TIPS
TIPS
Note
Connector cover
USB connector
USB cable
USB port
Look for this mark.
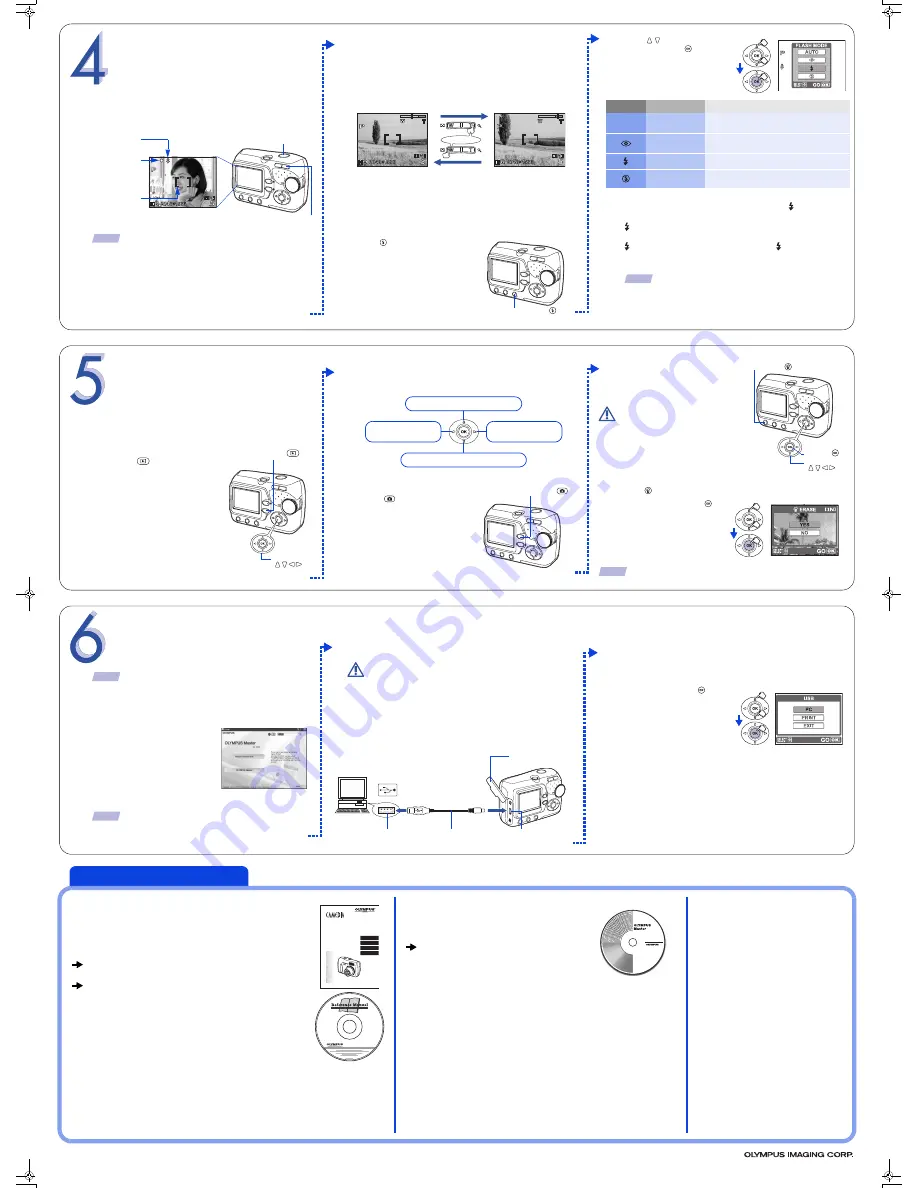
TAKING PICTURES
Let’s press the shutter button and take a picture – it’s easy.
a.
Taking a Picture
1
Position the AF target mark on the subject while looking at the
monitor and decide on composition.
Icons representing camera settings appear on the monitor, telling
you important information such as the flash and record modes,
battery life and the number of frames remaining.
2
Press the shutter button gently (halfway) to adjust the focus.
• The focus is properly set when the green lamp lights.
• The
#
indicator lights steadily when the flash is ready to fire.
3
Press the shutter button completely to take the picture.
b.
Zooming
Use the zoom button to zoom in closer to the subject or zoom
out for a wide-angle shot.
c.
Flash Modes
This digital camera features multiple flash modes. Choose
the mode best suited to the shooting conditions and the kind
of picture you want.
1
Press .
Green lamp
(Lights when the subject is in
focus)
Flash standby
(Lights when taking pictures
with flash)
AF target mark
(Indicates the area on which
the camera is focused)
Shutter button
Zoom button
TIPS
Press toward T to choose
telephoto shooting and
make the subject bigger.
Press toward W to zoom
out and get everything
into the picture.
Press
Flash mode button (
)
VIEWING AND ERASING
PICTURES
With a digital camera, you can easily view the photos you
want - and delete the ones you don’t.
a.
Viewing Pictures
1
With the camera in the shooting
mode, press
.
• Playback mode is set.
• The last picture taken appears in
the monitor.
Arrow pad
(
)
Playback button (
)
2
Use the arrow pad to playback other pictures.
• To return to the shooting mode,
press .
Jumps to the picture 10 frames back.
Displays the previous
picture.
Displays the next
picture.
Jumps to the picture 10 frames ahead.
Shooting button (
)
© 2004
3
Plug the other end of the USB cable into the USB connector on
your camera.
• The camera starts communicating with the PC and the selection
screen for the USB connector is displayed on the camera’s monitor.
4
Select [PC], and press
.
• When the camera is recognized
by the PC, a new icon appears
on the desktop.
About the functions and
detailed instructions on
how to use them...
See “BASIC MANUAL” to find out the capabilities of
your camera.
Insert the CD-ROM provided with the camera to your PC,
and refer to “REFERENCE MANUAL” on the CD-ROM for
more information.
• Take pictures using the optimal settings according to the
shooting conditions.
• Record movies.
• Increase the maximum number of pictures to take with an
optional xD-Picture Card inserted.
• Play back pictures on your TV using the video cable provided with the camera.
• Use the direct print function, connecting the camera and PictBridge-compatible
printer with the USB cable provided with the camera.
DIGITAL CAMERA
APPAREIL PHOTO NUMÉRIQUE
DIGITALKAMERA
CÁMARA DIGITAL
D-535 ZOOM
C-370 ZOOM
X-450
BASIC MANUAL
MANUEL DE BASE
EINFACHE ANLEITUNG
MANUAL BÁSICO
ENGLISH..........2
FRANÇAIS .....40
DEUTSCH ......78
ESPAÑOL ....116
For advanced users
To enjoy the images
on your PC...
Insert the Olympus Master CD-ROM
provided with the camera to your PC, and
enjoy pictures with the OLYMPUS Master
software.
• Play back still pictures and movies.
• Perform the editing such as rotating and trimming of images.
• Manage images using the calendar function.
• Print images easily.
• Make online user registration of camera (confirm that your PC is
connected to Internet beforehand).
Technical Support (USA)
1-888-553-4448 (Toll-free)
8:00 AM - 10:00 PM ET
Monday - Friday
European Technical Customer
Support
00800 - 67 10 83 00 (Toll-free)
+49 180 5 - 67 10 83 or
+49 40 - 237 73 899 (Charged)
9:00 AM - 6:00 PM MET
Monday - Friday
d4205_qsg_e_6.fm 2 ページ 2004年8月2日 月曜日 午後11時58分