All-Frame Erase:
Deletes all pictures on the xD-Picture Card in one
operation, except for pictures you have protected.
Once erased, pictures cannot be restored.
•
Set the mode dial to (playback mode) and press the
POWER
switch.
• Press
, then press to select MODE MENU.
• Use to select the CARD tab, then press twice to access
the CARD SETUP screen.
• ALL ERASE should be highlighted. Press
.
• As a safeguard, this digital camera will ask you to select
YES or NO to confirm erasing, as this process permanently
deletes all unprotected pictures. Select YES and press
.
TAKING PICTURES
There are two ways to compose your subject: with the
viewfinder or using the monitor. Depending upon the shooting
situation, there may be advantages to each method. Please
refer to the printed Basic Manual for more information.
Taking still pictures
•
Remove the lens cap. Set the mode dial to and
press the POWER switch.
• Point the camera towards a subject, and place the subject
on the AF target mark.
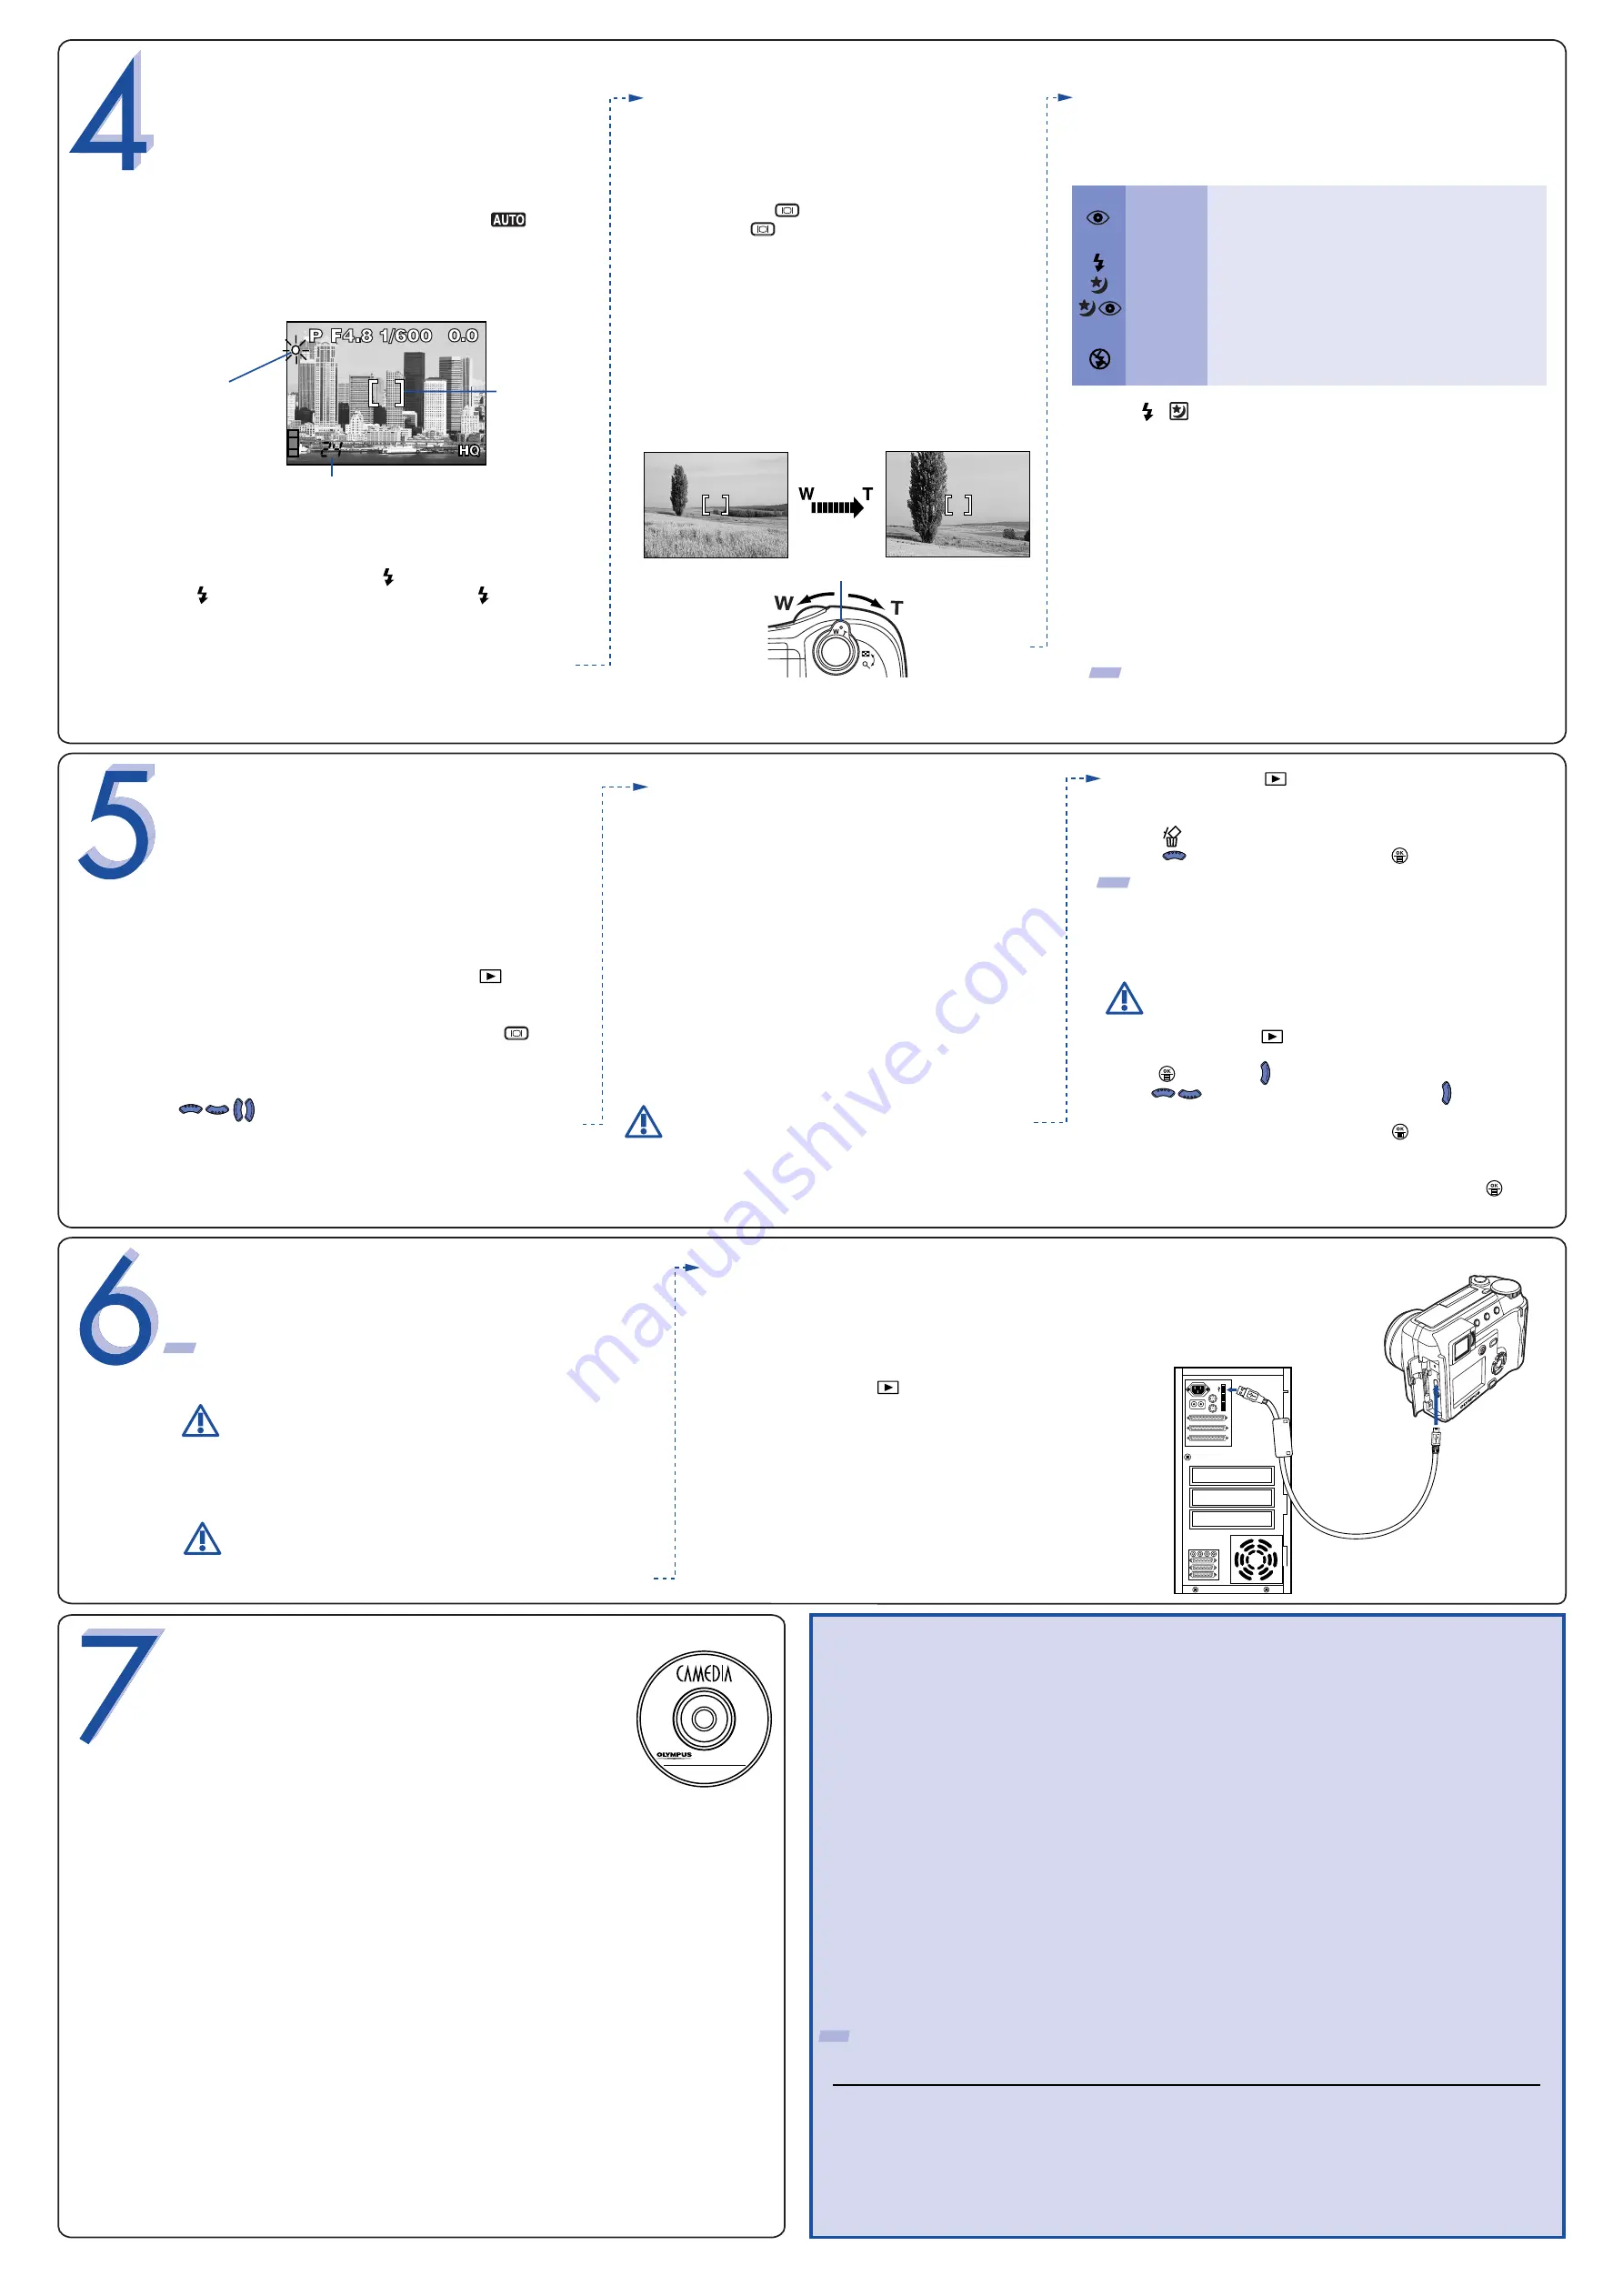
• Press the shutter button halfway.
When the focus and brightness (exposure) are locked, the
green lamp lights.
To warn you of camera shake, will blink. In this case, press
the (flash) switch to pop up the flash. If the (flash stand-by)
mark lights, the flash will fire automatically.
• Press the shutter button completely to take the picture.
A short beep confirms your picture has been taken.
Zooming
This digital camera features a zoom lens, allowing
you to get closer to action, or capture wide-angle
shots and get everything into the picture.
a.
Number of Storable Pictures
Your digital camera can handle xD-Picture Card from 16 MB to
512 MB. The number of storable pictures depends on the image
quality selected.
See the Reference Manual for complete descriptions of each
record mode and the storable frame capacity for the various
resolution modes and xD-Picture Card capacities.
TIP:
To find out how many frames you have left, turn on the monitor and look for
the number in the lower right corner. Remember, you can always delete unwanted
pictures to make room for more. (See Step 5.)
Press / to cycle through the available flash modes. With the
shutter button depressed halfway, the flash is ready to fire when
the orange lamp next to the viewfinder lights steadily. When the
orange lamp is blinking, the flash is charging.
c.
b.
Icons representing camera settings appear on the
monitor, telling you important information such as the
Flash and record modes, battery life, and the number
of frames remaining.
• How to turn off only the monitor
T
Press the (monitor) button. The monitor turns
off. If is pressed again, the monitor turns on.
Icon
Flash Mode
Description
No icon Auto-flash
The camera automatically decides if the flash is needed.
Red-eye
Reduction
Flash
Reduces incidence of red-eye by emitting pre-flashes to
shrink pupil size before firing the main flash. The strobe
effect is normal operation for this mode.
Night scene
Adjusts the flash for slow shutter speeds.
Night scene
with red-eye
reduction flash
Adjusts the flash for slow shutter speeds, and minimizes
red-eye.
Fill-in Flash
The flash always fires with every picture.
Flash Off
Turns the flash off for times when flash photography is
prohibited or not desired. The flash never fires.
•
Set the mode dial to (playback mode) and press the
POWER switch.
•
Select a picture you wish to erase by using the arrow pad.
• Press .
• Press to select YES, and then press .
Viewing Pictures
There are two ways to access the Playback mode:
•
If the camera is off, set the mode dial to and press
the POWER switch.
OR
•
If the camera is in the shooting mode, press twice in
rapid succession (Quick View).
The last picture taken appears in the monitor. Use
to scroll though all the images saved on your
xD-Picture Card.
When you are finished reviewing your pictures:
•
Press POWER to turn the camera off.
OR
•
To return back to the shooting mode, press the shutter
button halfway.
Erasing Pictures
The beauty of digital photography is your ability to keep
the photos you want, delete the rest, and reuse empty
memory space to take new pictures. This digital camera
offers two ways to permanently erase unwanted digital
photos:
Single-Frame Erase
: Deletes only the picture currently
displayed in the monitor.
VIEWING AND ERASING
PICTURES
With this digital camera, you can easily view the photos
you want—and delete the ones you don’t.
a.
b.
Once erased, pictures cannot be restored.
Olympus makes it simple to connect this digital camera to
your computer.
• Turn the camera off.
• Plug the supplied USB cable into the ports on your
camera and computer as illustrated at right.
•
Set the mode dial to and press POWER if the camera
does not turn on automatically.
The camera starts communicating with the PC.
CONNECTING THE CAMERA
TO A COMPUTER
TIP:
Olympus recommends using the optional AC adapter to ensure
a consistent power supply when downloading images.
Additional Camera Features
This digital camera offers a host of advanced features to expand your creativity. Here’s just a small
sampling. See the Basic Manual for details on these capabilities, and more!
•
3 Scene Program Shooting Modes
: This camera has 3 shooting modes to choose from
depending on the shooting conditions and the effect you want to achieve.
•
Macro Mode
: For close-ups as tight as 4 inches (10 cm), select Macro Mode.
•
Sequential shooting
: Take a rapid succession of still pictures.
•
Still Picture Editing
: Edit still pictures and store them as new pictures.
•
Movie Mode
: Yes, this digital camera records movies! (Movie Mode does not record sound.)
•
Two-in-one Pictures
: Combine two separate images taken in succession and store them as a
single picture.
•
Close-up Playback
: Enlarge the pictures in the monitor to check details of the selected image.
•
Index Display
: View several thumbnail pictures on the monitor at once.
•
Protecting Pictures
: Prevents you from accidentally erasing photos.
•
Video Playback
: View your pictures and movies on a television monitor.
•
Panorama Shooting
: Connect overlapping images into a single picture using the panorama
mode and Olympus CAMEDIA Master software.
TIP: Remember to complete and return your Registration Card, and keep all camera documentation handy.
About the Olympus CAMEDIA Master CD-ROM
Your Olympus digital camera comes bundled with a suite of software and
documentation. The CD includes:
•
CAMEDIA Master
: To download pictures from the camera, view,
organize, retouch, and print your digital photos and movies.
•
USB Driver for Windows 98
: This utility must be installed to allow the
camera to communicate with your computer if it uses the Microsoft Windows 98
operating system.
•
Olympus
Digital
Camera Reference Manual
: A complete
reference guide in digital form, saved on the CD in PDF format.
You've now mastered the basic functionality of your new Olympus
digital camera! You are now ready to begin exploring the
possibilities that digital photography brings to your computer.
Activities such as photo editing, printing, and much more are
only steps away!
INSTALLING THE CAMERA
SOFTWARE
You are now ready to install the computer software.
• Open the CAMEDIA Master CD-ROM package and locate the Software
Installation Guide in the language you wish to use.
•
Continue to follow the step-by-step instructions for installing the software, and
enjoy your new digital photo processing capabilities!
TIP: Images can also be erased while in the "Quick View" mode
described in step 5A. This makes it easy to quickly erase a picture that
you just took.
Green lamp
Number of storable still pictures
Shoot a wider view
picture (wide-angle)
Press the zoom lever
toward W to zoom out.
Zoom in on a
subject (telephoto)
Press the zoom lever
toward T to zoom in.
AF target mark
Zoom lever
Flash Modes
This digital camera features multiple flash modes.
d.
European Technical Customer Support
00800-67 10 83 00 (Toll-free)
+49(0)1805-67 10 83 or +49(0)40-23 77 38 99 (Charged)
9:00 AM - 6:00 PM MET
Monday - Friday
Technical Support
(USA)
1-888-553-4448 (Toll-free)
8:00 AM - 10:00 PM ET
Monday - Friday
Windows 98 users must install the "USB Driver for
Windows 98" software before connecting this
digital camera to the computer.
Refer to the Software Installation Guide for
complete information.
Make sure that the camera is turned off before
connecting it to your computer.
©
2004 OLYMPUS CORPORATION