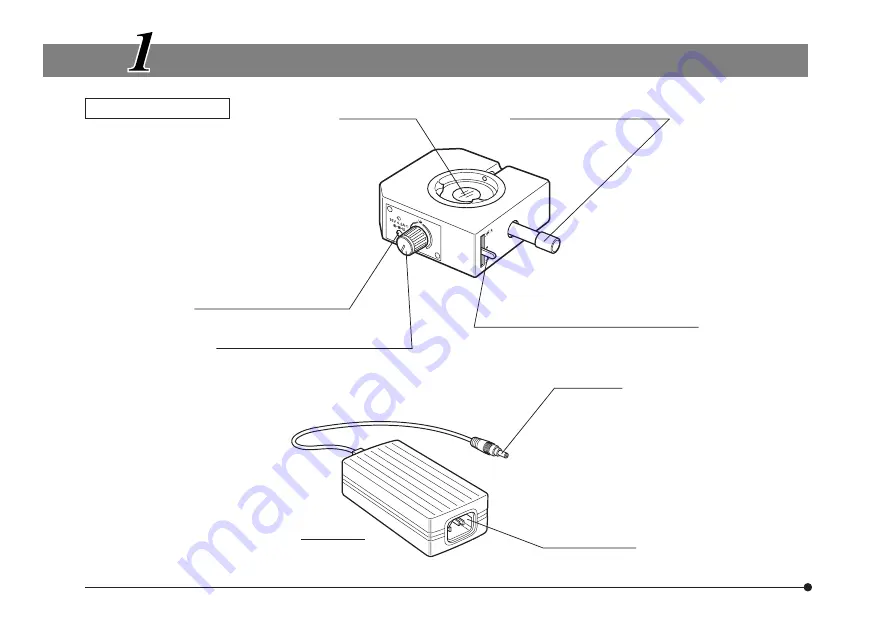
Olympus ARROW POINTER Instructions Manual Download Page 8

5

CONTROLS

  Arrow Pointer U-APT

Pointer control lever (Page 6)

AC adapter input connector

Pointer brightness control (Page 6)

OFF/Continuously variable

Pointer color switch lever (Page 6)

Up: Red. Middle: Shielded. Down: Green.

Tube mounts

Output plug

Input connector

AC Adapter

Summary of Contents for ARROW POINTER

Page 1: ...ety obtain optimum performance and to familiarize yourself fully with the use of this attachment we recommend that you study this manual thoroughly before operating the microscope Retain this instruction manual in an easily accessible place near the work desk for future reference A X 9 8 9 7 Optical Microscope Accessory ...

Page 2: ...eparately Refer to your local Olympus distributor in EU for return and or collection systems available in your country For Korea only ࣾ匏ࣜ匶匶ࣜࣜࣤ儆洛殯ࣜ愯暧皻柦匶沖沲ࣥ 決ࣜ匶匶垚ࣜ儆洛殯ࣤࣾ匏ࣥࣜ洊沖砒洇穯匶匶嵢昢ࣜ渂嵢ࣜ儆洛櫖昢ࣜ斲殯穞垚ࣜ冉汊 徯洇求嵢ࣜ穞彶ࣨࣜ微姦ࣜ滆櫳櫖昢ࣜ斲殯穦ࣜ朞ࣜ沎枻城埪 This product is applied with the requirements of standard IEC EN61326 1 concerning electromagnetic compatibility Immunity Applied to industrial and basic environment requirement...

Page 3: ... 4 ASSEMBLY pages 10 to 11 IMPORTANT Be sure to read this section for safe use of the equipment 1 4 1 CONTROLS 5 2 OPERATION 6 8 2 1 Focus Adjustment of the Arrow Pointer 6 2 2 Pointer Operation 7 2 3 Notes on Photomicrography 8 3 SPECIFICATIONS 9 4 ASSEMBLY 10 11 1 Adjusting the Pointer Brightness 2 Selecting the Pointer Color 3 Moving the Pointer PROPER SELECTION OF THE POWER SUPPLY CORD 12 15 ...

Page 4: ...inter is combined with a superwide field observation tube the pointer cannot be moved around the entire range of the field of view Also note that a ghost of pointer may be observed in such a case 3 If the eyepiece in use incorporates a micrometer ghost may be observed with dark specimens 4 Always use the power cord and AC adapter provided by Olympus If no power cord is provided please select the p...

Page 5: ...it gauze slightly moistened with commercially available absolute alcohol Since the absolute alcohol is highly flammable it must be handled carefully Be sure to keep it away from open flames or potential sources of electrical sparks for example electrical equipment that is being switched on or off Also remember to always use it only in a well ventilated room 2 With any part of the arrow pointer oth...

Page 6: ...d illuminator BX3 URA Coded fluorescence illuminator BX3 RFAS 5 When the arrow pointer is used with the BX40 BX41 BX43 BX45 BX46 BX50 BX51 BX52 BX53 BX60 microscope frame only one intermediate attachment can be mounted in a 2 level configuration However the usable intermediate attachment is restricted depending on whether it is mounted above or below the arrow pointer The only intermediate attachm...

Page 7: ... manual The following symbols are used to set off text in this instruction manual Indicates that failure to follow the instructions in the warning could result in bodily harm to the user and or damage to equipment including objects in the vicinity of the equipment Indicates that failure to follow the instructions could result in damage to equipment Indicates commentary for ease of operation and ma...

Page 8: ...ointer control lever Page 6 AC adapter input connector Pointer brightness control Page 6 OFF Continuously variable Pointer color switch lever Page 6 Up Red Middle Shielded Down Green Tube mounts Output plug Input connector AC Adapter ...

Page 9: ... lever to other position than the middle position If the pointer cannot be seen in the field of view move the pointer at the center of field using the pointer control lever 2 Looking into the eyepiece sleeve without the diopter adjustment ring turn the helicoid of the eyepiece to focus on the pointer 3 Looking into the eyepiece sleeve with the diopter adjustment ring turn the diopter adjustment ri...

Page 10: ...ry the brightness continuously 2 Turning the control to the fully counterclockwise position switches it off Using the pointer color switching lever select a color which is clearly distinguishable from the specimen color Top position Red Middle position Light shielded Down position Green Fig 3 1 Adjusting the Pointer Brightness Fig 3 2 Selecting the Pointer Color Fig 3 Fig 4 3 Moving the Pointer Fi...

Page 11: ...e adequate contrast This has the following effects on photographs that are not apparent during visual observation Since the pointer is always overexposed when exposure is correct for specimen the pointer color will bleach to white in color photographs When taking photographs with photomicrographic equipment with automatic exposure control the brightness of the pointer will cause the specimen to be...

Page 12: ... x 45 H mm approx 1 2 kg Operating environment Indoor use Altitude Max 2000 meters Ambient temperature 5o to 40o C 41o to 104o F Maximum relative humidity 80 for temperatures up to 31o C 88o F decreasing linearly through 70 at 34o C 93o F 60 at 37o C 99o F to 50 relative humidity at 40o C 104o F Supply voltage fluctuations Not to exceed 10 of the normal voltage Pollution degree 2 in accordance wit...

Page 13: ...r provided by Olympus IF no power cord is provided with the microscope please select the proper power cord by referring to section PROPER SELECTION OF THE POWER SUPPLY CORD at the end of this instruction manual 1 Firmly connect the AC adapter s output plug to the AC adapter input connector on the left side panel of the arrow pointer 2 Connect the power cord s connector into the AC adapter s input ...

Page 14: ...ng in the way of microscope operation and from contacting the lamp housing peel off the backings from the two provided cord stopper stickers and fix the power cord at two positions on the arrow pointer using them Fig 7 3 Fixing the Cord Stopper ...

Page 15: ... authorized agencies in your country PROPER SELECTION OF THE POWER SUPPLY CORD If no power supply cord is provided please select the proper power supply cord for the equipment by referring to Specifications and Certified Cord below CAUTION In case you use a non approved power supply cord for Olympus products Olympus can no longer warrant the electrical safety of the equipment Specifications Voltag...

Page 16: ... Argentina Australia Austria Belgium Canada Denmark Finland France Germany Ireland IRAM SAA ÖVE CEBEC CSA DEMKO FEI UTE VDE NSAI Italy Japan Netherlands Norway Spain Sweden Switzerland United Kingdom U S A IMQ KEMA NEMKO AEE SEMKO SEV ASTA BSI UL JET JQA TÜV UL APEX MITI ...

Page 17: ...ernal wir ing Alternative Marking Utilizing Black Red Yellow Thread Length of color section in mm Black Red Yellow Comite Electrotechnique Belge CEBEC Verband Deutscher Elektrotechniker VDE e V Prüfstelle Union Technique de l Electricite UTE Instituto Italiano del Marchio di Qualita IMQ British Approvals Service for Electric Cables BASEC N V KEMA SEMKO AB Svenska Elektriska Materielkontrollanstalt...

Page 18: ...Hellenic Organization for Standardization ELOT Instituto Portages da Qualidade IPQ Schweizerischer Elektro Technischer Verein SEV Elektriska Inspektoratet ÖVE HAR DEMKO HAR NSAI HAR NEMKO HAR UNED HAR ELOT HAR np HAR SEV HAR SETI HAR 30 10 50 30 10 30 30 30 50 10 10 70 30 10 70 30 30 70 10 10 90 10 30 90 10 30 90 Underwriters Laboratories Inc UL SV SVT SJ or SJT 3 X 18AWG Canadian Standards Associ...

Page 19: ......

Page 20: ...geunsa ro Gangnam gu Seoul 06153 Korea Distributed by Manufactured by 48 Woerd Avenue Waltham MA 02453 U S A Shinjuku Monolith 2 3 1 Nishi Shinjuku Shinjuku ku Tokyo 163 0914 Japan www olympus global com Printed in Japan 20161028 M0000 ...

Reviews: