background image

DMTA-10004-01EN, Rev. D, November 2016

Software Options


97

9.

Press 

[CAL VEL]

 again.

10. Couple the transducer to the sample with known internal oxide thickness.
11. When the reading is stable, press 

[ENTER]

.

12. Using the arrow keys, edit the thickness value to match the known internal oxide 

thickness.

13. Press 

[MEAS]

 to complete the calibration.

7.3.4

Measuring Boiler Tube and Oxide Layer Thicknesses

With the oxide layer software option, the 38DL PLUS simultaneously measures the 
thickness of the boiler tube metal and the thickness of oxide scale that has built up 
inside the tube.

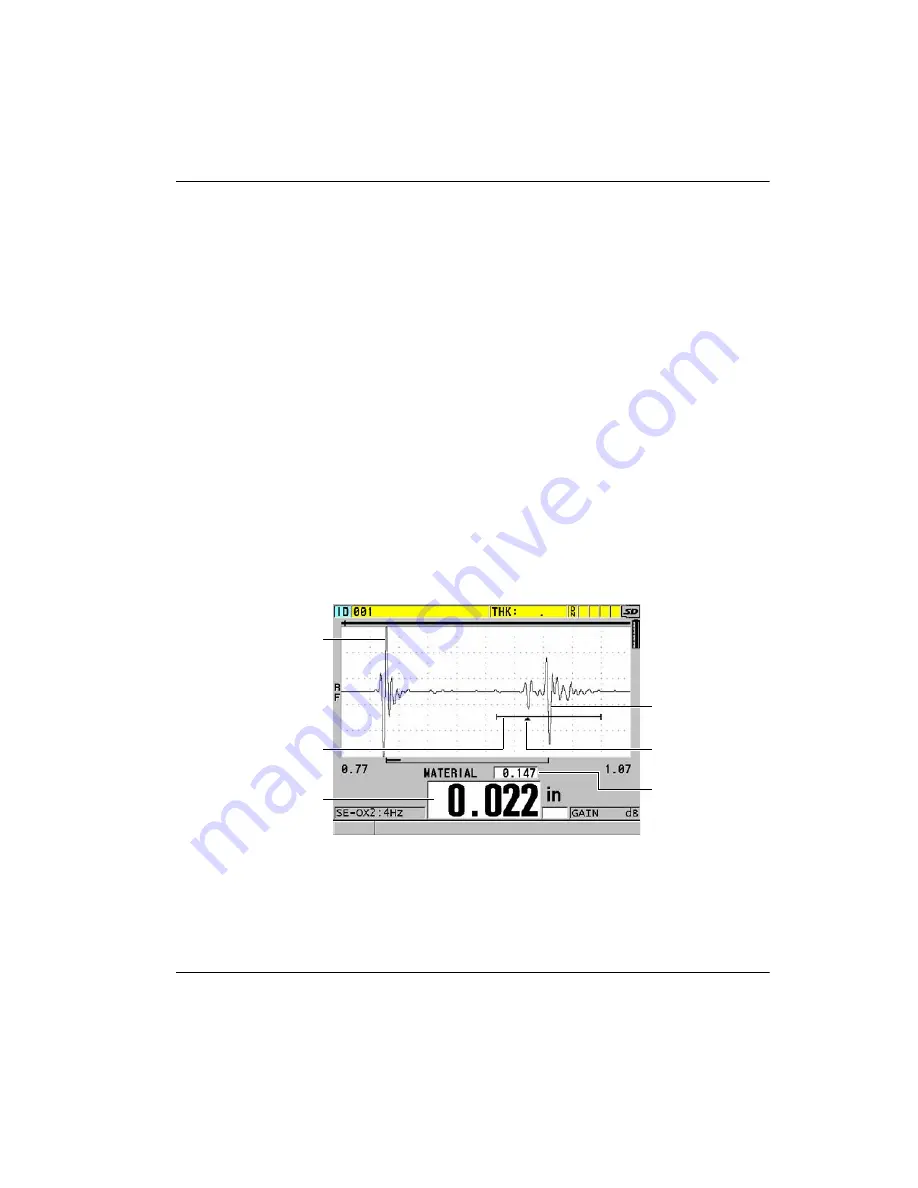
Figure 7-4 on page 97 shows the correct ultrasonic signals using the single element 
transducer default setup DEF-OXIDE/M2017. The 38DL PLUS makes a standard 
mode 2 measurement from the delay line echo (surface of the boiler tube) to the echo 
from the inside of the oxide layer (total back-wall echo). The instrument centers the 
data window on the detected total back-wall echo and then searches for the 
steel/oxide interface echo in the data window. An oxide echo marker indicates the 
detected steel/oxide interface echo.

Figure 7

4  Measurement screen with the oxide layer software option

Interface echo

Tube thickness

Oxide layer thickness

Echo from inside of 
oxide

Data window

Steel/Oxide echo 
marker

Summary of Contents for 38DL PLUS

Page 1: ...s Manual This instruction manual contains essential information on how to use this Olympus product safely and effectively Before using this product thoroughly review this instruction manual Use the product as instructed Keep this instruction manual in a safe accessible location ...

Page 2: ... accuracy of the information contained therein and corresponds to the version of the product manufactured prior to the date appearing on the title page There could however be some differences between the manual and the product if the product was modified thereafter The information contained in this document is subject to change without notice Part number DMTA 10004 01EN Rev D November 2016 Printed...

Page 3: ...Compatibility 6 Repair and Modification 7 Safety Symbols 7 Safety Signal Words 7 Note Signal Words 8 Safety 9 Warnings 9 Battery Precautions 10 Equipment Disposal 11 CE European Community 11 WEEE Directive 12 China RoHS 12 EMC Directive Compliance 13 FCC USA Compliance 13 ICES 001 Canada Compliance 14 Regulatory Information 14 Warranty Information 14 Technical Support 15 Introduction 17 1 Instrume...

Page 4: ...Edit Mode 44 3 4 1 Editing Text Parameters Using the Virtual Keyboard 44 3 4 2 Editing Text Parameters Using the Traditional Method 46 4 Initial Setup 49 4 1 Setting the User Interface Language and Other System Options 49 4 2 Selecting the Measurement Units 50 4 3 Setting the Clock 50 4 4 Changing Display Settings 51 4 4 1 Color Schemes 52 4 4 2 Display Brightness 53 4 4 3 Waveform Rectification 5...

Page 5: ...ode Datalogger Flags 85 5 7 Using the VGA Output 86 6 Using EMAT Transducers 87 6 1 Connecting the E110 SB EMAT Transducer 88 6 2 Calibrating with the E110 SB EMAT Transducer 89 7 Software Options 91 7 1 Activating Software Options 92 7 2 High Resolution Software Option 93 7 3 Oxide Layer Software Option 93 7 3 1 Steam Boiler Tube Scale 94 7 3 2 Setting Up for Oxide Layer Measurement 95 7 3 3 Cali...

Page 6: ...147 10 4 1 Activating and Configuring the DB Grid 147 10 4 2 Changing the Highlighted Cell in the DB Grid 150 10 4 3 Saving Thickness Readings in the DB Grid 152 10 4 4 Viewing an Inserted or an Appended Cell in the DB Grid 152 10 5 Configuring AVG MIN Measurements 153 10 6 Making AVG MIN Measurements 154 10 7 Using Temperature Compensation 156 11 Using the Datalogger 159 11 1 Datalogger 159 11 2 ...

Page 7: ...sducer Setups 211 12 1 Standard D79X and Other Dual Element Transducers 211 12 2 Creating a Setup for Nonstandard Dual Element Transducers 212 12 3 Recalling Stored Dual Element Transducer Setups 215 12 4 V Path 215 12 4 1 Activating the V Path Function 216 12 4 2 Building a V Path Correction Curve for a Nonstandard Dual Element Transducer 216 13 Custom Setups for Single Element Transducers 221 13...

Page 8: ...r 254 14 5 Capturing 38DL PLUS Screen Images 255 14 5 1 Sending a Screen Capture to GageView 255 14 5 2 Sending a Screen Capture to the External microSD Card 257 14 6 RS 232 Serial Data Output Formats 258 14 7 Resetting the Communication Parameters 260 15 Maintaining and Troubleshooting the 38DL PLUS 263 15 1 Providing Routine Gage Maintenance 263 15 2 Cleaning the Instrument 264 15 3 Maintaining ...

Page 9: ...DMTA 10004 01EN Rev D November 2016 Table of Contents ix Index 297 ...

Page 10: ...DMTA 10004 01EN Rev D November 2016 Table of Contents x ...

Page 11: ...can standard code for information interchange AVG average CSV comma separated variables DB database DC direct current DIA diameter DIAG diagnostic DIFF differential EFUP environment friendly use period EMAT electromagnetic acoustic transducer ESS electronic stress screening EXT extended FRP fiber reinforced polymer GB giga bytes GRN green HDPE high density polyethylene HI high HR high resolution I...

Page 12: ...easured time interval MULTI multiple NiMH nickel metal hydride P N part number PDF portable document format PDSTL pedestal PRF pulse repetition frequency PVC polyvinylchloride SE single element SEC second SP special STD standard SW software SWC shear wave couplant TDG time dependent gain TFT thin film transistor liquid crystal display technology TOF time of flight USB universal serial bus VAC volt...

Page 13: ...mbols are missing or illegible please contact Olympus Do not touch the inner conductor of the T R 1 and T R 2 connectors to avoid risks of an electric shock Up to 200 V can be present on the inner conductor The warning symbol between the Transmit Receive T R connector markings is shown in Figure i 1 on page 1 Figure i 1 The warning symbol between the T R connectors CAUTION Top end view Warning sym...

Page 14: ...N Rev D November 2016 Labels and Symbols 2 Figure i 2 Labels and symbols are attached to the instrument Serial number label Side view Back view Patent label Instruction label see Table 1 on page 3 Serial number label ...

Page 15: ...Symbols 3 Table 1 Label contents Serial number label Where yy last two digits of the production year nnnnn 5 digit nonduplicated incrementing number representing the nth production unit of this product mm production month Instruction label yynnnnnmm ...

Page 16: ... not be disposed of as unsorted municipal waste but should be collected separately The China RoHS mark indicates the product s Environment Friendly Use Period EFUP The EFUP is defined as the number of years for which listed controlled substances will not leak or chemically deteriorate while in the product The EFUP for the 38DL PLUS has been determined to be 15 years Note The Environment Friendly U...

Page 17: ...o not use the 38DL PLUS for any purpose other than its intended use It must never be used to inspect or examine human or animal body parts Instruction Manual This instruction manual contains complete and essential information on how to use this Olympus product safely and effectively Before using this product thoroughly review this instruction manual Use the product as instructed Keep this instruct...

Page 18: ... DMTA 10009 01EN U8778346 A printed document containing a detailed description of the instrument as well as basic setup and operation procedures GageView Interface Program User s Manual P N 910 259 EN U8778347 The 38DL PLUS also works with the GageView interface program Refer to this document for detailed information on GageView The document is available in PDF format on the GageView CD and as onl...

Page 19: ...s The following safety symbols might appear on the instrument and in the instruction manual General warning symbol This symbol is used to alert the user to potential hazards All safety messages that follow this symbol shall be obeyed to avoid possible harm or material damage Shock hazard caution symbol This symbol is used to alert the user to potential electric shock hazards All safety messages th...

Page 20: ...stood and met The CAUTION signal word indicates a potentially hazardous situation It calls attention to a procedure practice or the like that if not correctly performed or adhered to may result in minor or moderate personal injury material damage particularly to the product destruction of part or all of the product or loss of data Do not proceed beyond a CAUTION signal word until the indicated con...

Page 21: ... on the instrument Keep this instruction manual in a safe place for further reference Follow the installation and operation procedures It is imperative to respect the safety warnings on the instrument and in this instruction manual If the equipment is used in a manner not specified by the manufacturer the protection provided by the equipment could be impaired Do not install substitute parts or per...

Page 22: ...rument inoperative and secure it against any unintended operation The instrument must only be connected to a power source corresponding to the type indicated on the rating label If an unauthorized power supply cord is used to power the instrument or charge the batteries Olympus cannot guarantee the electrical safety of the equipment Battery Precautions Before disposing of a battery check your loca...

Page 23: ...cuit the battery terminals A short circuit could cause injury and severe damage to a battery making it unusable Do not expose a battery to moisture or rain doing so could cause an electric shock Only use the 38DL PLUS unit or an external charger approved by Olympus to charge the batteries Only use batteries supplied by Olympus Do not store batteries that have less than 40 remaining charge Recharge...

Page 24: ... of as unsorted municipal waste but should be collected separately Refer to your local Olympus distributor for return and or collection systems available in your country The China RoHS mark indicates the product s Environment Friendly Use Period EFUP The EFUP is defined as the number of years for which listed controlled substances will not leak or chemically deteriorate while in the product The EF...

Page 25: ...This device may not cause harmful interference 2 This device must accept any interference received including interference that may cause undesired operation Changes or modifications not expressly approved by the party responsible for compliance could void the user s authority to operate the equipment This equipment has been tested and found to comply with the limits for a Class A digital device pu...

Page 26: ...US may display a regulatory screen that lists the specific regulation with which it complies To view the REGULATORY screen 1 In the measurement screen press 2nd F SETUP MENU SP MENU 2 In the SP MENU select REGULATORY to display the REGULATORY screen 3 Use the up and down arrow keys to scroll through the different REGULATORY screens 4 Press MEAS to return to the measurement screen Warranty Informat...

Page 27: ...testing and or verification by the operator or the supervisor Such independent verification of procedures becomes increasingly important as the criticality of the application increases For this reason Olympus makes no warranty expressed or implied that the techniques examples or procedures described herein are consistent with industry standards nor that they meet the requirements of any particular...

Page 28: ...DMTA 10004 01EN Rev D November 2016 Important Information Please Read Before Use 16 ...

Page 29: ...asonic thickness gage The information in this manual is organized to explain the technology safety details hardware and software Practical measurement examples help the user become familiar with the instrument s capabilities The list of other 38DL PLUS documents is provided in Instruction Manual on page 5 Figure i 3 The 38DL PLUS instrument IMPORTANT ...

Page 30: ...DMTA 10004 01EN Rev D November 2016 Introduction 18 ...

Page 31: ...escription The 38DL PLUS by Olympus is a hand held ultrasonic thickness gage designed for a wide variety of thickness measurement applications With the 38DL PLUS you only need access to one side of a part to measure in a nondestructive manner the thickness of corroded pitted scaled granular and other difficult materials see Figure 1 1 on page 19 Figure 1 1 Measuring thicknesses with the 38DL PLUS ...

Page 32: ...echo to echo measurements You can connect the 38DL PLUS to a printer and to a computer using the bidirectional serial USB RS 232 communication ports Advanced Measurement Features THRU COAT measurement Temperature compensated measurement Min Average mode EMAT transducer capability Measurement related status flags and alarms Full VGA color transflective LED back lite display Automatic probe recognit...

Page 33: ...scanned measurements Display stored and downloaded waveforms Internal Datalogger Functions Internal data storage and possibility to export data to a removable microSD memory card Capacity to store 475000 fully documented thickness readings or 20000 waveforms with thickness readings Database enhancements include 32 character file naming and 20 character ID naming Automatic ID number increments foll...

Page 34: ... to harsh environments To maintain the original level of ingress protection you are responsible for the proper care of all routinely exposed membrane seals Additionally you are responsible for returning the instrument to an authorized Olympus service center each year to ensure that the instrument seals are properly maintained 1 3 Instrument Hardware Components The 38DL PLUS front panel features a ...

Page 35: ...rates the possible connections of the 38DL PLUS with external devices Figure 1 3 The 38DL PLUS connections Connector rubber seal Protective rubber boot shown in blue Stand Hand strap Strap rings at the four corners Color display Keypad I O door protecting more connectors Connectors ON OFF key USB RS 232 USB VGA Transducer AC power cord EP MCA microSD ...

Page 36: ... probe connectors are located on the top end of the 38DL PLUS see Figure 1 4 on page 24 Figure 1 4 The top end connectors The USB client connector the VGA output connector and the external microSD memory card slot are located on the right side of the instrument hidden behind the I O door see Figure 1 5 on page 25 CAUTION DC power connector USB RS 232 serial communication connector Transmit Receive...

Page 37: ...rnational Chinese or Japanese keypad see Figure 1 6 on page 26 The functions are the same for all keypads On the international keypad the text labels on many keys are replaced by pictograms In this document keypad keys are referred to using the English label in bold and within brackets ex MEAS USB client connector VGA output connector microSD external memory card slot I O door ...

Page 38: ...icates a secondary key function that you can activate by first pressing 2nd F Throughout this document references to a secondary function are written as follows 2nd F Primary Secondary For example the instruction to activate the clear memory function is written as follows Press 2nd F FILE CLR MEM English keypad International keypad Chinese keypad Japanese keypad ...

Page 39: ...tion number Accesses several functions related to the ID numbers for the thickness measurement location Note Allows you to create or select comments to store at an ID number location File Opens the file menu to access file commands open review create copy edit delete send import export note copy memory and report Clear memory Acts as an alternative method to erase an entire file Also erases a rang...

Page 40: ...lue Up arrow In a screen or a list moves to the previous element For some parameters ex Gain increases the value Down arrow In a screen or a list moves to the next element For some parameters ex Gain decreases the value Left arrow Selects the previous available value for the selected parameter In text edit mode moves the cursor one character position to the left Right arrow Selects the next availa...

Page 41: ...ew and manually change the sound velocity In THRU COAT mode or with the internal oxide option pressing the keys a second time allows you to view adjust the velocity for the coating or the oxide layer Zero calibration Compensates for transducer zero or enables the step block zero calibration With the traditional text edit mode only inserts a character at the cursor position Do zero Compensates for ...

Page 42: ...e waveform display range to the next available value Delay Allows editing the value for the beginning of the waveform display Zoom Dynamically changes the waveform display range so that the region immediately surrounding the measured echo is shown at maximum magnification Echo to Echo With dual element transducers opens a menu to select the measurement mode standard auto echo to echo or manual ech...

Page 43: ... type of power the instrument operates see Figure 2 1 on page 31 Figure 2 1 The power indicator for battery and AC operation When the instrument operates on the battery the vertical black bar in the power indicator indicates the remaining battery charge Each graduation mark represents 12 5 of the charge AC power operation while charging the battery flashing Fully charged battery with or without AC...

Page 44: ...y To use AC power 1 Connect the AC power cord to the charger adaptor P N EP MCA U8767042 and to an appropriate power outlet see Figure 2 2 on page 32 To avoid the risk of injuries or equipment damage use only the AC power cord supplied with the 38DL PLUS Do not use this AC power cord with other products Figure 2 2 Connecting the charger adaptor 2 On the 38DL PLUS lift the rubber seal covering the ...

Page 45: ...atically recharges the 38 BAT battery when you connect the instrument to the AC power You can also operate the 38DL PLUS using four AA size Alkaline or nickel metal hydride NiMH rechargeable batteries using the AA battery holder P N 38DLP AA U8780290 The 38DL PLUS does not recharge NiMH batteries You must recharge AA batteries with an external battery charger not included The 38DL PLUS battery is ...

Page 46: ...38DL PLUS charger adaptor P N EP MCA U8767042 is designed to charge 38DL PLUS batteries only P N 38 BAT U8760054 Do not attempt to charge any other battery types such as alkaline or NiMH or use any other chargers adaptors to charge the 38DL PLUS batteries P N 38 BAT U8760054 Doing so may cause an explosion and injury Do not attempt to power or charge other electronic equipment with the 38DL PLUS c...

Page 47: ...ies Battery Usage Instructions If the battery is used daily or frequently connect the instrument to the charger adaptor when not in use Whenever possible the instrument should remain connected to the EP MCA charger adaptor overnight or over a weekend so that the battery reaches a full charge The battery must reach full charge on a regular basis for proper capacity and cycle life maintenance Fully ...

Page 48: ...rom children The battery used in this device may present a risk of fire or chemical burn if mishandled Do not disassemble heat above 50 C or incinerate the battery Replace the battery only with an Olympus battery P N 38 BAT U8760054 To replace the battery 1 Disconnect the instrument from the charger adaptor 2 Ensure that the 38DL PLUS power is off 3 Disconnect any other cable connected to the 38DL...

Page 49: ...t cover at the back of the instrument and then tighten the four screws 12 Reinstall the protective rubber boot and the hand strap 13 Press ON OFF to turn on the 38DL PLUS 14 To answer the question appearing at the bottom of the screen see Figure 2 5 on page 37 Select Li ion when using a 38 BAT battery OR Select NiMH or Alkaline when using four NiMH AA batteries or four Alkaline AA batteries with t...

Page 50: ...DMTA 10004 01EN Rev D November 2016 Chapter 2 38 ...

Page 51: ... and read the measured thickness value see Figure 3 1 on page 39 The measurement screen is the main screen of the 38DL PLUS software From anywhere in the 38DL PLUS software simply press MEAS to return to the measurement screen The power indicator is always present on the right side of the 38DL PLUS screen see Using Battery Power on page 33 for details Figure 3 1 The main elements of the measuremen...

Page 52: ...ement comes from a file rather than from a newly acquired value Figure 3 2 The ID bar The external microSD memory card indicator appears in the top right corner of the screen when a microSD memory card is inserted in its slot under the I O door on the right side of the instrument see Figure 1 5 on page 25 The 38DL PLUS recognizes an external microSD memory card when you start the instrument Depend...

Page 53: ...Submenus The 38DL PLUS displays menus and submenus when you press some of the front panel keys The menu appears at the top left corner of the screen see Figure 3 5 on page 42 If applicable a submenu also appears conveniently showing the parameters available for the highlighted menu command Zoom indicator Rectification indicator Echo detection marker Delay value Minimum Maximum Echo detection mode ...

Page 54: ... to highlight the desired submenu command 4 Press ENTER to select the highlighted menu or submenu command In the remainder of this document the above procedure is summarized by simply stating to select a specific menu or submenu command For example In the menu select MEAS 3 3 Parameter Screens The 38DL PLUS parameters are logically grouped in parameter screens that you access using front panel key...

Page 55: ...d parameter 2 For parameters with predefined values use the and keys to select the desired value 3 In parameter screens containing lists or alphanumeric parameters In a list use the and keys to highlight the desired list item For an alphanumeric parameter use the and keys to enter the desired characters see Selecting the Text Edit Mode on page 44 for details Press 2nd F or 2nd F to leave a list or...

Page 56: ...xt Parameters Using the Virtual Keyboard on page 44 for details With the traditional method you select each character from a hidden list of standard sorted letters numbers and special characters see Editing Text Parameters Using the Traditional Method on page 46 for details To select the text edit mode 1 From the measurement screen press SETUP MENU 2 In the menu select SYSTEM 3 In the SYSTEM param...

Page 57: ...If you need to move the position of the cursor in the value text box on the virtual keyboard highlight either the left or right arrow button below DONE and then press ENTER The cursor moves by one character position 5 When you need to delete a character a Move the cursor to the character you wish to delete b On the virtual keyboard highlight DELETE and then press ENTER 6 When you need to insert a ...

Page 58: ...ER moves the cursor to the next line You can also press 2nd F to accept the text and move the cursor to the next line 3 4 2 Editing Text Parameters Using the Traditional Method When the text edit mode is set to TRADITIONAL you select each character from a hidden circular list of standard sorted letters numbers and special characters see Figure 3 8 on page 46 Only upper case letters are available F...

Page 59: ...cter 4 Repeat the steps 2 and 3 to enter other characters 5 If you need to move the position of the cursor in the value text box use the or key 6 To insert a character at the cursor position press CAL ZERO The character at the cursor and all those to the right moves one position to the right making a space for a new character 7 To delete the character at the cursor position press CAL VEL The chara...

Page 60: ...DMTA 10004 01EN Rev D November 2016 Chapter 3 48 ...

Page 61: ...e generator to confirm when a key is pressed and to notify you of an alarm condition You can set the beeper on or off To save battery while you do not use the instrument you can enable the inactive time function so that the instrument automatically turns off when no key has been pressed and no measurement has been made within about six minutes To change the user interface language and other system...

Page 62: ...ts You can set the 38DL PLUS to show thickness measurements in inches or millimeters To set the measurement units 1 Press SETUP MENU 2 In the menu select MEAS 3 In the MEAS screen set UNIT TYPE to INCH or MILLIMETER 4 Press MEAS to return to the measurement screen 4 3 Setting the Clock The 38DL PLUS has a built in date and time clock You can set the date and the time and select their format The 38...

Page 63: ...ecting clock parameters 4 4 Changing Display Settings You can change the appearance of some display elements such as colors brightness waveform rectification and waveform trace To change the display setting 1 From the measurement screen press DISPLAY 2 In the DISPLAY SETTINGS screen see Figure 4 3 on page 52 select the desired parameter and value for the following parameters COLOR SCHEME to either...

Page 64: ...he trace types see Waveform Trace on page 55 for details VGA OUTPUT to turn ON or OFF the VGA signal for the VGA output see Using the VGA Output on page 86 for details Figure 4 3 The DISPLAY SETTINGS screen 3 Press MEAS to return to the measurement screen 4 4 1 Color Schemes The 38DL PLUS offers two standard color schemes designed to provide best display visibility in indoor or outdoor lighting co...

Page 65: ...ace on a white background For best readability in this document most screen captures are shown with the outdoor color scheme Colored measurement values corresponding to specific alarm conditions only appear when the indoor color scheme is selected 4 4 2 Display Brightness You can adjust the 38DL PLUS display brightness by selecting the backlight intensity The display brightness can be set at 0 25 ...

Page 66: ...ications are based on backlight brightness set to 50 4 4 3 Waveform Rectification The rectification mode is the way in which the ultrasonic echoes are represented on the waveform display see Figure 4 5 on page 54 The rectification mode does not affect the thickness measurement in any way The rectification indicator FULL POS NEG or RF appears on the left edge of the waveform display From the measur...

Page 67: ...ows negative waveform lobes as positive and does not show the positive lobes HALF POS indicator Shows positive waveform lobes and does not show the negative waveform lobes RF Shows negative and positive lobes on either side of the baseline RF is the default mode for single element transducers 4 4 4 Waveform Trace The 38DL PLUS can display the waveform trace as a line OUTLINE or as a FILLED area se...

Page 68: ...f the horizontal axis the delay is generally set to zero You can manually adjust the delay value to change the starting point of the range see Adjusting the Delay Value on page 58 and select the end point of the range see Selecting the Range Value on page 57 You can also activate the zoom function to automatically set the delay and the range values to best see the echo see Activating the Zoom Func...

Page 69: ...ximum waveform resolution for each application The range setting affects the waveform display only You can still make measurements even when the display range does not show the detected echo from which the thickness is measured You cannot manually set the range while the zoom is active To select the range value 1 From the measurement screen press RANGE The waveform range changes to the next higher...

Page 70: ...d F RANGE DELAY again to stop editing the delay value Press and hold the RANGE key to reset the delay to zero 4 5 3 Activating the Zoom Function The zoom function automatically and dynamically sets the delay and the range values to optimally track and show the detected echo in the waveform display To activate the zoom function 1 From the measurement screen press ZOOM The zoom flag appears on the r...

Page 71: ... echo and the first back wall echo appear on the waveform display see Figure 4 9 on page 59 Figure 4 9 Comparing normal and zoomed display in mode 2 The zoom with single element transducers in mode 3 adjusts the waveform range and delay so that the interface echo and the second measured back wall echo appear on the waveform display see Figure 4 10 on page 60 Normal display Zoomed display Normal di...

Page 72: ...ways present on the left of the thickness measurement see Figure 4 11 on page 60 Figure 4 11 The measurement update rate indicator The MAX update rate is up to 30 Hz and is dependent on measurement type This option is useful when making high temperature thickness measurements to help limit the transducer contact time or for applications where you scan the transducer over an area to find the minimu...

Page 73: ...kness differential reference value and alarm set points The highest thickness resolution with dual element transducer is 0 01 mm 0 001 in The velocity is always reported with full four digit resolution You can reduce the resolution in some applications where the extra precision of the last digit is not required or where extremely rough outside or inside surfaces make the last thickness display dig...

Page 74: ...DMTA 10004 01EN Rev D November 2016 Chapter 4 62 LOW 0 1 mm or 0 01 in Optional HIGH 0 001 mm or 0 0001 in 4 Press MEAS to return to the measurement screen ...

Page 75: ...ep block supplied with the instrument With dual element transducers you need to perform a transducer zero compensation For a single element transducer or other dual element transducers you need to manually load an appropriate setup The 38DL PLUS ships from the factory set up with default conditions for the purchased transducers using an approximate sound velocity for the stainless steel test block...

Page 76: ...ual element transducer the Do message appears in the measurement screen see Figure 5 2 on page 64 Figure 5 2 Initial screen with a standard D79X dual element transducer 3 For dual element transducers perform the transducer zero compensation a Wipe couplant off the tip of the transducer T R 1 connector for a single element transducer Standard dual element transducer connector ...

Page 77: ...you use ex DEFAULT SINGLE ELEMENT c In the DEFAULT screen for the type of probe that you are using see the example shown in Figure 5 3 on page 65 in the list of available default setups highlight the setup for the transducer that you are using Figure 5 3 Selecting a default single element transducer setup D E F M 1 2 0 0 M 1 1 6 Probe part number ex M116 Probe frequency ex 20 0 MHz Mode 1 2 3 Mate...

Page 78: ...ature You must perform the transducer zero compensation procedure when the unit is powered on when the transducer is changed and when the transducer temperature changes significantly see Setting Up the Transducer on page 63 and Transducer Zero Compensation on page 70 Material sound velocity calibration CAL VEL Perform a velocity calibration using a thick test block of the measured material with kn...

Page 79: ... to be inspected see Test Blocks on page 70 for details on test blocks The following procedure is illustrated using a dual element probe and a 5 step test block Refer to Calibration on page 66 for more details on the calibration process To calibrate the instrument 1 To perform the material sound velocity calibration see Figure 5 4 on page 68 a Place a drop of couplant on the surface of the thick p...

Page 80: ...bration see Figure 5 5 on page 69 a Place a drop of couplant on the surface of the thin part of the test block b Couple the transducer to the thin part of the test block and then press CAL ZERO c When the thickness reading is stable press ENTER d Using the arrow keys edit the thickness value to match the known thin thickness of the test block 12 7 mm 0 500 in ...

Page 81: ...city is not updated to the new value instead the instrument retains the previous value When the 38DL PLUS detects an error in the calibration procedure it successively displays the following messages in the help text bar before returning to the measurement screen Potential wrong echo detected Invalid calibration results In this case the velocity is not changed The probable case is that an incorrec...

Page 82: ...ely known thicknesses Have one part as thin as the thinnest section of the parts to be tested to perform the zero calibration The surface condition should be similar to that of the tested parts Rough surfaces generally reduce the accuracy of measurements but simulating actual surface conditions on the calibration block can help to improve results Have one part as thick as the thickest section of t...

Page 83: ... RM for general purpose applications 5 2 4 Material Sound Velocity and the Zero Calibrations The 38DL PLUS performs a material gain optimization during the velocity calibration procedure when this feature is activated see Configuring Measurement Parameters on page 127 For dual element transducers the material gain optimization GAIN OPT in the MEAS screen evaluates the signal from the test block an...

Page 84: ...ng to measure thicknesses on parts made of a different material if you know the sound velocity for the material you can directly enter the velocity without performing a material sound velocity calibration procedure To enter a known material sound velocity 1 From the measurement screen press 2nd F CAL VEL VEL 2 In the VELOCITY screen see Figure 5 7 on page 72 use the arrow keys to edit the velocity...

Page 85: ...rs and applications In some cases it may be desirable to optimize these setups for specific measurement situations In all cases it is essential that you perform the velocity and zero calibrations whenever the test material or transducer is changed Periodic checks with samples of known thickness are recommended to verify that the gage is operating properly Surface roughness of the test piece The be...

Page 86: ... cases it may be useful to observe the waveform display as an aid in maintaining optimum alignment Practice the best way to hold a transducer with the aid of a waveform display On curved surfaces it is important to use only enough couplant to obtain a reading Excess couplant forms a fillet between the transducer and the test surface where sound reverberates and possibly creates spurious signals th...

Page 87: ...e phase or polarity of a returning echo is determined by the relative acoustic impedances density velocity of the boundary materials The 38DL PLUS assumes the customary situation where the test piece is backed by air or a liquid both of which have a lower acoustic impedance than metals ceramics or plastics However in some specialized cases such as measurement of glass or plastic liners over metal ...

Page 88: ...te to firm pressure couple the tip of the transducer to the surface of the test material and keep the transducer as flat as possible on the material surface see Figure 5 9 on page 76 Figure 5 9 Coupling dual element transducer and reading the measured thickness 3 Read the measured thickness value for the tested part 5 4 Saving Data The 38DL PLUS datalogger is a file based system where one file is ...

Page 89: ...lly opens the last file that was used The following special cases may occur When the thickness value is blank is saved rather than a value When a measurement is already stored at the current ID the new value overwrites the old thickness reading unless the overwrite protection is enabled see Setting the ID Overwrite Protection on page 196 When the ID increment reaches the end of a sequence and cann...

Page 90: ...y requires a single back wall echo and is recommended for heavy corrosion applications where the outside of the material is coated or painted If needed you can also calibrate the measurement of the coating paint layer to precisely measure the thickness of the coating paint 5 5 1 Enabling the THRU COAT Function The THRU COAT function is only available when you connect a THRU COAT transducer P N D79...

Page 91: ...nabling the THRU COAT Function on page 78 2 Couple the transducer to the thick sample 3 Press CAL VEL 4 When the reading is stable press ENTER 5 Using the arrow keys edit the thickness value to match the known thickness of the sample 6 Couple the transducer to the thin sample 7 Press CAL ZERO 8 When the reading is stable press ENTER 9 Using the arrow keys edit the thickness value to match the know...

Page 92: ...ous material conditions A description of each of the three echo detection modes STANDARD AUTO E TO E and MANUAL E TO E follows STANDARD The standard echo detection mode measures the thickness based on the time of flight between the main bang to the first back wall echo Use this mode for uncoated materials with good echo waveforms The DE STD indicator appears to the left of the thickness reading an...

Page 93: ...ode MANUAL E TO E The manual echo to echo detection mode also measures the thickness using the time of flight between two consecutive back wall echoes In this mode you can however also manually adjust the gain and the blanking parameters Use this mode when material conditions produce noisy signals where the automatic mode may be less effective The DE MEtoE indicator appears to the left of the thic...

Page 94: ...datalogger functions with the echo to echo modes The internal datalogger recognizes and saves all necessary echo to echo information to upload and download thickness waveform and setup data You do not have to switch between echo detection modes when measuring both coated and uncoated areas because you can measure uncoated wall thicknesses using an echo to echo mode To change the echo detection mod...

Page 95: ...blank creates a blanked zone that begins at the left edge of the waveform display and in which no signals are detected In situations where the second or third pair of back wall echoes are stronger or cleaner than the first pair use the extended blank to control which pair of echoes to use for measurement E1 BLANK The echo 1 E1 blank runs for a selected interval following the first detected echo Us...

Page 96: ...38DL PLUS dual element transducers Olympus recommends using particular transducers for specific thickness ranges in steel parts see Table 3 on page 84 Table 3 Recommended transducers for various steel thickness ranges Transducer type Thickness rangea a Thickness ranges are dependent on transducer type material conditions and temperature D798 1 5 mm to 7 6 mm 0 060 in to 0 300 in D790 791 2 5 mm to...

Page 97: ...is smaller in amplitude than subsequent echoes This causes the instrument to give a double or triple reading If you are using a D790 transducer this effect may occur around 5 mm 0 2 in on flat smooth steel samples If this occurs it is clearly visible on the waveform display and you can work around it using the manual echo to echo detection mode or moving the extended blank beyond the previously de...

Page 98: ...ways turned off when you restart the 38DL PLUS To use the VGA output 1 Turn off the 38DL PLUS 2 Connect the optional VGA output cable P N EPLTC C VGA 6 U8840035 to the VGA output connector located under the I O door on the right side of the 38DL PLUS see Figure 1 5 on page 25 3 Connect the other end of the VGA output cable to the external screen or projector 4 Turn on the 38DL PLUS 5 Turn on the e...

Page 99: ...When the scale is not fully bonded to the surface of the steel the shear wave sound energy is not transmitted to the steel The EMAT transducer is an effective way to estimate the remaining thickness of steel boiler tubes since you do not have to remove the external scale to perform the measurement The EMAT transducer creates a nonfocused signal and is designed to give a good estimate of the remain...

Page 100: ...matically detects the E110 SB and 1 2XA E110 filter adaptor and automatically recalls the default DEF EMAT E110 setup from the DEFAULT SINGLE ELEMENT transducer list Like for standard transducers you may need to adjust the gain and the extended blank to make proper thickness measurements Experienced technicians familiar with the basic theory of ultrasonic gaging and the interpretation of ultrasoni...

Page 101: ...libration samples with external oxide scale made from the material to be tested These samples should have a metal of known thickness not including external oxide scale and should represent the minimum and maximum thickness of your measurement range The calibration procedure is the same as for a standard transducer except that you do not need to use couplant to couple the transducer to the material...

Page 102: ...DMTA 10004 01EN Rev D November 2016 Chapter 6 90 ...

Page 103: ...n page 285 for the software option part numbers Table 4 38DL PLUS software options Option Description HIGH RESOLUTION see High Resolution Software Option on page 93 Increases the thickness resolution to 0 001 mm or 0 0001 in for single element transducers with a frequency 2 25 MHz OXIDE LAYER see Oxide Layer Software Option on page 93 Allows the 38DL PLUS to measure the thickness of both the boile...

Page 104: ... 1 on page 92 note the 16 digit alphanumeric serial number appearing in the S N field The OPTION list indicates the actual status of the software options where Licensed means that the option is activated Figure 7 1 The OPTIONS screen to activate software options 4 Contact your local Olympus representative to purchase one or more software options and provide the alphanumeric serial number Your Olym...

Page 105: ...y surface condition temperature and needs to be determined on a case by case sample evaluation High resolution is available for the following transducers and measurement conditions Single element transducer in the frequency range of 2 25 MHz to 30 0 MHz Thickness measurement below 100 mm 4 00 in High resolution is not available for the following transducer or measurement conditions Dual element tr...

Page 106: ...rm exposure to overly high temperatures combined with the very high pressure inside the tube leads to intergranular micro cracking in the metal and to creep deformation slow swelling or bulging of the metal This eventually leads to tube failure The growth of magnetite scale and associated metal damage are primary limiting factors for boiler tube service life The process begins slowly and then acce...

Page 107: ...lement transducer connector at the top of the 38DL PLUS 3 Press ON OFF to start the instrument 4 While in the measurement screen press XDCR RECALL 5 In the DEFAULT SINGLE ELEMENT screen highlight DEF OXIDE M2017 or DEF OXIDE M2091 depending on which transducer you are using 6 Press MEAS 7 Press SETUP MENU 8 In the menu select OXIDE 9 In the OXIDE screen see Figure 7 2 on page 95 a In OXIDE MEAS TY...

Page 108: ...ess and on a sample with known internal oxide scale thickness To calibrate for oxide layer measurements 1 Couple the transducer to the thick oxide free boiler tube sample When using the M2091 normal incident shear transducer you must use shear wave couplant SWC between the delay line and the surface of the material 2 Press CAL VEL 3 When the reading is stable press ENTER 4 Using the arrow keys edi...

Page 109: ...le that has built up inside the tube Figure 7 4 on page 97 shows the correct ultrasonic signals using the single element transducer default setup DEF OXIDE M2017 The 38DL PLUS makes a standard mode 2 measurement from the delay line echo surface of the boiler tube to the echo from the inside of the oxide layer total back wall echo The instrument centers the data window on the detected total back wa...

Page 110: ...is exfoliated disbonded from the inside of the boiler tube Figure 7 5 on page 98 shows a waveform from a sample in which the internal oxide layer is disbonded from the boiler tube Because the oxide is disbonded sound energy does not travel into the internal oxide layer and only a single reflected echo from the inside of the boiler tube appears When the internal oxide is thinner than 0 25 mm 0 010 ...

Page 111: ...f curvature and thickness calculation Co extruded plastic Two layer hot tubs and spas The 38DL PLUS has three different multi measurement modes NORMAL Measures and displays up to four different thickness layers or three layers and the sum of any selected layers SOFT CONTACT Displays sagittal height and lens thickness and calculates the radius of curvature of soft contact lenses This mode is design...

Page 112: ...f the screen The corresponding waveform appears in the waveform display see Figure 7 6 on page 100 Figure 7 6 Waveform display screen To change the active measurement 1 Enable the multi measurement mode see Using the Multi Measurement with the Soft Contact Mode on page 102 2 Use the arrows keys to change the active measurement 7 4 2 Using the Multi Measurement Normal Mode Use the multi measurement...

Page 113: ...see Figure 7 7 on page 101 a Set MULTI ENABLE to ON Figure 7 7 Setting multi measurement parameters in the normal mode b Set MULTI MODE to NORMAL c Set SUM MODE to one of the following options ON Measures and displays up to three individual layer thicknesses and calculates and displays the sum of thicknesses for selected layers OFF Measures and displays up to four individual layer thicknesses d Se...

Page 114: ...SEND f For SETUP 1 SETUP 2 SETUP 3 and SETUP 4 select the custom setups that you created in step 1 for each of the layers Selecting NONE shows no thickness at the location g When SUM MODE is set to ON in SUMMATION select the setups for which you want to sum the thickness measurements h Press MEAS to return to the measurement screen with the multi measurement function active in the normal mode 7 4 ...

Page 115: ...see Figure 7 8 on page 102 d Set SAVE SEND KEY to one of the following options to determine the operation when you press SAVE SEND ACTIVE Saves only the active measurement the highlighted thickness to the datalogger AUTO INCR ACTIVE Saves the active measurement to the datalogger and then changes the active setup to the next setup in the multi measurement list This option allows you to easily save ...

Page 116: ...e 1 Follow the procedure to use the multi measurement normal mode see Using the Multi Measurement Normal Mode on page 100 except that you set MULTI MODE to TOTAL THICKNESS 2 In the MULTI screen Figure 7 10 on page 105 a In TOTAL select the setups for which you want to sum the thickness measurements b In SHOW TOTAL select YES to show the calculated total thickness on the display while the multi mea...

Page 117: ...he GageView interface program The Encoded B Scan option is designed to work with the Olympus B Scan Encoder Buggy part number EP4 ENC U8780018 but it can be connected to other linear encoders Please contact Olympus for more information about connecting the 38DL PLUS encoded B Scan to other encoders A maximum of 10000 thickness readings with distance traveled DT can be saved in a single B scan The ...

Page 118: ...DLP EBSCAN U8147018 2 B Scan Encoder Buggy P N EP4 ENC U8780018 The EP4 ENC is designed to work with the D790 and D790 SM dual element transducers when the bell housing is not in place The D790 and D790 SM are not included with the EP4 ENC 3 D790 or D790 SM transducer Please contact Olympus for pricing on longer cables for the D790 SM transducer B scan Live A scan Min thickness Live thickness B sc...

Page 119: ...e Encoded B scan can be activated and configured from the B SCAN screen see Figure 7 12 on page 107 by pressing SETUP MENU and then selecting B SCAN in the menu Most of the controls for the encoded B scan are the same as those for the standard non encoded B scan Please refer to B Scan on page 139 for more information concerning B scan configuration Figure 7 12 Changing B scan parameters Additional...

Page 120: ...n speed Maximum scanning speed can be calculated as follows Maximum scan speed 20 Reading spacing Table 6 on page 108 provides sample scan speed calculations Maximum B scan distance is also dependent on the reading spacing setting The maximum B scan length can be calculated as follows Maximum scan distance Reading spacing 10000 Table 7 on page 109 provides sample maximum distance calculations Tabl...

Page 121: ...e in the B scan represents a single thickness reading Setting the zoom factor to 1 yields a very compressed B scan image see Figure 7 13 on page 110 A zoom factor of 10 indicates that 10 vertical lines in the B scan represent a thickness reading Setting the zoom factor to 10 yields an expanded B scan see Figure 7 14 on page 110 and Figure 7 15 on page 111 Table 7 Sample maximum distance calculatio...

Page 122: ...DMTA 10004 01EN Rev D November 2016 Chapter 7 110 Figure 7 13 7 inch scan zoom set to 1 Figure 7 14 7 inch scan zoom set to 5 ...

Page 123: ...asure using standard ultrasonic instruments The M2008 U8415001 transducer is a special low frequency transducer used to measure the thickness of thick fiber reinforced polymer FRP and composite materials With a M2008 transducer only press 2nd F CAL ZERO Do ZERO at any time to auto adjust the zero offset and compensate for temperature changes in the delay line To use the high penetration software o...

Page 124: ...ht the default transducer setup for the M2008 DEFP1 0 5 M2008 or any custom setup that uses the M2008 transducer 6 Press MEAS to return to the measurement screen with the recalled transducer setup 7 Wipe couplant off the transducer tip 8 Press 2nd F CAL ZERO Do ZERO 9 Perform the material sound velocity and zero calibration see Calibrating the Instrument on page 67 ...

Page 125: ...r basic thickness operation they can make the gage a more versatile instrument 8 1 Activating and Configuring a Differential Mode The 38DL PLUS includes differential modes to easily compare the actual measurement with a reference value that you enter The actual thickness measurement appears on the thickness display and the differential value appears in the differential display area see Figure 8 1 ...

Page 126: ...select one of the three differential modes NORMAL Shows the actual thickness along with the difference between the actual thickness measurement and the REF VALUE that you entered RATIO Shows the actual thickness along with the percent difference from the REF VALUE that you entered REDUCTION RT Shows the actual thickness as well as the percent difference between the actual thickness and the former ...

Page 127: ...ress MEAS to return to the measurement screen with the displayed differential value 8 2 Using the Minimum Maximum or Min Max Thickness Mode You can activate the minimum maximum or min max thickness mode to also display retained minimum and or maximum thickness values The MIN and or MAX values appear on the left side of the main thickness reading see Figure 8 3 on page 116 The minimum or maximum th...

Page 128: ...date rate is automatically activated when entering the minimum or maximum thickness mode When leaving the mode the display update rate is restored to its previous state Active reading Minimum thickness Active reading Maximum thickness Recalled maximum during LOS Maximum thickness Active reading Minimum and maximum thicknesses NOTE ...

Page 129: ...MIN MAX value is reset Saving or sending a MIN MAX reading also resets the value 8 3 Preventing False Minimum Maximum Thickness Readings A false minimum or maximum reading can occur when you lift the transducer from the test piece This is due to excess couplant particularly on smooth surfaces which causes the instrument to read the thickness of a couplant drop when you lift the transducer To preve...

Page 130: ...s value and alarm indicator appear in color only when the indoor color scheme is active see Color Schemes on page 52 to change the color scheme Figure 8 4 Example of a HIGH alarm indicator The datalogger records an alarm condition in the second status box for all stored measurements An A indicates the alarm mode an L indicates a low alarm condition and an H indicates a high alarm condition There a...

Page 131: ...following parameters When the thickness differential is smaller than or equal to the ABSOLUTE LOSS value a low alarm is indicated When the thickness differential is greater than the ABSOLUTE GROWTH value a high alarm is indicated Table 8 on page 119 shows the result for an example where both ABSOLUTE LOSS and ABSOLUTE GROWTH are set to 1 27 mm 0 05 in You can also choose the DIFF differential mode...

Page 132: ...ge see Figure 8 5 on page 121 In addition the alarms are operational as you review B scan thicknesses in B scan freeze review mode Table 9 Alarm calculation example with the DIFF mode Previous values Actual thickness Low alarm High alarm Calculations 7 62 mm 0 300 in 6 07 mm 0 239 in Yes No or in inches 7 62 mm 0 300 in 8 03 mm 0 316 in No Yes or in inches 7 62 mm 0 300 in 7 24 mm 0 285 in No No o...

Page 133: ...ears only when the active file is configured with FILE DATA MODE set to REDUCTION RT You set the reduction percentage for a low YELLOW ALARM and high RED ALARM limits and the instrument displays see Figure 8 6 on page 122 The RED indicator for reduction rates that are greater than or equal to the RED ALARM value The YEL indicator for reduction rates that are between the YELLOW ALARM and the RED AL...

Page 134: ...ion b In ALARM MODE select the desired alarm mode STANDARD PREVIOUS THK previous thickness B SCAN or REDUCTION RT reduction rate The other parameters vary depending on the alarm mode selection The B SCAN option appears only when the B scan mode is active see Using the B Scan on page 144 The REDUCTION RT option appears only when the active file is configured with the FILE DATA MODE parameter set to...

Page 135: ...et to ABSOLUTE DIFF absolute differential set the ABSOLUTE LOSS and the ABSOLUTE GROWTH values b With PREVIOUS THK MODE set to DIFF percent differential set the LOSS and the GROWTH values OR When ALARM MODE is set to REDUCTION RT set the YELLOW ALARM and the RED ALARM values 5 Press MEAS to return to the measurement screen Alarm reference values that were entered in one unit system are displayed a...

Page 136: ...ons except SAVE SEND Gain adjustment with GAIN Waveform adjustment with WAVE ADJ Locking the calibration prevents changes to calibration values so that no parameters can affect the value of the measurement these include material velocity and test block zero calibration However you can still view these values use the measurement screen and use the datalogger functions Anytime a user attempts to use...

Page 137: ...d 4 Select SET to set the password and return to the measurement screen To lock and unlock instrument functions 1 From the measurement screen press SETUP MENU 2 In the menu select INSTRUMENT LOCK 3 In the INSTRUMENT LOCK screen see Figure 8 9 on page 125 a If a password was set enter the password in PASSWORD b Set the functions you want to lock to ON and the ones you want to unlock to OFF c Select...

Page 138: ...nvenient to easily set the gain parameters review a B scan or perform a high temperature measurement without having to maintain the transducer coupled to the test piece You may also want to use the freeze function to pause measurements before uncoupling the transducer from the test piece to prevent recording wrong minimum or maximum values To freeze the waveform and thickness display 1 Press FREEZ...

Page 139: ...used setup menu screen where you access global parameters concerning the instrument measurement features To configure measurement parameters 1 From the measurement screen press SETUP MENU 2 In the menu select MEAS The MEAS screen appears The last parameters differ depending if a single or dual element transducer is connected see Figure 9 1 on page 127 Figure 9 1 The MEAS screen For a dual element ...

Page 140: ...kness and waveform while a loss of signal LOS occurs The MIN MAX and HOLD BLANK functions are mutually exclusive You must set MIN MAX to OFF to be able to change the HOLD BLANK function Similarly you must set HOLD BLANK to BLANK to be able to change the MIN MAX function 8 In MEASURE RATE adjust the measurement update rate see Adjusting the Measurement Update Rate on page 60 for details 9 Set ID OV...

Page 141: ...e stability of the averaged reading 13 For dual element transducers only set GAIN OPT to ON to activate the gain optimization during the zero and material velocity calibrations see Material Sound Velocity and the Zero Calibrations on page 71 for details 14 For dual element transducers only set VPATH CAL ENABLE to ON to activate the V Path calibration option when you press CAL VEL see Building a V ...

Page 142: ...cter period or comma to separate the integer and the decimal numbers 7 Set SAVE SEND KEY to configure what happens to the actual data as set in SAVE DATA when you press SAVE SEND The options are SAVE saves the actual data to the internal datalogger SEND sends the actual data to the RS 232 port see Setting Up RS 232 Serial Communication on page 245 for details on RS 232 data communication The SAVE ...

Page 143: ...icroSD card for the actual screen shot when you press 2nd F DISPLAY see Sending a Screen Capture to the External microSD Card on page 257 for details 12 Press MEAS to return to the measurement screen 9 3 Configuring Communications The 38DL PLUS features a RS 232 and a USB port allowing you to connect the instrument to a computer a printer or optional accessories such as a caliper When connected to...

Page 144: ...ic keystroke b In OUTPUT FORMAT select the format of the data being output F1 F2 F3 F10 Refer to Table 24 on page 258 and Table 25 on page 259 for the description of available output formats Contact Olympus for more information on the following communication parameters Multi and single character remote commands Send formats F1 F2 F3 F4 F5 F6 F7 F8 F9 and F10 c Set DATABASE TRACKING to ON to allow ...

Page 145: ... number the following additional waveform related parameters are automatically adjusted to match those stored with that waveform Range Zoom on off Extended blank position Rectification mode full wave half wave negative half wave positive RF If the database does not have any data stored at the current ID number then the setup remains unchanged Even if database tracking is activated you can override...

Page 146: ...f device the 38DL PLUS communicates with PRINTER for communicating with serial port printers TERMINAL for communicating with computers CALIPER to receive reference thickness data from the optional digital caliper FISHER to receive data from a Fisher coating instrument h In BAUD RATE set the RS 232 data transfer rate to match that of the device with which the 38DL PLUS communicates i In CONTINUOUS ...

Page 147: ...accurate measurement This works well for most corrosion measurement applications In special circumstances you may need to manually adjust the gain to get a correct thickness measurement For example in high temperature measurements increasing the gain is generally recommended Olympus recommends to manually adjust the gain only when you are an experienced operator who can analyze and understand the ...

Page 148: ...e first graticule line above the baseline in Figure 10 1 on page 136 The peak amplitude of measured echoes must be at or above the threshold to be processed for thickness calculation To view restore or change the gain value 1 Press GAIN to view the current automatic gain value The gain value appears near the lower right corner of the display The waveform display changes to the amplitude proportion...

Page 149: ...rmally the 38DL PLUS searches for echoes down to nearly zero thickness However some special circumstances such as a high degree of near surface corrosion aluminum material enclosed flaws or laminations can generate echoes that the instrument may falsely detect as the low thickness When these echoes are larger than the sought after back wall echo the manual gain adjustment see Adjusting the Gain wi...

Page 150: ...f the extended blank use the key to decrease the extended blank value back to zero If the measurement point changes when the extended blank is moved echoes can change in height This is because in the normal waveform display mode the 38DL PLUS attempts to adjust the height The instrument also attempts to make the most accurate measurement by identifying the beginning of an echo When the extended bl...

Page 151: ...ew the recorded thickness values Figure 10 3 B scan example for a 5 step test block While the B scan is running you can save individual thickness readings save the current B scan screen with all thickness values or the entire scan up to 10000 readings see Saving B Scans A Scans or Thickness Readings on page 145 You can activate and configure the B scan from the B SCAN screen see Figure 10 4 on pag...

Page 152: ...e B SCAN screen contains the following parameters GRID SIZE Determines the size of the B scan with the following two options see Figure 10 5 on page 141 HALF SIZE Displays a half height A scan waveform and a half height B scan FULL SIZE Displays the B scan over the entire waveform display area ...

Page 153: ... page 141 The data starts appearing on the screen in the opposite direction LEFT TO RIGHT The transducer scans the part from left to right and the data starts appearing at the right of the screen and scrolls to the left RIGHT TO LEFT The transducer scans the part from right to left and the data starts appearing at the left of the screen and scrolls to the right Figure 10 6 B scan elements Half siz...

Page 154: ... the waveform and thickness reading for the maximum reading collected during the scan SHOW CURRENT Displays the last thickness reading made before pressing FREEZE B SCAN FREEZE REVIEW When this feature is enabled and a B scan is active pressing FREEZE freezes the B scan image in review mode In this mode a vertical line the review marker appears to indicate the location of the displayed thickness s...

Page 155: ... the vertical scale represents the zero value and the bottom of the scale is the value that you enter in the B SCAN MAX THICKNESS parameter that appears The allowed range is 0 00 mm to 635 00 mm 0 000 in to 25 000 in Olympus does not recommend using the A scan zoom feature when B SCAN MAX THICKNESS is set to A SCAN RANGE The zoom constantly adjusts the start and the end points of the A scan range ...

Page 156: ...N FREEZE REVIEW is set to ON use the and keys to move the review marker and read the thickness value corresponding to the marker position 7 Press MEAS again to reset the B scan and begin a new B scan 8 Refer to Saving B Scans A Scans or Thickness Readings on page 145 for details on how to save B scan data 10 3 2 Using the B Scan Alarm Mode You can specify B scan low and high alarm reference values...

Page 157: ... Save all thickness readings for one B scan screen 600 readings the minimum or maximum thickness reading and waveform for a held B scan Save an entire B scan history up to 10000 thickness readings the minimum or maximum thickness readings and waveform and the held B scan To save a live thickness reading while the B scan is running Press SAVE SEND To save any reviewed thickness reading on a frozen ...

Page 158: ... it is frozen press 2nd F SAVE SEND WAVEFORM The Save B Scan history message appears on the help text bar 2 Select Yes or No Yes Saves the entire B scan history including the Minimum or Maximum thickness with corresponding waveforms No Saves the current B scan screen and the waveform When a B scan screen is saved to the datalogger the gage saves the thickness values for the 600 data points appeari...

Page 159: ...y display the A scan the DB grid and the thickness reading see Figure 10 8 on page 147 You can configure the grid cells to show a data cell flag and a background color corresponding to the range in which their thickness reading falls Figure 10 8 Example of the half size DB grid 10 4 1 Activating and Configuring the DB Grid You activate and configure the DB grid options from the DB GRID screen To a...

Page 160: ...ions see Figure 10 10 on page 149 HALF SIZE Displays a half screen A scan waveform and a half screen database grid Up to five grid rows are shown FULL SIZE Displays the database grid on the entire screen Up to 11 grid rows are shown With both options the number of grid columns shown varies depending on the length of column labels and whether or not a database flag is displayed with each data cell ...

Page 161: ...n a grid see Figure 10 11 on page 149 Figure 10 11 Grid transposition example The ID number increments in the order assigned when the file was originally set up independently of the TRANSPOSE GRID value 7 Set LINEARIZE GRID to ON to display the grid IDs in the linear form see Figure 10 12 on page 150 Half size DB grid Full size DB grid TRANSPOSE GRID set to OFF TRANSPOSE GRID set to ON NOTE ...

Page 162: ...ess alarm H indicates any high alarm condition A SCAN W indicates that a waveform is stored with the thickness 9 Set GRID COLOR OPTION to ON to activate usage of low mid and high range colors for the grid cell background 10 Set LO RANGE COLOR to the desired cell background color RED YELLOW or GREEN when the cell thickness value is smaller than the LO RANGE VALUE 11 Set MID RANGE COLOR to the desir...

Page 163: ...to the last ID location in the file c Press 2nd F to jump to the first ID location in the file d Press ID at any time to edit the displayed ID location Figure 10 13 The highlighted DB grid cell in the ID review screen 4 Press MEAS to return to the measurement screen with the current ID number changed to the ID location selected in the ID review screen OR Press 2nd F MEAS to return to measurement s...

Page 164: ...ay is blank when you press SAVE SEND then is saved in place of a value The ID number is automatically updated to the next ID number in the sequence The new ID number is indicated on the ID bar and its cell is highlighted in the grid If the ID number cannot be updated a long beep sound is emitted and the instrument displays a message pertaining to the reason the ID was unable to update In this case...

Page 165: ...normal DB grid view 10 5 Configuring AVG MIN Measurements You can use the AVG MIN measurement function to store the average or the minimum measurement of several successive thickness readings to the datalogger To configure the AVG MIN measurement option 1 From the measurement screen press SETUP MENU 2 In the menu select AVG MIN 3 In AVG MIN screen see Figure 10 16 on page 154 a Set AVG MIN ENABLE ...

Page 166: ...ess MEAS to return to measurement screen 10 6 Making AVG MIN Measurements When you are in the measurement screen and the AVG MIN measurement is active the last measured thickness values up to four appear above the current thickness value together with the average or minimum value see Figure 10 17 on page 155 ...

Page 167: ... Each time you press SAVE SEND the actual thickness reading appears in the next shaded box moving to the right while the minimum or average of the thickness readings is automatically calculated and placed in the right most box 4 If you want to replace a reading use the and keys to switch from one highlighted box to another and press SAVE SEND to save the new reading 5 When the minimum or average b...

Page 168: ...e The following equation is used to compensate for the change in sound velocity due to temperature Where MTI Measured time interval V0 Calibrated test block velocity T1 Actual material temperature T0 Temperature at calibration k Temperature coefficient normally 0 00018 for C or 0 0001 for F A temperature coefficient of 0 00018 for C or 0 0001 for F assumes a 1 change in velocity per 55 C 100 F cha...

Page 169: ...e You can specify a negative sign using the or keys to move the cursor over the or and then using the and keys to change the sign Figure 10 18 The TEMP COMP screen 4 Press MEAS to return to the measurement screen with the activated temperature compensation see Figure 10 19 on page 158 The measured thickness is temperature compensated based on the CALIBRATION TEMP the CURRENT TEMP and the TEMP COEF...

Page 170: ...compensation function is active if the temperature of the test piece changes you can quickly change the CURRENT TEMP as follows a Press 2nd F XDCR RECALL REF VALUE b In the CURRENT TEMPERATURE screen enter the new current temperature value Both the thickness and current temperature values are saved to the internal datalogger NOTE ...

Page 171: ...file is opened at a time The active file stores a measurement at a thickness measurement location ID Each time you press SAVE SEND the displayed value is saved to the active file at the current ID The ID is automatically incremented for the next measurement When you press FILE the name of the active file appears in the ID bar above the menu see Figure 11 1 on page 159 Figure 11 1 The active file n...

Page 172: ...n the ID bar at the top of the measurement screen see Figure 11 2 on page 161 Table 10 File contents summary Contents Description See section Header Extra parameters to describe the contents and the context of the data Creating a Data File on page 163 Measurement data Organized by predefined IDs arranged by file types Data File Types on page 165 Data format defined by the file data mode File Data ...

Page 173: ...ying datalogger parameters With each measurement the 38DL PLUS also stores a complete description of the measurement conditions Table 11 on page 162 describes the additional data stored with each thickness measurement and with each waveform Notes ID number Previous thickness ID bar ...

Page 174: ...rations on page 183 add notes see Notes on page 192 and perform data operations see Setting the ID Overwrite Protection on page 196 Table 11 Additional information stored with the data For a measurement For a waveform File name File header data Identifier Units in or mm LOS loss of signal Differential mode Differential reference value Alarm mode Alarm status Alarm set points Minimum or maximum mod...

Page 175: ...a description of the contents of the file c In the INSPECTOR ID optionally enter an identification of the inspector d In the LOCATION NOTE parameter optionally enter an identification of where the measurement are performed e Select the appropriate DATA FILE TYPE for your application see Data File Types on page 165 for details f Select the appropriate FILE DATA MODE for your application see File Da...

Page 176: ...eters on the screen SEQ CUSTOM PT see Sequential with Custom Points Data File Type on page 168 2D GRID see 2 D Grid Data File Type on page 170 2D CUSTOM PT see 2 D Grid with Custom Points Data File Type on page 174 3D GRID see 3 D Grid Data File Type on page 176 BOILER see Boiler Data File Type on page 178 3D CUSTOM see 3 D Custom File Type on page 180 TIP ...

Page 177: ...ost character Extends leftward until reaching the first punctuation or special character or the left most character whichever comes first Increments digits from 0 1 2 9 Makes the 9 to 0 transition only after incrementing the character to the left Increments letters from A B C Z Makes the Z to A transition only after incrementing the character to the left When an ID cannot be incremented after savi...

Page 178: ...ile on page 163 for details on the first parameters 2 In the CREATE screen see Figure 11 4 on page 167 a Enter the START ID value b Select CREATE Table 12 Resulting ID examples for the INCREMENTAL file type START ID Resulting IDs 1 1 2 3 9 0001 0001 0002 0003 0009 0010 9999 ABC ABC ABD ABE ABZ ACA ACB ACC ZZZ 1A 1A 1B 1C 1Z 2A 2B 9Z ABC 12 34 ABC 12 34 ABC 12 35 ABC 12 36 ABC 12 99 ...

Page 179: ...imilar to the incremental type but you can define both a starting and ending ID numbers The resulting file is inclusive of the starting and ending points and all incremental points in between see examples in Table 13 on page 167 Table 13 Resulting ID examples for the SEQUENTIAL file type START ID END ID Resulting IDs ABC123 ABC135 ABC123 ABC124 ABC125 ABC135 XY GY XY IB XY GY XY GZ XY HA XY IB ...

Page 180: ...ential file type 11 2 1 3 Sequential with Custom Points Data File Type The sequential with custom point SEQ CUSTOM PT data file type is defined by a starting and an ending ID number plus a series of custom points The resulting file is inclusive of the start and end points and all points in between In addition multiple thickness readings per ID number location are assigned using the assigned custom...

Page 181: ...ial data file with custom points 1 From the measurement screen press FILE and then select CREATE in the menu see Creating a Data File on page 163 for details on the first parameters 2 At the bottom of the CREATE screen select CONTINUE 3 In the second page of the CREATE screen see Figure 11 6 on page 170 a Enter the START ID and END ID values b Enter two or more CUSTOM POINTS values c Press 2nd F t...

Page 182: ...on A 2 D two dimensional sequence begins with the ID number that refers to the first column and the first row see Figure 11 7 on page 171 Then the column or row increments one value at a time until the sequence reaches the last column or row value while the other dimension value stays constant At this point the other dimension increments from its first to its last value This continues until the ID...

Page 183: ...2 D grid example A grid structure may associate one dimension of the grid with the physical parts whose wall thickness is to be measured The particular measurement points on each part are then associated with the other dimension of the grid see the example in Figure 11 8 on page 172 ...

Page 184: ...75 identical parts Alternatively the rows and columns of a grid may refer to a two dimensional map of measurement points on the surface of one part In this case a different grid is made for each part see the examples in Figure 11 9 on page 173 Row Column Measurement location ID ...

Page 185: ...see Creating a Data File on page 163 for details on the first parameters 2 At the bottom of the CREATE screen select CONTINUE 3 In the second page of the CREATE screen see Figure 11 10 on page 174 a Enter the START COLUMN END COLUMN START ROW and END ROW values Name Elbow Rows 01 through 10 Columns A through E ID s Elbow A0 through Elbow E10 Name Tee Rows 1 through 4 Columns 1 through 3 ID s Tee 1...

Page 186: ... grid data file type The 38DL PLUS has the ability to add a row add a column and change the incrementing direction after a grid file is created see Editing a File on page 186 for details 11 2 1 5 2 D Grid with Custom Points Data File Type The 2 D grid with custom points data file type is similar to the 2 D grid data file type see 2 D Grid Data File Type on page 170 except that you can add custom p...

Page 187: ...11 11 on page 176 a Enter the START COLUMN END COLUMN START ROW and END ROW values b Enter two or more CUSTOM POINTS values c Press 2nd F to finish entering CUSTOM POINTS values d In INC 1ST BY select which parameter increments first POINT ROW or COLUMN e In INC 2ND BY select which parameter increments second POINT ROW or COLUMN f Select CREATE Table 15 Resulting ID example for the 2D CUSTOM PT fi...

Page 188: ...refers to the first column the first row and the first point Each time you press SAVE SEND the value for the first dimension increments by one while the values for the other two dimensions remain unchanged When the sequence reaches the last value of the first dimension the value for the second dimension increments by one This continues until the ID number that refers to the last column last row an...

Page 189: ...e Creating a Data File on page 163 for details on the first parameters 2 At the bottom of the CREATE screen select CONTINUE 3 In the second page of the CREATE screen see Figure 11 12 on page 178 a Enter the START COLUMN END COLUMN START ROW END ROW START POINT and END POINT values b In INC 1ST BY select which parameter increments first POINT ROW or COLUMN c In INC 2ND BY select which parameter inc...

Page 190: ...ension refers to the physical distance from the bottom of the boiler toward the top Tube number The second dimension refers to the number of the specific boiler tube to be inspected Custom points The third dimension refers to the actual thickness reading location at the specified elevation on the specified tube The three dimensions are combined in a single ID number to precisely identify the exact...

Page 191: ... values b Enter two or more CUSTOM POINTS values c Press 2nd F to finish entering CUSTOM POINTS values d Enter two or more ELEVATIONS values e Press 2nd F to finish entering ELEVATIONS values f In INC 1ST BY select which parameter increments first POINT TUBE or ELEVATIONS g In INC 2ND BY select which parameter increments second POINT TUBE or ELEVATIONS h Select CREATE Table 17 Resulting ID example...

Page 192: ...ere the custom point increments first the custom row second and the column third To create a 3 D custom data file 1 From the measurement screen press FILE and then select CREATE in the menu see Creating a Data File on page 163 for details on the first parameters Table 18 Resulting ID example for the 3 D CUSTOM file type Parameters Value CUSTOM ROWS CUSTOM POINTS Resulting IDs START COLUMN END COLU...

Page 193: ...ish entering CUSTOM ROWS values d Enter two or more CUSTOM POINTS values e Press 2nd F to finish entering CUSTOM POINTS values f In INC 1ST BY select which parameter increments first POINT ROW or COLUMN g In INC 2ND BY select which parameter increments second POINT ROW or COLUMN h Select CREATE Figure 11 14 Configuring the ID range for a 3 D custom data file type The columns of the 38DL PLUS can i...

Page 194: ...ickness Material thicknesses When using THRU COAT see Measurements with THRU COAT D7906 and D7908 Transducers on page 78 TEMP COMP Material temperature Material thickness When using temperature compensation see Using Temperature Compensation on page 156 OXIDE LAYER Oxide thickness Material thickness When using the optional oxide software see Oxide Layer Software Option on page 93 VELOCITY Velocity...

Page 195: ... perform numerous file operations see Figure 11 15 on page 184 The following sections describe how to perform the operations Datalogger files are stored in the internal microSD memory card You can import export files from to an external microSD memory card SOFT CONTACT Sagittal height Radius of curvature Lenses thickness When using the multilayer software option see Using the Multi Measurement wit...

Page 196: ...select OPEN 3 In the OPEN screen see Figure 11 16 on page 185 a In SORT BY select how files appearing on the screen are sorted by NAME or by DATE CREATED b In the list of files select the file that you wish to open The descriptive header for the highlighted file name appears on the lower section of the display c Select OPEN to return to the measurement screen with the selected file as the active f...

Page 197: ...opy only allows you to copy an existing file in the internal memory to the internal memory Use the file import and export functions to copy data between the internal memory and the external microSD card To copy a file 1 From the measurement screen press FILE 2 In the menu select COPY 3 In the COPY screen see Figure 11 17 on page 186 a In the list select the source file b In COPY NAME enter the fil...

Page 198: ...it function to change the following file parameters File name File description Inspector ID Location note Delete protection on off End row column or point of a grid file Incrementing order of a grid file Incrementing direction forwards or reverse for rows columns points tube numbers and elevations The edit function does not let you edit the file type and cannot be used to edit individual measureme...

Page 199: ...ower section of the display This information can assist in selecting the proper file if you are uncertain of the exact file name b To rename the file edit the NAME value c Edit the file description DESC the inspector identification INSP ID and the location note LOC NOTE values as needed d To change the file lock state set DELETE PROTECTION to ON or OFF e For a nongrid file select UPDATE Figure 11 ...

Page 200: ...SE increments in the opposite direction of that which was specified during file creation d Select UPDATE Figure 11 19 Displaying the grid edit screen 11 3 4 Deleting a File or its Contents You can use the file delete function to completely erase the file from the datalogger memory or to erase the contents of a file Files that are delete protected cannot be deleted until the delete protection is di...

Page 201: ... right on the line of files that you selected b Press 2nd F to leave the list c Select the desired Delete Stored Data or Entire File option d Set DELETE MODE to DATA to only delete the contents of the file OR Set DELETE MODE to FILE to completely erase the file from the memory e Select DELETE to perform the operation Figure 11 20 Deleting a file When you select to delete multiple files and some fi...

Page 202: ...ber locations To delete a range of IDs in a file 1 Open the file from which you wish to delete the data of a range of IDs see Opening a File on page 184 2 Press 2nd F FILE CLR MEM 3 In the CLEAR ID RANGE screen see Figure 11 21 on page 190 a Edit the STARTING ID and the ENDING ID values to define the range of IDs that you wish to delete from the file b Select CLEAR Figure 11 21 Deleting the data o...

Page 203: ...pletely empty after this procedure To delete all files 1 Press 2nd F SETUP MENU SP MENU 2 In the menu select RESETS 3 In the RESETS screen see Figure 11 22 on page 191 a In the RESETS list select INTERNAL MEMORY RESET to delete all files on the internal microSD memory card b Select RESET to delete all the files OR Select CANCEL or press MEAS to abort the operation Figure 11 22 Warning message when...

Page 204: ...OTES screen A note is made of up to 16 characters In the FILE NOTES screen you can enter up to 26 notes per file Each note is uniquely identified by a letter code You can select up to four notes in the list and then associate them to an ID or to a range of IDs When a note is associated to the current ID the letter code of the note appears in the ID bar at the top of the measurement screen see Figu...

Page 205: ...eps 3 a to 3 c to create or edit other notes e Select SAVE to save the note list to the file If there are any previous notes the FILE NOTES screen may show these notes 11 4 2 Associating a Note to an ID or to a Range of IDs You can associate up to four notes to each measurement ID within a file You can also select to use up to four notes and save them to a range of IDs in a file Notes can be saved...

Page 206: ... s e In TO enter the ID or the end ID of the range to which you want to associate the note s f Select SAVE to save the note list to the file The letter codes for the checked notes are assigned to the selected ID range Figure 11 24 Selecting a note from the notes table The letter codes are automatically untagged every time you press SAVE SEND Therefore you must select the desired comment code befor...

Page 207: ...enter the edit mode c Delete all the characters of the note text d Select SAVE to save the edited note list to the file 11 4 4 Copying a Note Table You can easily copy notes from one file to another file in the 38DL PLUS This is very useful when you are creating files from the 38DL PLUS and want to use a common note table To prevent loss of data do not copy a note table to a file that has existing...

Page 208: ...elect COPY Figure 11 25 Copying a note table from one file to another 11 5 Setting the ID Overwrite Protection You can activate the ID overwrite protection to warn you every time that you attempt to overwrite an existing measurement in a file You can enable this function at any time When the ID overwrite protection is enabled a message appears on the help text bar when you attempt to save data ove...

Page 209: ...he data stored in the active file using the ID review screen You toggle the state of the ID review screen by pressing ID The ID review screen shows the waveform and the data for the active ID Figure 11 27 on page 198 shows an example of ID review screen and describes its contents The area under the waveform is reserved for status flags describing the displayed stored thickness values The flags are...

Page 210: ...nt transducers Probe type Dual element DE STD Standard DE AEtoE Automatic echo to echo DE MEtoE Manual echo to echo DE EMAT EMAT Single element SE M1 Mode 1 SE M2 Mode 2 SE M3 Mode 3 ID review mode m Min Active m MIN Held minimum M Max Active M MAX Held maximum m M Min Max Active m M BOTH Held Min Max Stored value Differential mode D X XXXIN Normal D XX X Percentage Alarm A Alarm on A LOW Low alar...

Page 211: ...e next ID in the file c Press to display the data for the previous ID in the file d Press 2nd F and 2nd F to respectively jump to the last ID and to the first ID in the file e Press ID to edit the ID see Editing the ID on page 199 4 Press MEAS to return to the measurement screen with the new active ID 11 6 2 Editing the ID You can edit the ID for one of two following purposes Change the active ID ...

Page 212: ... Data and Changing the Active ID on page 199 4 Press ID again and edit the ID value see Figure 11 28 on page 200 Figure 11 28 Editing the ID edit mode 5 Press MEAS to return to the measurement screen with the new active ID 6 When the edited ID is not in the database the help text bar message shown in Figure 11 29 on page 201 appears select INSERT to insert the new ID before the active ID OR Select...

Page 213: ...previous active ID 11 6 3 Erasing Data in the Active File Data erased by the following techniques CANNOT be recovered To erase a single measurement 1 From the measurement screen press ID The ID review screen appears and shows the active ID with its stored data 2 Select the ID to be erased see Reviewing Stored Data and Changing the Active ID on page 199 3 Press 2nd F FILE CLR MEM to erase the data ...

Page 214: ...ection data reports without having to connect to a computer or printer The following reports are available File summary Shows basic statistics for the file minimum thickness and location maximum thickness and location high and low alarm conditions along with the mean median and standard deviation Minimum Maximum summary Shows a list of ID number location that have the minimum and maximum thickness...

Page 215: ...een press FILE 2 In the menu select REPORT 3 In the submenu select the desired type of report When you select FILE SUMMARY go to step 4 MIN MAX SUMMARY go to step 5 FILE COMPARISON go to step 6 ALARM SUMMARY go to step 7 MIN REVIEW go to step 8 4 In the FILE SUMMARY screen see Figure 11 30 on page 203 a Select the file for which you want to create the report b Select REPORT The FILE SUMMARY report...

Page 216: ...to the measurement screen or NEW REPORT to generate another report 5 In the MIN MAX SUMMARY screen a Select the file for which you want to create the report b Select REPORT The MIN MAX SUMMARY report result screen opens with the first min ID highlighted see Figure 11 32 on page 204 Figure 11 32 The MIN MAX SUMMARY report screen ...

Page 217: ...e FILE COMPARISON screen see Figure 11 33 on page 205 a In the upper list select the reference file that you want to use in the comparison b In the lower list select the comparison file containing newer data for the same measurement points c Select REPORT The FILE COMPARISON report result screen opens with the first maximum wall loss ID highlighted see Figure 11 34 on page 206 Figure 11 33 The FIL...

Page 218: ...maximum wall growth location list e Select CANCEL to return to the measurement screen or NEW REPORT to generate another report 7 In the ALARM SUMMARY screen a Select the file for which you want to generate the report b Select REPORT The report page of the ALARM SUMMARY screen opens with the first low alarm location ID highlighted see Figure 11 35 on page 207 ...

Page 219: ...high alarm location lists d Select CANCEL to return to the measurement screen or NEW REPORT to generate another report 8 In the MIN REVIEW screen a Select the file for which you want to generate the report b Select REPORT The MIN MAX SUMMARY report result screen opens with the minimum thickness ID highlighted see Figure 11 36 on page 208 ...

Page 220: ...turns to the live measurement screen at the selected minimum ID in the file see Figure 11 37 on page 208 Figure 11 37 Returning to the measurement screen d You can couple the probe back to the minimum ID location to verify the thickness and then press SAVE SEND to store the new measurement e Use the and keys to move to other minimum review list IDs ...

Page 221: ...DMTA 10004 01EN Rev D November 2016 Using the Datalogger 209 f Press MEAS to exit the minimum review ...

Page 222: ...DMTA 10004 01EN Rev D November 2016 Chapter 11 210 ...

Page 223: ...ns You can however easily change existing setups and create up to 35 user defined application setups providing flexibility for a wide range of applications 12 1 Standard D79X and Other Dual Element Transducers The 38DL PLUS is compatible with a full line of Olympus dual element thickness gage transducers see Table 21 on page 213 The 38DL PLUS automatically recognizes a D79X transducer when you plu...

Page 224: ...ent prompts you to select a generic transducer setup or one of the previously created custom stored transducer setup The 38DL PLUS has the ability to build and store a custom transducer setup for nonrecognized dual element transducers in the frequency range of 1 MHz to 10 MHz 12 2 Creating a Setup for Nonstandard Dual Element Transducers The 38DL PLUS automatically detects standard D79X series dua...

Page 225: ...es the frequency and the diameter of the dual element transducer that you are using see Table 21 on page 213 Table 21 Default transducers Default transducer Frequency Tip diameter D790 791 D799 5 MHz 11 0 mm 0 434 in D792 D793 5 MHz 7 2 mm 0 283 in D794 D795 10 MHz 7 2 mm 0 283 in D797 2 MHz 22 9 mm 0 900 in D798 D7226 7 5 MHz 7 2 mm 0 283 in D7912 D7913 10 MHz 7 5 mm 0 295 in MTD705 5 MHz 5 1 mm ...

Page 226: ...t VELOCITY to the sound velocity in the material to be tested d If needed adjust the MAX GAIN value see Maximum Gain on page 230 e If needed adjust the EXT BLANK value see Adjusting the Extended Blank with Dual Element Transducers on page 137 f Press SAVE SEND to save the changes to the setup Figure 12 2 Example of the ACTIVE screen 8 In the SAVE SETUP screen a If needed highlight SAVE AS and then...

Page 227: ...be lost when a different application setup is recalled Save all changes made to the active setup before recalling another setup To recall a custom dual element transducer setup 1 Press XDCR RECALL 2 In the menu select CUSTOM DUAL ELEMENT 3 In the CUSTOM DUAL ELEMENT screen select the desired custom setup 4 In the ACTIVE screen review the setup parameters 5 Press MEAS to return to the measurement s...

Page 228: ...ou need to activate the V path function to be able to build a V path correction curve To activate the V path function 1 Press SETUP MENU 2 In the menu select MEAS 3 In the MEAS screen set VPATH CAL ENABLE to ON 4 Press MEAS to return to the measurement screen 12 4 2 Building a V Path Correction Curve for a Nonstandard Dual Element Transducer Creating a custom V path requires a multi step test bloc...

Page 229: ... element transducer is performing properly and is suitable for the application To build a V path correction for a nonstandard dual element transducer 1 Ensure that the transducer is not coupled to the test material and that there is no couplant on the tip to the transducer 2 Press 2nd F CAL ZERO Do ZERO to perform the transducer zero calibration 3 To ensure that the instrument properly detects ech...

Page 230: ...cho Detection Mode on page 83 f Ensure that the instrument properly detects echoes on all test block steps 4 Activate the V path function see Activating the V Path Function on page 216 for details 5 Couple the transducer to a thick sample representing the thickest material that you will measure 6 Press CAL VEL 7 In the help text bar select YES to the VPath Calibration prompt see Figure 12 4 on pag...

Page 231: ...o match the known thickness 13 Repeat steps 10 to 12 for the other thicknesses You need a minimum of three points and a maximum of ten V path calibration points 14 When all known thickness values from all calibration points have been entered press MEAS 15 At this point you can either press CAL VEL to view the V path Calibration table OR Save the V path calibration as a custom dual element transduc...

Page 232: ...setup location that already has a stored custom setup deletes and replaces the contents with the new custom dual element transducer setup d Select SAVE to save the custom setup e In the ACTIVE screen review the parameters f Press MEAS to return to the measurement screen The new custom transducer is now the active setup and can be recalled from the list of custom dual element transducer setups CAUT...

Page 233: ...ustom setup when the measurement requirements of a particular application are not optimally met by one of the standard setups Once adjustments are made you can name and store this setup in one of the 35 user defined setup locations The adjustments described in the following procedure and subsections should be made only by a qualified technician who is familiar with the basic theory of ultrasonic g...

Page 234: ...e the custom setup To reduce the number of changes to make to parameter values you can also select an existing single element setup with parameter values that are close to the desired setup 5 In the ACTIVE screen see Figure 13 1 on page 222 a Set DET MODE to the desired detection mode see Detection Modes on page 225 for details Figure 13 1 The ACTIVE screen for the setup of a single element transd...

Page 235: ...l to be tested with this setup see Material Sound Velocity and the Zero Calibrations on page 71 f Set ZERO VALUE to the calibrated zero offset value time of flight of the echo that is not traveling through the material for this transducer see Calibrating the Instrument on page 67 g If needed increase the PULSER POWER to increase the ultrasound wave penetration in the material Reduce the value for ...

Page 236: ...sting Waveform Parameters For Single Element Transducers With single element transducers you can quickly adjust individual waveform parameters using the WAVE ADJ key To quickly adjust individual waveform parameters 1 Ensure that a single element transducer is connected to the 38DL PLUS 2 From the measurement screen press WAVE ADJ The waveform adjustment parameter appears on the measurement screen ...

Page 237: ...5 for details MB BLANK see Main Bang Blank on page 232 for details TDG SLOPE see TDG Slope on page 231 for details INIT GAIN see Initial Gain on page 231 for details MAX GAIN see Maximum Gain on page 230 for details PULSER POWER see Pulser Power on page 228 for details PROBE TYPE MEAS TYPE see step 5 c in Creating a Custom Setup for a Single Element Transducer on page 221 for details 4 Use the or ...

Page 238: ...he time of flight between the interface or delay line echo and the first back wall echo using a delay line or an immersion transducer see Figure 13 4 on page 226 Figure 13 4 Mode 2 detection example Main bang First back wall echo Detection marker Main bang First back wall echo Interface echo Detection bar ...

Page 239: ...gle element transducers the 38DL PLUS normally detects peaks on either the highest positive or highest negative peak of the RF waveform This feature works well for most precision thickness applications This normal peak detection can be unstable for applications in which the back wall echo is irregular and contains several negative or positive peaks that are close in amplitude In these cases the th...

Page 240: ...gative peak 13 5 Pulser Power You can set the excitation pulse main bang voltage to one of the following values 60 V 110 V 150 V and 200 V Higher voltages may provide greater penetration at the expense of a lower near surface resolution especially in mode 1 Inversely lower voltages may provide better near surface resolution at the expense of a lower penetration For most applications the 110 V valu...

Page 241: ...dent gain TDG functions to automatically adjust receiver gain to an optimum level when an echo is detected The 38DL PLUS offers three parameters to draw a time dependent gain curve INIT GAIN TDG SLOPE and MAX GAIN see Figure 13 8 on page 230 From the initial gain level receiver gain slopes up to the maximum gain level at the rate determined by the TDG SLOPE setting When you adjust any of the recei...

Page 242: ...eceiver gain possible The maximum gain is used to amplify echoes that are further out in time In general for a given application you should set the maximum gain high enough so that all echoes of interest are detected You can adjust the maximum available receiver gain from 0 0 dB to 99 0 dB When no echo is detected LOS prompt the gain rises to the maximum level set by the initial gain slope and max...

Page 243: ...ess capability is less important than penetration and scatter echoes are not a problem you can set the initial gain equal to the maximum gain The initial gain does the following Indicates the initial time dependent receiver gain currently selected Amplifies echoes that are close to the Main Bang or interface echoes Starts at time zero and extends to the main bang blank in mode 1 the end of the int...

Page 244: ...al to ensure accurate measurements In mode 1 however the length of the main bang blank determines the minimum thickness that can be measured and it must be positioned with care after selecting the initial gain level see Figure 13 9 on page 232 When the main bang blank is too short the instrument hangs up on the excitation pulse and readings are not possible When the main bang blank is too long the...

Page 245: ...terval begins at the end of the main bang blank The echo window ends x µs following the main bang in mode 1 or x µs following the interface blank in mode 2 and mode 3 In mode 1 you can usually set the echo window to any value greater than the round trip pulse transit time in the thickest or slowest piece of material to be measured see Figure 13 11 on page 234 The exact setting is not critical as l...

Page 246: ... the echo window must be set ahead of the second interface echo to prevent an incorrect detection which in turn determines a maximum measurable thickness In applications involving mode 2 and mode 3 immersion measurements the echo window placement must apply throughout the range of the water paths to be used Figure 13 12 Echo window setting for mode 2 and mode 3 Echo window Interface echo Echo wind...

Page 247: ...ak Positive and negative polarity refer to processed echoes displayed on the waveform display see Figure 13 13 on page 235 To measure thicknesses with the highest accuracy it is important that the 38DL PLUS detects the maximum amplitude peak in an echo Figure 13 13 Negative and positive echo detection examples Refer to Table 22 on page 236 to help you decide which detection polarity to select for ...

Page 248: ...contact transducer Back wall echo normally negative except when measuring material of low acoustic impedance bonded to a material of high impedance such as plastic or rubber over metal where the echo is phase reversed Not applicable Mode 2 using delay line or immersion transducers Interface echo normally positive for high impedance materials such as metals and ceramics and negative for low impedan...

Page 249: ...k wall echoes are measured see Figure 13 15 on page 238 In most conditions the interface blank would be set just short of the first back wall echo However as a practical matter the first back wall echo from thin materials is often distorted or lost in the interface echo With some challenging geometries such as tight radii later pairs of back wall echoes may be cleaner than early ones In these case...

Page 250: ... mode 2 or to the main bang blank in mode 1 This function creates a blank or dead zone up to 20 µs long following the leading edge of the first detected back wall echo to prevent detection of trailing lobes or cycles of that echo and the resulting gage hang up see Figure 13 16 on page 239 Gage reading between back wall 1 and 2 Interface blank adjusted so gage measures between back wall echoes 2 an...

Page 251: ... blank as long as necessary to prevent detection of the spurious signals 13 9 Saving Setup Parameters After adjusting selected waveform parameters you can store the settings for a quick and easy recall The 38DL PLUS can store up to 35 custom setups in its internal memory To save setup parameters 1 Make the appropriate changes to the waveform parameters 2 Press XDCR RECALL In the menu ensure that A...

Page 252: ...17 Saving custom setups 5 In the ACTIVE screen review the setup parameters 6 Press MEAS to return to the measurement screen 13 10 Quickly Recalling a Custom Setup for Single Element Transducers Normally you can change the setup for a custom application by pressing RECALL XDCR to select the appropriate setup in the list of available setups and then press MEAS This process is adequate for typical se...

Page 253: ...en set QUICK SETUP RECALL to ON 4 Press MEAS to return to the measurement screen To quickly recall one of the four first custom setups While in measurement screen with the quick setup recall function activated press 2nd F to recall the first custom single element transducer setup OR Press 2nd F to recall the second custom single element transducer setup OR Press 2nd F to recall the third custom si...

Page 254: ...DMTA 10004 01EN Rev D November 2016 Chapter 13 242 ...

Page 255: ...ing the RS 232C D protocol This includes personal computers minicomputers dataloggers and printers The data cable must be compatible with the 38DL PLUS output connector and the serial input connector of the receiving device Olympus supplies cables for computers and serial printers and provides assistance with connecting to any other equipment When communicating directly to a printer the 38DL PLUS ...

Page 256: ...omputer This driver is installed when you install the GageView interface program For more information on installing GageView refer to the GageView Interface Program User s Manual P N 910 259 EN U8778347 2 If you use a communication program other than GageView refer to the program documentation to properly configure the program for USB communication 3 Turn the 38DL PLUS on 4 From the measurement sc...

Page 257: ... with the 38DL PLUS If you experience problem to establish the communication between the 38DL PLUS and a remote device consider using the 38DL PLUS communication reset function to return all communication parameters to the default values see Resetting the Communication Parameters on page 260 and then reconfigure only needed communication parameters 14 3 Setting Up RS 232 Serial Communication The 3...

Page 258: ...its 1 Parity None To set up the RS 232 serial communication 1 Refer to the receiving device hardware and software documentation and set the receiving device serial communication parameters to values supported by the 38DL PLUS a Set the baud rate to 1200 2400 4800 9600 19200 38400 57600 or 115200 b Set the stop bits to 1 c Set the parity to none 2 On the 38DL PLUS from the measurement screen press ...

Page 259: ... MODE to one of the following options OFF Continuous output is off default value ON Continuously sends data at the selected measurement rate see Adjusting the Measurement Update Rate on page 60 5 SEC AVERAGE Sends one averaged thickness reading every 5 seconds 10 SEC AVERAGE Sends one averaged thickness reading every 10 seconds Figure 14 2 Viewing communication parameters 8 Using the appropriate R...

Page 260: ...1 Sending Entire Files RS 232 You can send a single or multiple files from the 38DL PLUS to a computer or printer The data that is transmitted includes the file name the file header ID numbers thickness data flags calibration setups and notes To send entire files from the 38DL PLUS to a computer or printer 1 Ensure that the RS 232 communication parameters are configured correctly see Setting Up RS...

Page 261: ...pears on the help text bar while the data is transferred Figure 14 3 Selecting a file to send 14 4 2 Sending an ID Range from a File RS 232 The 38DL PLUS allows you to only transmit a portion of a given file to a computer or to a printer To send a specific range of ID numbers from a specific file 1 Ensure that the RS 232 communication is configured correctly see Setting Up RS 232 Serial Communicat...

Page 262: ...This function is useful when the 38DL PLUS is continuously connected to an external device printer data collector or computer and you need to collect only data on command To perform a single send 1 Ensure that the RS 232 communication is configured correctly see Setting Up RS 232 Serial Communication on page 245 2 Setup the desired measurement screen on the 38DL PLUS 3 Make a thickness reading 4 P...

Page 263: ...our computer in Microsoft Excel or any other program You can import survey files in GageView from the microSD card reader You can send your user defined transducer setups to the GageView interface program to save a copy of these setups on a computer You can also send these transducer setups back to the 38DL PLUS see Importing Survey Files from the External Memory Card on page 252 This procedure al...

Page 264: ...lected file is created in the following folder on the external microSD memory card OlympusNDT 38DLP Transfer The instrument automatically returns to the measurement screen Figure 14 5 The EXPORT screen 14 4 5 Importing Survey Files from the External Memory Card You can import a survey file from the external microSD memory card to the 38DL PLUS internal memory You can use this function in conjuncti...

Page 265: ...on turn the 38DL PLUS off and then back on so that it recognizes the presence of the memory card 4 From the measurement screen press FILE 5 In the menu select IMPORT 6 In the IMPORT screen see Figure 14 6 on page 253 a Select the file to import in the list of available files The listed files are those found in the OlympusNDT 38DLP Transfer folder on the external microSD memory card b Select IMPORT...

Page 266: ... computer must have setup information The setup can be the gage default setups or any other desired sequence of setups The data downloaded to the 38DL PLUS must be in the same precise format in which data is transmitted Olympus recommends using the GageView interface program to handle all functions of interfacing storing and creating 38DL PLUS data Please contact Olympus for information on additio...

Page 267: ...View Interface Program User s Manual P N 910 259 EN U8778347 for information on how to install and use GageView To send a screen capture to GageView 1 Set the USB communication parameters and then connect the 38DL PLUS to the computer see Setting Up USB Communication on page 244 2 On the 38DL PLUS select the screen that you wish to capture 3 On the computer start GageView 4 In GageView perform the...

Page 268: ...n the menu select Device Tools b In the Device Tools dialog box see Figure 14 8 on page 257 select Screen Capture and then click Receive The screen image appears when the data transfer completes c Click Copy to copy the screen capture to the Windows clipboard OR Click Save to save the image as a BMP file to a folder and file name of your choice ...

Page 269: ...a computer and open the file in any program that can view bitmap bmp files To send a screen capture to the external microSD card 1 Ensure that a microSD memory card is inserted in its slot under the I O door on the right side of the 38DL PLUS see Figure 1 5 on page 25 2 If you inserted the microSD memory card while the 38DL PLUS was turned on turn the 38DL PLUS off and then back on so that it reco...

Page 270: ...der connect the memory card to a computer c Copy the file from the OlympusNDT 38DLP Snapshot folder on the card to the desired folder on the computer 14 6 RS 232 Serial Data Output Formats The 38DL PLUS supports 10 output formats for RS 232 transmitted data Output formats vary depending whether you are using a dual element transducer or a single element transducer Table 24 on page 258 and Table 25...

Page 271: ...e OUTPUT FORMAT value see Table 24 on page 258 and Table 25 on page 259 for a description of the formats F8 F9 F10 Table 25 Serial data output format for single element transducers Format File header ID header Thickness table Wave forms Setup table Note table F1 F2 F4 F5 F6 F7 F8 F9 F10 Table 24 Serial data output format for dual element transducers continued Format File header ID header Thickness...

Page 272: ...ly returns communication parameters to the factory default values This function may be useful when you experience difficulties to establish the communication with a remote device Table 26 on page 260 gives the default values for the communication parameters Table 26 Default communication parameter values Parameter Value COMM PROTOCOL MULTI CHAR OUTPUT FORMAT F1 DATABASE TRACKING OFF B SCAN OUTPUT ...

Page 273: ...ransfer 261 To reset the communication parameters 1 Press 2nd F SETUP MENU SP MENU 2 In the menu select RESETS 3 In the RESETS screen see Figure 14 10 on page 261 a In the RESETS list select COMMUNICATION RESET b Select RESET Figure 14 10 Selecting the COMMUNICATION RESET ...

Page 274: ...DMTA 10004 01EN Rev D November 2016 Chapter 14 262 ...

Page 275: ...owever as with any electronic instrument damage is possible if not handled with some care Observe the following instructions in particular Never press a key with a hard or sharp object When connecting cables to the instrument first align the connector with the mating receptacle on the instrument dual element D79X series transducer center pin is down and the RS 232 I O cable key tab facing down the...

Page 276: ...nical abuse to the cables Never leave a transducer where a heavy object can be placed on the cable Never remove a transducer from the gage by pulling on the cable pull on the molded connector only Never tie a knot in the transducer cable Do not twist or pull the cable at the point where it connects to the transducer Excessive wear at the tip of the Transducer degrades its performance To minimize w...

Page 277: ...e to 12 00AM in the 12 hour format COMMUNICATION RESET Changes the communication settings to the default factory values listed in Table 28 on page 266 Table 27 Measurement default settings Parameter Default value Measurement mode with differential Fast min max and alarms turned off Material sound velocity 5 969 mm s or 0 2350 in s approximate velocity of the included test blocks Differential refer...

Page 278: ...tivate a reset function 1 Press 2nd F SETUP MENU SP MENU 2 In the menu select RESETS 3 In the RESETS screen see Figure 15 1 on page 267 a In the RESETS list highlight the desired reset function A warning message appears indicating the type of data that will be reset b Select RESET Table 28 Default communication settings Parameter Default value COMM PROTOCOL Multi Character OUTPUT FORMAT F1 DATABAS...

Page 279: ...ardware operation Some tests are designed for Olympus internal testing procedures during the manufacturing process The available tests are Keypad test Video test Internal microSD card test Pass or Fail External microSD card test Pass or Fail Dual element transducer test ESS Test Electronic Stress Screening for Olympus internal use only B scan Test for Olympus internal use only Battery Test for Oly...

Page 280: ... screen press DISPLAY to start the video test The display shows three vertical color strips that darken to black Any problems with the display show up as a disruption of the pattern b Press ENTER to terminate the video test 6 When INTERNAL SD CARD TEST or EXTERNAL SD CARD TEST is selected in the INTERNAL SD CARD TEST or EXTERNAL SD CARD TEST screen a Press DISPLAY to start the test The test result...

Page 281: ... follows Similar values indicate a normal dual element transducer A difference between the values indicates that the delay line wear is not the same for each element A missing value indicates that a cable is broken or that the element is not functioning c You can note the calculated ZERO VALUE d Press ENTER to terminate the dual element transducer test Figure 15 3 The DUAL XDCR TEST screen 15 6 Pe...

Page 282: ... the SW DIAG screen 3 Press MEAS to return to the measurement screen 15 7 Viewing the Instrument Status The STATUS screen lists important information about the instrument The status screen shows the following information Current instrument internal temperature Current battery charge level Instrument model Software release date build date Software version Hardware version Options code S N to be com...

Page 283: ...pear Usually these messages indicate a problem with the operating procedure but some might indicate a physical problem with the gage itself If you do not understand an error message contact Olympus for assistance 15 9 Resolving Battery Pack and Charger Problems The power indicator in the upper right corner of the display shows bars that indicate the percentage of remaining battery charge level Whe...

Page 284: ...e instrument after the charger is connected for several minutes the instrument or the charger may be at fault 15 10 Resolving Measurement Problems Table 29 Measurement troubleshooting Symptom Possible explanation No or weak echoes no measurement LOS Insufficient couplant especially on rough or curved surfaces Gain set too low Material is too attenuating or surfaces are not parallel or are too roug...

Page 285: ...perform calibration Differential mode check DIFF flag Min or Max mode see Using the Minimum Maximum or Min Max Thickness Mode on page 115 Material is too grainy has flaws inclusions or laminations or very high surface noise try manual gain adjustment or extended blank Table 29 Measurement troubleshooting continued Symptom Possible explanation ...

Page 286: ...DMTA 10004 01EN Rev D November 2016 Chapter 15 274 ...

Page 287: ...ery 24 42 Wh Five AA auxiliary batteries Probe sockets types Dual LEMO with center pin IP67 Battery operating time Lithium ion 12 6 hours minimum 14 hours typical 14 7 hours maximum Operating temperature With lithium ion battery 10 C to 50 C 14 F to 122 F Battery storage temperature 20 C to 40 C 4 F to 104 F Battery indicator 8 step battery charge level indication Flashing low battery warning Puls...

Page 288: ...justable square wave pulser Pulser voltage Pulse voltages 60 V 110 V 150 V and 200 V Pulse rise time Damping in 5 ns typical Damping out 3 5 ns typical pulse width dependent Pulse duration Adjustable to probe frequency Table 33 Receiver EN15317 specifications Parameter Value Gain control Automatic or manual 0 dB to 99 dB Frequency range 0 5 MHz to 24 MHz typical filter dependent Table 34 Other EN1...

Page 289: ...or custom V path calibration with dual element transducers Display response time Adjustable 4 Hz 8 Hz 16 Hz 20 Hz and 30 Hz Number of pixels to display a waveform 640 480 pixels Printer output RS 232 serial Table 35 Environmental rating specifications Parameter Value IP rating Designed for IP67 Explosive atmosphere MIL STD 810F Section 511 4 Procedure I Shock test MIL STD 810F Section 516 5 Proced...

Page 290: ...on transducers Mode 3 Time between a pair of back wall echoes following the interface echo Normally used with delay line or immersion transducers V path correction Automatic or manually created dependent on transducer type Measurement resolution Selectable from the keypad LOW 0 1 mm 0 01 in STD 0 01 mm 0 001 in HI 0 001 mm 0 0001 in with high resolution option Not all resolutions are available for...

Page 291: ... 25 M106 M106 Steel 2 00 mm to 635 00 mm 0 080 in to 25 000 in DEFM1 2 25 M1036 M1036 Steel 2 00 mm to 635 00 mm 0 080 in to 25 000 in DEFM3 20 0 M208 M208 Steel 0 25 mm to 5 00 mm 0 008 in to 0 200 in DEFP2 20 0 M208 M208 Plastic 0 12 mm to 5 mm 0 005 in to 0 200 in DEFM3 10 0 M202 M202 Steel 0 25 mm to 12 00 mm 0 010 in to 0 500 in DEFM2 10 0 M202 M202 Steel 0 75 mm to 12 00 mm 0 030 in to 0 500...

Page 292: ...terial condi tions and temperature Table 39 Setup parameter description Name Description Units Resolutions Range MEAS OPTION Echo detect mode Standard dual Dual echo to echo Thru Coat Mode 1 Mode 2 Mode 3 MEAS TYPE Special measurement modes Standard or Oxide optional Barrier Layer optional First Peak PROBE TYPE Transducer types Dual element Direct contact Delay line Immersion EMAT PULSER POWER Pul...

Page 293: ...99 mm µs 0 0200 in µs to 0 7362 in µs ZERO Zero calibration factor 0 00 to 999 99 Table 40 General specifications Element Description Keypad Sealed and embossed membrane surface Tactile and audible feedback color coded graphics 21 keys Dual element transducers Automatically identifies the transducer type and optimizes the gage for that transducer Non Olympus transducers might work but performance ...

Page 294: ...DMTA 10004 01EN Rev D November 2016 Appendix A 282 ...

Page 295: ...perature Therefore for maximum accuracy establish the sound velocity in a given material by first testing a sample of the material Table 41 Sound velocities in common materials Material V in µs V m s Acrylic resin Perspex 0 107 2730 Aluminum 0 249 6320 Beryllium 0 508 12900 Brass naval 0 174 4430 Copper 0 183 4660 Diamond 0 709 18000 Glycerin 0 076 1920 Inconel 0 229 5820 Iron Cast slow 0 138 3500...

Page 296: ... Van Nostrand Co New York 1958 Papadakis E P Panametrics unpublished notes 1972 Polyamide slow 0 087 2200 Nylon fast 0 102 2600 Polyethylene high density HDPE 0 097 2460 Polyethylene low density LDPE 0 082 2080 Polystyrene 0 092 2340 Polyvinylchloride PVC hard 0 094 2395 Rubber polybutadiene 0 063 1610 Silicon 0 379 9620 Silicone 0 058 1485 Steel 1020 0 232 5890 Steel 4340 0 230 5850 Steel 302 aus...

Page 297: ...P MM U8147016 Optional High Penetration software installed in units via activation code 38DLP HP U8147017 Table 43 Accessories and replacement parts Description Part number Carrying case 38 CC U8764099 Protective rubber boot with chest harness 38DLP RPC U8779306 Gage stand EPLTC PS U8780044 Chest harness 441 087 U8902895 Rectangular rubber boot rings 412 1061LF U8907259 38DL PLUS User s Manual DMT...

Page 298: ...80287 Universal charger AC adaptor EP MCA X where X denotes power cord type U for North America Japan and Korea U8050397 A for Australia U8767330 K for United Kingdom U8767287 I for Italy U8767289 D for Denmark U8767290 P for Pakistan India South Africa and Hong Kong U8767291 E for Europe U8767288 AC adaptor power cord for North America South America Japan and Korea 2111 U8840015 AC adaptor power ...

Page 299: ...step 1018 steel English units 0 100 in 0 200 in 0 300 in 0 400 in 0 500 in 2214E U8880014 5 step 1018 steel Metric units 2 5 mm 5 0 mm 7 5 mm 10 0 mm 12 5 mm 2214M U8880016 5 step aluminum English units 0 100 in 0 200 in 0 300 in 0 400 in 0 500 in 2213E U8880010 4 step 1018 steel English units 0 250 in 0 500 in 0 750 in 1 500 in 2212E U8880008 2 step 303 stainless steel English units 0 050 in 0 15...

Page 300: ...DMTA 10004 01EN Rev D November 2016 Appendix C 288 ...

Page 301: ...battery compartment 36 Figure 2 5 Selecting the new battery type 37 Figure 3 1 The main elements of the measurement screen 39 Figure 3 2 The ID bar 40 Figure 3 3 Example of other elements appearing on the measurement screen 41 Figure 3 4 The loss of signal LOS indicator 41 Figure 3 5 Menu and submenu example 42 Figure 3 6 Parameter screen example 43 Figure 3 7 Example of the virtual keyboard 45 Fi...

Page 302: ...g manual measurements 84 Figure 6 1 EMAT transducer and filter adaptor connection 88 Figure 7 1 The OPTIONS screen to activate software options 92 Figure 7 2 The OXIDE screen 95 Figure 7 3 Selecting which measurement appears with the larger font 96 Figure 7 4 Measurement screen with the oxide layer software option 97 Figure 7 5 Measurement screen for a disbonded oxide layer 98 Figure 7 6 Waveform ...

Page 303: ...sure dialog box 154 Figure 10 17 Examples of the measurement screen with the AVG MIN measurement active 155 Figure 10 18 The TEMP COMP screen 157 Figure 10 19 Displaying temperature compensation data 158 Figure 11 1 The active file name appearing in the ID bar 159 Figure 11 2 Identifying datalogger parameters 161 Figure 11 3 Example of the CREATE screen 164 Figure 11 4 The CREATE screen for the in...

Page 304: ...207 Figure 11 36 The MIN MAX SUMMARY report result screen 208 Figure 11 37 Returning to the measurement screen 208 Figure 12 1 The GENERIC SETUP SELECTION screen 213 Figure 12 2 Example of the ACTIVE screen 214 Figure 12 3 Illustration of the V path 216 Figure 12 4 Answering YES at the V path calibration prompt 218 Figure 12 5 Editing point 1 of the V path calibration 219 Figure 12 6 Saving the se...

Page 305: ... to send 250 Figure 14 5 The EXPORT screen 252 Figure 14 6 Example of the IMPORT screen 253 Figure 14 7 The Device Configuration dialog box 256 Figure 14 8 The Device Tools dialog box with a screen capture 257 Figure 14 9 Viewing or changing the file output format 260 Figure 14 10 Selecting the COMMUNICATION RESET 261 Figure 15 1 Activating a reset function 267 Figure 15 2 The KEYPAD TEST screen 2...

Page 306: ...DMTA 10004 01EN Rev D November 2016 List of Figures 294 ...

Page 307: ...SEQUENTIAL file type 167 Table 14 Resulting ID example for the SEQ CUSTOM PT file type 169 Table 15 Resulting ID example for the 2D CUSTOM PT file type 175 Table 16 Resulting ID example for the 3 D GRID file type 177 Table 17 Resulting ID example for the BOILER file type 179 Table 18 Resulting ID example for the 3 D CUSTOM file type 180 Table 19 File data mode stored measurements 182 Table 20 Pred...

Page 308: ...s 277 Table 36 Measurement specifications 278 Table 37 Datalogger specifications 278 Table 38 Typical measurement ranges and default setups for a single element transducer 279 Table 39 Setup parameter description 280 Table 40 General specifications 281 Table 41 Sound velocities in common materials 283 Table 42 Software options 285 Table 43 Accessories and replacement parts 285 Table 44 Interface c...

Page 309: ...tive file name 77 159 active ID changing 199 active measurement 100 adjusting delay value 58 extended and E1 blanks 83 extended blank with D79X series transducers 137 gain with DE and EMAT transducers 135 update rate 61 waveform parameters 224 advanced gaging functions 135 alarm setting 122 alarm indicator 41 alarms 117 Alkaline batteries operating time 34 using 33 arrow keys 27 A scan 40 associat...

Page 310: ...asurement reset 191 cannot recover deleted file content 188 cannot recover erased data 201 do not delete existing notes 195 experienced operator only 137 221 ingress protection guarantee 22 internal memory reset deletes all data 265 master reset deletes all data 266 overwriting notes with copied note table 195 replacing setup deletes original data 220 240 unsaved data lost 215 CAUTION signal word ...

Page 311: ... 2 D grid 170 2 D grid with custom points 174 3 D grid 176 3 D grid custom 180 boiler 178 creating 163 incremental 165 sequential 167 sequential with custom points 168 datalogger about the 159 echo to echo flags 85 file based system 76 159 functions 21 date setting 51 DB grid about the 147 activating and configuring 147 changing the highlighted cell 151 saving readings 152 viewing inserted cell 15...

Page 312: ...changing data 248 exporting files to memory card 251 extended blank 137 adjusting 83 using 137 F fast mode 60 FCC USA compliance 13 FCC symbol 4 file copying 185 deleting 189 deleting all 191 editing 187 opening 184 renaming 187 file data modes 182 file name 77 159 filled waveform 56 first peak 227 flags echo to echo 85 freeze indicator 41 freezing waveform 126 waveforms 126 full rectification 54 ...

Page 313: ...71 interface blank 236 internal memory reset 265 internal oxide 98 international keypad 26 IP67 ingress protection 22 J Japanese keypad 26 K keypad 25 functions 25 27 secondary function 26 known material sound velocity 72 L labels instructions 2 3 safety 1 language changing 49 last ID 77 lenses soft contact 99 loading setup 65 locked calibration 73 locking instrument 124 loss of signal indicator 4...

Page 314: ...163 creating note table in GageView 193 creating or editing 193 data saved with a B scan 146 database tracking and setting overwriting 133 deleting an ID 202 deleting and delete protection 189 deleting from a file 195 display brightness and battery life 54 display update rate and min max mode 116 displaying file header 187 entering and signs 157 entering known material sound velocity 80 experience...

Page 315: ...t 97 P painted material 78 parameter screens 42 selecting 43 password setting 124 patent label 2 performing diagnostic tests 267 THRU COAT calibration 79 phase distortion 75 reversal 75 polarity of detection 235 positive detection 235 power AC 32 battery 33 indicator 31 39 precautions battery 10 safety 9 preventing false min max readings 117 printer 248 product description 19 protective rubber boo...

Page 316: ...r 94 oxide layer measurement 95 password 124 transducer 63 units 50 USB communications 244 setups creating for nonstandard DE transducers 212 creating for SE transducers 222 custom for SE transducers 221 dual element transducer 211 loading 65 recalling custom DE transducer 215 saving parameters 239 shear wave unwanted 85 signal words information notes 8 IMPORTANT 8 NOTE 8 TIP 9 safety 7 CAUTION 8 ...

Page 317: ...unication reset to solve communi cation problems 245 248 when to turn off AGC 129 TIP signal word 9 title bar 43 traditional text edit method 46 47 transducer maintenance 264 setting 63 transmitting data 248 troubleshooting 263 U units setting 50 unlocking instrument 125 unwanted shear wave echo 85 update rate 60 adjusting 61 USB client connector 24 communications setting 244 connector 23 USB RS 2...

Page 318: ...gs electrical 10 general 9 misuse of instrument 5 warranty information 14 waste electrical and electronic equipment 12 waveform delay 56 display 39 freezing 126 parameters adjusting 224 range 56 rectification 54 rectification changing 52 trace 40 55 trace changing 52 WEEE directive 12 symbol 4 Z zero calibration 66 69 zero compensation 66 zoom activating 58 indicator 41 zoomed display 59 ...

Reviews: