


Menu
o
perat
ion
s
EN
37
Operating, shutting off and checking the alarm
• Operating the alarm:
Turn off the camera. The alarm only operates when the camera is off.
• Shutting off the alarm:
While the alarm is sounding, press any button to shut off the alarm and turn off the camera.
Note that pressing
o
will turn the camera on.
When [SNOOZE] is [OFF], the alarm stops automatically and the camera turns off after 1
minute of no operation.
• Checking the alarm settings:
While the camera is off, press
g
/
E
to display the current and alarm set times. Times will
be displayed for 3 seconds.
The factory default settings differ according to the region where the camera is sold.
To play back camera images on a TV, set the video output according to your TV’s video signal
type.
• TV video signal types differ by country/region. Check the video signal type before connecting
the camera to the TV.
NTSC: North America, Taiwan, Korea, Japan
PAL: European countries, China
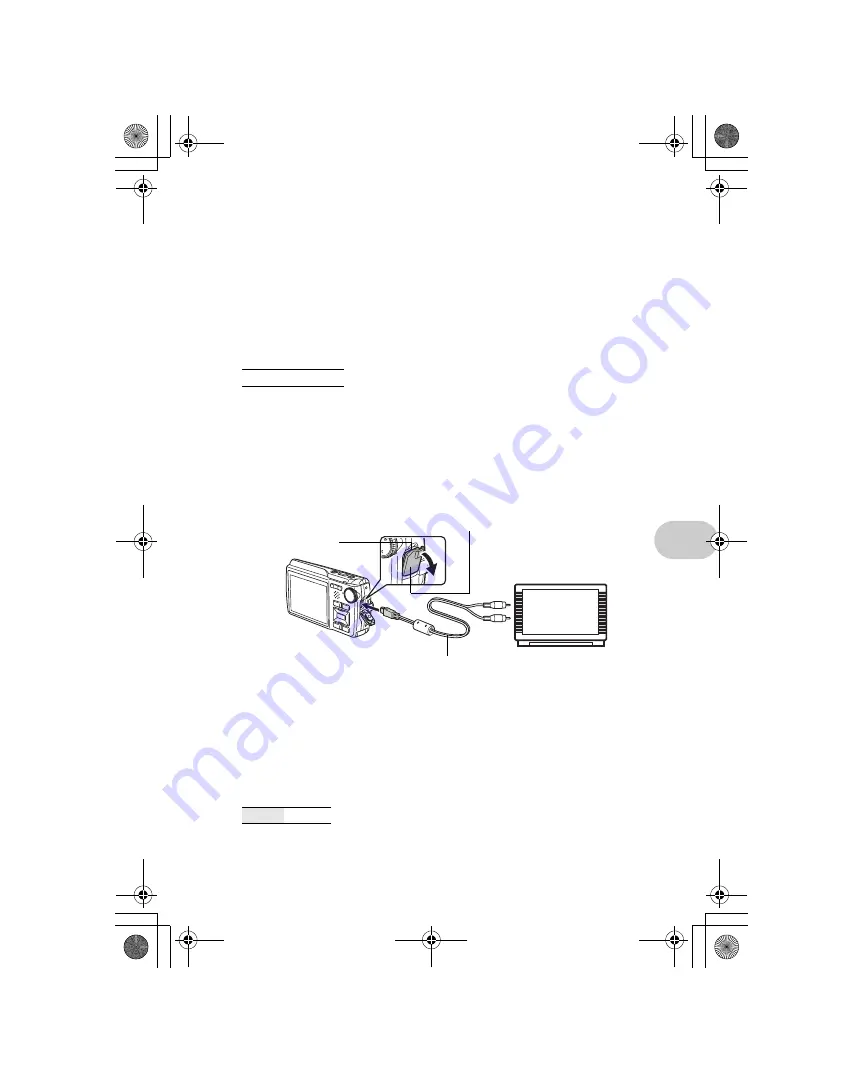
Playing back pictures on a TV
Turn off the camera and the TV before connecting.
When no operation has been performed for approximately 10 seconds while in shooting mode,
the monitor automatically shuts off. Pressing the zoom button or other buttons restores the
camera from power save mode.
VIDEO OUT
.................................................................................. Playing back pictures on a TV
NTSC
/ PAL
POWER SAVE
..................................................... Setting the camera to the power save mode
OFF
/ON
Connect to the TV’s video
input (yellow) and audio
input (white) terminals.
AV cable (provided)
Multi-connector
Connector cover
Settings on the TV
Turn the TV on, and set it to video input
mode.
• For details of switching to video input,
refer to your TV’s instruction manual.
• Images and the information displayed on
the screen may become cropped
depending on the TV’s settings.
Settings on the camera
Press
o
in playback mode to turn the
camera on.
• The last picture taken is displayed on the
TV. Use the arrow pad to select the
picture you want to display.
d4357_e_0000_72.book Page 37 Monday, July 30, 2007 10:01 AM
Summary of Contents for 226125 - Stylus 830 Digital Camera
Page 78: ...78 EN Memo d4357_e_0000_72 book Page 78 Monday July 30 2007 10 01 AM ...
Page 79: ...EN 79 Memo d4357_e_0000_72 book Page 79 Monday July 30 2007 10 01 AM ...
Page 80: ...80 EN Memo d4357_e_0000_72 book Page 80 Monday July 30 2007 10 01 AM ...
Page 81: ...EN 81 Memo d4357_e_0000_72 book Page 81 Monday July 30 2007 10 01 AM ...
Page 82: ...82 EN Memo d4357_e_0000_72 book Page 82 Monday July 30 2007 10 01 AM ...
Page 83: ...EN 83 Memo d4357_e_0000_72 book Page 83 Monday July 30 2007 10 01 AM ...
Page 84: ...Printed in China VS304601 d4357_e_0000_72 book Page 84 Monday July 30 2007 10 01 AM ...


