background image

Installation

www.olympia-life.com

OPERATING

INSTRUCTIONS

3

Page

The base station is not equipped with a power switch. Ensure
that a mains power outlet is close by and that the power plug is
easy to access. Check that the voltage specified on the power
plug corresponds with that supplied by local power network.

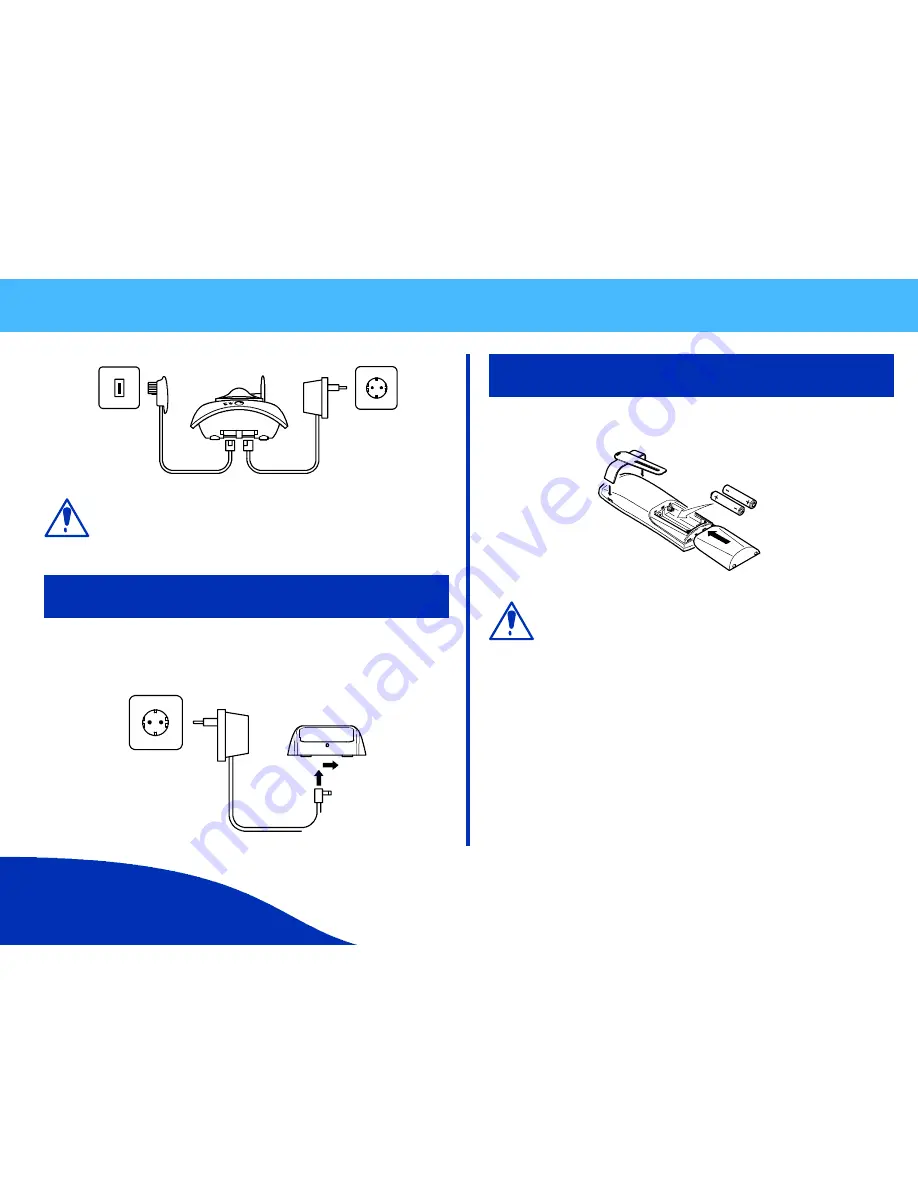
Connecting the Charging Station

Insert the power plug in the socket on the underside of the charging station.

Insert the power plug at the other end in the power outlet. The charging

station is now ready to operate.

Inserting Batteries / Attaching Belt Clip

Open the battery compartment by sliding the cover down.

Insert two AAA batteries in the compartment, ensuring correct polarity.

The handset does not work if the wrong batteries are inserted.
It is also possible that the handset could be damaged as a
result.

Replace the cover on the battery compartment and slide it on until it locks in

place. Place the handset in the base station. An acoustic acknowledgement
is issued and the charging indicator signals the charging process has

started.

Note:

Allow the batteries to be charged for 14 hours without interruption the

first time they are charged. When possible, only remove the handset from

the base station when the charging process has been completed. This

ensures optimum operation.

Attach the belt clip by pressing it from behind over the back housing panel
and inserting the tabs in the slots provided. The clip is slightly flexible and

snaps audibly into place.

Summary of Contents for 6111

Page 1: ...Digital Cordless Telephone Operating Instructions 01 09 2003 en en 6111 6112 ...

Page 2: ......

Page 3: ...s 4 Operating Elements and Indicators 5 Menu Structure 6 Telephone Operation 8 Switching the Handset On Off 7 Selecting the Language 7 Using the Telephone 7 Making external calls 7 Direct dialing 7 On hook dialing 7 Dialing with a prefix 8 Making internal calls 8 Taking calls 8 Handset is in the base station 8 Handset is not in the base station 8 Muting the microphone 9 Changing the receiver volum...

Page 4: ...on 6 13 Changing the dialing mode Function 7 13 Changing the PIN code Function 8 13 Registering additional handsets Function 9 14 Deleting handsets Function 0 14 Activating Deactivating the key lock 14 Base Station Functions 15 Paging the handsets 15 CID Services 15 CID caller identification 15 View caller log 15 Deleting CID entries 15 Warning tones 16 Warranty Accessories 17 Warranty 17 Accessor...

Page 5: ...nly be carried out by service centers recommended by the sales outlet S We recommend removing the batteries if the equipment is not to be used for longer periods S Only replace the batteries with types recommended by us Dispose of defective batteries according to the applicable local laws not in household waste We assume no liability for damage caused by using the equipment for unintended purposes...

Page 6: ... the equipment is set down where all the necessary cables can be laid in such a way that nobody can trip over them Do not position the base station and the charging station in the direct vicinity of other electrical apparatus such as microwave ovens PCs or HiFi equipment Do not expose the base station or charging station to direct sunlight Protect the base and charging stations from getting wet Th...

Page 7: ... batteries in the compartment ensuring correct polarity The handset does not work if the wrong batteries are inserted It is also possible that the handset could be damaged as a result Replace the cover on the battery compartment and slide it on until it locks in place Place the handset in the base station An acoustic acknowledgement is issued and the charging indicator signals the charging process...

Page 8: ...fix dialing S redialing the last call number S CID function for 10 calls S microphone muting function S acoustic battery and range warning signals S key lock S automatic call answering on off S key input tone on off S 9 incoming call ringing melodies S three level ringing volume control S three level receiver volume control S paging function from base station to handset S operation of up to 2 hand...

Page 9: ...station 11 Handset 12 Quick dial memory Scroll to the left 13 OK key confirmation Activate settings Internal call 14 Display b Indicates the battery charge status X Flashes in the case of incoming external call Y Flashes in the case of incoming internal call W Indicates that the key input lock is active S Indicates that microphone muting is active V Indicates that the ringing tone is switched off ...

Page 10: ...Set flash time 7 DIAL MODE TONE PULSE Set dialing mode 8 CHANGE PIN ENTER PIN NEW PIN REPEAT Change PIN default setting 0000 9 REGISTER Register handset on base station 0 DELETE HS Delete the handset from base station u LANGUAGE DEUTSCH ENGLISH Select language for display texts Note The functions can be selected in various ways The basic condition however is that the handset is on hook i e no outs...

Page 11: ...ISH b O Using the Telephone Making external calls There are two ways to dial a number namely direct dialing or on hook dialing Direct dialing 1 Press the Akey and wait for the dialing tone 2 Enter the telephone number and complete the call 3 Press the Akey to end the call 030123456 b L X O On hook dialing 1 Enter the telephone number 2 Press the key to delete any incorrect entries and correct them...

Page 12: ...an external call is received during an internal call short acoustic signals are issued call waiting Taking calls When an external call is received all the handsets registered and the base station ring EXT flashes in the handset display and if configured the telephone number of the caller appears network dependent The incoming call LED on the base station flashes In the case of an internal call or ...

Page 13: ...r during a call Putting a call on hold If the telephone is connected to a PBX network it is possible to put calls on hold and call other subscribers or to forward calls 1 Press the key to put the call on hold 2 Dial the number of the extension required e g 23 3 Press the key once more to take the call back again or the Akey to forward the call to the extension number dialed 23 b L X O Note The abo...

Page 14: ...Carry out the conversation 03012345 b L X O Transferring a call It is possible to transfer a call to other handsets which are registered on the same base station 1 Press the key for approx two seconds 2 The external caller is kept on hold As soon as the person with the other handset takes the call press the A key at any time to transfer the call 3 If the handset contacted does not answer press the...

Page 15: ... entries 1 In order to edit or delete telephone numbers which have been stored press the Bkey and the relevant memory segment number 2 Delete the digits by pressing the key and enter the new ones 030 12345 b O 030 54321 b O STORE TO b O 3 Enter the existing or new memory segment number and confirm by pressing the key Note If a memory segment should be deleted simply delete all the digits without e...

Page 16: ... be confirmed by an acknowledgement tone 1 Press the and 3keys BEEP ON b O 2 Press the and 3keys again to deactivate the key tone feature BEEP OFF b O Activating Deactivating automatic call answering Function 4 The automatic call answering function enables the incoming call to be taken immediately the handset is removed from the base station It is not necessary to press the call key after removing...

Page 17: ...g mode Function 7 The dialing mode used can be selected between the dialing pulse PULSE and dual tone multi frequency TONE modes 1 Press the and 7keys TONE b O 2 Press the Bor Ckey to switch between PULSE and TONE Changing the PIN code Function 8 1 Press the and 8keys ENTER PIN b O 2 Enter the PIN default setting is 0000 and press the key to confirm the entry 3 Enter the new PIN and press the key ...

Page 18: ...nnection has been established the flashing antenna symbol lights up constantly Deleting handsets Function 0 Handsets which have been registered can be deleted or deregistered 1 Press the and 0keys ENTER PIN b O 2 Enter the PIN factory setting is 0000 The handset with which the deletion was performed remains registered the other handset is always the one deleted PIN b O b O 3 Confirm by pressing th...

Page 19: ...ore information is available from your service provider the telephone automatically stores the last ten incoming calls View caller log 1 If the handset is on hook press the key for two seconds 01 03012345 b O 2 Press the Bor Ckey to scroll through the list 3 Press the Akey to dial the subscriber directly 03012345 b L O Deleting CID entries 1 Press the key for two seconds 2 Press the key for two se...

Page 20: ...l has been deacti vated Low battery charge If there are no more bars inside the battery symbol a warning tone is issued which prompts the user to charge the battery Confirmation of input Is always issued when a setting or selection is con firmed Range Is always issued when the handset is used too far from the base station The flashing antenna symbol indica tes that there is no longer a connection ...

Page 21: ... please return the device together with the receipt and original packing material to the point of sale Accessories Approved options and consumables such as batteries extension kits headsets etc can be ordered from our Service Center under 01 80 51 98 00 0 1 Minute 0 12 or in Internet under http www otas de ...

Page 22: ... This operating instruction manual serves purely for information purposes Its content is not part of any contract of sale All the data specified relates to nominal values The equipment and options described may differ from country to country according to national requirements ...

Page 23: ...All rights reserved ...

Reviews: