


Do
or F
lan
ge
Outdoor Living Today www.outdoorlivingtoday.com sales@outdoorlivingtoday.com
Page 33
63.
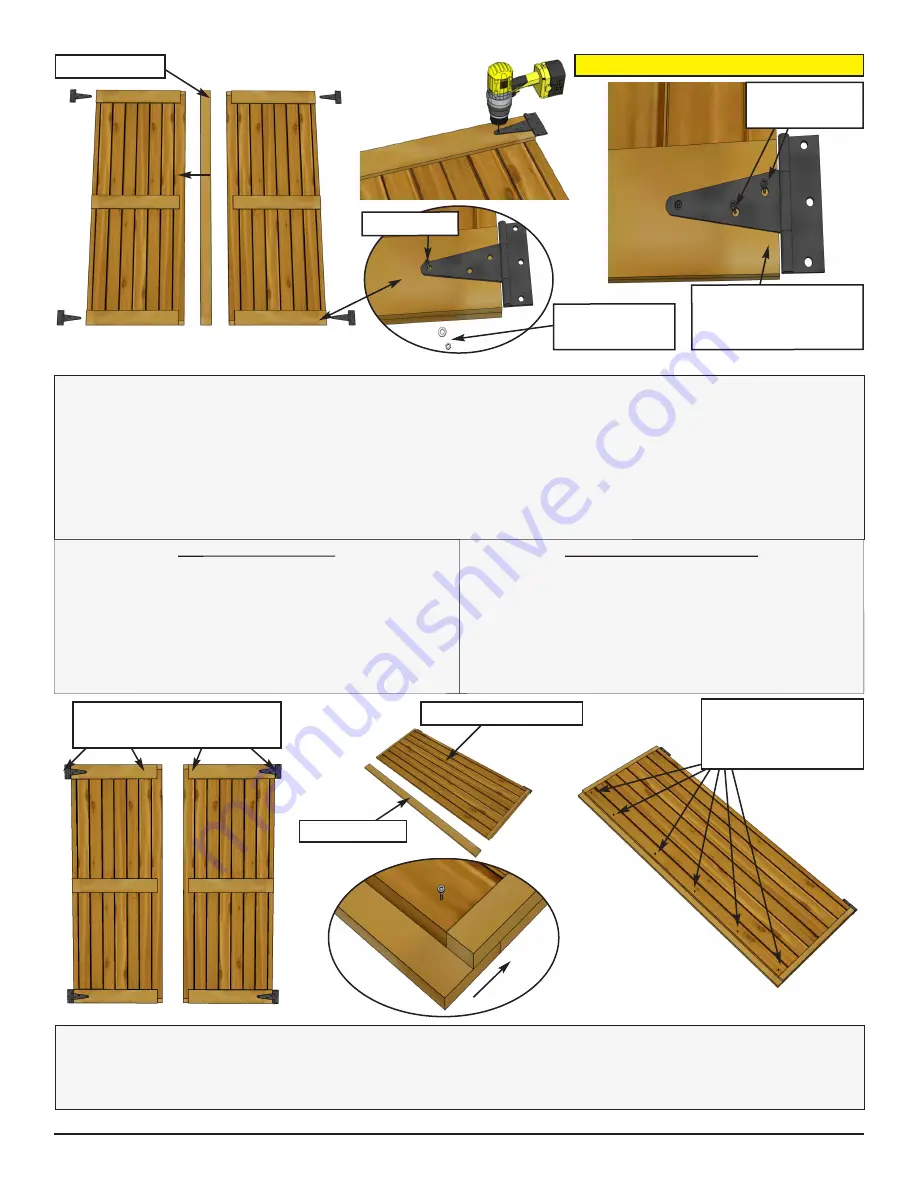
Locate
Left and Right Doors
and
Door Flange.
Orientate Doors so the outside of each Door
is facing up. Locate
Black T Hinges.
Prior to attaching, position Hinges equally on Door trim as
shown above and with a 1/8” drill bit, drill a hole through the tip of the Hinge and all the way through
the Door. Complete for all 4 hinges. Attach each Hinge to Door as above with
1 - 1 1/2” Black
Headed Bolt,
and a
1/4” Silver Nut and Washer,
using a 3/8” wrench. Finish Hinge by securing
with
2 - 3/4” Black Headed Screws.
Drill small pilot holes first to prevent wood from splitting.
Complete both Doors (4 Hinges).
1 1/2” Bolt
Left Door
Right Door
Parts (Step 63 - 67)
Left and Right Doors
(22 1/4” x 61 3/8”)
Door Flange
(1/2” x 2 1/2” x 61 3/8”)
Hardware (Step 63 - 67)
Black T Hinge
x 4 total
1 1/2” Black Headed Bolt
x 4 total
1/4” Silver Nut and Washer
x 4 total
3/4” Black Headed Screws
x 8 total
1” Silver Screws
x 6 total
2” Black Headed Screws
x 12 total
3/4” Black
Head Screws
64.
Flip Left Door over to attach
Door Flange.
Position Door Flange tight against horizontal trim
and even with trim on top and bottom. If out slightly, make sure top horizontal trim and Flange are
even. Pre-drill with 1/8” bit to prevent wood from splitting. Attach with
6 - 1” Silver Screws.
Left Door
Right Door
Flip Left Door Over
Door Flange
Re
ar
S
ide
Do
or F
lan
ge
6 - 1” Silver
Screws. Pre-drill to
prevent splitting.
Align barrel of Hinge
on center of door
trim as shown above
1/4” Silver Nut
and Washer
Door Flange
Hor. Door Trim Flush with
Outside/ Gap Inside
Drill Pilot Holes to prevent splitting.