background image

OLIPAD 

17 


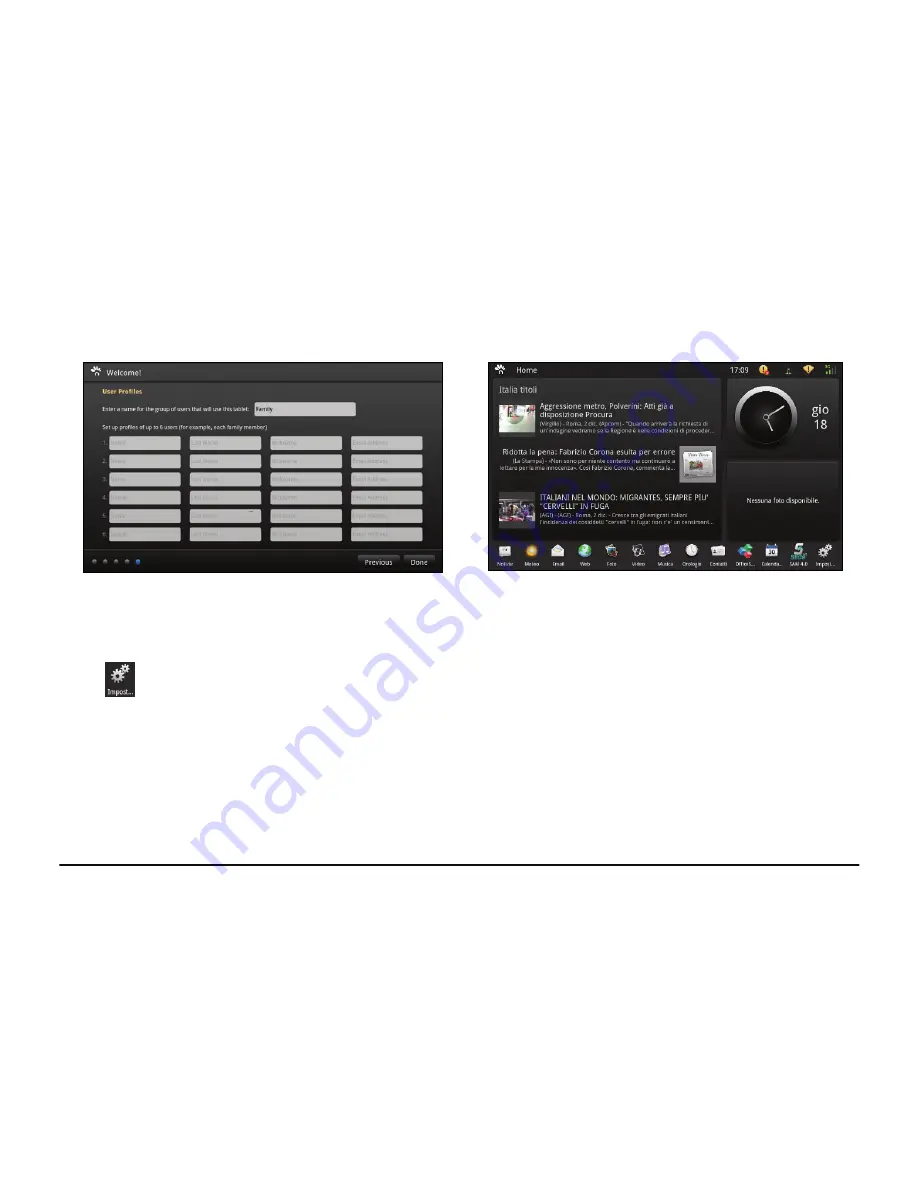
5.  Set the User Profiles and then confirm with 

Done

6.  Initial configuration of the device is complete and you can now 

use all its functionalities.. 


Note:

  During the initial configuration phase, selecting 

Previous

 you can return to the previous screen page to modify settings 

entered previously.  
All settings configured during the first configuration phase can be subsequently modified from 

Settings

 by selecting the 

 icon.


Summary of Contents for OliPad

Page 1: ......

Page 2: ...their products Olivetti disclaims any proprietary interest in trademarks and trade names other than its own Date of publication March 2011 This product is in compliance with requirements of European...

Page 3: ...DATA 7 YOUR TABLET PC PROFILE 8 FRONT VIEW 8 BOTTOM VIEW 9 TOP VIEW 9 LEFT RIGHT VIEWS 10 CARING FOR YOUR TABLET PC 11 LCD SCREEN 11 OTHER ACCESSORIES 12 IF WATER ENTERS INSIDE YOUR TABLET PC 12 OTHER...

Page 4: ...TTINGS FUNCTION 20 SYSTEM SETTINGS 21 NETWORK CONFIGURATION 22 WIRELESS CONNECTIONS 23 BLUETOOTH CONNECTIONS 23 BLUETOOTH SETTINGS 24 MOBILE NETWORKS ONLY FOR MODEL WITH 3G FUNCTION 25 SOUND 26 DISPLA...

Page 5: ...IL SETUP AN ACCOUNT 38 Configuring an Exchange account 39 FUN 40 PHOTOS 40 MUSIC 42 VIDEOS 43 CAMERA 44 UPDATING THE TABLET 45 UPDATING AUTOMATICALLY 45 UPDATING MANUALLY 46 SYSTEM CONNECTIONS 47 INSE...

Page 6: ...4 OLIPAD APPENDIX 50 TROUBLESHOOTING 50 TECHNICAL SPECIFICATIONS 52 DOCKING STATION OPTIONAL 54 CONNECTIONS 55 Setting up the Tablet 55 Connecting an HDMI Device 55 Connecting the Power Supply 56...

Page 7: ...dge and references etc Other trademarks and trade names may be used in this manual to refer to entities claiming the marks and names or their products The manufacture disclaims any proprietary interes...

Page 8: ...O NOT dispose of the Tablet PC in municipal waste Check local regulations for disposal of electronic products Recycle the Battery Pack and check with your Local Authority or retailer for recycling adv...

Page 9: ...e and conditions of health SAR tests are carried out using normal operator stations with the device transmitting at its highest certified power limit in all the frequency bands tested During the test...

Page 10: ...6 LCD Touch sensitive Screen Touching the screen lightly you can interact with the system for example to make selections enable disable settings etc 7 Charge Indicator Light is red while battery is ch...

Page 11: ...OLIPAD 9 3 2 1 VOLUME 1 BOTTOM VIEW 1 Microphone Port 2 SIM card slot only for models with 3G capabilities 3 Docking port TOP VIEW 1 VOL button...

Page 12: ...1 Power button 2 Micro SD Port 3 USB USB2 0 Port 4 Mini USB Port 5 Speakers 6 Headphone Jack 7 Power Jack 8 Speakers The USB device must be inserted oriented correctly Forced insertion may cause damag...

Page 13: ...objects on the LCD Screen DO NOT scratch the LCD Screen with your fingernails or hard objects Use a soft lint free cloth to clean your Tablet PC wiping the LCD Screen gently so as not to damage it DO...

Page 14: ...ff the Tablet PC Drain the water from the Tablet PC Use soft damp cloth to wipe carefully the surface of the Tablet PC Use a fan to dry the Tablet PC and accessories then send it to the service centre...

Page 15: ...manual and Warranty card with you DO NOT forget the passwords of your Tablet PC 4 Check the voltages used in the countries you plan to visit Your Tablet PC comes with a universal AC DC adapter so you...

Page 16: ...connecting the adapter is indicated below 1 Take the adapter and the plug then push the plug into the socket until it clicks into place 2 Plug the DC end of the adapter into the power jack of the Tab...

Page 17: ...ss the POWER button to turn on the Tablet PC To turn off the Tablet PC press the POWER button once and select Power Off from the pop up menu Press the Power button for 4 seconds to turn the device off...

Page 18: ...ting Accept to continue 3 Select the Position Date and Time Select Next to confirm 2 Select the language desired from the list of languages available and select Next to confirm 4 The device searches f...

Page 19: ...nd you can now use all its functionalities Note During the initial configuration phase selecting Previous you can return to the previous screen page to modify settings entered previously All settings...

Page 20: ...ping the display using the right or left scrolling function you can access the screen page with the other applications provided by the Tablet Easy to read initial screen with three windows portlets an...

Page 21: ...the internal battery or are connected to the mains supply availability of Wi Fi network and current connections to it availability of mobile network e g 3G systems and current connections to it Note T...

Page 22: ...ons through touch screen interactions with a system of submenus Example 1 Select the item you require The related submenu opens to the right of the selected item 2 To return to the previous menu or to...

Page 23: ...e settings available are listed on the left touching the display using the up or down scroll function you can display the items in the Settings menu General information about the device is displayed a...

Page 24: ...for connection to the Internet To access the network configuration menu select the icon Then select Wireless networks to enable disable the Wi Fi network set up the Wi Fi connection or enable disable...

Page 25: ...y out other functions after pairing the two devices A Wi Fi network can also be added manually using the option Add Wi Fi network entering the SSID for the network and the related security settings No...

Page 26: ...file to a remote device 1 Carry out pairing select a file on the local device using the File Explorer application and select the Send option using Bluetooth 2 The Tablet displays a setup screen conta...

Page 27: ...oaming mode It is also possible to select the operator and define the APN Access Point Name required for data exchange WARNING To obtain the best performance of the device a data connection must alway...

Page 28: ...sounds except media alarms Audible selection to hear the screen selection tone Volume to set the volume for warning notification tones or multimedia applications Select notification tone to associate...

Page 29: ...rightness automatically adjusts screen brightness Brightness allows screen brightness to be adjusted manually using the cursor Screen timeout to select the time lapse after which the screen is switche...

Page 30: ...ly member to insert new contacts for example family members selecting them from those available Following insertion they can be modified and colours associated with each name Select from contacts to a...

Page 31: ...OLIPAD 29 LOCATION DATE AND TIME To set the time zone current date date display format time and time display format...

Page 32: ...let or on the Micro SD card and remove safely and format the SD card Shows the amount of total occupied memory for every partition of the internal memory system archive data archive If an external mem...

Page 33: ...SIM card change the PIN of the SIM card lock unlock the device by PIN request The Tablet can also be restored to the factory default conditions erasing all the internal data of the Tablet Note During...

Page 34: ...ew applications downloaded and remove them if required check which services are active on the Tablet display and check the status of the applications preloaded onto the Tablet set options needed by an...

Page 35: ...uage and other settings related to the virtual keyboard Ticking the options on the right you can associate sounds with keys use capital letters at the beginning of a sentence correct typing errors dis...

Page 36: ...of battery being used by the activities active on the Tablet such as the display Wi Fi and Bluetooth Via a submenu you can regulate the consumption by modifying the screen brightness and disabling the...

Page 37: ...Provides detailed information about the Tablet comprising mainly of legal information mobile network information model serial number and the versions installed of Android OS operating system TAP UI B...

Page 38: ...traightaway the web site desired Click the icon at top right to enter the configuration menu Note The functionalities available are those used by the main browsers available on the market the only dif...

Page 39: ...red 3 Fill in all the parts required for the contact by scrolling downwards other fields may be visible at the bottom At the end touch the Save key Import contacts 1 From the Contacts environment sele...

Page 40: ...unt 2 Enter the user data and password and press the Next button 3 Select the type of server for the incoming post e g POP3 and at the end select the Save button Make sure to enter correctly the names...

Page 41: ...sword then click Next 2 Select the type of incoming server such as Exchange Microsoft Exchange 3 Select Synchronise at the bottom and tick the Contacts and Calendars options 4 Save the settings and wa...

Page 42: ...d allows images to be imported from your Picasa account Note the user must already be the owner of a Picasa account or create one using the Picasa web site The application allows you to display the pi...

Page 43: ...e displayed and you can perform certain operations on the images Slideshow to view the pictures in the album as a slideshow Rotate rotate the picture to the left or to the right Delete delete the curr...

Page 44: ...play and play a musical album The multimedia contents can be viewed according to Artists Albums Songs and Playlists The players provide the standard functions play stop pause forwards backwards plays...

Page 45: ...u can view the videos stored on the internal memory or on the external memory card Select the film video you want to view The players provide the standard functions play stop and pause Using a cursor...

Page 46: ...ects recording mode film displays a miniature of the photo taken or video recorded Simply clicking the miniature you can play the video or view the photo press this key to take the photo or to start r...

Page 47: ...ystem checks if any updates are available on the server If the result is positive a message appears in the notifications icon see top right 2 Select a new update is available 3 Follow the instructions...

Page 48: ...available You can proceed with updating by pressing the Download update button or otherwise cancel the operation pressing the Cancel key 3 Press Download update to proceed with the update 4 Follow the...

Page 49: ...ped with a mini USB port which allows you to connect the unit to a PC See the figure here for details Connect the USB cable to the computer and to the Tablet as shown in the figure When a prompt appea...

Page 50: ...the Tablet PC The speakers are automatically disactivated when external headphones are connected to the Tablet PC As an excessively high volume can damage hearing turn down the volume before connecti...

Page 51: ...OLIPAD 49 INSERTING THE SIM CARD The unit is furnished with a SIM Card slot To insert the card orient it as shown in the following figure SIM...

Page 52: ...micro SD card and any other external device that could be blocking it from working Q3 What do I do if water penetrates inside the Tablet PC A 1 DO NOT turn on the Tablet PC 2 Disconnect the cable fro...

Page 53: ...t be read A Re insert the device and restart the unit Q8 How do I deal with problems related to Bluetooth pairing A Make sure that the timeout has not elapsed and that the Tablet and remote device are...

Page 54: ...isplay Size 10 1 Display Technology TFT LCD Resolution 1024X600 WSVGA Touch Panel Type Multiple point Capacitive Touch Panel Camera Resolution 1 3M Pixels Bluetooth Bluetooth Specification V2 1 EDR Vi...

Page 55: ...mer Battery Ports WLAN Wireless Card 802 11 b g n Audio Port Headphone Speaker and Built in Microphone port USB Port USB X1 USB 2 0 Mini USB X1 Micro SD Card Port Supports Micro SD Card Physical Featu...

Page 56: ...4 USB Port USB 2 0 5 Dock Connector WARNING 1 Make sure that the Power Adapter complies with the ratings indicated Only use manufacturer approved attachments and accessories 2 The USB device can only...

Page 57: ...ert the docking port on the Tablet into the docking connector as shown here Connecting an HDMI Device Connect one end of the HDMI cable to the HDMI port on the Docking station and the other end to the...

Page 58: ...on Technical Specifications Power Supply Input 100 240V AC or 200 240V AC 50 60Hz 1A Output 12V DC 2A Ports USB Port USB A X2 USB 2 0 Audio Port Headphone Port HDMI Port HDMI1 2 Output Audio Physical...

Page 59: ......

Page 60: ......

Reviews: