background image

8-2

Fax Settings > Default fax settings

Default fax settings

This section explains the fax settings in the system menu.
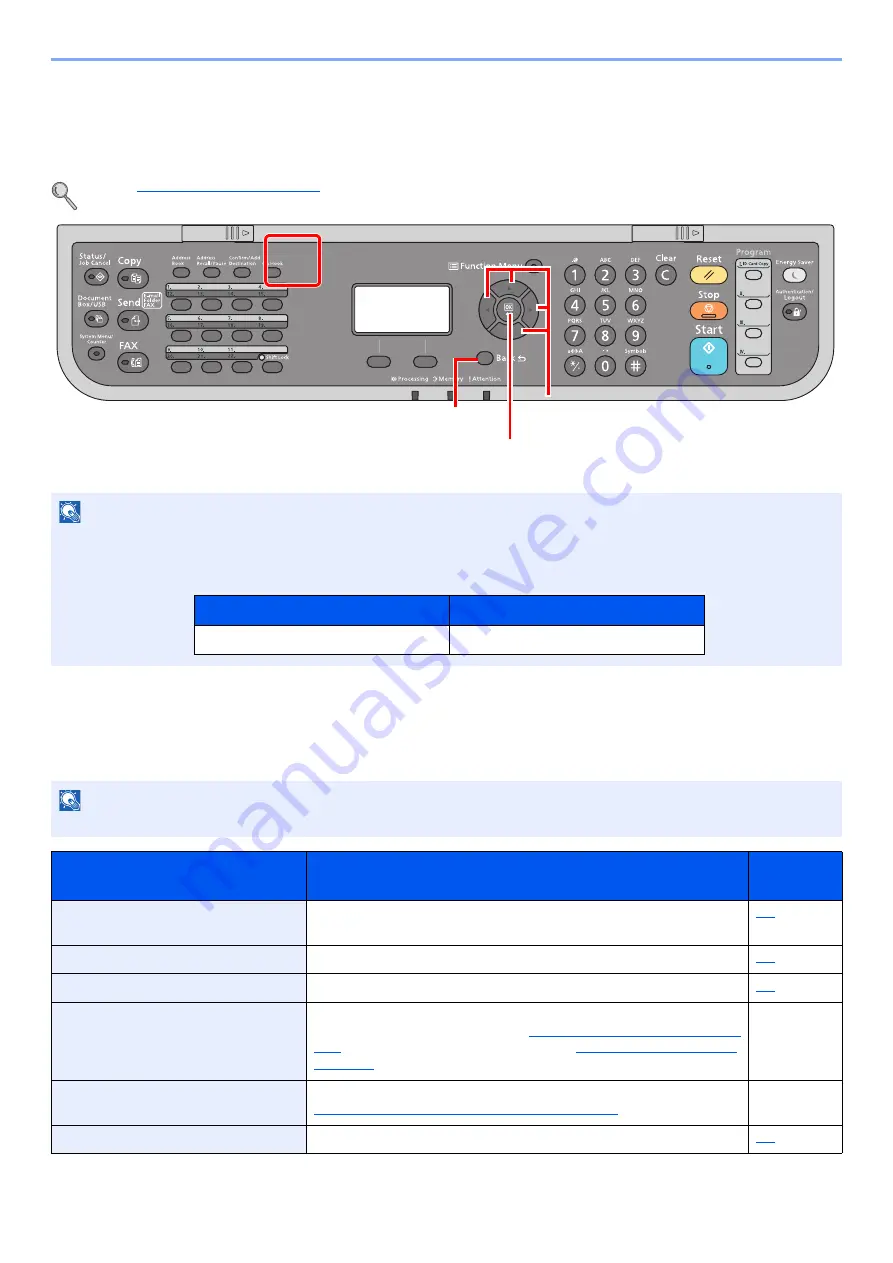
Press the [

System Menu/Counter

] key to show the settings on the message display. Then, select from the settings 

displayed.

Refer to 

Operation Method on page 2-5

.

Refer to 

System Menu Settings

 on the following page and configure as needed.

System Menu Settings

Settings for the fax function in the system menu are shown below.

NOTE

If the login user name entry screen appears during operations, log in by referring to the machine's 

Operation Guide

 for 

Administrator User Name and Password.

The factory default login user name and login password are set as shown below.

NOTE

For settings other than fax settings, refer to the 

Operation Guide

 for the machine.

Item

Description

Reference 

Page

Report

Print reports to check the machine settings and status. Default settings 
for printing the result reports can also be configured.

8-3

Common Settings

Configures overall machine operation.

8-3

FAX

Configures settings for fax functions. 

8-4

Document Box

Configures settings related to the Sub Address Box and Polling Box. For 
details on Sub Address Box, refer to 

Sub Address Box Function on page 

5-12

, and for details on Polling Box, refer to 

Polling Communication on 

page 5-22

.

Edit Destination

Configures Address Book settings. For details on Address Book, refer to 

Adding a Destination (Address Book) on page 2-14

.

Adjust/Maint.

Adjust printing quality and conduct machine maintenance.

8-8

Cancels the current menu setting to 
return to the menu one level higher.

2

Confirms the selected setting.

Selects the item displayed or 
changes the numeric value.

1

Login User Name

Login Password

4000

4000

Summary of Contents for d-COPIA 4004MF

Page 1: ...FAX FAX BEDIENUNGSANLEITUNG H H A GU A DE USO DE FAX MANUEL D UTILISATION DU FAX FAX HASZN LATI TMUTAT GEBRUIKERSHANDLEIDING VOOR DE FAX PODR CZNIK OBS UGI FAKSU GUIA DE USO DE FAX GHID DE OPERARE A F...

Page 2: ...he following actions which could compromise the conformity attested to above as well as the characteristics of the product incorrect electrical power supply incorrect installation incorrect or imprope...

Page 3: ...y 2 8 TTI Transmit Terminal Identification 2 8 Local FAX Name 2 8 Local FAX Number 2 9 Local FAX ID 2 10 FAX Dialing Mode 2 10 ECM TX 2 11 TX Start Speed 2 12 PBX Setting Europe only 2 13 Registering...

Page 4: ...nnection of communication 4 4 Manual Reception 4 5 Flow of reception 4 5 Fax reception functions 4 6 Fax reception settings 4 7 FAX Media Type 4 7 RX Date Time 4 8 2 in 1 Printing 4 8 Batch Print 4 8...

Page 5: ...es from PC 6 1 Flow of Sending Faxes from PC 6 2 Flow of Network FAX Receiving 6 2 Setup 6 3 Installing the FAX Driver 6 3 Uninstalling the FAX Driver 6 5 Basic Transmission 6 6 Configuring the Driver...

Page 6: ...e 8 18 Account Management 8 20 9 Troubleshooting 9 1 Indicators During Sending Receiving Operation 9 2 Responding to an Attention Indicator Flashes 9 2 Precautions When Turning Power OFF 9 3 Messages...

Page 7: ...s Explains the general methods for receiving faxes and reception functions 5 Using Convenient Fax Functions Explains convenient fax functions such as storing received faxes in boxes in the memory forw...

Page 8: ...o select On Regular Indicates a message or setting displayed on the computer screen You can select from the Print size menu Click to move from the current page to the previously displayed page This is...

Page 9: ...used in procedures for operating the machine Operation panel keys that are pressed are outlined in red Procedures consisting of a sequence of operation panel or touch panel operations are numbered as...

Page 10: ...Notice 1 2 Safety Conventions in This Guide 1 2 About this Operation Guide 1 3 Legal Notice 1 3 FCC PART 68 REQUIREMENTS 1 3 IMPORTANT SAFETY INSTRUCTIONS 1 4 IMPORTANTES MESURES DE SECURITE 1 4 Decla...

Page 11: ...oints of attention are indicated inside the symbol General warning Warning of high temperature The symbol indicates that the related section includes information on prohibited actions Specifics of the...

Page 12: ...lar jack that is also compliant See installation instructions for details 4 The REN is used to determine the number of devices that may be connected to a telephone line Excessive RENs on a telephone l...

Page 13: ...will be transmitted see Local FAX Name on page 2 8 Local FAX Number on page 2 9 TTI Transmit Terminal Identification on page 2 8 and Setting Date and Time on page 2 6 IMPORTANT SAFETY INSTRUCTIONS Whe...

Page 14: ...ogy equipment EN55022 Class B Limits for harmonic currents emissions for equipment input current 16A per phase EN61000 3 2 Limitation of voltage fluctuations and flicker in low voltage supply systems...

Page 15: ...emark of Xerox Corporation IBM and IBM PC AT are trademarks of International Business Machines Corporation All other company and product names in this Operation Guide are trademarks or registered trad...

Page 16: ...Date and Time 2 6 Local FAX Information Entry 2 8 TTI Transmit Terminal Identification 2 8 Local FAX Name 2 8 Local FAX Number 2 9 FAX Dialing Mode 2 10 ECM TX 2 11 TX Start Speed 2 12 PBX Setting Eu...

Page 17: ...e s Operation Guide 1 Operation panel Perform the fax operation with this panel 2 Power switch Set this switch to the ON side when performing the fax or copier operation 3 LINE connector Connect the m...

Page 18: ...jammed in the Document Processor 6 Original Width Guides Adjust these guides according to the original width 7 Original Table Stack the sheet originals on this table 8 Original Eject Table Read origin...

Page 19: ...red numbers and characters Returns settings to their default states Cancels or pauses the job in progress Starts copying and scanning operations and processing for setting operations Displays the func...

Page 20: ...able arrow keys are shown on the screen displayed When the or key is pressed the selection moves line by line When the or key is pressed the selection moves in units of one page When OK is displayed p...

Page 21: ...Set the time difference 1 Press the or key to select Time Zone 2 Press the OK key 3 Press the or key to set the time zone 4 Press the OK key 3 Set the date and time 1 Press the or key to select Date T...

Page 22: ...key to select the display format of year month and date 4 Press the OK key 5 Set the Summer Time 1 Press the or key to select Summer Time 2 Press the OK key 3 Press the or key to select On or Off 4 Pr...

Page 23: ...ey 4 Press the or key to select Transmission 5 Press the OK key 6 Press the or key to select TTI 7 Press the OK key 2 Set the TTI 1 Press the or key to select the desired location for printing the inf...

Page 24: ...e or key to select FAX 3 Press the OK key 4 Press the or key to select Transmission 5 Press the OK key 6 Press the or key to select Local FAX Number 7 Press the OK key 2 Local FAX Number Entry 1 Use t...

Page 25: ...3 Press the OK key 4 Press the or key to select Transmission 5 Press the OK key 6 Press the or key to select Local FAX ID 7 Press the OK key 2 Local FAX ID Number Entry 1 Press the or key or numeric k...

Page 26: ...machines that have ECM mode check for errors as they communicate preventing distortion of the image due to noise on the line and other conditions 1 Display the screen 1 Press the System Menu Counter...

Page 27: ...y the screen 1 Press the System Menu Counter key 2 Press the or key to select FAX 3 Press the OK key 4 Press the or key to select Transmission 5 Press the OK key 6 Press the or key to select TX Start...

Page 28: ...PBX it is recommended to contact the company that installed the PBX system to request connection of this machine Note that correct operation cannot be guaranteed in environment in which this machine i...

Page 29: ...200 contact addresses can be registered Contact name fax number sub address communication encryption transmission start speed and ECM can be registered for each destination 1 Display the screen 1 Pres...

Page 30: ...select Contact Name 2 Press Edit 3 Enter the destination name Up to 32 characters can be entered For details on character entry refer to Character Entry Method on page 10 2 4 Press the OK key 5 Enter...

Page 31: ...gs for and then press Edit or Change 3 Press the OK key Item Description Sub Address Set this to transmit using a Sub Address For details refer to Sub Address Transmission on page 5 20 Encrypted TX Th...

Page 32: ...r the address number Press the key or numeric keys to enter a particular Address Number 001 250 Address Number is an ID for a destination 4 Press the OK key 8 Register the destination 1 Press the OK k...

Page 33: ...ess the System Menu Counter key 2 Press the or key to select Edit Destination 3 Press the OK key 4 Press the or key to select Address Book 5 Press the OK key 2 Adds a new destination 1 Press Menu 2 Pr...

Page 34: ...page 10 2 4 Press the OK key 5 Select the members destinations 1 Press the or key to select Group Member 2 Press Edit 3 Press Menu 4 Press the or key to select Add Member 5 Press the OK key 6 Press th...

Page 35: ...key to select Delete 4 Press the OK key 5 Press Yes in confirmation screen The selected member is deleted from Group Member 7 Confirm the registered member 1 Press the Back key when all members are r...

Page 36: ...ete the destinations contacts you added to the Address Book 1 Display the screen 1 Press the System Menu Counter key 2 Press the or key to select Edit Destination 3 Press the OK key 4 Press the or key...

Page 37: ...y to select the member you want to delete 6 Press Menu 7 Press the or key to select Delete 8 Press the OK key 9 Press Yes in confirmation screen To delete a destination contacts or group 1 Press the o...

Page 38: ...s Book You can sort the list in the order of index or address numbers of the destinations 1 Display the screen 1 Press the System Menu Counter key 2 Press the or key to select Edit Destination 3 Press...

Page 39: ...d the Address Book appears Go to the next step When the registered One Touch Key number is selected the Key Edit screen appears Select another key number or edit or delete the One Touch Key Refer to E...

Page 40: ...he Key Edit screen appears Go to the next step When an unregistered One Touch Key number is selected the Address Book appears The One Touch Key can be registered by selecting the destination from the...

Page 41: ...nd address of the destination selected are displayed 5 Press the OK key Completed is displayed and the destination is changed When deleting registration contents 1 Press the or key to select Delete 2...

Page 42: ...nting has been Enabled 3 16 Logging in when Job Accounting has been Enabled 3 18 Fax transmission functions 3 19 Quiet Mode 3 20 Original Size 3 20 Original Image 3 20 FAX Resolution 3 21 Orig Orienta...

Page 43: ...ommunication starts Memory transmission is selected by default Direct transmission The destination is dialed and communication starts before the original is scanned For details refer to FAX Direct Tra...

Page 44: ...n the document processor are scanned and stored in the memory the receiving system is dialed When originals are placed on the glass surface After originals placed on the glass surface are scanned and...

Page 45: ...continuous scan is set you can continue with scanning of a next original after an original on the glass surface has been stored in memory Every time one page is scanned you perform an operation to all...

Page 46: ...the OK key Information of the destination is displayed 5 Press the OK key when checking of the destination is complete 4 Change the FAX number 1 Press the or key to select the destination that you wan...

Page 47: ...the or key to select Delete 4 Press the OK key 5 Press Yes in confirmation screen Completed is displayed and the destination is removed 7 Exit the operation 1 Press Exit NOTE When editing information...

Page 48: ...job you want to check 2 Press Menu 3 Press the or key to select Detail 4 Press the OK key 5 Press the or key to check the details of the job 6 Press the OK key when checking of the job is complete Pri...

Page 49: ...progress If a fax job to multiple destinations broadcast transmission is in progress the priority override job will be sent when transmission to the current destination is completed When the priority...

Page 50: ...remain in the document processor take them out from the original eject table Cancelling Memory Transmission during communication 1 Press the Stop key 2 Display the cancel send job list screen 1 Press...

Page 51: ...ation 4 Press Line Off When communication is disconnected transmission stops To cancel direct transmission refer to Cancelling Direct Transmission on page 3 24 To cancel a delayed transmission or send...

Page 52: ...the same receiving system press the Address Recall Pause key and you can call the receiving system you dialed on the destination list 1 Press the FAX key 2 Press the Address Recall Pause key The prev...

Page 53: ...ng dialing For example when dialing the receiving system on an external line you can use this method to insert a pause before resuming dialing after you dial a specific number 3 Select transmission se...

Page 54: ...TE Normally the default setting should be used ECM ECM is a communication mode specified by the ITU T International Telecommunication Union that retransmits data when an error occurs Fax machines that...

Page 55: ...aracter Entry Method on page 10 2 5 Press the OK key The searched destination is displayed 4 Press the OK key To send to multiple destinations repeat steps 2 to 4 You can send to as many as 100 destin...

Page 56: ...FAX key 2 Press the One touch key where the destination is registered When selecting One Touch Key numbers 12 to 22 the One touch Key needs to be pressed after switching on the Shift Lock indicator b...

Page 57: ...10 2 2 Enter the login password 1 Press the key to select the column for entering a login password and press the OK key NOTE Press Menu and select Login Type and then it is possible to select the aut...

Page 58: ...ic keys and press the OK key For details on character entry refer to Character Entry Method on page 10 2 3 Press Login Logout To logout from the machine press the Authentication Logout key to return t...

Page 59: ...ss the OK key Logout To logout from the machine press the Authentication Logout key to return to the login user name login password entry screen NOTE If you entered a wrong character press the Clear k...

Page 60: ...ls page 3 21 Orig Orientation Select the orientation of the original document top edge to scan correct direction page 3 21 Continuous Scan Scan a large number of originals separately and then produce...

Page 61: ...uide Item Description A4 R A5 R A6 R B5 R B6 R Folio 216 340 mm Letter R Legal Statement R Executive Oficio II 16K R ISO B5 Envelope 10 Envelope 9 Envelope 6 Envelope Monarch Envelope DL Envelope C5 H...

Page 62: ...tion 200x100dpi Norm Normal when sending originals with standard size characters Typical character size 10 5 point example Resolution Resolution 200x200dpi Fine Fine when sending originals with relati...

Page 63: ...from between 00 00 and 23 59 in one minute increments IMPORTANT If the current time displayed on the message display is not correct you cannot send originals correctly at the preset time In this case...

Page 64: ...s after the connection is made with the receiving system allowing you to verify that each page of the fax has been properly sent Setting for Direct transmission Description On Starts direct transmissi...

Page 65: ...o read both sides of the original NOTE In some cases transmission may take place even if the Stop key Item Description Off Does not print reports On Prints reports Error Only Prints reports only if an...

Page 66: ...he On hook key 4 Dial the destination Use the numeric keys to enter the number of the receiving system 5 Press the Start key When you hear the fax tone the telephone line has connected to the receivin...

Page 67: ...ain 4 Enter the fax number to be added to the chain number When entering the FAX number using the numeric keys continue entering the FAX number When entering the FAX number from Address Book select th...

Page 68: ...step 2 6 Press the Start key The transmission will start NOTE When On is selected in Check New Dest a confirmation screen is displayed for the entered FAX number Re enter the same FAX number and press...

Page 69: ...Selection Cassette 1 Zoom Auto Combine 2 in 1 Original Size Statement Inch models A5 Metric models Continuous Scan On ID Card Copy is printed on the Program I key Registering Programs Use the procedu...

Page 70: ...Recalling Program Press the one of the Program I to Program IV keys where the settings you want to recall are registered The current settings of various functions are replaced with the registered sett...

Page 71: ...Press Yes in the confirmation screen to register the changed program Deleting Program You can delete program 1 Display the screen Press the one of the Program I to Program IV keys to delete and hold...

Page 72: ...Checking and Changing the Reception Method 4 2 Flow of reception 4 3 Canceling reception Disconnection of communication 4 4 Manual Reception 4 5 Flow of reception 4 5 Fax reception functions 4 6 Fax r...

Page 73: ...hods Auto Normal Auto FAX TEL Refer to 5 36 Auto TAD Refer to 5 38 Manual Refer to 4 5 Auto DRD Refer to 5 40 Checking and Changing the Reception Method 1 Display the screen 1 Press the System Menu Co...

Page 74: ...printing starts The number of pages that can be stored depends on the pages As a general guideline about 256 or more A4 size pages at normal resolution can be stored During memory reception FAX Recept...

Page 75: ...ng the telephone line during communication use the following procedure 1 Display the screen 1 Press the System Menu Counter key 2 Disconnection of communication 1 Press the or key to select FAX 2 Pres...

Page 76: ...he machine receives a call When the machine receives a call it rings 2 Press the On Hook key Press On Hook to establish the connection 3 Press Manual RX Reception will start NOTE To use Manual Recepti...

Page 77: ...nformation RX Date Time page 4 8 Receive a two page fax on one page 2 in 1 Printing page 4 8 Print received faxes together as a batch Batch Print page 4 8 Encrypt an original to send it safely Encrypt...

Page 78: ...g Paper Set 5 Press the OK key 6 Press the or key to select the cassette Cassette 1 to 5 Set or MP Tray Set you want to use for fax reception 7 Press the OK key 2 Selecting the paper size 1 Press the...

Page 79: ...r A5 size original this function prints 2 pages of the original at a time on one Letter or A4 size sheet of paper If you specify 2 in 1 reception and duplex printing at the same time 2 in 1 reception...

Page 80: ...ed multiple pages of data are the same width they can be printed out on both sides of paper having the same width as the data For more information about configuring settings refer to Default fax setti...

Page 81: ...14 Printing Originals from a Sub Address Box 5 15 Deleting Originals after Printing from a Sub Address Box 5 17 Deleting Originals from a Sub Address Box 5 18 Printing a Sub Address Box List 5 19 Sub...

Page 82: ...r for e mail transmission or folder SMB or FTP transmission Setting Forwarding Use the procedure below to set forwarding 1 Display the screen 1 Press the System Menu Counter key 2 Press the or key to...

Page 83: ...elect Reception 5 Press the OK key 6 Press the or key to select Forward Settings 7 Press the OK key 8 Press the or key to select Forward Dest 9 Press the OK key 2 Registering Forwarding Destination Se...

Page 84: ...and then press the OK key The Search screen is displayed When checking details of the destination press the or key to select the destination to check details press Menu and then or key select Details...

Page 85: ...ion 5 Press the OK key 6 Press the or key to select Forward Settings 7 Press the OK key 8 Press the or key to select Forward Dest 9 Press the OK key 10Press the or key to select Confirmation 11Press t...

Page 86: ...Forwarding Time Setting Register the start time and end time between which forwarding is enabled 1 Display the screen 1 Press the System Menu Counter key 2 Press the or key to select FAX 3 Press the O...

Page 87: ...to move the cursor right and left 2 Press the OK key 3 Press the or key to set the hours and minutes of the end time Press the and key to move the cursor right and left 4 Press the OK key File Format...

Page 88: ...mation you can select either Sender Name or Sender 1 Display the screen 1 Press the System Menu Counter key 2 Press the or key to select FAX 3 Press the OK key 4 Press the or key to select Reception 5...

Page 89: ...the or key to select FTP Encrypted TX 9 Press the OK key 2 Configure the function 1 Press the or key to select On or Off 2 Press the OK key File Name Entry You can set the file name to be created whe...

Page 90: ...dd Info Sender or Sender Add Info for sender name information addition File name sample Example doc00352720100826181723 pdf doc file name 6 digit job number year month day hour minute second file form...

Page 91: ...ttings Accessing Embedded Web Server RX 1 Display Embedded Web Server RX 1Open the web browser 2 In the Address or Location bar enter the machine s IP address as the URL e g 192 168 48 21 Theweb page...

Page 92: ...es These include confidential delivery sending originals to an original delivery box set up in the receiving system and polling communication reception of documents from a source machine that is contr...

Page 93: ...ox 1 Press Menu 2 Press the or key to select Add Box 3 Press the OK key 4 Enter the sub address using the numeric keys 5 Press the OK key 6 Enter the box name using the numeric keys Up to 32 character...

Page 94: ...sub address Box Name Enter a box name consisting of up to 32 characters For details on character entry refer to Character Entry Method on page 10 2 User Name 1 2 1 Displayed when the user login admini...

Page 95: ...K key 5 Press Yes in confirmation screen Printing Originals from a Sub Address Box To print the originals that have been sent to a Sub Address Box use the following operation 1 Display the screen 1 Pr...

Page 96: ...e Function Menu key then change the settings and press the OK key For each of the functions refer to the machine s Operation Guide 4 Press the Start key Printing starts NOTE If a Sub Address Box is pr...

Page 97: ...ss the OK key 3 Press the or key to select the document you want to check 4 Press Menu 5 Press the or key to select Detail Edit 6 Press the OK key The details of the selected document are displayed De...

Page 98: ...y 3 Configure the function 1 Press the or key to select Print 2 Press the OK key 3 Press the Function Menu key 4 Press the or key to select Del after Print 5 Press the OK key 6 Press the or key to sel...

Page 99: ...the or key to select Delete 2 Press the OK key 3 Press Yes in confirmation screen Printing a Sub Address Box List You can print the Sub Address Box list in which the list of Box No s and Box names of...

Page 100: ...ss Box Function on page 5 12 1 Press the FAX key 2 Place the originals 3 Specifying destination Enter the fax number of the receiving system using the numeric keys NOTE To use sub address transmission...

Page 101: ...art key NOTE You can use up to 20 digits including the numbers from 0 to 9 space and characters to enter a sub address NOTE You can use up to 20 digits including the numbers from 0 to 9 space and char...

Page 102: ...ission with the same originals as many times as you wish Refer to Deleting Originals After Polling Transmission on page 5 22 Deleting Originals After Polling Transmission Originals intended for pollin...

Page 103: ...ss the System Menu Counter key 2 Press the or key to select Document Box 3 Press the OK key 4 Press the or key to select Polling Box 5 Press the OK key 2 Configure the function 1 Press the or key to s...

Page 104: ...iginal saved in the polling box For information on how to delete the saved original refer to Deleting Originals in a Polling Box on page 5 28 Item Description Quiet Mode Lower print and scan speed for...

Page 105: ...destination for which encrypted communication is registered encrypted communication is disabled for polling reception To use polling reception you must first ensure that the sending machine is set up...

Page 106: ...Press the FAX key 2 Turn on polling reception To turn on polling reception refer to Polling Reception on page 5 25 3 Select the destination and entering the sub address For the procedure for setting a...

Page 107: ...mark will be placed on the right of the selected file Select the checkmarked file and press Select again to cancel the selection 3 Press the OK key 3 Print 1 Press the or key to select Print 2 Press t...

Page 108: ...want to check 2 Press Menu 3 Press the or key to select Detail Edit 4 Press the OK key The details of the selected document are displayed Deleting Originals in a Polling Box Use this procedure to dele...

Page 109: ...y to select the document you want to delete 2 Press Select A checkmark will be placed on the right of the selected file Select the checkmarked file and press Select again to cancel the selection 3 Pre...

Page 110: ...herefore the sending system and the receiving system need to have the same encryption key and 2 digit key No registered in advance Description of settings at sending and receiving systems IMPORTANT In...

Page 111: ...u Counter key 2 Press the or key to select FAX 3 Press the OK key 4 Press the or key to select TX RX Common 5 Press the OK key 6 Press the or key to select Encryption Key 7 Press the OK key 2 Configur...

Page 112: ...n key you want to delete 2 Press Menu 3 Press the or key to select Delete 4 Press the OK key 5 Press Yes in confirmation screen Using the Encrypted Transmission When sending originals by encrypted tra...

Page 113: ...hat you decided upon with the recipient For the procedure for registering an encryption key refer to Registering an Encryption Key on page 5 31 7 Press the OK key 8 Select whether or not to use an enc...

Page 114: ...ster the encryption key ahead of time Register the encryption key that you decided upon with the sender For the procedure for registering an encryption key refer to Registering an Encryption Key on pa...

Page 115: ...2 Press the OK key 3 Press the or key to select On 4 Press the OK key 5 Press the or key to select the encryption key number that you used to register the encryption key that you decided upon with the...

Page 116: ...et number of times the other party is required to pay phone line charges even if the receiving system does not respond FAX FAX Telephone When the other party has sent originals with automatic send Whe...

Page 117: ...nd Lift the handset of the telephone within 30 seconds 2 Talk to the other party When the call is from a fax The machine starts receiving fax originals NOTE At the end of the conversation you can also...

Page 118: ...nto operation and the machine switches to fax reception NOTE In order to use FAX Answering Machine Auto Switch Reception it is necessary to connect an answering machine equipped telephone set commerci...

Page 119: ...answering machine plays a response message and starts recording the other party s message When the call is from a fax The machine starts receiving fax originals NOTE If you lift the handset while the...

Page 120: ...n the telephone will ring NOTE Using DRD Reception to receive a telephone call is only possible if a separately purchased telephone is connected to the machine DRD reception is only possible if you su...

Page 121: ...ception will start automatically Manual Send When you want to talk to the person at the receiving system or the receiving system needs to switch to fax use this method to send originals 1 Place the or...

Page 122: ...ected to the machine makes a ringing tone 2 Lift the handset Lift the handset of the telephone 3 Check if the telephone line has connected to the fax of the sending system If the destination is a fax...

Page 123: ...phone set use the following operation NOTE When using a telephone set that can send tone signals use the telephone to start the reception of originals with the remote switch function Refer to Remote S...

Page 124: ...phone 2 Press the remote switch dial number 2 digits When you hear the fax tone from the handset enter the two digit remote switch dial number using the dial button on the telephone set The telephone...

Page 125: ...k FAX Receiving 6 2 Setup 6 3 Installing the FAX Driver 6 3 Uninstalling the FAX Driver 6 5 Basic Transmission 6 6 Configuring the Driver Default Settings 6 9 Default Settings Dialog Box 6 10 Changing...

Page 126: ...rom PC Sending faxes from PC is performed in the following sequence Flow of Network FAX Receiving Network FAX receiving is performed in the following sequence Prepare a document using a PC connected t...

Page 127: ...ry disc 2 Display the screen Click View License Agreement and read the License Agreement Click Accept NOTE Use the memory transmission function to forward the received fax to the PC or forward it as a...

Page 128: ...age appears restart the computer by following the screen prompts This completes the FAX driver installation procedure NOTE The machine cannot be detected unless it is on If the computer fails to detec...

Page 129: ...eck in the check box of the driver to be deleted and click Uninstall 3 Finish uninstalling If a system restart message appears restart the computer by following the screen prompts This completes the s...

Page 130: ...int dialog box for the application that you are using will appear 2 Select settings in the Print dialog box 1 Select the product name of the machine to be used in the printer name list 2 Set the print...

Page 131: ...return to the Print dialog box for the application Click OK The Transmit Settings dialog box will appear 4 Select settings in the Transmit Settings dialog box You can specify settings such as a transm...

Page 132: ...on fax number in the Address Setting tab 2 Click Add to Destination List The destination information will appear in the address list To send to multiple destinations repeat this operation 3 To use the...

Page 133: ...The Printing Preferences screen will open 2 Select settings The following settings can be specified Item Description Page Size Select the size of the document being transmitted from the drop down list...

Page 134: ...X Delayed Transmit checkbox Check the checkbox in order to activate the time fields to the right of the checkbox whenever you want to set the time that your documents will be transmitted The desired t...

Page 135: ...t the documents at the fax machine same time as you send them by fax Display confirm dialog checkbox You can check the checkbox to display the destination confirmation screen and check the destination...

Page 136: ...ID as desired Use Specific Account ID Enter the Account ID Transmission will be performed using the entered Account ID Prompt for Account ID A screen for entering the Account ID will be displayed whe...

Page 137: ...x opens Maximum number of characters that can be entered 64 half width characters Characters that can be entered 0 to 9 space a space or CANNOT be entered as the first character NOTE There are three t...

Page 138: ...stination List click on the Delete all button NOTE To use the Windows Address Book select Windows Address Book For adding an Address Book for Network FAX data file fdt select the Refer to Address Book...

Page 139: ...ings dialog box 2 Enter the sub address and password as it is registered in the destination fax A maximum of 20 characters can be entered Entry is allowed for the characters 0 to 9 and spaces a space...

Page 140: ...r Cover Pages original templates can be created and used To attach and transmit a Cover Page place a check in the check box for Attach Cover Page in the Cover Page tab 4 Optional Settings The settings...

Page 141: ...can be selected from a template The Cover Page contains such destination information and sender information as that shown below Sample of English template 01 No Item 1 Recipient Name 2 Destination Co...

Page 142: ...the destination and go to Step 5 2 Enter the fax number In the Address Setting tab enter the destination fax number and click on the Option Settings button 3 Enter the recipient information When fini...

Page 143: ...4 Sender Information Tab on page 6 12 Item Description FAX Number The fax number cannot be changed Company A maximum of 32 characters can be entered Department A maximum of 32 characters can be enter...

Page 144: ...NOTE If the Cover Page is registered in the Default Settings then the action of selecting the Cover Page for each transmission can be omitted Refer to Cover Page Registration Default Settings on page...

Page 145: ...utton 8 Edit the Message 1 Click on the Edit Message button 2 Enter the message to be added to the Cover Page and click on the OK button 9 Transmit Click on the Send button to begin the transmission I...

Page 146: ...ettings The registration method is as follows 1 Open the Default Settings dialog box Perform the Default Settings Dialog Box procedure shown on page 6 10 open the Default Settings dialog box 2 Attach...

Page 147: ...the drop down menu at the top of the dialog box or click on the or button The template display magnification can also be changed within the range of 25 to 250 from the drop down menu 2 Click on the C...

Page 148: ...riginal Cover Page template 1 Open the Default Settings dialog box Perform the Default Settings Dialog Box procedure shown on page 6 10 open the Default Settings dialog box 2 Edit the Cover Page templ...

Page 149: ...ll not fit in the field box and some of the characters could be cut off When positioning the field box make it large enough and adjust the font point size so that the inserted information will fit in...

Page 150: ...and can now be selected Sender Company Sender Company Sender information company name Department Sender Department Sender information department name Name Sender Name Sender information sender name FA...

Page 151: ...on Once a fax transmission starts being processed a Transmission Control icon will be displayed in the Windows Task Bar 1 Double click on that icon to access the Transmission Control window which indi...

Page 152: ...7 4 Printing Administrative Reports Result Rpt Set 7 5 Send Result Reports Send Result 7 5 Report for Job Canceled before Sending 7 6 Recipient Format 7 6 FAX RX Result Reports 7 7 Activity Report Out...

Page 153: ...ored FAX jobs only Any time 7 4 Send result report Receipt result report Report printing Send Result FAX RX Result Latest send or receipt result Automatic printout after every sending or receiving ope...

Page 154: ...he or key to select Print Job Log to check reception results or Send Job Log to check transmission results 3 Press the OK key 4 Press the or key to select the job you want to check 5 Press Detail 2 Ch...

Page 155: ...lect FAX Job Log 3 Press the OK key 4 Press the or key to select Outgoing FAX Log to check transmission results or Incoming FAX Log to check reception results 5 Press the OK key 2 Check the status Pre...

Page 156: ...or key to select Result Rpt Set 5 Press the OK key 6 Press the or key to select Send Result 7 Press the OK key 8 Press the or key to select FAX 9 Press the OK key 2 Configure the function 1 Press the...

Page 157: ...OK key 6 Press the or key to select Send Result 7 Press the OK key 8 Press the or key to select CancelBeforeSend 9 Press the OK key 2 Configure the function 1 Press the or key to select On or Off 2 P...

Page 158: ...Set 5 Press the OK key 6 Press the or key to select Send Result 7 Press the OK key 8 Press the or key to select Dest Info 9 Press the OK key 2 Configure the function 1 Press the or key to select Dest...

Page 159: ...7 Press the OK key 2 Configure the function 1 Press the or key to select Off not to print On to print or Error SubAddress 2 Press the OK key 3 Press the or key to select Report Print 4 Press the OK ke...

Page 160: ...ctivity Reports The latest 50 sent or received fax data are printed as a report 1 Display the screen 1 Press the Status Job Cancel key 2 Press the or key to select FAX Job Log 3 Press the OK key 2 Pri...

Page 161: ...y to select Report 3 Press the OK key 4 Press the or key to select Admin Rpt Set 5 Press the OK key 6 Press the or key to select Outgoing FAX Rpt or Incoming FAX Rpt 7 Press the OK key 2 Configure the...

Page 162: ...me fax line setting etc You can print it out as necessary 1 Display the screen 1 Press the System Menu Counter key 2 Press the or key to select Report 3 Press the OK key 4 Press the or key to select R...

Page 163: ...6 Press the or key to select FAX RX Result 7 Press the OK key 2 Configure the function 1 Press the or key to select On or Error SubAddress 2 Press the OK key 3 Press the or key to select E mail 4 Pre...

Page 164: ...elect the destination 4 Press the OK key Enter the E mail address 1 Press the or key to select Address Entry 2 Press the OK key 3 Enter the desired e mail address using the numeric keys For details on...

Page 165: ...details of 2 Press the OK key 3 Press the or key to select Detail 4 Press the OK key 5 The details of the destination are displayed When the check has been completed press the OK key 3 Change a destin...

Page 166: ...7 15 Managing Jobs Confirmation Screen of Destinations 4 Press Next When you have finished checking all destinations press Next 5 Press the Start key Start sending...

Page 167: ...8 3 FAX 8 4 Adjust Maint 8 8 Transmission Restriction 8 9 Registering Permit FAX No 8 10 Changing and Deleting Permit FAX No 8 11 Registering Reject FAX No 8 11 Changing and Deleting Reject FAX No 8 1...

Page 168: ...Guide for the machine Item Description Reference Page Report Print reports to check the machine settings and status Default settings for printing the result reports can also be configured 8 3 Common...

Page 169: ...port Outgoing FAX Rpt and Incoming FAX Rpt on page 7 9 Incoming FAX Rpt An activity report is printed out automatically after every 50 faxes received Value Off On Refer to Activity Report Outgoing FAX...

Page 170: ...200x200dpi Fine 200x400dpi S Fin 400x400dpi U Fin Con scan FAX Set the continuous scan defaults Value Off On Item Description Encryption Key This is used to register an encryption key for encrypted co...

Page 171: ...fer to FAX Dialing Mode on page 2 10 NOTE This setting does not appear in some regions Retry Times The number of retry times can be changed automatically ECM TX Set whether ECM TX is performed ECM is...

Page 172: ...ttern 1 Normal Ring Pattern 2 Double Ring Pattern 3 Short Short Long Pattern 4 Short Long Short DRD reception mode is available for some countries For details refer to DRD Reception Available for inch...

Page 173: ...tortion of the image due to noise on the line and other conditions Value On Off NOTE When there is a large amount of noise on the line communication may take slightly longer than when Off is selected...

Page 174: ...line For the number contact the PBX administrator Value 0 9 00 99 Remote Diag Set If a problem arises with this machine and you contact our service representative this feature enables our Service Cent...

Page 175: ...estrictions Register Permitted FAX numbers or Permitted ID numbers 1 Refer to Registering Permit FAX No on page 8 10 or Registering Permit ID No on page 8 13 Send restriction settings are specified in...

Page 176: ...epeat Steps 2 1 to 2 5 Prerequisites Reception Rejection Requirements Reception Rejection Register Reject FAX numbers 1 Refer to Registering Reject FAX No on page 8 11 Reception restriction settings a...

Page 177: ...the or key to select the Permit FAX No to be changed 2 Press the OK key 3 Use the numeric keys to reenter the Permit FAX number 4 Press the OK key Deleting 1 Press the or key to select the Permit FAX...

Page 178: ...select Add FAX Number 3 Press the OK key 4 Use the numeric keys to enter a Reject FAX number 5 Press the OK key 3 To register another Reject FAX No repeat Steps 2 1 to 2 5 Changing and Deleting Reject...

Page 179: ...te 4 Press the OK key 5 Press Yes in confirmation screen Registering Permit ID No 1 Display the screen 1 Press the System Menu Counter key 2 Press the or key to select FAX 3 Press the OK key 4 Press t...

Page 180: ...e or key to select TX RX Restrict 5 Press the OK key 6 Press the or key to select Permit ID List 7 Press the OK key 2 Change Delete Changing 1 Press the or key to select the Permit ID No to be changed...

Page 181: ...reen 1 Press the System Menu Counter key 2 Press the or key to select FAX 3 Press the OK key 4 Press the or key to select TX RX Restrict 5 Press the OK key 6 Press the or key to select TX Restriction...

Page 182: ...to select FAX 3 Press the OK key 4 Press the or key to select TX RX Restrict 5 Press the OK key 6 Press the or key to select RX Restriction 7 Press the OK key 2 Configure the function 1 Press the or...

Page 183: ...ress the or key to select UnknownNumber RX 7 Press the OK key 2 Configure the function 1 Press the or key to select Prohibit or Permit 2 Press the OK key To receive faxes from the unknown number selec...

Page 184: ...t and left 2 Press the OK key 3 Press the or key to set the hours and minutes of the end time Press the and key to move the cursor right and left IMPORTANT When Unusable Time is set in addition to fax...

Page 185: ...Use the numeric keys to enter Unlock Code 0000 to 9999 2 Press the OK key NOTE If the same time is set as the start time and end time you cannot use all day NOTE To use the machine temporarily during...

Page 186: ...ion Sub address transmission Encrypted transmission Manual send when dialed from this machine to the receiving system Polling reception Sending Faxes from PC Item Description Registration of User Regi...

Page 187: ...ialed from this machine to the receiving system Polling reception Sending Faxes from PC When job accounting has been enabled batch transmission function works only for communication to be performed fo...

Page 188: ...hapter explains the following topics Indicators During Sending Receiving Operation 9 2 Responding to an Attention Indicator Flashes 9 2 Precautions When Turning Power OFF 9 3 Messages 9 4 Error Code L...

Page 189: ...lit up or blinks check the message display If error information is not indicated on the message display check the following Symptom Checkpoints Corrective Actions Reference Page Cannot send fax Is th...

Page 190: ...e a fax when the power switch is turned off Make sure that the Processing indicator and the Memory indicator are off before turning off the power switch NOTE When the Processing indicator or Memory in...

Page 191: ...Error occurred Turn the power switch off and on System error has occurred Turn the main power switch OFF and then ON FAX memory is full FAX cannot be performed any more due to insufficient memory The...

Page 192: ...nsufficient memory The job is canceled Press the OK key Scheduled sending jobs exceeded The number of jobs has exceeded the limit set for delayed transmission Press the OK key The job is canceled Wait...

Page 193: ...d again If you still have trouble reduce TX Start Speed and send again NOTE If the communication error occurs frequently change the default setting of TX Start Speed in System Menu U00900 U00910 Page...

Page 194: ...d model and transmission restrictions were found set by the other party during polling reception Communication was interrupted because the password was incorrect 2 The other party s machine is an our...

Page 195: ...opped because there is no more free space in the memory of this machine Create free space by outputting the data stored in the memory or cancel the reception to the Sub Address Box U14100 Transmission...

Page 196: ...restriction activated Cancel the RX restriction 8 9 Cannot perform memory reception Is free space available in the memory Receive after the memory has free space or create free space in the memory Can...

Page 197: ...etin board communication Does the other party s fax machine have the same sort of sub address bulletin board communication function If the other party s fax machine does not have the same sort of sub...

Page 198: ...This chapter explains the following topics Character Entry Method 10 2 Specifications 10 6 Menu Map 10 8 Received FAX Sizes and Paper Priority Metric Model 10 12 Received FAX Sizes and Paper Priority...

Page 199: ...to enter characters and symbols 4 Arrow keys Press to select the entry position or select a character from the character list 5 OK key Press to finalize entry and return to the screen before the entr...

Page 200: ...key changes the character in the order from left to right _ 1 Repeats from the first character on the left 1 During number entry a b c A B C 2 Repeats from the first character on the left 2 During num...

Page 201: ...ts from the first character on the left 9 During number entry _ space 0 Repeats from the first character on the left 0 During number entry Press to change the character in the cursor position between...

Page 202: ...he key Displays the symbol list 5 Press the or key to move the cursor and select 6 Press the OK key is entered 7 Press the 3 key four times D is entered 8 Press the key Account Name Text ABC R Account...

Page 203: ...al Size Max width 8 1 2 216 mm Max length 14 356 mm Automatic Document Feed Max 75 sheets with document processor Resolution Scan 200 100 dpi Normal 8 dot mm 3 85 line mm 200 200 dpi Fine 8 dot mm 7 7...

Page 204: ...ansmit Based on settings in the FAX Driver setting is possible to any 1 minute increment within the subsequent 24 hour period Transmit and Print Fax transmission and print out at the machine is availa...

Page 205: ...uch Key page 3 15 Program page 3 28 Quiet Mode page 3 20 Original Size page 3 20 Original Image page 3 20 FAX Resolution page 3 21 Orig Orientation page 3 21 Continuous Scan page 3 21 File Name Entry...

Page 206: ...er to the machine s Operation Guide USB Memory refer to the machine s Operation Guide SSD refer to the machine s Operation Guide USB Keyboard refer to the machine s Operation Guide ConnectionStatus re...

Page 207: ...ine s Operation Guide Error Handling refer to the machine s Operation Guide Date Setting page 2 6 Timer Setting Unusable Time page 8 18 Function Default FAX Resolution page 8 4 Con scan FAX page 8 4 L...

Page 208: ...RX Date Time page 8 6 2 in 1 Printing page 8 6 Batch Print page 8 6 Remote SW Dial page 8 6 Encryption RX page 5 30 Duplex Printing page 8 6 ECM RX page 8 6 RX Start Speed page 8 6 TX RX Restrict page...

Page 209: ...tion of the paper feed Paper Size 1 A5 3 3 Paper orientation is different from the received document The image is printed after being rotated 90 automatically A4 Folio A4 Folio 2 A4 Folio A4 A4 4 4 Im...

Page 210: ...gal Long Originals Originals longer than Legal in the direction of the paper feed Paper Size 1 Statement 3 3 Paper orientation is different from the received document The image is printed after being...

Page 211: ...mail Notice Job Finish Notice 3 21 Reporting FAX Receipt Result 7 12 Encryption Communication 5 30 Changing and Deleting Registration Contents of Encryption Key 5 31 Encryption Box No 5 30 Encryption...

Page 212: ...28 Q Quiet Mode 3 20 R Received FAX Sizes and Paper Priority 10 12 10 13 Receiving Mode 4 2 8 6 Redial 3 11 Changing Retry Times 8 5 Reject Fax No Change Deletion 8 12 Registration 8 11 Remote Diagnos...

Page 213: ...mit FAX No 8 10 Permit ID No 8 13 Prerequisites 8 9 Reception Rejection Requirements 8 10 Reception Restriction Setting 8 16 Reject FAX No 8 11 Send Restriction Setting 8 15 Unknown Number Reception 8...

Page 214: ......

Page 215: ...you need and the instructions for handling the waste correctly for example location and times of the waste collection centres etc b When you purchase a new device of ours give a used device similar t...

Page 216: ...y EMC Part 3 Limits Section 3 Limitation of voltage fluctuations and flicker in low voltage supply systems for equipment with rated current up to and including 16A EN 55024 2010 Electromagnetic Compat...

Reviews: