Olivetti d-Copia 16W Operation Manual Download Page 54

50

TROUBLESHOOTING

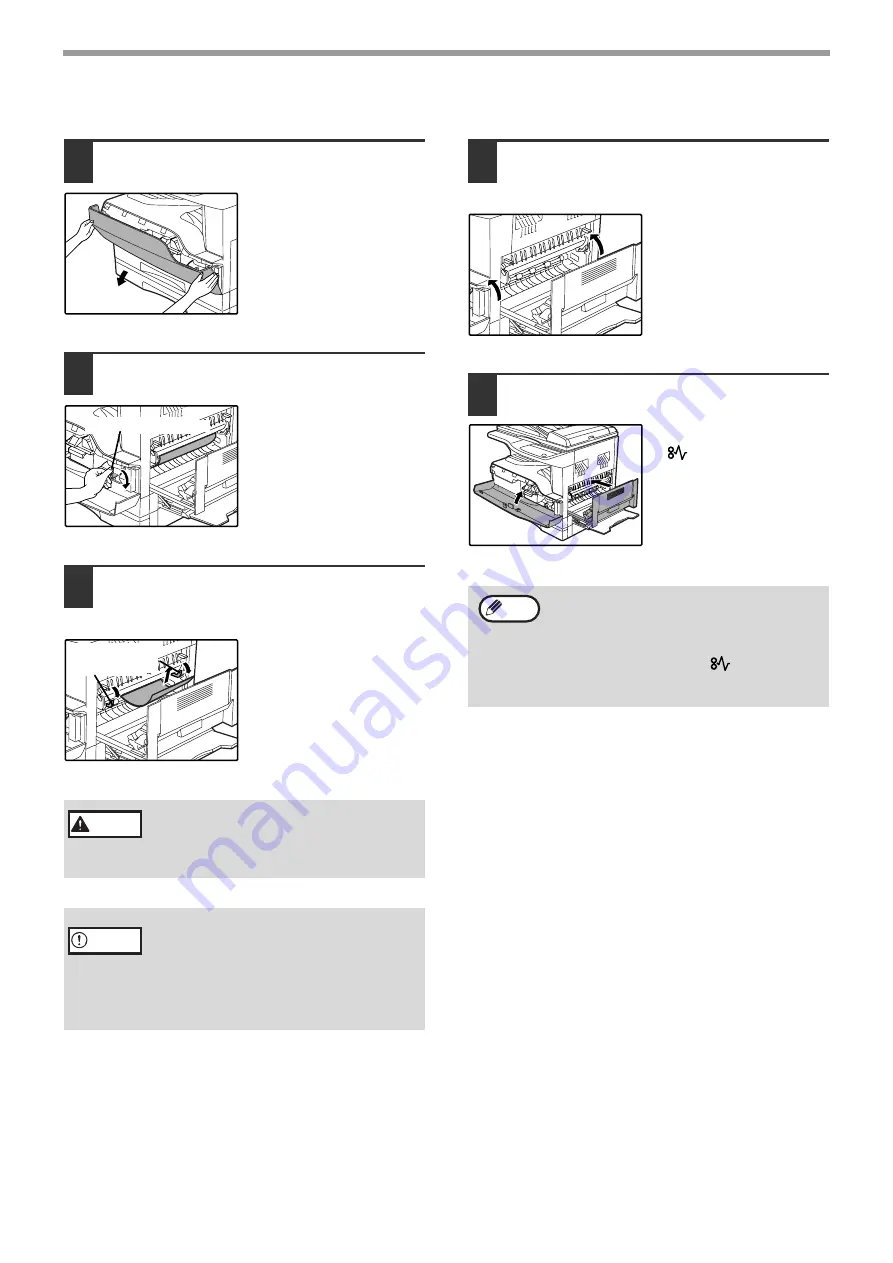
B. Misfeed in the fusing area

1

Push gently on both ends of the front 
cover.

2

Turn the roller rotating knob in the 
direction of the arrow.

3

Carefully remove the misfed paper. 
Lower the fusing unit release levers to 
allow easier removal.

Be careful not to tear the 
misfed paper during 
removal.

4

Lift the fusing unit release levers, to 
return them to their operating 
positions.

5

Close the front cover and side cover.

The misfeed indicator 
(

) will go out.

The fusing unit is hot. Do not touch 
the fusing unit when removing misfed 
paper. Doing so may cause a burn or 
injury.

• Do not touch the photoconductive drum 

(green portion) when removing the misfed 
paper. Doing so may damage the drum and 
cause smudges on copies.

• Be careful about unfixed toner on the 

misfed paper not to soil your hands or 
clothes.

Roller rotating knob

Fusing unit 
release lever

Warning

Caution

• When closing the front cover, gently hold 

both ends.

• When closing the side cover, press on the 

handle.

• If the misfeed indicator (

) does not stop 

blinking, check for torn pieces of paper in 
the machine.

Note

Summary of Contents for d-Copia 16W

Page 1: ...ERATION MANUAL BEFORE USING THE MACHINE COPY FUNCTIONS PRINTER FUNCTIONS USER SETTINGS TROUBLESHOOTING ROUTINE MAINTENANCE PERIPHERAL DEVICES AND SUPPLIES APPENDIX 8 18 29 31 40 55 58 60 Page d Copia...

Page 2: ...product certifies that the product satisfies the basic quality requirements Your attention is drawn to the following actions which could compromise the conformity attested to above as well as the cha...

Page 3: ...opier is so marked please read I for ON and for OFF Caution For a complete electrical disconnection pull out the main plug The socket outlet shall be installed near the equipment and shall be easily a...

Page 4: ...you need and the instructions for handling the waste correctly for example location and times of the waste collection centres etc b When you purchase a new device of ours give a used device similar t...

Page 5: ...Y FUNCTIONS NORMAL COPYING 18 O MAKING A COPY DARKER OR LIGHTER 21 O SELECTING THE TRAY 21 O SETTING THE NUMBER OF COPIES 22 REDUCTION ENLARGEMENT ZOOM 22 O AUTOMATIC RATIO SELECTION 22 O MANUAL RATIO...

Page 6: ...ING THE TONER CARTRIDGE 54 6 ROUTINE MAINTENANCE CHECKING THE TOTAL OUTPUT COUNT AND TONER LEVEL 55 O CHECKING THE TOTAL OUTPUT COUNT 55 O CHECKING THE TONER LEVEL 56 ROUTINE MAINTENANCE 56 O CLEANING...

Page 7: ...achine with a dust cover cloth or plastic film while the power is on Doing so may prevent heat dissipation damaging the machine Use of controls or adjustments or performance of procedures other than t...

Page 8: ...nowledgements Microsoft Windows operating system is a trademark or copyright of Microsoft Corporation in the U S A and other countries Windows 95 Windows 98 Windows Me Windows NT 4 0 Windows 2000 and...

Page 9: ...machine to be used with your computer and procedures for establishing initial printer settings THE MEANING OF R IN ORIGINAL AND PAPER SIZE INDICATIONS An R appearing at the end of an original or pape...

Page 10: ...B series size indications are shown on the operation panel of this manual inch series indications are displayed on the inch series machines Model d Copia 20W d Copia 16W Appearance With optional SPF i...

Page 11: ...25 to 400 in 1 increments When the SPF is being used the zoom copy ratio range is 50 to 200 Continuous copying of up to 999 copies is possible Can be changed to a maximum of 99 copies in the user pro...

Page 12: ...t cover Open to remove paper misfeeds and perform machine maintenance p 50 p 54 Paper trays Each tray holds 250 sheets of paper p 14 Side cover Open to remove paper misfeeds and perform machine mainte...

Page 13: ...machine here after copying Toner cartridge lock release lever To replace the toner cartridge pull out the toner cartridge while pushing on this lever Toner cartridge Contains toner p 54 Roller rotatin...

Page 14: ...er replacement required indicator p 46 Paper required indicator p 46 Misfeed indicator p 46 POWER SAVE indicator Lights up when the machine is in a power save mode p 12 Display Shows the set number of...

Page 15: ...set reduction enlargement copy ratios p 23 Numeric keys Use to select the desired copy quantity or to make user program entries p 22 To display the total number of pages output by the machine hold the...

Page 16: ...power is on All lights except the POWER SAVE indicator and ON LINE indicator go off To resume normal operation press the START key Normal operation also resumes automatically when a print job is rece...

Page 17: ...IVETTI recommended media must be used feed each sheet one at a time using the bypass tray do not attempt continuous copying or printing O There are many varieties of special paper available on the mar...

Page 18: ...aper is not fanned double feeds or misfeeds may occur 4 Load paper into the tray 5 Gently push the paper tray into the machine Do not load paper higher than the line on the tray up to 250 sheets Make...

Page 19: ...e that they are straight and flat and do not have loosely glued construction flaps not the closure flap Special papers except OLIVETTI recommended transparency film labels and envelopes must be fed on...

Page 20: ...d paper feed location indicator will blink and the corresponding paper size which is currently set indicator will light steadily All other indicators will go out 2 If the machine has two paper trays u...

Page 21: ...eft guide in the slot at the left front of the paper tray 5 Press the START key and then the PAPER SIZE ENTER key To change the paper size setting of another tray repeat steps 2 to 5 after pressing th...

Page 22: ...e same size of paper as the original Load paper of the required size in a tray or select the bypass tray with the TRAY SELECT key and copy from the bypass tray The bypass tray must be manually selecte...

Page 23: ...ss tray with the TRAY SELECT key and copy from the bypass tray The bypass tray must be manually selected To copy on paper of a different size than the original select the paper with the TRAY SELECT ke...

Page 24: ...over SPF is not completely closed shadows may appear on the copy or it may be fuzzy Straighten originals with folds or creases well before placing Originals that can be used in the SPF Originals that...

Page 25: ...cator lights 2 Press the Light key or Dark key to adjust the exposure For a darker image press the Dark key For a lighter image press the Light key If exposure level 2 or 4 is selected the two indicat...

Page 26: ...ey AUTOMATIC RATIO SELECTION below Reduction and enlargement ratios can be selected manually with the PRESET RATIO selector keys and or the ZOOM keys MANUAL RATIO SELECTION p 23 Separate settings can...

Page 27: ...ss the Zoom keys or to increase or decrease the ratio To decrease or increase the zoom ratio rapidly hold down the Zoom keys or When a Zoom key or is pressed the ZOOM indicator will light up and the z...

Page 28: ...lue for the vertical direction will appear in the display 4 Use the PRESET RATIO selector keys and Zoom keys to change the copy ratio in the vertical direction Press the PRESET RATIO selector keys to...

Page 29: ...and the display will change to the number of copies display 8 Set the number of copies and other copy settings and then press the START key The copy will be delivered to the paper output tray To veri...

Page 30: ...original A 3 Turn the copy of original A over and without changing the position of the edge closest to you insert it in the bypass tray Insert the paper all the way in 4 Select the bypass tray with th...

Page 31: ...f copies and other copy settings and press the START key The copy will be delivered to the paper output tray Original Copy A4 8 1 2 x 11 paper is used for dual page copying When used in combination wi...

Page 32: ...the START key 4 When the copy job is finished press the INTERRUPT key and remove the original s The INTERRUPT indicator will go off indicating that the interrupt function is no longer operating The co...

Page 33: ...and select print settings in the printer driver For information on the settings in the printer driver see the Online Manual the Software Setup Guide or the printer driver help file 5 Click the Print b...

Page 34: ...ey to begin printing When Use close paper size is enabled Printing will take place using a size of paper that is close to the size of the print image OPERATION IN COPY AND PRINTER MODES Some operation...

Page 35: ...automatic exposure level in the SPF place the original in the SPF p 19 Make sure that the SPF indicator is lit 2 Press the AUTO TEXT PHOTO key to select PHOTO 3 Hold down the AUTO TEXT PHOTO key unti...

Page 36: ...T 2 Hold down the AUTO TEXT PHOTO key until the PHOTO indicator blinks The exposure level indicators show the current setting 3 To enable toner save mode press the Light key To enable high image quali...

Page 37: ...even less power than preheat mode if the set duration of time elapses without the machine being used when the power is on All lights except the POWER SAVE indicator and ON LINE indicator go off To res...

Page 38: ...anged by the accidental pressing of a key 27 Audible signals volume 1 Short beep 2 Long beep 3 OFF This sets the volume of beep signals p 35 28 Base setting beep signal 0 OFF 1 ON Use this to sound a...

Page 39: ...e machine sounds three different types of beep signals a key entry beep that sounds when a valid key is pressed an invalid key beep that sounds when an invalid key is pressed and a base setting beep t...

Page 40: ...d Explanation 10 Auditing mode 0 OFF 1 ON Use to enable or disable Auditing mode Auditing mode is initially disabled 11 Account number entry None Use to set up account numbers Up to 20 accounts can be...

Page 41: ...ly selected setting code blinks on the right side of the display 4 Enter the desired setting code for the program as explained in the detailed procedures on the following pages For the setting codes s...

Page 42: ...o be deleted with the Copy ratio display key and then press the START key Number of copies per account program No 14 Use this procedure to display the copy count of each account If no account numbers...

Page 43: ...s in the display 1 Enter your 3 digit account number with the numeric keys When you enter your account number 0 appears in the display to indicate that copying is possible 2 Follow the appropriate ste...

Page 44: ...e paper or the image disappears in places 41 Paper misfeed 42 Original size not selected automatically 42 Copies are smudged or dirty 43 White or black lines appear on copies 43 Paper size for a paper...

Page 45: ...ect AUTO with the AUTO TEXT PHOTO key or press the Light key and Dark key to manually select an appropriate exposure If the copy is too light or too dark even though AUTO was selected with the AUTO TE...

Page 46: ...r Fan the paper well before loading it 14 The guides on the bypass tray do not match the width of the paper Adjust the guides to match the width of the paper 15 The bypass tray extension is not pulled...

Page 47: ...ng copy runs are automatically paused every 250 copies Remove the copies in the paper output tray and press the START key to resume copying 22 The tray is out of paper Load paper 14 The POWER SAVE ind...

Page 48: ...e if the printer driver is installed 1 Click the start button click Control Panel click Printers and Other Hardware and then click Printers and Faxes On Windows 95 98 Me NT 4 0 2000 click the Start bu...

Page 49: ...emove the paper from the tray and store it in a dark place in a bag to prevent moisture absorption You did not set sufficient margins in the paper settings of your application The top and bottom of th...

Page 50: ...cator Blinking A blinking PAPER SIZE indicator means that the size of paper loaded in the tray is different from the paper size setting for the tray Change the paper size setting To clear the display...

Page 51: ...ment feeder tray Close the feeding roller cover Section B Open the SPF and rotate the two release rollers in the direction of the arrow to feed the original out Close the SPF and then remove the origi...

Page 52: ...pening and closing the feeding roller cover or the right side cover 3 Return the originals indicated by the minus number in the display to the document feeder tray and press the START key Copying will...

Page 53: ...eed indicator will go out If paper is misfed here go to B Misfeed in the fusing area If paper is misfed here go to A Misfeed in the paper feed area If the misfed paper is visible here go to C Misfeed...

Page 54: ...misfeed indicator will go out The fusing unit is hot Do not touch the fusing unit when removing misfed paper Doing so may cause a burn or injury Do not touch the photoconductive drum green portion wh...

Page 55: ...t area remove the paper by pulling it into the paper output area Be careful not to tear the misfed paper during removal 3 Close the side cover The misfeed indicator will go out The fusing unit is hot...

Page 56: ...oval 2 Open and close the side cover The misfeed indicator will go out 3 Close the upper paper tray Push the upper paper tray in completely Make sure that there is no misfed paper in the tray before p...

Page 57: ...he misfed paper is not seen in step 2 lift and pull out the lower paper tray and remove the misfed paper Be careful not to tear the misfed paper during removal 4 Close the lower side cover The misfeed...

Page 58: ...the toner cartridge Discard the shutter 6 Close the front cover The toner cartridge replacement required indicator will go out When the toner cartridge replacement indicator lights up little toner re...

Page 59: ...and the total output count can be counted up to 999 999 Total output count Hold down the 0 key The total output count appears sequentially in two parts while you hold down the 0 key Example Total numb...

Page 60: ...TENANCE CLEANING THE DOCUMENT GLASS AND SPF DOCUMENT COVER If the document glass SPF underside of the document cover or the scanner for originals coming from the SPF the long narrow glass surface on t...

Page 61: ...he side cover 3 Lift and pull out the upper paper tray 4 Take the charger cleaner out by holding the tab 5 Set the charger cleaner onto the transfer charger and gently slide the cleaner in the directi...

Page 62: ...ithout prior notice The performance specification figures indicated are nominal values of production units There may be some deviations from these values in individual units Note d Copia 20W d Copia 1...

Page 63: ...at is clean and dry at a stable temperature not exposed to direct sunlight Store paper in the wrapper and lying flat Paper stored out of the wrapper or in packages standing on end may curl or get damp...

Page 64: ...copies subtractive counter First copy time Approx 7 2 sec Warm up time Approx 45 sec Copy ratio Variable 25 to 400 in 1 increments total 376 steps Fixed preset 50 70 81 86 100 115 122 141 200 50 64 77...

Page 65: ...dby 18 dB A Noise emission measurement in accordance with ISO 7779 Emission concentration measured according to RAL UZ62 Edition Jan 2002 Ozone 0 02 mg m3 or less Dust 0 075 mg m3 or less Styrene 0 07...

Page 66: ...nother or over a network 3 Termination This license is effective until terminated You may terminate this License at any time by destroying the Software and related documentation and all copies thereof...

Page 67: ...ORAL OR WRITTEN INFORMATION OR ADVICE GIVEN BY OLIVETTI OR A OLIVETTI AUTHORIZED REPRESENTATIVE SHALL CREATE A WARRANTY OR IN ANY WAY INCREASE THE SCOPE OF THIS WARRANTY SHOULD THE SOFTWARE PROVE DEFE...

Page 68: ...R key 11 18 19 Conventions used in this manual 5 Copy functions 18 Copy ratio display key 10 23 38 56 D Dark indicator 10 21 Dark key 10 21 31 32 Developer replacement required indicator 10 46 Differe...

Page 69: ...e toner cartridge 54 Right side cover 9 47 Roller rotating knob 9 49 50 Routine maintenance 55 56 S Selecting the tray 21 Setting the number of copies 22 Side cover 8 Side cover handle 8 Single pass f...

Page 70: ...s Auditing mode Copies how to make 39 Setting procedures 37 Settings 36 Automatic exposure level setting 31 High image quality mode 32 Toner save mode 32 User programs 33 Setting procedures 35 Setting...

Page 71: ......

Page 72: ...LUOKAN 1 LASERLAITE KLASS 1 LASERAPPARAT CLASS 1 LASER PRODUCT LASER KLASSE 1...

Page 73: ...en 89 336 EEG en 73 23 EEG gewijzigd door 93 68 EEG Dette udstyr overholder kravene i direktiv nr 89 336 EEC og 73 23 EEC med till g nr 93 68 EEC Quest apparecchio conforme ai requisiti delle direttiv...

Page 74: ...CODE 508904...

Reviews: