background image

HVBTR1600USERMANUAL


HVBTR1600_User_Manual_V1


HVBTR1600PVRREADYSETTOPBOX

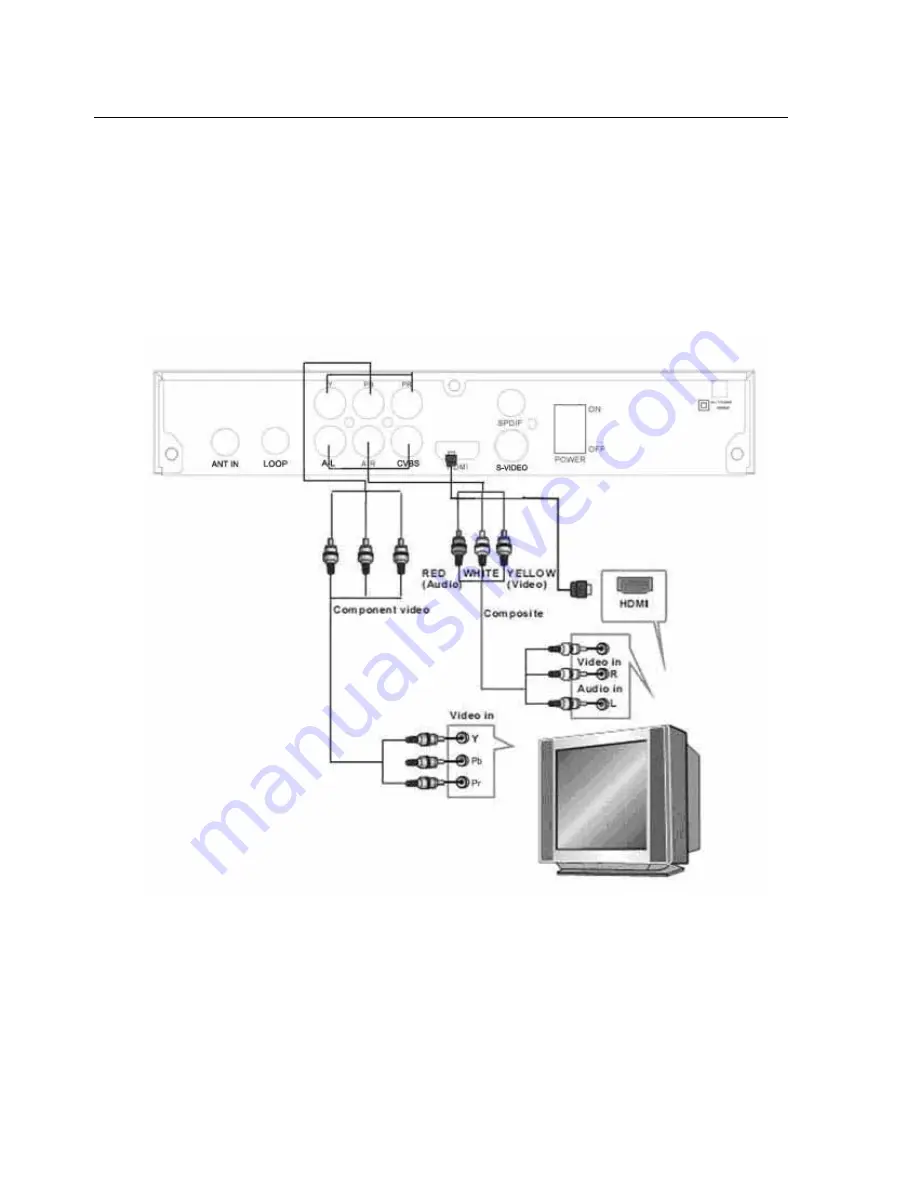
CONNECTINGTOATELEVISION 

1.TurntheTVoffatthemainpoweroutlet.
2.ChecktheMainPowerswitchontherearofHVBTR1600HDSetTopBox  andthemainsoutlet
thatitistobeconnectedtooisintheoffposition.
3.ConnecttheAntennacabletotheANTInsocket.


4.

ChoosethebestconnectionmethodforyourEquipment.Thereare3possibleconnection

methodsandthetypethatyouchoosemaydependonthetypeofTVthatyouhave.


-8- 

Summary of Contents for HVBTR-1600

Page 1: ...HVBTR 1600 PVR READY SET TOP BOX High Definition...

Page 2: ...HVBTR 1600 USER MANUAL HVBTR 1600_User_Manual_V1 High Definition Terrestrial Receiver HVBTR 1600USER MANUAL User Manual Please read carefully before use...

Page 3: ...nd Audio Connection 9 Connection Method A Composite 9 Connection Method B Component Y Pb Pr 9 Connection Method C HDMI 9 Audio Connection 9 FIRST TIME INSTALLATION 11 OSD Language 11 Channel Search 11...

Page 4: ...ie Configuration 20 PVR Configuration 21 Record Device 21 Format 2 MULITMEDIA PLAYBACK 22 Music 22 Photo 22 Movie 23 Time Shifting Live TV 23 PVR Function 24 PVR Function 24 Instant Recording 24 EPG R...

Page 5: ...ched cables are secure and will not cause the device to fall There are no user serviceable parts in this product Un authorized attempts to dismantle or repair this product will void product warranty a...

Page 6: ...INSTALLING THE BATTERIES 1 Remove the battery compartment cover on the rear of the Remote control 2 Insert the 2 X AAA batteries supplied in to the compartment being sure to match the polarities with...

Page 7: ...WHP HVFULSWLRQ STANDBY USB CH VOL Rear Panel Item Description Item Description 1 Antenna IN socket 6 HDMI Output 2 RF Loop Out Socket 7 S VIDEO 3 Y PB PR Video Output 8 SPDIF Coaxial Digital Audio Out...

Page 8: ...PG 13 PREV 14 NEXT 15 RED BUTTON 16 GREEN BUTTON 17 TV RADIO 18 AUDIO 19 REC 20 HDMI 21 RETURN EXIT 22 RIGHT LEFT 23 OK 24 PAGE DOWN 25 TEXT 26 SUBTITLE 27 FWD 28 REW 29 BLUE BUTTON 30 YELLOW BUTTON N...

Page 9: ...USER MANUAL HVBTR 1600_User_Manual_V1 REMOTE CONTROL Key Function NOTE Some features on this remote rely on the feature being available during the broadcast Button may not respond if function is not a...

Page 10: ...k the Main Power switch on the rear of HVBTR 1600 HD Set Top Box and the mains out let that it is to be connected too is in the off position 3 Connect the Antenna cable to the ANT In socket 4 Choose t...

Page 11: ...e Audio cables are also required to carry the audio signal to the TV Best Used for Any TV that has matching inputs that does not have HDMI inputs Connection Method C HDMI Quality Best HDMI High Defini...

Page 12: ..._V1 CONNECTING HVBTR 1600 PVR READY SET TOP BOX Once the HVBTR 1600 HD Set Top Box has been connected to the power and to the TV After all connections have been made properly switch on TV and make sur...

Page 13: ...On Screen Display Language press the LEFT RIGHT buttons on the remote until the desired Language is displayed and then press the DOWN button Channel Search Press OK to start the Channel Search The Sy...

Page 14: ...return to TV viewing If you know the channel number it can be entered in directly using the Numeric Key Pad Volume Control Press the LEFT VOL button to decrease the volume Press the Right VOL button t...

Page 15: ...utton Use the UP and Down Button to move the channel and then press the OK button to confirm SKIP GREEN channel to be skipped Press GREEN again to stop the SKIP LOCK YELLOW Use the UP and DOWN buttons...

Page 16: ...ough the EPG and highlight the program you are interested in The program information is displayed on the right hand side of the window If more than one page of information is available use the YELLOW...

Page 17: ...Set the Start Time Use the LEFT RIGHT Button to select the field to change and use the numeric pad to enter the new number END TIME Set the End Time Use the LEFT RIGHT Button to select the field to ch...

Page 18: ...the way the display is shown on you TV from the Aspect Ratio to the resolution SELECTION OPTIONS DESCRIPTION ASPECT RATIO 16 9 Wide Screen Auto 4 3 Full 4 3 Pan Scan Set the best aspect ratio that su...

Page 19: ...hannels for both DVB T and DVB R This option will delete all previously scanned channels A full scan can take several minutes Manual Search This option allows you to scan for new channels without dele...

Page 20: ...s you to set a time that the STB will automatically turn off from the last input from the remote control Options are 1 to 12 hours set in 1 hour increments OFF disables the Sleep feature Option OSD La...

Page 21: ...sword for programs that are outside the restrictions Set Password Set or change the password for locked programs Input Old Password Use the Numeric keypad to enter the old password Input New Password...

Page 22: ...er of seconds to display each picture SLIDE SHOW 1 to 59 Random Set the Slide Show Effect to a fixed type or set to Random effects ASPECT RATIO KEEP DISCARD Use KEEP to show picture in original format...

Page 23: ...room to record a program Format The Format feature allows you to format the attached USB device Use the LEFT or RIGHT button to select the File System used to format the device z FAT32 z NTFS With th...

Page 24: ...he music files to play Select the file and press the OK button to begin playback Track and playback information are displayed on the right hand window Photo In the Photo Menu use the LEFT and RIGHT bu...

Page 25: ...pause and rewind live TV Press the GREEN button on the remote to enter Timeshift mode it will take about 5 seconds when you are ready press the PLAY PAUSE button again to resume viewing In Time Shift...

Page 26: ...the screen Press INFO key to get further more information of instant recording Press STOP key to stop instant recording EPG Recording If you will never loss any preference program base on fully EPG re...

Page 27: ...Or use MENU button to go to Program screen use VOL_ or VOL to move to USB screen use CH button to highlight Multimedia then press OK to enter Multimedia In Multimedia screen use VOL_ or VOL to select...

Page 28: ...resolution programs Connecting a 2 5 Notebook Hard Drive It is recommended that 2 5 drives are connected to HVBTR 1600 HD Set Top Box using a powered USB hub Only single partition drive should be use...

Page 29: ...ections Check connections of audio Cables Sound is muted Un Mute audio No picture but sound OK No or incorrect Video cable connections Make sure cables are connected correctly Remote Control is not re...

Page 30: ...z MAXIMUM POWER CONSUMPTION 8W STANDBY POWER CONSUMPTION 1W PLEASE NOTE THIS DEVICE SUPPORTS CERTAIN MPEG 4 H 264 VIDEO PLAYBACKS DUE TO VARIOUS COMPRESSION METHOD IT MAY NOT BE COMPATIBLE WITH SOME M...

Page 31: ...stylised logo are registered with the Australian IP office OLIN is a registered trademark of Westwell Australia Pty Ltd All rights reserved All promotional materials offered for reference only Actual...

Reviews: