background image

21

EN

Section 4 


Enjoying the Playback Mode

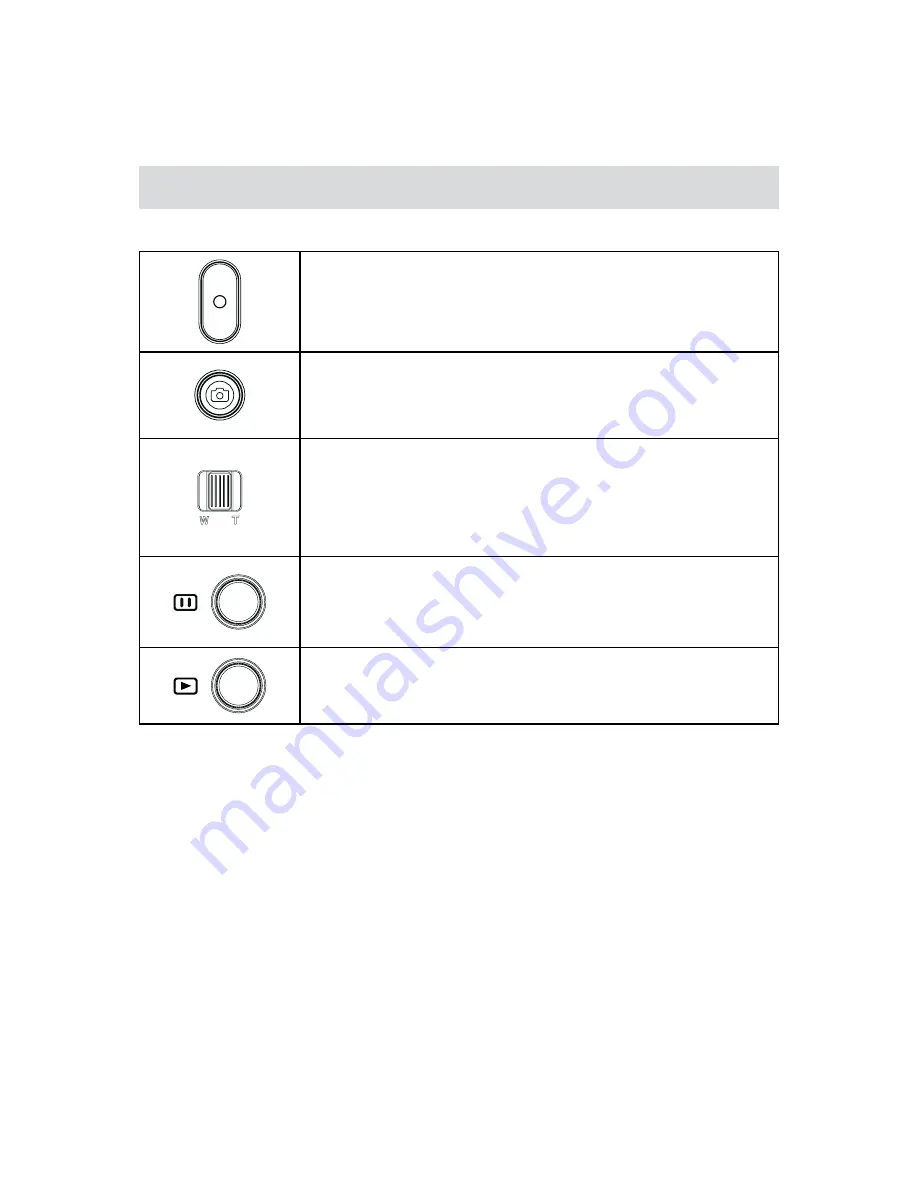
Button Function

The Buttons have the following functions in Playback Mode. 

Video Button:

Press to go the Record Mode

1. 

Photo Button: 

Press to go the Record Mode

1. 

Tele Button:

Volume increase. /Zoom in the photo

1. 

Wide Button

Volume decrease. /Zoom out the photo

1. 

Pause Button:

In Video Playback Mode, press to pause the recorded video.

1. 

Playback Button: 

Switch to the Playback Mode.

1. 

For quick review, press it after recording.

2. 

Summary of Contents for DVC-380

Page 1: ......

Page 2: ...High Definition Digital Video Camera User s Manual...

Page 3: ...before using the camera Only use accessories supplied by the manufacturer Use only the type of battery that came with your camera Remove the battery if the camera is not going to be used for long per...

Page 4: ...Enjoying the Playback Mode 21 Section 5 Setting Your Camera 26 Section 6 Viewing Photos and Videos on TV 30 Section 7 Viewing Video Photo on PC 31 Section 8 Uploading Files to Internet 32 Section 9 Sp...

Page 5: ...screen HDTV Moreover the camera has an advanced uploading feature With the exclusive built in Internet Direct application you can upload the videos captured by the camera to the web site more effortle...

Page 6: ...View Rear View Lens Microphone LED Light Macro Switch Speaker Tele Wide Button Video Button HDMI Port Mini USB 2 0 Port TV Port Photo Button Record LED Indicator Playback LED Indicator LCD Touch Panel...

Page 7: ...6 EN Side View Bottom View Playback Button Power Button Pause Button Tripod Socket SD card Cover...

Page 8: ...e correct polarity marks or 1 Close the battery cover firmly 2 Charge your battery You must use the supplied AC charger or the USB cable The camera must be turned OFF blinking light confirms charging...

Page 9: ...lled SD card press the card inwards to 2 release it When the card pops out gently remove it from its slot 3 Recommended memory capacity 1GB or above 4 Note When a memory card is fitted videos photos a...

Page 10: ...g 2 Touch the OK icon to validate the setting 3 Touch the Exit icon 4 to exit Getting Started To record video Press Video Button to record video To stop recording press it again To pause recording Pre...

Page 11: ...hoto Tele Button Zoom in 1 Wide Button Zoom out 1 Pause Button Press to pause the recording 1 To continue the recording press it again 2 Playback Button Switch to the Playback Mode 1 For quick review...

Page 12: ...720p 30 fps VGA 640X480 Slow Motion Record video at QVGA resolution Photo Resolution 16MP 5MP 3MP 2 00 05 30 Recording time of the video that can still be taken at current resolution 1000 Number of im...

Page 13: ...n Video Recording Only 12 Macro Focusing On 13 Date Printing On Photo Only 14 SD Card Inserted 15 Battery full power Battery medium power Battery low power Battery empty power DC power mode 16 Zoom me...

Page 14: ...apturing Press Photo Button to take photo Press Playback Button or touch on the screen to view the photo Three resolution settings are available Image Quality 16 Mega Pixels 5 Mega Pixels 3 Mega Pixel...

Page 15: ...eo Photo Effect Setting Resolution Stabilization Motion Detect Slow Motion Time Lapse Pre record Resolution ISO Self Timer Light Scene WB White Balance Face Tracking Sound TV Language Time Setting Dat...

Page 16: ...HD 1080p30 Record videos at 1920x1080p 30 fps resolution HD 720p 60 Record videos at 1280x720p 60 fps resolution HD 720p 30 Record videos at 1280x720p 30 fps resolution VGA 640X480 Record videos at 6...

Page 17: ...be longer than the actual recording time Operation Display Screen In the Video menu touch the Slow Motion icon on the 1 screen Touch to select On or Off 2 Touch the Exit icon 3 to exit Time Lapse Reco...

Page 18: ...Operation Display Screen T 1 ouch on the screen in Record Mode The menu will show on the screen Touch the Photo icon on the screen Submenu of 2 Photo will pop out on the screen The Photo submenu conta...

Page 19: ...mage may become noisy when the ISO number is large Self Timer The self timer allows you to take photos with a ten second time delay The LED light on the front of the camera will also blink The speed o...

Page 20: ...n Auto Shoot without any special effect on the image Skin Shoot with an effect that makes skin tones more natural Night Use Night Mode for night scenes or low light conditions Backlight You can take s...

Page 21: ...screen Touch to select the desired option 2 Touch the Exit icon 3 to exit Face Tracking Photo Only The camera can detect human face s and focus on the face s automatically This function can works wit...

Page 22: ...ress to go the Record Mode 1 Photo Button Press to go the Record Mode 1 Tele Button Volume increase Zoom in the photo 1 Wide Button Volume decrease Zoom out the photo 1 Pause Button In Video Playback...

Page 23: ...e 1 Video Resolution Full HD 1080p 30 fps HD 720p 60 fps HD 720p 30 fps VGA 640X480 Slow motion QVGA Photo Resolution 16MP 5MP 3MP 2 00 09 25 Video playback time counter 0003 0005 Current number Total...

Page 24: ...or Operations for Playback Mode The Playback Mode is for viewing and managing videos and photos on the built in memory or on an SD Card Operation Display Screen Press 1 Playback Button or touch on the...

Page 25: ...a few seconds the playback function icons will disappear automatically Delete Videos Operation Display Screen T 1 ouch to go to the Delete option screen Touch Yes to delete the current video or No to...

Page 26: ...ion 4 mode Touch 5 to start or to stop the slide show Touch 6 to exit Note When the LCD is idle for a few seconds the playback function icons will disappear automatically Delete Photo Operation Displa...

Page 27: ...ng Sound Enable or disable the keypad tone and the operation sound Operation Display Screen In the Setting menu touch the Sound icon on the 1 screen Touch to select On or Off 2 Touch the Exit icon 3 t...

Page 28: ...ime Setting icon on the 1 screen to enter the time setting screen Touch Year Month Day Hour Minute and AM PM to set 2 Adjust the numeric value by touching 3 Touch the OK icon to validate the setting 4...

Page 29: ...enter the confirmation screen Touch the Yes 3 icon to execute the operation and the No icon to cancel the operation Note All the data will be erased if the SD card is formatted Make sure all the data...

Page 30: ...esolution FHD 1080p 30 for Video 5MP for Photo Stabilization Off Motion Detection Off Slow Motion Off Pre Record Off Time Lapse Off Self Timer Off ISO Auto Scene Auto White Balance Auto Light Off Soun...

Page 31: ...n the LCD screen do not display when the camera is connected to an HDTV Some functions may not be accessible while the camera is connected to an HDTV Connecting to a non high definition 4 3 TV Connect...

Page 32: ...hotos or Videos to a Computer You can transfer photos or videos stored on your camera to a computer and send them in e mails to friends or post them on the web sites To do this you should Connect the...

Page 33: ...em with your family and friends on the web site To upload files to Internet Connect the camera to your computer by using the supplied USB cable 1 After making a USB connection the AutoPlay window will...

Page 34: ...to install ArcSoft MediaImpression first Note The social media Web site may not be accessible in certain regions You must have internet access to upload videos to a Web site On the thumbnail screen c...

Page 35: ...k on the Play Pause icon 2 to play pause Click on the Return icon to return to the thumbnail preview screen To setup your account information for the web site 1 Click on to go to the setup screen 2 Fi...

Page 36: ...SD SDHC SDXC card slot support up to 64GB Image resolution 16MP 4608 x 3456 16M pixels Interpolated 5MP 2592x1944 5M pixels 3MP 2048x1536 3M pixels Video resolution Full HD 1080p 30 1920X1080 30fps HD...

Page 37: ...16 bit Color Display Note The LCD screen is manufactured using extremely high precision technology so over 99 99 of the pixels are operational for effective use However some tiny black and or bright...

Page 38: ...he shutter will sound when photo is being taken How do I charge battery 444 You must use the supplied AC charger or the USB cable The camera must be turned OFF A blinking light confirms charging and t...

Page 39: ...the recording press it again 2 In Video Playback Mode press to pause the recorded video 3 Tele Button Zoom in 1 Wide Button Zoom out 1 Photo Button P 1 ress to take photo Photo Button Playback Stop Bu...

Page 40: ...e recorded video 3 Previous Button Go to the previous video photo 1 Forward Button Video fast forward 1 Volume Down Button Volume decrease 1 Rewind Button Video fast rewind 1 Note Record menu is not a...

Page 41: ...which the Warranty relates 3 What you must do for Westwell to be entitled to claim under the warranty To make a claim under the Warranty you must recording press it again a Return the product which yo...

Page 42: ...ion to provide you with a remedy in respect of the returned product including for breach of a guarantee under the Australian Consumer Law then a Westwell reserves the right to claim all expenses and c...

Page 43: ...means or stored in a database retrieval system without prior written permission from us The information of this manual is based on the current version of the product We reserve the right to alter the...

Page 44: ......

Reviews: