


AURA ABSOLUTE
DIRTY
TIMER
PM2.5
(µg/m
3
)
LOCK
AUTO
REPLACE
FILTER
ION
MIN
MED
HIGH
MAX
UV
WIFI
CLEAN
T1
D1
D4
D3
D2
T4
T3
T6
D9
D7
D8
D6
D5
T5
T2
>>>>>
EN - 9
ENGLISH
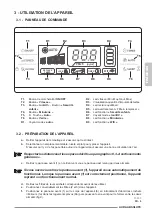
3 - USE OF THE APPLIANCE
3.1 - CONTROL PANEL
T1.
ON
/
OFF
key
T2.
“
Speed
” key
T3.
“
Ion/UV
” key -
“Child Lock”
key
T4.
“
Timer
” key
T5.
“
Auto
” key
T6.
“
Sleep
” key
D1.
“Auto”
mode LED
D2.
Speed LED (Min, Med, High, Max)
D3.
Visualization of detected quantity of impurities
D4.
Air quality LED
D5.
“Filter to be replaced” warning LED
D6.
“Child Lock
(Children safety)
”
function
LED
D7.
“Ions/UV”
mode LED
D8.
“Timer”
function LED
D9.
“Wifi”
function LED
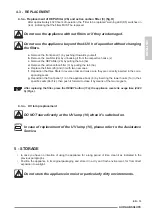
3.2 - APPLIANCE PREPARATION
a.
Remove the appliance from the packaging and make sure it is intact.
b.
Select a stable, levelled and plane location where to place the appliance.
Make sure there is enough free space around the appliance to ensure correct air flow.
Respect the distances and spaces described in the paragraph “0.3 - General warn-
ings”.
c.
Remove the front panel (1) by pulling it towards yourself, the panel is closed thanks to two magnets.
If the front panel (1) is opened or removed, the appliance immediately stops op-
eration. When the front panel (1) is positioned correctly, the appliance resumes
normal operation.
d.
Remove the filters from its respective bags before use.
e.
Correctly position the filters (2 and 3) in the appliance.
f.
Position the front panel (1) on the appliance body (6) by inserting the lower hooks (1a) in the specific
seats (6b) first, then push it forward to close it by means of the two magnets (fig.C).
Summary of Contents for AURA ABSOLUTE
Page 2: ......
Page 6: ...1 6a 10 6 8 9 7 7 4 5 8 2 2a 3 11 11a 2b min 20cm m in 20cm min 30cm A B B1...
Page 7: ...1 6 6b 1a 6a 6a 1 6 2a 2b 3 11 D F G C E...
Page 8: ...H 11a L 2a 2a x 3a 2b 2b 3 1 6 3a 6b 1a...
Page 79: ......
Page 80: ...263736A...


