background image

STEP  2 

Back panel D,Left side panel X and Right side panel Z assembly. 

1,  Insert cam bolts@  and dowel pins 

(ill) 

on panel X and Z into cams on panel D and 

tighten in a clockwise direction as illustrated above. 

STEP  3 

Top panel A1  and Back panel D,Left side panel X,Right side panel Z assembly. 

1,  Insert cam bolts@  and dowel pins@]) on panel A1 into cams on panel X,Z 

and D and tighten in a clockwise direction as illustrated above. 

2,  Cover the cam covers@  on the top of cams. 

PAGE 

8

Summary of Contents for AXIS AXRPDN18

Page 1: ...ASSEMBLY INSTRUCTION AXIS Reception Counter Main ITEM No AXRPDN18 AXRDN18 OPTION 1 see page 4 6 OPTION 2 see page 7 9 PAGE 1...

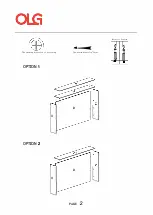
Page 2: ...The turning direction of attaching OPTION 1 X OPTION 2 X Incorrect Correct The arrow direction front D D PAGE 2...

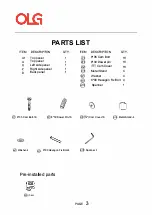
Page 3: ...panel 1 8 30 Dowel pin 16 Left side panel 1 Cam Cover 16 Right side panel 1 Metal Stand 4 D Back panel 1 Washer 4 6 90 Hexagon Fix Bolt 4 Spanner 1 i I 6 35 Cam Bolt 16 8 30 Dowel Pin 16 Ys Cam Cover...

Page 4: ...OPTION 1 STEP 1 Preparation for Top panel A Back panel D Left side panel X Right side panel Z 1 Insert cam bolts and dowel pins into panel A D X and Z as illustrated above PAGE 4...

Page 5: ...e Metal Stand with screws on Top panel A A1 STEP 3 X Back panel D Left side panel X and Right side panel Z assembly 1 Insert cam bolts and dowel pins on panel X and Z into cams on panel D and tighten...

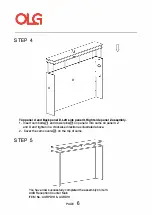
Page 6: ...Insert cam bolts and dowel pins on panel A into cams on panel X Z and D and tighten in a clockwise direction as illustrated above 2 Cover the cam covers on the top of cams STEP 5 You have now successf...

Page 7: ...OPTION 2 STEP 1 Preparation for Top panel A1 Back panel D Left side panel X Right side panel Z 1 Insert cam bolts and dowel pins into panel A1 D X and Z as illustrated above PAGE 7...

Page 8: ...n panel D and tighten in a clockwise direction as illustrated above STEP 3 D D X Top panel A1 and Back panel D Left side panel X Right side panel Z assembly 1 Insert cam bolts and dowel pins on panel...

Page 9: ...ve now successfully completed the assembly on item AXIS Reception Counter Main ITEM No AXRPDN18 AXRDN18 Remove all QC and panel labels and wipe clean using a damp cloth and general household cleaner P...

Reviews: