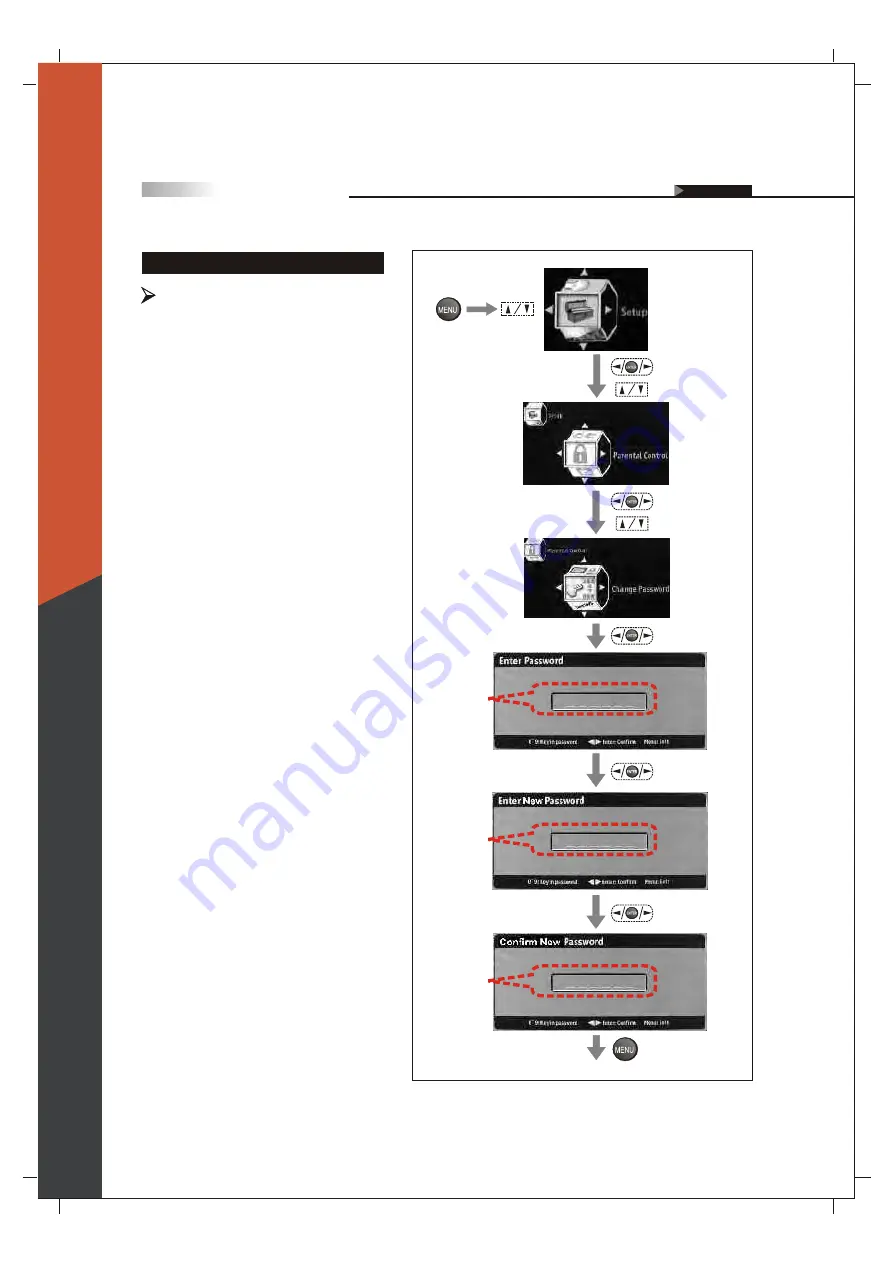
background image

61

Change Password

You may change to a new preferred 
password by pressing the numeric key 
within 6 numbers.     

Resetting the Password

(To enter the 
sub-menu)

(To show 
the Main 
Menu)

(To select 
the item)

(To select the item)

(To enter the 
sub-menu)

(To select the item)

(To enter "Enter
Password" screen)

On Screen Displays (OSD)

OSD-Setup

(NOTE:


The Factory Default password is

999999 or 314159).

(To confirm and then
enter "Enter New
Password" screen)

(Key in 
password by 
pressing the 
numeric key )

(To confirm and then
enter "Confirm New
Password" screen)

(Key in new 
password by 
pressing the 
numeric key )

(To go back last OSD Menu or exit OSD Menu)

(Key in new
password 
again by 
pressing the 
numeric key )

English

Summary of Contents for 265T FHD

Page 1: ......

Page 2: ...emote Control Guide Remote Function Keys Description Programming the Remote Control Battery Installation On Screen Display OSD Introduction Operating in the OSD Initial Screen PICTURE OSD Adjusting TV...

Page 3: ...satisfies FCC regulations when shielded cables and connectors are used to connect the unit to other equipment Prevent electromagnetic interference from electrical appliances such as radios and televi...

Page 4: ...ce The TV may fall resulting in serious personal injuries to nearby people as well as damage to the display unit Ventilation Do not cover or block these vents and openings located on the top and back...

Page 5: ...glass Do not hit the panel Be careful to prevent from getting hurt by broken glass pieces in case the panel breaks Follow operating instructions All operating instructions must be followed Precautions...

Page 6: ...f any of the following conditions occurs unplug the AC cord from the AC outlet and request a qualified service person to perform repairs 1 A liquid was spilled on the display unit or objects have fall...

Page 7: ...ded in this manual for your records Please read all the safetyand operating instructions carefully andkeep this manual for future reference Model No Serial No Owner s Record The model andserial number...

Page 8: ...des the bestinterface between a DVD playerand compatible productssuch as digitalset top boxfor uncompressed digital audio videoconnections When matchedwith a SyntaxBrillian OLEVIATV multi channel digi...

Page 9: ...ion adaptive approach in which maximum resolution is preserved When both fields reach the HQV video processor a comparison is made with the previous two fields to determine which pixels represent moti...

Page 10: ...y whenscaling the imageup from standard definition 10 bit 4 4 4 internaldata paths Not only doesHQV processing implementsome of themost advanced algorithms for videoprocessing but theinternal data pat...

Page 11: ...These items are all you need to set up and operate the TV in its basic configuration Note Most components VCRs DVD players etc come with the necessary cables to connect them If you want to set up a c...

Page 12: ...ress to enter to Sub Menu or select and confirm your setting Displays the On Screen Display OSD menu In OSD menu press it to return to the previous screen or to exit Adjusts Channel In the OSD menu bo...

Page 13: ...ble Video Game System Component 1 2 Video 1 2 AV Composite Video 3 RCA jacks Used to connect a VCR Super VHS S VHS DVD player or other video devices to the TV HDMI DVI S Video AV R L Pr Cr Pb Cb Y R L...

Page 14: ...lyfound on A V equipment Used for transferringvideo signal whichis split into three signals one brightness andtwo color Through this connection you can viewa better high definition picturethan S Video...

Page 15: ...y turn on If so then skip step 3 and step 4 If the light is NOT on do Step 3 3 If a red or blue light on the front of the TV is NOT on press the Power Button on the back of the TV as shown below Now t...

Page 16: ...DVD Player with Component Cables Connecting to a DVD Player with HDMI Cables Connecting to a Satellite Receiver or Cable Box with A V Cables Connecting to a VCR PVR or DV with A V Cables Connecting to...

Page 17: ...ent s IN jack 2 Connect another 75 ohm coaxial cable from the Video Equipment s OUT jacks to the TV s Antenna jacks RF Terminal If connecting to Video Equipment withAntenna outlet 1 Connect a75 ohm co...

Page 18: ...V s HDMI IN jacks Note HDCP is a copy protecteddigital connection thatreceives analog ordigital video andaudio signals from equipment with aHDMI output thatfeatures the HDCPfunction HDMI allowsthe tra...

Page 19: ...er or Cable Box are sometimes labeled as Y Cb and Cr or B Y and R Y If so connect the cables to the matching colors 2 Using an Audio cable connect the Satellite Receiver or Cable Boxes Audio OUT jacks...

Page 20: ...Using an S Video Cable connect the DVD player s S Video OUT jack to the TV s S Video IN jack Note When you connect video equipment to both the same Video and S Video input jacks the display will auto...

Page 21: ...Y and R Y If so connect the cables to the matching colors 2 Using an Audio cable connect the DVD player s Audio OUT jacks to the TV s Audio in jacks Note The Y Pb and Pr jacks do not provide audio so...

Page 22: ...HDCP is a copy protected digital connection that receives analog or digital video and audio signals from equipment with a HDMI output that features the HDCP function HDMI allows the transfer of digita...

Page 23: ...connect video equipment to both the same Video and S Video input jacks display will automatically select S Video first To view S Video signal please disconnect Video jack or turn off the Video signal...

Page 24: ...he same Video and S Video input jacks display will automatically select S Video first To view Video signal please disconnect the S Video jack or turn off the S Video signal on the video equipment S Vi...

Page 25: ...this function on your equipment Rear of TV Disconnect all power sources before making any connections Connecting to a Blue Ray DVD Player or HD Receiver with HDMI Cables TV Installation and Connectio...

Page 26: ...2 UsingAudio and S Video YPbPr or HDMI isstrongly recommended cables connect the Set Top Box s Audio andS Video OUTjacks to theTV s Audio and S Video IN jacks 3 Connect an I Linkcable from theSet Top...

Page 27: ...b andPr IN jacks for watching therecorded videos Note The YPbPr connection provides the best quality of video signal compared to AV Composite and S Video connection Use this methodof connection ifyour...

Page 28: ...sing an audio receiver such as a Home Theater System toamplify the audio from the TV 1 Using the Coaxial or Optical audio cable connect the TV s audioOUT jack tothe audio receiver s Coaxial or Optical...

Page 29: ...rnal Audio amplifier is necessary to amplify the signal for external speakers Note If you connect a Home Theater Sound System please disable the TV s speakers in the OSD by selecting off in audio sect...

Page 30: ...n and Connection Guide 1 Go to our website www olevia com andregister your TV TM 2 Click FutureProof your TV You will need the serial number of your Olevia TV and a USB flash drive 3 Click on the inst...

Page 31: ...EVICE BUTTONS Press to selectthe equipment item you wantto program oroperate 1 REVERSE FAST FORWARD Press to fast reverse forward playback 2 PLAY Press to begina Disc play 3 SKIPBACKWARD FORWARD Press...

Page 32: ...assign a mode for learning Press this TV sremote control head to head from your original remote control On the TV sremote control press a key where the learned function will be stored On the original...

Page 33: ...pletely drained We do not warrant the quality of the batteries in any case since many factors are considered If replacement is needed please purchase two AAA batteries 2 Handle remote with care Avoid...

Page 34: ...OSD Audio OSD Setup OSD Screen OSD English 1 Press button to enter OSD menu mode 2 To select between four main sections press the keys and 3 To enter to Sub Menu press the keys or 4 To select the func...

Page 35: ...the TV there are three language formats available for the OSD Menu You may select it by doing the following English Francais Espanol 2 Selecting Input Source After the Power Up selection the Input So...

Page 36: ...rom PC device Component VGA input source from varied video device 2 2 HDMI By selecting HDMI you may watch the video program with the HDMI audio input source from varied equipments HDMI Audio input so...

Page 37: ...until you see Color Temp then press enter Step 4 Press Up Down until you see 6500 then press enter 35 Picture OSD Adjusting TV Picture Settings Description of Settings Item Brightness Contrast Color...

Page 38: ...ard Def TV High Def TV Game Mode After entering this mode a dialogue screen below will appear Video Source Only User To enter the sub menu To show the Main Menu To select the item To selectthe item To...

Page 39: ...s mode provides the best settings to view the TV for regularuse Disable Showroom Mode and Enable Home Mode Follow these 4 steps to activate Home Mode Step 1 Press Menu and Scroll up down to Picture an...

Page 40: ...Picture Quality Brightness To darken or brighten the picture Contrast To reduce soften or enhance deepen color contrast of the picture Native To select the nature color tones of the picture To enter t...

Page 41: ...to black so a more accurate picture is produced with a wider contrast scale Contrast Enhance Enhances the contrast of the picture White Peak Limiter Limits the signal amplitude varying degree resulted...

Page 42: ...cal performance capability It allows to elevate the audio image to the optimal location It allows to expand the stereo sound field It allows to select the sound effect as occurred in an enclosed space...

Page 43: ...To select the item To adjust the settings To enter the sub menu To select the item Lip Sysc Audio iDIVA Audio Lip Sysc DeepBass It allows to delivers deep rich bass beyond the range of the speaker s p...

Page 44: ...S Toggles audio through Stereo SAP and Mono MTS System for Stereo TV In this Setup Index you can adjust the audio settings to suit your personal preferences Mono Selects Mono reception Uses to reduce...

Page 45: ...change the position of Picture 2 It allows you to change the size of Picture 2 It allows you to switch the position of Picture1 and Picture2 It allows you to select the main picture or video source y...

Page 46: ...o of the picture you are watching Full Screen Enlarges a 4 3 picture to fill the 16 9 screen Aspect Toggles picture between 16 9 4 3 aspect ratio Panoramic Enlarges a picture from 4 3 to 16 9 by stret...

Page 47: ...fing Full Screen splits in one dynamic screen view Pic1 and four motionless screen views Pic2 5 by pressing the numeric key to select channels Note This feature helpsremove any noise visible under bot...

Page 48: ...1 Pic2 Pic2 Pic1 Low Right Low Left Upper Right Upper Left Pic1 Pic2 Pic1 Pic2 Pic1 Pic2 Pic1 Pic2 PIP Position Changes the position of Picture 2 small screen view To enter the sub menu To go back las...

Page 49: ...ing the appropriate input source Selecting the Picture or Video Source In this Setup Index you can select the input source of the picture or video you want to view Tuner 1 2 Composite 1 2 S Video 1 2...

Page 50: ...Off Function It allows you to set up Channel functions It can auto scan the available channels of the TV or CATV It allows you to add channels to your favorite channel list It allows you to select th...

Page 51: ...set the cable TV channels and VHF UHF channels at the sametime Cable Selects cable if using tuner as the input Air Selects air if using antenna To enter the sub menu To show the Main Menu To select th...

Page 52: ...al preferences Favorite Selects and stores a list of favorite channels Browses through favorite channels by pressing Hotkey FAVORITE To enter the sub menu To show the Main Menu To select the item To s...

Page 53: ...hannel number by pressing thenumeric keys on the remote control To enter the sub menu To show the Main Menu To select the item To selectthe item To enter the sub menu To go back last OSD Menu or exit...

Page 54: ...in Menu To select the item To selectthe item To enter the sub menu To go back last OSD Menu or exit OSD Menu To selectthe item To enter the sub menu To selectthe item To enter the sub menu To select t...

Page 55: ...sub menu To show the Main Menu To select the item To selectthe item To enter the sub menu To go back last OSD Menu or exit OSD Menu To selectthe item To enter the sub menu To selectthe item Enter Key...

Page 56: ...elects preferred font by scrolling through As Broadcaster Style 1 7 Digital TV Channel Only Size Selects preferred font size by scrolling through As Broadcaster Large Medium Small Digital TV Channel O...

Page 57: ...Menu To select the item To selectthe item To enter the sub menu To go back last OSD Menu or exit OSD Menu Rating Activating the Parental Control Feature Blocks programs based on programing rating sys...

Page 58: ...strongly cautioned Children under 13 should be accompanied by an adult R Restricted Viewers should be 17 or older NC 17 Not classified Viewers should be 17 or older X Adults only To enter the sub men...

Page 59: ...ked automatically To enter the sub menu To show the Main Menu To select the item To selectthe item To enter the sub menu To go back last OSD Menu or exit OSD Menu To selectthe item To enter the sub me...

Page 60: ...content inappropriate for unsupervised viewing by children aged 8 13 14 Not suitable for viewers under the age of 14 18 Adult To enter the sub menu To show the Main Menu To select the item To selectt...

Page 61: ...Not suitable for children under the age of 13 16 ans Not suitable for children under the age of 16 18 ans Restricted to adults To enter the sub menu To show the Main Menu To select the item To select...

Page 62: ...ur personal preferences To enter the sub menu To show the Main Menu To select the item To selectthe item To go back last OSD Menu or exit OSD Menu To enter the sub menu To selectthe item To enter the...

Page 63: ...selectthe item To enter Enter Password screen On Screen Displays OSD OSD Setup NOTE The Factory Default passwordis 999999 or 314159 To confirm and then enter Enter New Password screen Key in password...

Page 64: ...tivating this function the information of Date and Time will be corrected automatically based on accurate time To enter the sub menu To show the Main Menu To select the item To selectthe item To go ba...

Page 65: ...eout In this Setup Index you can setup the OSD Menu display time before disappeared when no action is taken On Screen Displays OSD OSD Setup Setting the TV Timer Timeout Settings for OSD Menu To show...

Page 66: ......

Page 67: ......

Page 68: ...ns W x D x H Carton Dimensions W x D x H Weight w o stand Weight w stand Gross Weight A B C E F D 65 Model Size A 38 11 in 61 89 in 35 35 in 16 73 in 39 53 in 6 93 in B C D E F 65 100 240 VAC 50 60 Hz...

Page 69: ...75 60 60 60 60 75 60 60 75 60 60 60 60 Resolution 480p 720p 1080i 1080p 640x480 800 x 600 1024 x 768 1280 x 768 1360 x 768 1920 x 1080 640 x 480 800 x 600 1024 x 768 1280 x 720 1280 x 768 1360 x 768 1...

Page 70: ...h a 90 degrees viewing angle A LCD HDTV will be considered dead on arrival D O A with regards to defective pixels on the LCD panel when any one of the following criteria is met Atotal of 12 defective...

Page 71: ...ndards for digital television Reference http www atsc org Bezel Refers to the plastic or metal frame that acts like a shell around the LCD glass Backlight Refers to the component that lights up the LC...

Page 72: ...flat panel displays DVI A Digital Video Hi Resolution Analog DVI D Digital Video Interface Digital Cable is used for direct connection from one digital source to the TV See DVI DVI I Digital Video Int...

Page 73: ...an unsuitable audience PIP Picture in Picture feature that enables one source to be displayed on top of another source Pixel Resolution Refers to the number of rows horizontal and vertical that produ...

Page 74: ...adult VGA 1 Video Graphics Array DB15 2 Video Display Refers to the display resolution Viewable Angle Angle at which the screen is still viewable Widescreen See 16 9 YCbCr Used often with standard int...

Page 75: ......

Reviews: