Step 1
Step 2
Tools Needed:
Allen W
rench
(2) ¼" x 3" Connector Bolt
I
nstructIons
for
A
ssemblIng
l
Inbergh
c
rIb
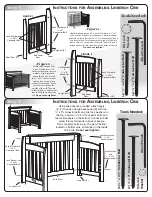
- Figure 1 -
Attach small end panels (A) to posts (D) with two ¼" x 2½"
connector bolts and two lock washers. Attach small end
panels (A) to posts (E) with two ¼" x 3" connector bolts and
two lock washers. Turn connector bolts snug. *Make sure
label is visible on the outside of the crib. The word “inside,”
located on bottom rails, should be on the inside of the crib.
Do not over tighten!
- Figure 2 -
Attach small end panel (B)
to post (F) with two ¼" x 3"
connector bolts and two lock
washers. Attach small end
panels (B) to posts (G) with
two ¼" x 2½" connector bolts
and two lock washers. Turn
connector bolts snug. *Make
sure label is visible on the
outside of the crib. The word
“inside,” located on bottom rails,
should be on the inside of the
crib.
Do not over tighten!
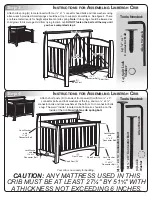
Using allen wrench provided, attach posts
(E, F) to ends of large back panel (B) with two
¼" x 3" connector bolts and two lock washers on
the top, and two ¼" x 4¾" connector bolts and
two lock washers on the bottom. Connector bolts
screw into metal inserts in ends of panels.
Turn connector bolts snug. The word "inside,"
located on bottom rails, should be on the inside
of the crib.
Do not over tighten!
FIGURE 1
Long Post (F)
I
nstructIons
for
A
ssemblIng
l
Inbergh
c
rIb
(B)
Back Panel
Long Post (E)
Long Post (E)
(A)
End Panel
2 pcs.
Lock Washer and
¼" x 2½"
Connector Bolt
Short Post (D)
Long Post (F)
Lock Washer
&
¼" x 3"
Connector
Bolt
(B)
End Panel
2 pcs.
FIGURE 2
Short Post (G)
Lock Washer &
¼" x 2½"
Connector Bolt
Lock Washer and
¼" x 3"
Connector Bolt
Lock Washer and
¼" x 4¾"
Connector Bolt
Lock Washer
and
¼" x 4¾"
Connector Bolt
Lock Washer and
¼" x 3"
Connector Bolt
(2) ¼" x 4 ¾" Connector Bolt
Label
(4) Lock
W
asher
Label
Lock Washer and
¼" x 3"
Connector Bolt
Tools Needed:
Allen Wrench
(4) ¼" x 2½" Connector Bolt
(4) ¼" x 3" Connector Bolt
(8) Lock Washer


