


TOTAL POS SOLUTION COMPANY
OKPOS
Manual
Service
ZED POS
1. Configuration of Main Board
2. Configuration of Major I/O Ports
Appendix
1. Stand
2. Cable Cover
3. Rear Cover
4. Main Press
5. Internal System Configuration
6. Storage Replacement
Assembly / Disassembly
1. System On/Off
2. Touch Screen
3. Disk back-up and Recovery
4. Dual monitor (Optional)
5. Magnetic Stripe Reader (Optional)
System Installation
and Usage
1. Preview
2. Features and Specifications
3. Parts Description
System Introduction
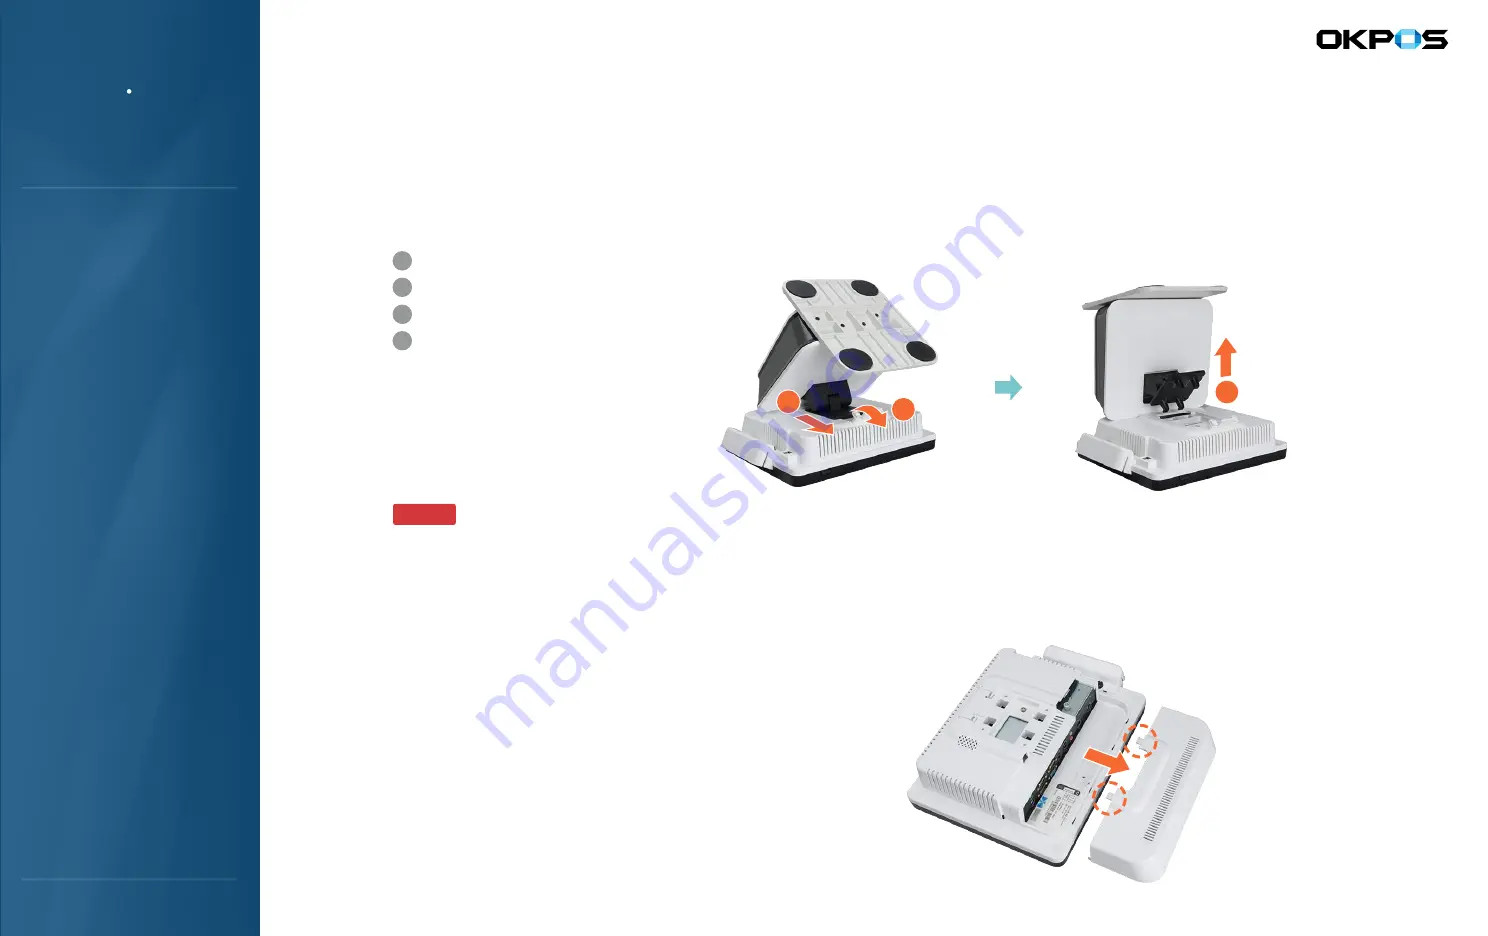
Pull out the cable cover by press the PUSH parts of cable cover for disassembly
● ● ● ● ● ● ● ● ● ● ● ● ● ● ● ● ● ● ● ● ● ● ● ● ● ● ● ● ● ● ● ● ● ● ● ● ● ● ● ● ● ● ● ● ● ● ● ● ● ● ● ● ● ● ● ● ● ● ● ● ● ● ● ● ● ● ● ● ● ● ● ● ● ● ● ● ● ● ● ● ● ● ● ● ● ● ● ● ● ● ● ● ● ● ● ● ● ● ● ● ● ● ● ● ● ● ● ● ● ● ● ● ● ● ● ● ● ● ● ● ● ● ● ● ● ● ● ● ● ● ● ● ● ● ● ● ● ● ● ● ● ● ● ● ● ● ● ● ● ● ● ● ● ● ● ● ● ● ● ● ● ● ● ● ● ● ● ● ● ● ● ● ● ● ● ● ● ● ● ● ● ● ● ● ● ● ● ● ● ● ● ● ● ● ● ● ● ● ● ● ● ● ● ● ● ● ● ● ● ● ● ● ● ● ●
2. Cable Cover Disassembly
Note when it
’
s put down the floor, careful with scratches on the LCD screen and main body.
Please be careful of dropping the POS system since it
’
s heavy.
CAUTION
1
3
4
Lift up the fixing lever
Unscrew it with a coin or (-) shaped driver
Pull the stand to the direction of arrow ③
Disassemble the stand by lifting up
4
3
2
1
● ● ● ● ● ● ● ● ● ● ● ● ● ● ● ● ● ● ● ● ● ● ● ● ● ● ● ● ● ● ● ● ● ● ● ● ● ● ● ● ● ● ● ● ● ● ● ● ● ● ● ● ● ● ● ● ● ● ● ● ● ● ● ● ● ● ● ● ● ● ● ● ● ● ● ● ● ● ● ● ● ● ● ● ● ● ● ● ● ● ● ● ● ● ● ● ● ● ● ● ● ● ● ● ● ● ● ● ● ● ● ● ● ● ● ● ● ● ● ● ● ● ● ● ● ● ● ● ● ● ● ● ● ● ● ● ● ● ● ● ● ● ● ● ● ● ● ● ● ● ● ● ● ● ● ● ● ● ● ● ● ● ● ● ● ● ● ● ● ● ● ● ● ● ● ● ● ● ● ● ● ● ● ● ● ● ● ● ● ● ● ● ● ● ● ● ● ● ● ● ● ● ● ● ● ● ● ● ● ● ● ● ● ● ●
1. Stand Disassembly
Please follow the below instruction if you need to disassemble the system.
System Disassembly / Assembly