background image

11

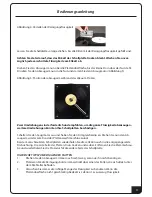
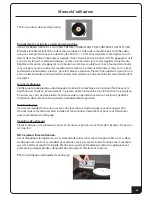
Photo 5: position of suction arm during vacuum process
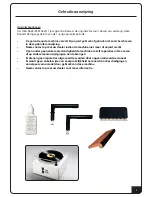
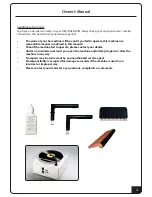
Vacuum Operation

You are now ready to clean off both dirt and fluid.

Vacuuming is done in forward motion only.  So make sure that the motor switch is in the 
top position. 

Swivel the suction arm until it is above the record and is pointing at the spindle (photo 5). The lugs 

/ pins on the vertical section of the suction arm should be right above the notched cutouts  of the 

suction arm holder. Gently push down the arm and locate the pins into the cutouts and at the same 

time,  switch on the vacuum motor. You will soon find that you do this  in one smooth operation. 

The arm will stay down whilst the record revolves. 

Two revolutions are normally sufficient and 

recommended to suck up all the fluid – any more may damage your records.  

Switch off the vacuum and the spring in the arm will lift it off the record. Move the suction arm to-

wards the rear of the record cleaner and switch off the turntable motor. Remember – switch vacu-

um off first, then turntable. Remove the clamp, turn the record over and now repeat the process on 

side 2.

Emptying the cleaning liquid reservoir

After having cleaned 20 – 30 LPs, the waste liquid has to be drained from the reservoir.  

Failure to 

drain the reservoir on a regular basis, may cause damage to the machine and will nullify 
your warranty!

Carefully pull out the drain down tube which is situated at the rear of the cleaner. Do not force it. 

When you encounter resistance – STOP! The point of resistance is built in.

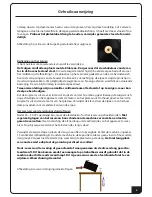
Remove the black end cap and place the end of the tube into a bottle or similar receptacle. Lift / or 

prop the front of the machine about 15 centimeters (photo 6).  Keep the machine in this position 

until  there is no liquid flowing from the drainage tube. Always replace the black cap on the drai-

nage tube and make sure it is secured and closed. 

Failure to do so will nullify your warranty!

Note: sometimes when you check the drain down tube, there will be little or no fluid. This 
may be because you are using an alcohol based mix, which is prone to evaporation due to 
heat generated inside the machine. However this is no excuse for not attempting to drain 
down the surplus fluid as per the above instructions. and it must be done. Warranty War-
ning!

Photo 6: draining the cleaning liquid

Owner’s Manual

Summary of Contents for Record Cleaning Machine

Page 1: ......

Page 2: ......

Page 3: ...soires Bijgeleverd zijn een standaard afzuigarm een applicatieborstel een flesje reinigingsvloeistof een platenklem en een geaard netsnoer NB het flesje reinigingsvloeistof is een concentraat en dient...

Page 4: ...ergelijk geval komt de garantie per direct te vervallen Reinigingstest Wij bevelen een testronde aan op een oude onbelangrijke elpee om er zeker van te zijn dat de machine goed is ingesteld en juist w...

Page 5: ...g de zuigarm rich ting achterzijde van het apparaat en zet de motor van het plateau uit Onthoud goed zet eerst de zuigmotor uit en dan de motor van het plateau Verwijder de klem draai de elpee om en h...

Page 6: ...de strips na circa 200 kanten en vaker indien noodzakelijk Zeer oude en vervuilde elpees dienen meerdere malen een schoonmaakbeurt te krijgen Vervang altijd de binnenhoes van een elpee bij de eerste...

Page 7: ...Neem contact op met uw dealer indien de machine niet meer of onjuist werkt Open onder geen enkele omstandigheid de machine om zelf reparaties uit te voeren of op andere manier wijzigingen aan te bren...

Page 8: ......

Page 9: ...bottle of cleaning fluid is a concentrate and requires mixing with a liter of purified water not battery or steam iron top up not tap water but purified water which is available from most chemists Wh...

Page 10: ...practice run on an old unwanted LP in order to ensure that the machine is set up and working correctly and to acquaint yourself with the correct cleaning procedure Cleaning operation Place the record...

Page 11: ...and now repeat the process on side 2 Emptying the cleaning liquid reservoir After having cleaned 20 30 LPs the waste liquid has to be drained from the reservoir Failure to drain the reservoir on a reg...

Page 12: ...dirt wear and damage Make sure there is no build up of debris and after each cleaning session brush off with your finger or a soft child s toothbrush is ideal Change strips after approx 200 sides more...

Page 13: ...nsible manner as advised in this manual Should the machine fail to operate please contact your dealer Under no circumstances must you open the machine and attempt repairs or alter the machine in any w...

Page 14: ......

Page 15: ...ne Fl schchen Reinigungskonzentrat wird mit 1 Liter destilliertem Wasser verd nnt Die gemischte Fl ssigkeit sollte an einem dunklen und k hlen Platz aufbewahrt werden Das kleine Fl schchen in dem das...

Page 16: ...mit der schwarzen Kappe sicher verschlossen ist WARNUNG Benutzen Sie niemals die Maschine ohne die sicher verschlossene schwarze Kappe Reinigungstest Wir empfehlen Ihnen einen Testdurchlauf an einer...

Page 17: ...Schallplatten besch digen Schalten Sie den Saugmotor aus und heben Sie den Arm gleichzeitig an Drehen Sie nun den Ab saugarm wieder zum Rand der Plattenwaschmaschine zur ck Bei stark verschmutzten Sch...

Page 18: ...dort nur wenig oder gar keine Fl ssigkeit vorhanden ist Dies kann folgende Ursache haben Sie verwenden eine Mischung auf Alkoholbasis die dazu neigt durch die W rme die von der Maschine entsteht zu v...

Page 19: ...nd 12 Absaugarme Reinigungsmittel Samtstreifen B rste Haube Wartung Der Drehteller sollte regelm ig mit einem herk mmlichen Hausstaubsauger abgesaugt werden Reinigen sie das Geh use mit einem feuchten...

Page 20: ...20 Zubeh r f r die Okki Nokki Reinigungsfl ssigkeit 10 inch und 7 inch Absaugarme Ersatzreini gungsstreifen B rste Haube Bedienungsanleitung...

Page 21: ......

Page 22: ...nettoyage liquide de nettoyage fixation ronde du disque c ble avec prise de terre Merci de bien noter que le petit fla con de liquide de nettoyage est un concentr et n cessite un m lange avec un litr...

Page 23: ...e le tube plastique de drainage l arri re de la machine est en position ferm e avec le bouchon noir en place Avertissement ne jamais utilisez la machine sans le bouchon noir en place En aucun cas vous...

Page 24: ...r tout absorber En proc dant davantage de tours vous pourriez endommager votre disque teignez le bouton d aspiration et le bras se soul ve automatiquement gr ce au res sort int gr dans le bras Tournez...

Page 25: ...ev e la machine se coupe automatiquement Dans ce cas teignez compl tement la machine et attendez au moins 30 minutes avant de la r utiliser Recommandations et conseils pratiques Maintenez votre machin...

Page 26: ...perdez la garantie sur cette machine si vous ne suivez pas la proc dure d utilisation de cette machine de mani re responsable Si la machine ne fonctionnait pas contacter s v p votre distributeur En au...

Page 27: ......

Page 28: ......

Page 29: ......

Page 30: ......

Page 31: ......

Page 32: ......

Page 33: ......

Page 34: ......

Reviews: