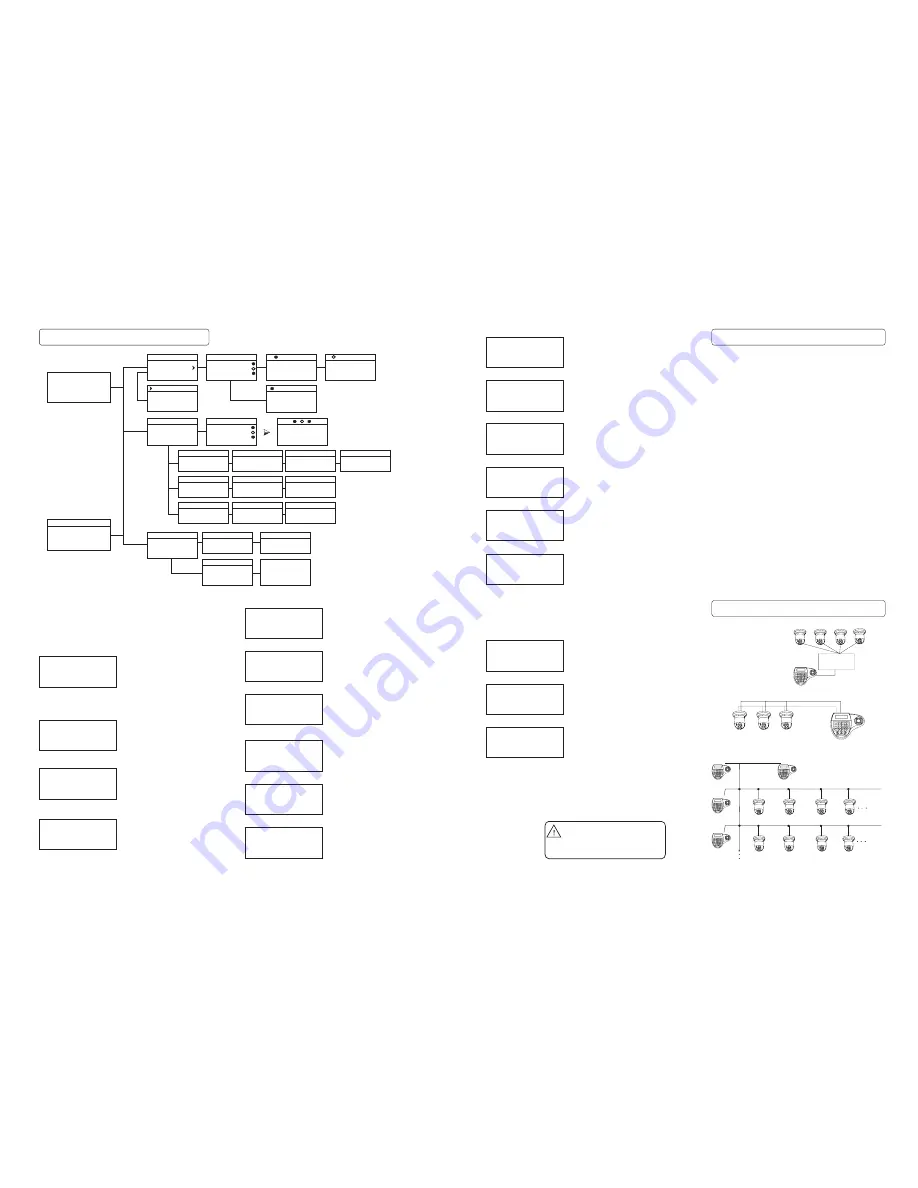
Keyboard Menu
1 Keyboard setup
2 Dome setup
3 Protocol select
4 Exit menu
、
、
、
、
About keyboard
Version:1.00
KB ID:008
Protocol:Factory
Baudrate:2400
1 Joy is free then
Press ENTER
、
Joy_calibrate
Keyboard setup
1 Set KB Parameter
2 About keyboard
、
、
1 Set KB ID:
2 Set baudrate
3 Joy_calibrate
、
、
、
Set KB Parameter
Input KB ID:
Set KB ID
1 2400 bps
2 4800 bps
3 9600 bps
4 19200 bps
、
、
、
、
Set baudrate
1 Set dome preset
2 Set dome scan
3 Set dome pattern
4 Set dome tour
、
、
、
、
Dome setup
Set dome preset
1 Save preset
2 Show preset
3 Clear preset
、
、
、
Preset num:
Press prev to back
1 Tour num:
2 Insert preset
3 Run tour
、
、
、
1 Set left limit
2 Set right limit
3 Run scan
、
、
、
Set dome scan
Press enter sure
Press prev to back
Press enter sure
Press prev to back
Set left limit
Set right limit
Press 1 to start
Press prev to back
Press 0 to stop
Run pattern
Set pattern
Success!
1 Pattern num:
2 Set pattern
3 Run pattern
、
、
、
Set dome pattern
Set dome tour
1 Preset num:
2 Speed:
3 Dwell:
、
、
、
Run tour
Success!
1 Matrix
2 Dome
、
、
Protocol select
Success!
Run scan
Success!
Pelco matrix
1 Pelco matrix
、
Matrix
Success!
Dome
1 Factory
2 Pelco-P
3 Pelco-D
4 B02
、
、
、
、
Exit menu
CamID:001 MonID:001
Protocol:Pelco-P
Baudrate:9600
Insert preset
1 Keyboard setup
2 Dome setup
3 Protocol select
4 Exit menu
.
.
.
.
1. Set KB ID
2. Set baudrate
3. Joy_calibrate
Enter the keyboard menu
To enter the keyboard’s setup menu, keep the [SET]-Key pressed for 2
seconds, To navigate through the menu items, use the joystick with “up”
and “down” to move between the items. Use “right” to enter the item or
confirm changes. Use “left” to leave the item or discard changes”
In main menu, you can select the
items by pressing the digit key, or use
joystick to navigate through the items.
For returning to upper menu level,
press [PREV] key. Use the [ENTER]
Main Menu
Keyboard Setup > Set KB Parameter
key to confirm the changes. The display will show “SUCCESS” when
changes are accepted.
Setup keyboards ID, Baud-rate and
calibrates the joystick.
Joystick up/down to select item
[ENTER] to enter the sub-menu
[PREV] return to upper level.
1. Set KB Parameter
2. About keyboard
Keyboard Setup
Initial setup for the keyboard, such as
keyboard ID, and baud-rate. Press
digit key to enter.
Input KB ID:
(1 - 64)
Keyboard Setup > Set KB Parameter> Set KB ID
Use the digit keys to enter the ID, and
press [ENTER] to confirm. LCD will
show “SUCCESS” when accepted, or
“ERROR” if the ID input exceeds the
range.
Joystick is free
then
press Enter
Keyboard Setup > Set KB Parameter> Joy_calibrate
Release the joystick, and press [ENTER]
to confirm the calibrate of zero-point .
Press [PREV] to return to upper level.
Version: 1.00
KB ID: 001
Protocol: B01
Baudrate: 9600 bps
Keyboard Setup > About keyboard
Information about current keyboard
setting. Press[PREV] to return.
2400 bps
4800 bps
9600 bps
19200 bps
Keyboard Setup > Set KB Parameter> set baudrate
Available baud rate. Move joystick “up’ or
“down” to select the setting and press
[ENTER] to confirm.
Press [PREV] to return to upper level.
1. Set dome preset
2. Set dome scan
3. Set dome pattern
4. Set dome tour
Dome setup
Configure and setup the PTZ related
functions, such as preset, pattern... Etc.
Preset num:
Press PREV to back
Dome setup > Set dome preset> Save, show or clear preset
Enter the preset number with the digit key,
For saving preset, move the joystick and
press [ENTER]. To show or clear the
preset, enter the preset number and press
[ENTER], or press [PREV] to exit.
1. Save preset
2. Show preset
3. Clear preset
Dome setup > Set dome preset
Save, recall and clear the preset points.
Press 1 to start
Press 0 to stop
Press PREV to back
Dome setup >Set dome pattern > Set pattern
Press 1 to start the pattern recording. The
dome will now memorize your PTZ
operation. When finished, press 0 to stop
the recording. Press [PREV] to exit the
menu
1. Set left limit
2. Set right limit
3. Run Scan
Dome setup > set dome scan
Setup the 2-Points scan, select 1. And 2.
To define the left and right limit. Select
option nr. 3. To run the scan
Press ENTER sure
Press PREV to back
Dome setup >set dome scan> set left, right limit
Move the Joystick to the desired position
and press [ENTER] for confirmation.
1. Pattern num:_
2. Set pattern
3. Run pattern
Dome setup >Set dome pattern
1: Press the digit and [ENTER] to select
the pattern number.
2: Sub-menu for pattern setup.
3: start the selected pattern
1. Preset num:_
2. Speed:
3. Dwell:
Dome setup >Set dome tour> Insert preset
1. Preset num:_ select the defined preset
position ( 1 - 80)
2. Speed: PTZ moving speed to this
preset, 1 - 8 ( fastest)
3. Dwell: Stop time on this preset. Max. 60
seconds.
1. Tour num:_
2. Insert preset
3. Run tour
Dome setup >Set dome tour
1: Press the digit and [ENTER] to select
the tour number.
2: Add defined preset position to the tour
3: start the selected tour
Use the digit keys to change the value on every option, and press [ENTER]
to complete the insert action. The LCD will show “SUCCESS” to confirm the
preset, and returns to upper menu level.
1. Pelco Matrix
Protocol select >Matix
Currently only pelco protocol is supported
in the matrix mode. Press [ENTER] to exit.
1. Matrix
2. Dome
Protocol select
1. Matrix: Matrix Mode
2. Dome: Setup Dome Protocol
1. Factory protocol
2. Pelco-P protocol
3. Pelco-D protocol
4. B02
Protocol > Dome
DO NOT CONNECT THE RJ-45 PORT
TO ANY COMPUTER NETWORK
INTERFACE,
as this may cause serious
damage to the keyboard.
Quick Reference
[N] + [CAM]
Select the connected
device
[TELE]
Zoom-In
[WIDE]
Zoom-Out
[FAR]
Manual focus far
[NEAR]
Manual focus near
[CLOSE]
Manual iris close
[OPEN]
Manual iris open
[SET]+[N]+[PRESET]
Store current PTZ
position as preset
[N]+[PRESET]
Recall stored preset
position
[SET]+[1]+[SCAN]
Define current position
as the left limit for scan
[SET]+[2]+[SCAN]
define current position
as the right limit for
scan
[1]+[SCAN]
Start the scan
[SET]+[N]+[PATTERN] Start pattern recording
[SET]+[0]+[PATTERN] Stop the pattern
recording and store.
[N]+[PATTERN]
Start recorded pattern
[N]+[TOUR]
Start the defined tour.
Connection sample
Star-Connection with
RS-Distributor
RS 485+
RS 485-
Termination
On
Termination
On
Termination
Off
Termination
Off
Keyboard
Termination on RS-485 chain
Dome
2
Dome
4
Dome
3
Keyboard
Dome
6
Dome
8
Dome
7
Dome
5
Keyboard
Keyboard
Keyboard
Dome
1
Multiple device connection
Max. 32 devices
(Keyboard and camera)
can be connected to a
RS-485 chain. E.g with 1
keyboard, you can max.
Connect 31 Speed
Domes.
For a multiple connection, you can
attach max. 4 keyboards to the
network. Make sure that every
keyboard has an unique ID.
RS-485
Distributor
Termination
Activated
on every dome


