background image

142 • Maintenance

3.

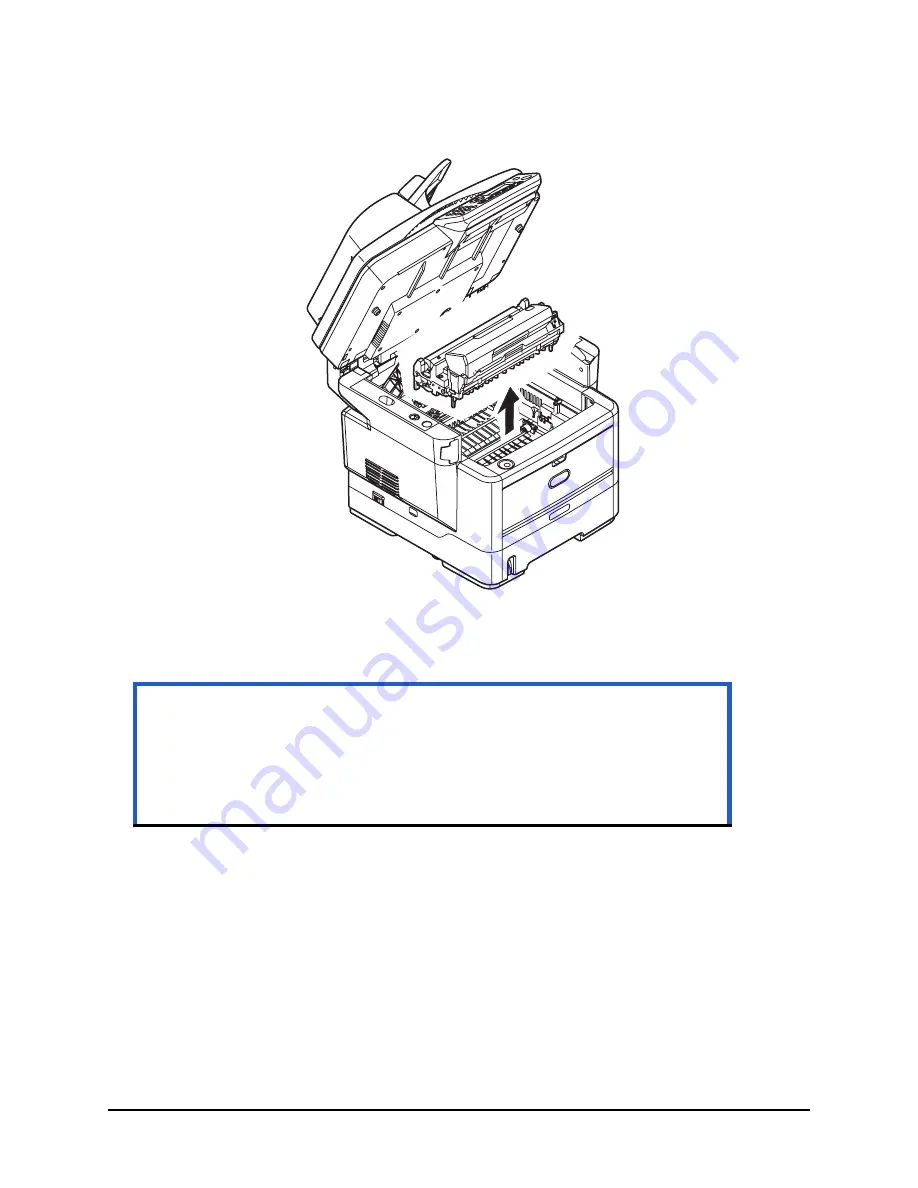
Holding it by its top centre, lift the image drum, complete with its toner cartridge, 

up and out of the MFP.

4.

Put the cartridge down gently onto a piece of paper to prevent toner from 

marking your furniture and to avoid damaging the green drum surface.

5.

With the colored toner release lever to the right, pull the lever towards you. This 

will release the bond between the toner cartridge and the image drum cartridge.

6.

Lift the right-hand end of the cartridge and then draw the cartridge to the right to 

release the left-hand end as shown, and withdraw the toner cartridge out of the 

image drum cartridge. Place the cartridge on a piece of paper to avoid marking 

your furniture.

7.

Take the new image drum cartridge out of its packaging and place it on the piece 

of paper where the old cartridge was placed. Keep it the same way round as the 

old unit. Pack the old cartridge inside the packaging material for disposal.

Caution!

The green image drum surface at the base of the cartridge is very 

delicate and light sensitive. Do not touch it and do not expose it to 

normal room light for more than 5 minutes. If the drum unit needs to 

be out of the MFP for longer than this, please wrap the cartridge 

inside a black plastic bag to keep it away from light. Never expose 

the drum to direct sunlight or very bright room lighting.

Summary of Contents for MPS480mb

Page 1: ...User s Guide 59102101 my okidata com RT322 MPS480mb...

Page 2: ...ly constitute endorsement by the manufacturer While all reasonable efforts have been made to make this document as accurate and helpful as possible we make no warranty of any kind expressed or implied...

Page 3: ...attempt to induce vomiting If inhaled move the person to an open area for fresh air Seek medical attention If it gets into the eyes flush with large amounts of water for at least 15 minutes keeping e...

Page 4: ...l panel 46 The Printer Menu 47 Setting the fax facility 61 Initial set up 61 Advanced set up 62 Managing the address book 66 Adding an email address entry 66 Deleting an email address entry 67 Modifyi...

Page 5: ...overlay 128 Defining overlays 129 Printing with PostScript overlays 129 Creating PCL Overlays 130 Creating the overlay image 130 Create and download macros 131 Test printing the macro 132 Defining ove...

Page 6: ...ide is part of a suite of printed and online documentation provided to help you become familiar with your unit and to make the best use of its many features Note Images used in this manual may include...

Page 7: ...ot operate at all even if it is described as compatible and if it does work your product s performance and print quality may be degraded Specifications are subject to change without notice Note A note...

Page 8: ...this MFP allows you to transmit document s over the internet via e mail With a touch of the e mail button and the selection of your recipients e mail addresses the document s is are first scanned and...

Page 9: ...l use of paper and compact printing of larger documents High speed USB 2 0 interface Emulations Standard PCL6 PCL5e and PostScript 3 Paper Handling 530 sheets 75 g m2 Template Manager Utility for Wind...

Page 10: ...sheets of 20 lb US Bond 75 g m paper 2 Top cover release button Press to open 3 Multi purpose tray release handle Pull to open 4 Multi purpose tray Used for feeding heavier paper stocks envelopes and...

Page 11: ...er switch Refer to Switching Off on page 19 for details 8 Scanner Bed 9 ADF Automatic Document Feed unit 10 ADF Automatic Document Feed paper tray Holds up to 50 sheets of letter A4 size paper 20 lb U...

Page 12: ...ed in conjunction with the multi purpose feed tray the paper path through the MFP is essentially straight This avoids bending the print media around curves in the paper path 16 AC power socket 17 Para...

Page 13: ...Sub Function Selection screen from the Stand by screen When Setting up Increments the value of the tree structure 3 Down Key When setting up or in switching mode Moves the cursor down 4 Right Key Whe...

Page 14: ...e structure When entering Pin ID Used to confirm the PIN ID entered When in Error Warning State Used to recover 7 One Touch Key Panel The One Touch keys 7a are used to dial numbers from 00 to 09 that...

Page 15: ...15 Overview Continued 9 Stop Button Stops the function being executed Copy Scan etc _ Cancels a Print job 10 Liquid Crystal Display LCD 128 x 64 dots...

Page 16: ...cters The example below is based on English being the display language KEY To scan through the choices for each key you must press the key rapidly within 2 seconds of the previous press 1 1 1 2 a b c...

Page 17: ...ort printing is English If required this can be changed using the Panel Language Setup utility English Canadian French Latin American Spanish Brazilian Portuguese Note See the information enclosed on...

Page 18: ...e document cover 2 Move the scan lock lever 1 to the UNLOCKED position Power Save Mode If you do not use the MFP for a while the machine will enter the power save mode to control the power consumption...

Page 19: ...ol panel to highlight Menu Press Enter 2 Press the down arrow button on the control panel to highlight System Shutdown Press Enter 3 Press Enter to execute 4 At the prompt turn the power switch OFF Ca...

Page 20: ...ve Tools Services 2 Double click Services 3 Double click Windows Image Acquisition WIA 4 From the Startup type menu select Automatic 5 Under Service status click Start 6 Click OK Windows Installing th...

Page 21: ...and Play Installation When the MFP is plugged into a PC using a USB cable you ll be prompted to install two different drivers the TWAIN scanner driver first and then the printer driver 1 Attach the p...

Page 22: ...22 Getting Started 4 Install the TWAIN driver first b c a d...

Page 23: ...he same 1 Insert the CD ROM and run the Oki driver installer program 2 Follow the on screen instructions to install the printer driver 3 Attach the printer to a USB port on your computer 4 Switch on t...

Page 24: ...data from your computer to the MFP and then the MFP automatically sends the document Windows XP has built in fax support you can use your computer s modem to send faxes directly from your computer In...

Page 25: ...e Actkey utility enables the unit to receive one key touch commands from a locally connected computer Installation of the Actkey utility is optional It is on the Driver Utilities CD under the Utilitie...

Page 26: ...3 The Utility returns to the Actkey console 7 To use Actkey in Local PC mode i e push scanning it must be set as the program to handle scanner events a Select Start Control Panel b Double click Scanne...

Page 27: ...ia including a range of paper weights and sizes transparencies and envelopes This section provides general advice on choice of media and explains how to use each type Standard Paper The best performan...

Page 28: ...le the same media sizes as the cassette trays but in weights from 60g m up to 163g m For very heavy paper stock use the face up rear cover paper stacker This ensures that the paper path through the MF...

Page 29: ...g m2 Heavy 28 32 lb US Bond 105 120 g m2 Legal 13 8 5 x 13 inches Legal 13 5 8 5 x 13 5 inches Legal 14 8 5 x 14 inches Executive 7 25 x 10 5 inches Statement 5 5 x 8 5 inches A6 105 x 140 mm A5 148 x...

Page 30: ...settings Always use this stacker and the multi purpose feeder for heavy paper stocks Duplex Unit The duplex unit provides automatic two sided printing on the same range of paper sizes as tray 2 i e a...

Page 31: ...31 Getting Started Loading Paper Cassette Trays 1 Remove the paper tray from the MFP...

Page 32: ...r Legal size paper push the lever in the arrow direction b and extend the paper tray using the rear paper stopper 3 Fan the paper to be loaded at the edges 1 and in the middle 2 to ensure that all she...

Page 33: ...e down with top edge towards the front of the paper tray up to mark a The paper level indicator 2 provides a visual indication of how much paper is left in the tray Note For letter head stationery loa...

Page 34: ...two trays optional second tray fitted and you are printing from the 1st upper tray you can pull out the 2nd lower tray during printing to reload it However if printing from the 2nd tray do not pull o...

Page 35: ...Started 6 Replace the tray in the MFP Loading Paper Multi Purpose Tray 1 Open the multi purpose tray 1 Fold out the paper support a 2 Press gently down on the paper platform 2 to ensure it is latched...

Page 36: ...of paper being used Do not exceed the paper capacity of about 50 sheets or 10 envelopes Maximum stacking depth is 10 mm about 3 8 inch 4 Press the tray latch button 4 inwards to release the paper pla...

Page 37: ...the top edge away from the MFP Envelopes should be loaded face up with top edge to the left and short edge into the MFP Do not select duplex printing on envelopes Load transparencies face up and top e...

Page 38: ...er Default From Address this MFP s Address To file document s via intranet FTP or CIFS Protocol environment Windows 2000 Windows XP Windows Vista Mac OS X or FTP server Pre configuration information G...

Page 39: ...he following network parameters have to be set 1 IP Address Set 2 IP Address 3 Subnet Mask 4 Gateway Address 5 DNS Server 6 SMTP Server 7 SMTP Port 25 8 POP3 Server 9 POP3 Port 110 Explanation 1 IP Ad...

Page 40: ...administrator 6 SMTP Port The port number of your SMTP Mail Server 7 DNS Server The IP address of DNS Server assigned by your network administrator 8 POP3 Server The IP address of your POP3 server 9 P...

Page 41: ...formation Instead this information will be automatically given for the MFP 2 IP Address An IP Internet Protocol address uniquely identifies a host connection to an IP network System administrator or n...

Page 42: ...F file format CIFS is the sharing system of Microsoft Windows What is unique about this filing function is that it allows all corporate users to share one machine to send documents to each file folder...

Page 43: ...r MFP 1 From the MFP s web page 2 From the MFP s Setup Tool utility 3 From the MFP control panel For illustration purposes only the configuration options shown are as accessed via the control panel No...

Page 44: ...pe the IP address of the MFP in the URL field of your browser and then press Enter The MFP web page displays For example http 10 18 207 81 Note The Administrative Settings are blocked by a password Re...

Page 45: ...the setup tool If you have not already done so install the setup tool as described in MFP Setup Tool Windows Only on page 24 Note The Administrative Settings are blocked by a password Refer to Pre con...

Page 46: ...wn arrow key 1 on the control panel until Menu is highlighted then press Enter 2 2 Press the Down arrow key 1 until Admin Setup is highlighted then press Enter 2 Note The Admin Setup option is blocked...

Page 47: ...A4 A5 B5 Mixed Mode Resolution Mixed Photo HiRes Mixed HiRes Photo Density 0 Density of print 3 0 3 Tray1 Input Tray Selects cassette Tray or Multi Purpose Tray Tray 1 Tray2 MP Tray Off Collate Sets c...

Page 48: ...tion Choose Address from Address Book Screen Entry Number LDAP Name Address Method OR AND Search Address List Subject Choose from the default subject list set by the administrator or enter a subject S...

Page 49: ...LEVEL 2 DESCRIPTION OPTIONS Email Scan to Email and save file Folder Scan to PC based folder Application Scan to Application1 Fax Scan to Facsimile and save file LEVEL 2 DESCRIPTION OPTIONS Check Dest...

Page 50: ...xx xxx xxx MAC Address Self explanatory xx xx xx xx xx xx NIC Program Version Self explanatory xx xx NIC Default Version Self explanatory xx xx System Serial Number Self explanatory xxxxxxxxxxxxxxxxxx...

Page 51: ...Execute PS Font List Execute IBM PPR Font List Execute EPSON FX Font List Execute Error Log Execute Demo Page DEMO1 Execute Prints a Demonstration page MFP Usage Report Execute Copies 1 to 99 Prints a...

Page 52: ...s Enable Disable Network Menu Network Setup TCP IP Enable Disable IP Version IPv4 IPv4 IPv6 IPv6 NetBEUI Enable Disable NetBIOS over TCP Enable Disable Ether Talk Enable Disable IP Address Set Auto Ma...

Page 53: ...t 110 POP Encryption None POP3S STARTTLS Authentication Method None SMTP POP SMTP User ID user defined SMTP Password user defined POP User ID user defined POP Password user defined LDAP Server Setup S...

Page 54: ...ble Default Orientation Potrait Landscape Form Length 5 60 64 128 lines Edit Size CassetteSize Letter Executive Statement Legal14 Legal 13 5 Legal13 A4 A5 A6 B5 Custom Com 9 Envelope Com 10 Envelope M...

Page 55: ...ate 33 6 Kbps 28 8 Kbps 14 4 Kbps 9 6 Kbps 4 8 Kbps TAD Mode Type1 Type2 Type3 Tel Priority Mode On Off Fax Setup cont Basic Setup cont CNG Detection On Off T F Timer Prg 20seconds 35seconds Remote Re...

Page 56: ...59 PCL T0ID 1 4 59 PCL T1ID 1 59 IBM PPR Setup Character Pitch 10 12 17 20 CPI Proportional Font Condense 12CPI to 20CPI 12CPI to 12CPI Character Set SET 2 SET 1 Symbol Set Available Sets Letter O Sty...

Page 57: ...olumn Form Length 11 11 7 12 inch TOF Position 0 0 0 1 1 0 inch Left Margin 0 0 0 1 1 0 inch Fit to Letter Enable Disable Text Height Same Diff PS Setup L1 Tray TYPE1 TYPE2 Parallel Protocol ASCII RAW...

Page 58: ...ight Medium Medium Heavy Heavy Tray2 Config Paper Size A4 A5 B5 Legal14 Legal13 5 Legal13 Letter Executive Custom Media Type Plain Letterhead Bond Recycled Cardstock Rough Media Weight Light Medium Li...

Page 59: ...0 0 00 2 00 millimeter Y Adjust 2 00 0 00 2 00 millimeter Duplex X Adjust 2 00 0 00 2 00 millimeter Duplex Y Adjust 2 00 0 00 2 00 millimeter Place Page Center Left Copy Menu Job Build Scanning On Off...

Page 60: ...t Grayscale On Off File Format PDF TIFF Compression Rate G3 G4 Raw Resolution 100 150 200 300 400 600 dpi Address Book Email Address 00 to 99 Group Address G00 to G19 Scan to Network PC Color Select C...

Page 61: ...sing the Down arrow key scroll to Fax Setup and press Enter 5 Press Enter to select the Clock Adjustment menu 6 Using the arrow keys and keypad enter the time and date 7 Press Enter to confirm 8 Using...

Page 62: ...s Enter to select Fax No 7 Using the keypad type in the destination fax number and press Enter 8 Press Enter to select Name 9 Using the keypad or arrow keys and the onscreen keypad type in the name 10...

Page 63: ...ow key 8 Press Enter to select Group Name 9 Using the keypad or arrows and the on screen keypad type in the name 10 Highlight Done and press Enter 11 Using the Down arrow key scroll to Done and press...

Page 64: ...the key three times to insert a then type in the destination fax number This will ensure the MFP waits until an outside line is available before dialling the rest of the number Automatic redial You ca...

Page 65: ...a telephone plug adaptor You will also need to update the telephone settings to set the ring response 1 Using the Down arrow key scroll to Menu and press Enter 2 Using the Down arrow key scroll to Ad...

Page 66: ...ect Email Address 5 Using the arrow keys scroll to the required email address entry position and press Enter 6 Press Enter to select Address 7 Using the keypad or arrows keys and the on screen keypad...

Page 67: ...email address entry from the address book 1 Using the Down arrow key scroll to Menu and press Enter 2 Using the Down arrow key scroll to Scanner Menu and press Enter 3 Using the Down arrow key scroll...

Page 68: ...s keys and the on screen keypad type in the name 10 Highlight Done and press Enter 11 Using the Down arrow key scroll to Done and press Enter to confirm and add your entry to the address book 12 Press...

Page 69: ...d group address and press Enter 6 If required press Enter to select Address List Update the details a Using the arrow keys scroll through the list and modify as required Press Enter to remove any addr...

Page 70: ...ll render the machine not usable by unauthorised users Enabling Access Control Access Control Enable Disable is switched in Menu Admin Setup System Setup Access Control If your administrator has enabl...

Page 71: ...of time Operation Time out the display automatically reverts to the idle screen if Access Control is disabled If an error state occurs Operation Time out is disabled After Operation Time out the displ...

Page 72: ...sure that your paper meets the following specifications Document s can range in size from 5 8 x 8 2 148 mm x 210m m 8 5 x 14 216 mm 356 mm Document s can range in weight from 16 to 28 lbs US Bond 60 1...

Page 73: ...f you have multiple pages fan the pages to avoid paper jams The ADF holds up to 50 pages at one time 2 Place the document with the text face UP in the ADF and make sure that the top of each page is fe...

Page 74: ...1 to centre the document in the ADF Placing document s on the glass 1 Open the document cover 2 Place your document with the text face DOWN on the glass and align the top of the page to the upper lef...

Page 75: ...ation Using the options available you can alter the copy output to suit your needs 1 Press Enter button 2 Select required parameter with Down arrow key and press Enter 3 Pressing Up and Down arrow key...

Page 76: ...ght Bottom to 0 mm 0 00 in d Any parts of the image that do not fit on the paper as a result of this setting are not printed The setting displayed mm or inch depends on the setting in Admin Setup Syst...

Page 77: ...glass 2 Using the Down arrow key scroll to Scan and press Enter 3 Press Enter to select Email 4 Using the Up arrow key scroll to Reply To and press Enter 5 Set the reply address from either Address Bo...

Page 78: ...or arrow keys and the on screen keypad type in the file name 13 Highlight Done and press Enter 14 If required adjust the density setting a Using the Down arrow key scroll to Density and press Enter b...

Page 79: ...le list is blank 5 Using the arrow keys scroll to the required profile filing destination and press Enter 6 Press the Start button Scan to PC The scanner function can be controlled from either the MFP...

Page 80: ...Application When the Application function is selected the Actkey Utility executes PC scan in accordance with your settings for Scan to Application1 The scanned image data is saved in the application s...

Page 81: ...from the PC Scan to Application1 Scan to Application2 Scan to Email Scan to Folder Scan to Fax Scan to Application2 works exactly the same as scan to Application1 simply allowing an alternative applic...

Page 82: ...itial character matches the entered character appears on the screen Note Lists of Speed Dials and Group Dials that have been added to the Phone Book are displayed in the order Group Dial G00 G09 and S...

Page 83: ...he Left arrow key to exit the list 4 If required press the Up arrow key and scroll to Check Dest to view edit the list of fax numbers Press Enter to remove any entry from the list no longer displays n...

Page 84: ...prove the quality by adjusting the density setting To change density 1 Follow Sending a Fax process steps 1 to 4 2 Using the Down arrow key scroll to Density 0 and press Enter 3 Using the Down arrow k...

Page 85: ...ge displays until you press the Stop button If an error occurs while a fax is being received fax communication related errors are displayed If an error occurs while a fax is printing error messages di...

Page 86: ...TAD Mode and press Enter 7 Select the appropriate setting Type1 Type2 Type3 8 Press the Left arrow key to exit the menu Refer to Reception Mode on page 65 for details on enabling TAD mode DRD interfac...

Page 87: ...6 Using the Down arrow key scroll to Remote Receive No and press Enter 7 Select the appropriate setting Off 000 111 222 333 444 555 666 777 888 999 8 Press the Left arrow key to exit the menu Refer to...

Page 88: ...n arrow key scroll to Basic Setup and press Enter 6 Using the Down arrow key navigate to the required report and press Enter Choose from MCF Single Location this prints a transmission report after eac...

Page 89: ...rop down menu b Set the resolution to Fine Normal or Fast c Set the orientation to Portrait or Landscape 5 On the Cover Sheet tab a Set the cover sheet usage settings as appropriate b Select a cover s...

Page 90: ...utton to add this number to the recipient list d Repeat b and c as required to create the recipient list e If you need to remove a number from the recipient list highlight the appropriate name and the...

Page 91: ...int 2 In the Select Printer window highlight the fax driver option 3 Press the Preferences button to display the fax driver window 4 Click the Phone book button The phone book screen displays 5 Select...

Page 92: ...create the group list d If you need to remove a number from the recipient list highlight the appropriate name and then press the Delete button 9 Once you have completed your list press the OK button...

Page 93: ...on the computer that the phone book file was imported start the phonebook in the same way and click Tool Import in the menu b In the Import File screen select a phone book file to import When the Ope...

Page 94: ...s applications When you choose to print your document from a Windows application program a Print dialog box appears This dialog usually specifies the name of the printer on which you will print your d...

Page 95: ...l one page per sheet or N up where N can be 2 or 4 for printing scaled down pages at more than one page per sheet 4 Under 2 sided Printing you can choose from auto or manual Under manual 2 sided Print...

Page 96: ...n and 1200 x 1200dpi for Xxxxxdn and Xxxxxdtn is the best option for printing vector objects such as graphics and text The Normal setting prints at 600 x 600dpi and is suitable for most printing jobs...

Page 97: ...the page image is done in the computer leaving little processing for the printer to do although the file size may be large In Vector mode file sizes may be smaller and so transmission over a network f...

Page 98: ...es that an array of lines is used for dithering 2 Select dithering texture by setting the size of dots used in the halftone screen 3 Set this control to print greyscale effects in black without dither...

Page 99: ...from Windows applications and will be remembered from one Windows session to the next General tab 1 This area lists some of the main features of your printer including optional items 2 This button op...

Page 100: ...ation program needs a lot of time for further computation in the middle of printing causing the print job to pause for more than a short period the printer could prematurely assume that the document h...

Page 101: ...ler chooses documents based only on their priority settings 7 Specifies that the spooler should not delete documents after they are completed This allows documents to be re submitted to the printer fr...

Page 102: ...102 Printer Settings in Windows Device options tab In this window you can select which optional upgrades are installed on your printer See the chapter entitled Installing options...

Page 103: ...tated by 180 degrees 2 Print on both sides duplex printing can be set to long edge or short edge of the document 3 Printed page order can be set as front to back or back to front of the document 4 Set...

Page 104: ...to set further document options as follows a Select the required printed paper size b You can substitute another font for TrueType Font c You can set other document options as required including Post...

Page 105: ...ttings in Windows Paper Quality tab You can set the paper source or leave it as automatic selection and by using the Advanced button you have access to the same set of options as described above for t...

Page 106: ...u would like to print on special stationery such as forms and letterhead but do not want to use pre printed stationery you can create your own using Overlays For more information on Overlays and Macro...

Page 107: ...vanced tabs are the same as for PCL emulation described earlier Device settings tab 1 You can set the desired paper sizes in each of the available paper feed trays 2 You can make a variety of font set...

Page 108: ...2 To carry out Duplex Printing 1 Select File Print and click the Properties button 2 Select the input tray Tray1 Tray2 optional Multi Purpose Tray from the Source drop down 3 In the Duplex printing dr...

Page 109: ...ting options You can choose your printer and select options for how you want your documents to print from the Print dialog box To set your printer options 1 Open the document you want to print 2 To ch...

Page 110: ...Copies Pages menu For a description of these options see Print Options on page 112 7 Click the Print button Saving driver settings You can save a set of printer driver options to use for future docum...

Page 111: ...e menu System Preferences 2 Click the Print Fax icon 3 Select your printer in the Selected Printer in Print Dialog drop down menu 4 Select your required paper size in the Default Size in Page Setup dr...

Page 112: ...specific paper size select Options in the Paper Handling drop down menu in the Print Options dialog box see Print Options on page 112 Orientation You can select a portrait or landscape option When us...

Page 113: ...e choosing 4 up will tie four of your document s pages across a single sheet of paper You can control the order in which the documents are tiled and also choose to surround each document page with a b...

Page 114: ...r This option lets you choose whether to print your document immediately or defer printing until later You can also assign a priority to a print job These features are useful if you are printing large...

Page 115: ...ose whether to print only odd or even number of pages This is useful if you are using manual duplex for which you first print all odd pages re insert the paper in the printer and then print all even p...

Page 116: ...ver page Choosing a cover page may help you identify your printed document in a large pile of paper This is useful in a busy office with many people sharing the printer Duplex Using the duplexer you c...

Page 117: ...gs in Mac OS X Long Edge Binding prints pages that read like a normal book Short Edge Binding prints pages that read like a notepad Paper source This option allows you to select the paper tray to use...

Page 118: ...by adjusting the combination of dots used in printing Selecting a setting determines the degree of detail with which a graphics image will be printed Mesh determines that a screen of dots is used for...

Page 119: ...on normal A4 paper do not select Labels or Transparency as this may cause toner smearing and paper jam Toner Save Toner Save uses less toner when printing your document This is best suited to draft te...

Page 120: ...ss of the document size Feed manually from Multi purpose tray Select this option if you want the printer to wait until you press the START button when feeding from the Multi purpose Tray This can be u...

Page 121: ...ions for the current job PS emulation Copies pages Refer to Copies Pages on page 112 Layout Refer to Pages per sheet on page 113 The Two sided option is used for Duplex printing Long edged Binding pri...

Page 122: ...rint detailed report under Error Handling which will print the error page in detail This will help you identify the error and take suitable action Tray switching If the printer runs out of paper in th...

Page 123: ...printed by setting Multi purpose tray as the source The remaining pages of the document can be loaded in the cassette tray and you can set that as the paper source The entire document will be printed...

Page 124: ...ndled as manual feed Select this option if you want the printer to wait until you press the START button when feeding from the Multi purpose Tray This can be useful if printing envelopes Job options Q...

Page 125: ...e lines select this option to improve the appearance of the lines However in some applications if this options is selected and you are printing barcodes the spaces in the barcode becomes too narrow De...

Page 126: ...printing Try to cancel printing job within software application Document is waiting in a print queue Delete print job from Print Queue You can access the print queue from the System Tray in Windows or...

Page 127: ...application software and print it to a printer PRN file 2 Use the Storage Device Manager utility software supplied on CD with your printer to create a project file import the PRN file s and download t...

Page 128: ...files to the current project 6 When a message box appears confirming that a filter file has been created click OK to clear the message 7 The project window will display one HST file for each printer...

Page 129: ...of the overlay file 4 exactly as it appeared in the Storage Device Manager project window Remember that this name is case sensitive If you forgot to note the overlay names when you created them you ca...

Page 130: ...y 4 and then click the Add button 3 again 7 When you have selected all the overlays you want to use for this document click OK 8 Finally in your application s print dialog click OK to begin printing C...

Page 131: ...down list to PRN Files prn 5 Navigate to the folder where the overlay PRN files are stored and select one or more of these to include in your overlay set You can have more than one macro file in a pro...

Page 132: ...pop up menu 3 On the Job Options tab click the Overlay button 4 In the Overlay window Click the Define Overlays button 1 5 In the Define Overlays window enter the name a and ID b of the required overl...

Page 133: ...our application s Print dialog and choose any options you will require ensuring that the target printer is your PCL printer driver in which the overlays have been defined 3 Click the Properties button...

Page 134: ...r is low or if print appears faded first open the top cover and try tapping the cartridge a few times to evenly distribute the toner powder This will enable you to obtain the best yield from your tone...

Page 135: ...cerning waste recycling If you do spill any toner powder lightly brush it off If this is not enough use a cool damp cloth to remove any residue Do not use hot water and NEVER use solvents of any kind...

Page 136: ...d open the top cover b fully 3 Pull the colored toner release lever 1 on the cartridge to be replaced fully towards the front of the MFP Warning If the MFP has been powered on the fuser may be hot Thi...

Page 137: ...m its box but leave its wrapping material in place for the moment 7 Gently shake the new cartridge from end to end several times to loosen and distribute the toner evenly inside the cartridge Caution...

Page 138: ...s top centre with the colored lever to the right lower it into the printer over the image drum unit from which the old cartridge was removed 10 Insert the left end of the cartridge into the top of the...

Page 139: ...hat it is firmly seated push the colored lever towards the rear of the MFP This will lock the cartridge into place and release toner into the image drum unit 12 Close the top cover and press down firm...

Page 140: ...140 Maintenance Image drum replacement 1 Lift the scanner Caution Static sensitive devices handle with care...

Page 141: ...141 Maintenance 2 Press the cover release a and open the top cover b fully Warning If the MFP has been powered on the fuser will be hot This area is clearly labelled Do not touch a b...

Page 142: ...aw the toner cartridge out of the image drum cartridge Place the cartridge on a piece of paper to avoid marking your furniture 7 Take the new image drum cartridge out of its packaging and place it on...

Page 143: ...less the remaining toner level is very low 9 Push the colored release lever away from you to lock the toner cartridge onto the new image drum unit and release toner into it 10 Holding the complete ass...

Page 144: ...f you need to return or transport this product for any reason please make sure you remove the image drum unit beforehand and place in the bag provided This is to avoid toner spillage Refer to Appendix...

Page 145: ...cloth moistened sparingly with water or neutral detergent 3 Use a soft dry cloth to dry the unit surface 4 Turn on the MFP the paper path in the ADF If marks are found on an image which has been read...

Page 146: ...up until it is locked 4 Moisten a soft clean lint free cloth and remove any marks by wiping the cloth in the direction of the arrow as shown 5 Return the feeder mechanism to its original position 6 C...

Page 147: ...as shown 3 Close the document cover the document glass The document glass needs to be cleaned occasionally to ensure optimum image quality and performance 1 Open the document cover 2 Moisten a soft cl...

Page 148: ...n the LED head when printing does not come out clearly has white lines or when text is blurred There is no need to switch the MFP off to clean the lens 1 Lift the scanner 2 Press the cover release a a...

Page 149: ...th and gently wipe the LED head surface 4 Close the top cover and press down firmly so that the cover latches closed 5 Gently lower the scanner Caution Do not use methyl alcohol or other solvents on t...

Page 150: ...and speed up the processing of large files Second paper tray to increase your printer s paper handling capacity by 530 sheets 75 g m2 Option order numbers Installation procedure To install any of the...

Page 151: ...oint on the paper path through the printer or scanner ADF When a jam occurs the MFP immediately stops If printing multiple pages or copies do not assume that having cleared an obvious sheet others wil...

Page 152: ...152 Troubleshooting b Remove any paper from ADF mechanism 4 Lower the ADF cover 5 Press the Stop button to restore the scanning head to the correct position In the printer section 1 Lift the scanner...

Page 153: ...ooting 2 If a sheet is well advanced out of the top of the printer simply grip it and pull gently to draw it fully out If it does not remove easily do not use excessive force It can be removed from th...

Page 154: ...154 Troubleshooting 3 Press the cover release a and open the MFP s top cover b fully Warning If the MFP has been powered on the fuser will be hot This area is clearly labelled Do not touch a b...

Page 155: ...avoid damaging the green drum surface Caution The green image drum surface at the base of the cartridge is very delicate and light sensitive Do not touch it and do not expose it to normal room light f...

Page 156: ...FP locating the pegs at each end into their slots in the sides of the MFP cavity 8 Lower the top cover but do not press down to latch it closed yet This will protect the drums from excessive exposure...

Page 157: ...w down in this area and difficult to remove it is probably still gripped by the fuser In this case raise the top cover reach around and press down on the fuser pressure release lever 10 If you are not...

Page 158: ...uplex Unit 1 and check for any paper in this area Remove any paper and replace the duplex unit Note If the paper is not advanced enough to grip push the cover 2 in the arrow direction raise it and rem...

Page 159: ...Multi Purpose Tray Remove any paper that you find and then close the tray 13 Pull out the paper tray and remove any paper from the underside of the printer Ensure that all paper is stacked properly i...

Page 160: ...guides are properly positioned against the edges of the paper stack When satisfied replace the tray 14 Close the top cover and press down firmly at both sides so that the cover latches closed 15 Gentl...

Page 161: ...ute any remaining toner If symptoms persist replace the toner cartridge The paper is not suitable for the printer unit Use recommended paper Printing is light The toner cartridge is not properly seate...

Page 162: ...is damaged Replace the fuser unit The image drum cartridge has been exposed to light Replace the image drum cartridge if the problem is not resolved White area of paper is lightly stained Paper contai...

Page 163: ...e conditions can also cause communication errors Try sending the fax again and check to make sure that the correct telephone number is being dialled If a prefix number must be dialled to get an outsid...

Page 164: ...hen check to see if the toner or image drum need replacing see Replacing consumable items on page 135 MFP is set for delayed transmission but it did not send Check the display to make sure that the MF...

Page 165: ...inches 447 x 432 x 529 mm Weight approximate 41 9 lbs 19 kg Power source 120V 50 60 Hz 2 220 240V 50 60Hz 2 Power consumption Operating 800W max Normal operating 500W Stand by 100W Power save mode 10...

Page 166: ...tbed ADF 50 000 pages or 5 years 240 000 pages or 5 years Scan area Flatbed ADF 105 mm x 148 mm 215 9 mm x 296 9 mm 105 mm x 148 mm 215 9 mm x 355 6 mm Document size Flatbed ADF B5 A5 A4 Letter B5 A5...

Page 167: ...DF B5 A5 A4 Letter B5 A5 A4 Letter Legal 13 Legal 13 5 Legal 14 Density 7 levels Copy Mode Mixed Photo 300 dpi Scan 600dpi Print Hires Mixed Hires Photo 600 dpi Scan 600dpi Print Input tray Tray 1 MP...

Page 168: ...S UPnP Bonjour POP3 SNTP WSDPrint Kerberos NetBEUI SMB NetBIOS CIFS WINS Netware Remote printer mode max 8 print servers Print server mode max 8 file server 32 queues Encrypted password support in pri...

Page 169: ...32 digits each location Group dial max 10 groups Auto redial Yes One touch dial 5 x 2 location with shift key Sender ID Yes max 32 characters Transmission Broadcast Yes max 100 transmissions Delayed...

Page 170: ...s of Subject Job Build Scanning Yes Separation limit 1MB 3MB 5MB 10MB 30MB No limit Mail server authentication SMTP Auth POP3 Supported mail server application Lotus Mail Server 5 0 MS Exchange Server...

Page 171: ...ION Communication protocol FTP CIFS File formats PDF M TIFF JPEG Default file format PDF Resolution 100 150 200 300 dpi 400 600 dpi 1 bit mono only Default resolution B W 200dpi Grey Color 150dpi Max...

Page 172: ...eets Multi Purpose Tray 50 sheets Optional 2nd Tray 530 sheets Paper weight Main Tray 16 to 32 lb US Bond 60 120 g m Multi Purpose Tray 16 to 43 lb US Bond 60 163 g m Optional 2nd Tray 16 to 32 lb US...

Page 173: ...the following Power cord Printer cable Paper in the paper cassette Note Lock the scanner before moving the MFP Warning This product is heavy a minimum of two people are required to lift it safely Note...

Page 174: ...A Moving and transporting 2 Lift the scanner 3 Press the cover release a and open the top cover b fully warning If the MFP has been powered on the fuser will be hot This area is clearly labelled Do n...

Page 175: ...tall the image drum along with the toner cartridge back into the MFP 7 Close the top cover and press down firmly so that the cover latches closed Caution The green image drum surface at the base of ea...

Page 176: ...t the MFP with cushion pads and put it in a box Note It is recommended that you use the original box and packaging if available Warning This product is heavy a minimum of two people are required to li...

Reviews: