background image

20

Microline 420/421 User’s Guide
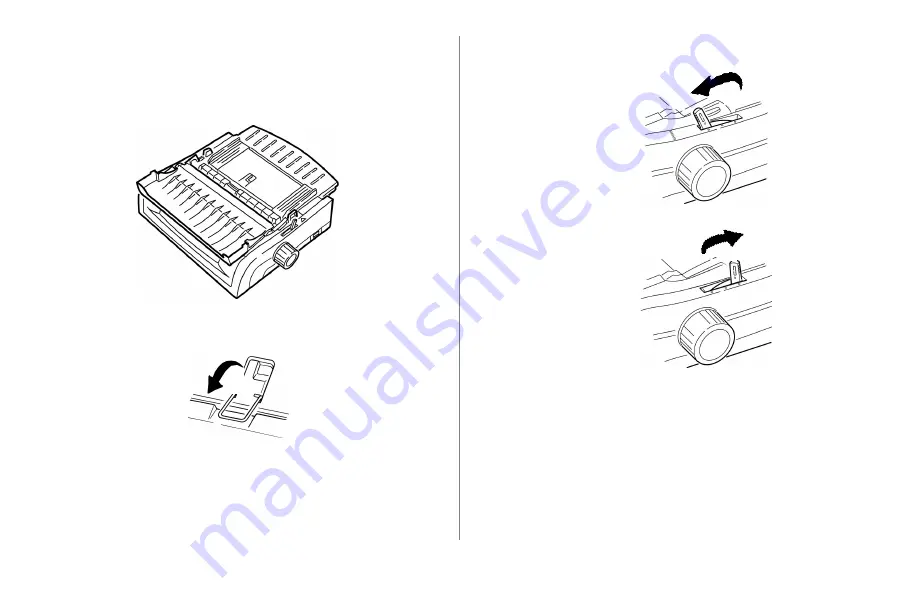
Move the paper lever to the appropriate position.

• Rear feed:

• Bottom feed:

If necessary, load continuous-form paper.

Press 

FF/LOAD

.

Single Sheets to Continuous Forms

Press 

FF/LOAD

 to remove the single-sheet paper.

Lower the sheet guide into the continuous-forms position.

Swing the wire feed guide over onto the pull-up roller.

Summary of Contents for ML420 Series

Page 1: ...User s Guide 59348301...

Page 2: ...ention of software products manufactured by other companies does not necessarily constitute endorsement by Oki Data Copyright 2002 2007 by Oki Data All rights reserved Written and produced by the Oki...

Page 3: ...ches the rating listed on the back of the printer If you aren t sure check with your dealer or with your local power company Your printer has a grounded 3 prong plug as a safety feature It will only f...

Page 4: ...des of the printer You could get a shock or cause a fire Aside from the routine maintenance described in this document don t try to service the printer yourself Opening the cover may expose you to sho...

Page 5: ...Sheets 11 Top of Form TOF 12 Top of Form TOF and Forms Tear Off 12 Determining if Forms Tear Off is Off or On 13 Setting Top of Form TOF Forms Tear Off OFF Default Setting 14 Setting Top of Form TOF...

Page 6: ...hapter 6 Troubleshooting 60 General Information 60 Problems Solutions 61 Appendix A Parts Accessories 66 Purchasing Parts Accessories 66 Replacement Parts 67 Accessories 68 Appendix B Printer Control...

Page 7: ...okidata com Printer Features Super reliable durable operation 20 000 hours Mean Time Between Failures MTBF at 25 duty cycle and 35 page density Advanced paper handling with built in rear push tractor...

Page 8: ...information see Paper Park in Chapter 3 Saving Money Forms Tear Off The Forms Tear Off feature allows a printed continuous forms page to be torn off without wasting paper or adjusting the printer When...

Page 9: ...3 Turning the Platen Knob Important Always turn the printer off before turning the platen knob If you turn the platen knob when the printer is on the Top of Form misaligns Controlling Access to the Pr...

Page 10: ...ward Chapter 3 Using Your Printer Parts Identification Rear Feed Continuous Forms Note The serial number of your printer is on a label on the back beside S N Sheet Guide Paper Lever On Off Switch Plat...

Page 11: ...1 Parts Identification Top Feed Single Sheets Paper Guides Sheet Guide Paper Lever On Off Switch Platen Knob Control Panel Acoustic Cover open Note For single sheet printing the paper lever must be in...

Page 12: ...is adjustable in increments of 1 144 of an inch The amount of adjustment is limited to avoid paper jams The first line prints at the red line of the plastic paper shield 1 on the printhead Top of Form...

Page 13: ...2 then press SEL 1 to enter the Menu Mode 3 Press PARK 4 to print the menu 4 Look for the Form Tear Off setting in the paper feed group you are using Rear Feed Bottom Feed or Top Feed Forms Tear Off...

Page 14: ...EL light goes out 2 Press and hold SHIFT 2 then Note When you begin pressing the Micro Feed key the printhead will move to the right Press LF Micro Feed Down 3 to set the TOF higher the paper moves do...

Page 15: ...t briefly until the paper moves up to the tear position then press and hold TEAR 5 The paper moves to the current TOF 5 Keep holding TEAR then press and hold SHIFT 2 and release TEAR 6 Continue to hol...

Page 16: ...To move the Top of Form position lower for one page only 1 Press SEL to deselect the printer 2 Press LF to lower the position of the Top of Form Resetting Top of Form to the Factory Default The factor...

Page 17: ...ff automatically moves the paper to align the perforation with the tear bar located under the access cover after the time interval which you selected through the menu Paper remains in the tear off pos...

Page 18: ...e third column Rear Feed Form Tear Off 1 Sec 5 Press SHIFT 2 SEL 1 to exit Menu Mode and save the setting Manual Forms Tear Off If you don t wish to engage the Forms Tear Off feature you can advance r...

Page 19: ...pages then press PARK 2 Raise the sheet guide 1 to the single sheet feed position 3 Pivot the wire feed guide into the sheet guide 4 Move the paper lever 1 to the middle position marked TOP 5 Adjust...

Page 20: ...on Rear feed Bottom feed 5 If necessary load continuous form paper 6 Press FF LOAD Single Sheets to Continuous Forms 1 Press FF LOAD to remove the single sheet paper 2 Lower the sheet guide into the c...

Page 21: ...arbon 3 3 part form with carbon 4 4 part form with carbon 5 Envelopes or extra thick paper Note When the head gap is set to 2 3 4 or 5 the printer automatically slows down for better print quality wit...

Page 22: ...mmands Press PRINT QUALITY 1 to select UTL Utility the default Medium quality medium speed 380 cps Gothic typeface only HSD High Speed Draft Lower quality higher speed 507 cps Gothic typeface only SSD...

Page 23: ...onal press the CHARACTER PITCH key until the light for the cpi value you wish to use is lit Character Pitch Important Front panel settings for character pitch are normally overridden when the SI comma...

Page 24: ...set the printer to the factory defaults For information on resetting the printer to the factory defaults see Resetting the Menu to the Factory Defaults later in this chapter Emulations IBM Proprinter...

Page 25: ...py of all the Menu settings With the SHIFT key prints the current settings for the Group selected MENU Light Glows when the printer is in the Menu Mode Note Please print the current Menu Mode settings...

Page 26: ...s 1 Turn the printer off 2 Press SEL LF while turning the printer on Printing the Menu Settings Printing the Current Menu Settings 1 Make sure paper is loaded in the printer 2 Press and hold SHIFT the...

Page 27: ...TEM and SET keys to make your changes a Press GROUP until the Group you wish to change appears in the first column b Press ITEM until the Item you wish to change appears in the second column c Press S...

Page 28: ...BM PPR Epson FX ML Font Print Mode LQ Courier LQ Roman LQ Swiss LQ Swiss Bold LQ Orator LQ Gothic LQ Prestige Utility HSD DRAFT Mode HSD SSD Pitch 10 cpi 12 cpi 15 cpi 17 1 cpi 20 cpi Proportional Spa...

Page 29: ...ear Off Off 500 ms 1 sec 2 sec Skip Over Perforation No Yes Page Width wide model 13 6 8 Page Length 11 11 2 3 12 14 17 5 3 3 5 4 5 5 6 7 8 8 5 Bottom Feed Line Spacing 6 LPI 8 LPI Form Tear Off Off 5...

Page 30: ...dth wide model 8 13 6 Page Length 11 11 2 3 12 14 17 5 3 3 25 3 5 4 5 5 6 7 8 8 5 Wait Time 500 ms 1 sec 2 sec Page Length Control by Actual Page Length by MENU Setting Set Up Graphics Bi directional...

Page 31: ...25 mmm to the right or left set in 0 05 mm increments press SEL to shift registration to the left press SHIFT SEL to shift registration to the right 7 or 8 Bits Data Word 8 7 Operator Panel Function...

Page 32: ...ect No Yes Centering Position DEFAULT MODE 1 MODE 2 CSF Type Wide Narrow Power Saving Enable Disable Power Save Time 5 min 10 min 15 min 30 min 60 min Parallel I F I Prime Buffer Print Buffer Clear In...

Page 33: ...Data 7 8 Bits 8 Bits 7 Bits Protocol Ready Busy X On X Off Diagnostic Test No Yes Busy Line SSD SSD DTR RTS Baud Rate 19200 bps 9600 bps 4800 bps 2400 bps 1200 bps 600 bps 300 bps DSR Signal Valid Inv...

Page 34: ...Bin 1 Line Spacing 6 LPI 8 LPI Bottom Margin Valid Invalid Page Width Wide model 8 13 6 Page Length 11 11 2 3 12 14 17 5 3 5 4 5 5 6 7 8 8 5 CSF Bin 2 Line Spacing 6 LPI 8 LPI Bottom Margin Valid Inv...

Page 35: ...Invalid Epson emulation only In the Epson emulation the XT signal on pin 14 of the parallel interface can control automatic line feed Some interface cables are wired in such a way that automatic line...

Page 36: ...led Sets the length of the busy signal when the Ready Busy protocol factory default is engaged Centering Position Default DEFAULT Used to limit printhead travel when printing narrow columns Select Mod...

Page 37: ...DTR Signal Default Ready on Power Up Appears only when the optional Serial Interface is installed Change to Ready on Select if the DTR signal is required when the printer is selected leave as Ready o...

Page 38: ...more lines on a page Operator Panel Function Default Full Operation Change to Limited Operation to deactivate the PRINT QUALITY and CHARACTER PITCH buttons so that these features can only be controll...

Page 39: ...aution Engaging Paper Out Override can cause loss of data and damage the printhead by allowing printing without paper Parity Default None Appears only when the optional Serial Interface is installed S...

Page 40: ...ed Change to X ON X Off if that is the type of protocol your system uses Receive Buffer Size Default 64K Selects the amount of memory devoted to holding received data Choosing 1 Line will tie up your...

Page 41: ...wn page formatting controls Style Default Normal Change to italics if you want the printed characters to be slanted Time Out Print Default Valid If your software spends a long time processing between...

Page 42: ...orrect replacement ribbon for the your printer The wrong ribbon will not print when installed in your printer Look for the printer model number on the ribbon package Ribbon Cartridge Handling Leave un...

Page 43: ...nob 1 in the direction of the arrow to take up any ribbon slack 6 Close the access cover and turn the printer back on CAUTION If ribbon should contact the eyes Flush eyes with large quantities of wate...

Page 44: ...o the back of the printer If you do not skip down to Loading Rear Feed Paper from the Front of the Printer 1 Make sure the paper lever is forward position marked REAR 2 Open the access cover 1 Loading...

Page 45: ...y rest it against the roller assembly Careful If you push the sheet guide too hard against the roller assembly it may dislodge it If it does be sure to reseat the roller assembly before continuing 3 G...

Page 46: ...printer to the reference mark 2 matching the width of the paper you are loading Then close the lock lever on the right tractor Note The movement of the right tractor is limited to ensure that the pape...

Page 47: ...er of paper holes engaged on either pin the same If you don t the paper will skew and jam 9 Close the right tractor cover 10 Adjust the left tractor until the holes in the paper are centered on the pi...

Page 48: ...rks align 12 Place the wire guide 1 in the illustration for the step above in the sheet guide on the pull up roller assembly 13 Press FF LOAD Note The factory default setting for the Top of Form where...

Page 49: ...he back of the printer If you do go back to Loading Rear Feed Paper from the Rear of the Printer earlier in this chapter Lock Lever Upper Tractor Cover Pins 1 Make sure the paper lever is forward posi...

Page 50: ...most common paper sizes ML420 ML421 6 Move the left tractor to the position to match your paper size and push back on the lever to lock it in place then move the right tractor to fit the width of the...

Page 51: ...f the right tractor to center the holes in the paper on the pins Then close its tractor cover and push back the lock lever Do not stretch the paper Note If the paper is too loose or too tight it can c...

Page 52: ...guide 1 in the sheet guide on the pull up roller assembly 11 Press FF LOAD Note The factory default setting for the Top of Form where the printing should begin is 1 down from the top of the page To c...

Page 53: ...Pivot the wire feed guide 2 up into the sheet guide Top Feed Single Sheets Note If you have continuous form paper in the path press PARK to remove it before loading single sheets 1 Make sure the prin...

Page 54: ...nt If the paper does not feed in remove it Check the paper lever position Make sure the ALARM light is on if it is flashing hold the SHIFT key and press the CHARACTER PITCH RESET key Reload the sheet...

Page 55: ...he printer is turned off before you open the access cover 3 Open the access cover 1 and remove the pull up roller assembly 2 Remove any torn pieces of paper 5 Lift the sheet guide 1 and reload paper M...

Page 56: ...ly 2 Then grasp the tabs 3 on the sheet guide 4 and lift it off the printer Rear Feed Repeating Paper Jams If the paper keeps jamming you may have defective paper misaligned paper bits of paper stuck...

Page 57: ...e covers 6 Use the platen knob to draw the quadruple thick page around the platen This brings out jammed pieces of paper 7 Remove the paper pieces Then use the platen knob to back the paper out 8 Load...

Page 58: ...ams 1 Turn off the printer 2 Use the platen knob to back the paper out 3 Open the access cover 1 and remove the pull up roller assembly 2 4 Remove any torn pieces from around the carriage 5 Reinstall...

Page 59: ...amage the housing 1 Turn off the printer 2 Use the platen knob to back the paper out of the printer CAUTION Make sure the printer is turned off before you open the access cover 3 Open the access cover...

Page 60: ...mbient conditions Does the paper being used meet the specifications for this product Is the paper properly installed Is the ribbon properly installed Is an Oki ribbon being used Is the printhead gap c...

Page 61: ...nel and menu settings To change your printer to ignore the reset code enter the Menu Mode go to the Set Up group and change the setting for Reset Inhibit to Yes The I Prime signal will automatically o...

Page 62: ...rd installed check to be sure that it is firmly seated in the printer Problem I m getting strange symbols incorrect fonts etc when I try to print a document Solutions 1 Check to be sure that the print...

Page 63: ...osition to MODE 1 See Using Your Printer Menu Mode For the wide carriage printer if MODE 1 doesn t work try setting the Centering Position to MODE 2 Problem I ve installed a new ribbon and the printin...

Page 64: ...the printer off and then back on again If the light still blinks call for service Problem The ALARM light is on and the Character Pitch 10 light is flashing Solution This indicates that the paper lev...

Page 65: ...ke the paper cling to the sheet guide Try moving the paper guides together so that the paper rests on the guides rather than on the separator Problem The Print Quality and Character Pitch keys on the...

Page 66: ...your purchased your printer Locate an Authorized Oki Data Reseller by visiting one of our web sites http my okidata com allows you to register your product and personalize your own support needs http...

Page 67: ...Ribbon Cartridge 42377801 Platen Knob 51902220 Power Cord 56631801 Printhead 41923901 Model ML420 Access Cover 42115401 Sheet Guide 51009509 Pull Up Roller Assembly 42044701 Model ML421 Access Cover 4...

Page 68: ...Model ML421 Pull Tractor Top Mount 70030601 Push Tractor Bottom Mount 70030801 Both Models Cut Sheet Feeder 70030101 Serial Interface 70012801 OkiLAN 6120i 10 100 Base T Ethernet Internal Print Serve...

Page 69: ...our printer model then click Continue 3 Click Documentation and follow the on screen prompts to view the file IBM Proprinter III Commands IBM Command ASCII Decimal Backspace BS 8 Carriage Return CR 13...

Page 70: ...55 ESC C n 27 67 n Horizontal Tab Execute HT 9 Italics On ESC G 27 37 71 Italics Off ESC H 27 37 72 IBM Command ASCII Decimal Line Feed Execute w Carriage Return LF 10 n 144 n 1 to 127 ESC 5 n 27 37 5...

Page 71: ...DC1 17 Proportional Spacing On ESC P 1 27 80 49 Proportional Spacing Off ESC P 0 27 80 48 Reset Clear Print Buffer CAN 24 IBM Command ASCII Decimal Software I Prime ESC NUL 27 125 0 Stop Printing ESC...

Page 72: ...Print DC2 18 Delete DEL 127 Epson Command ASCII Decimal Double Height On ESC w 1 27 119 49 Double Height Off ESC w 0 27 119 48 Double Width On ESC W 1 27 87 49 Double Width Off ESC W 0 27 87 48 Empha...

Page 73: ...97 51 Line Feed Execute Select 10 cpi ESC P 27 80 Select 12 cpi ESC M 27 77 w Carriage Return LF 10 n 216 n 0 to 255 ESC J n 27 74 n n 144 n 0 to 127 ESC 5 n 27 37 53 n Reverse n 216 n 0 to 255 ESC j...

Page 74: ...nt Suppress Mode On DC3 19 Print Suppress Mode Off DC1 17 Proportional Spacing On ESC p 1 27 112 49 Proportional Spacing Off ESC p 0 27 112 48 Epson Command ASCII Decimal Reset Printer Clear Buffer In...

Page 75: ...k Graphic ESC 1 27 33 49 Line Graphics ESC 2 27 33 50 Publisher ESC Z 27 33 90 Oki Command ASCII Decimal Slashed Zero ESC 27 33 64 Unslashed Zero ESC A 27 33 65 Double Height On ESC US 1 27 31 49 Doub...

Page 76: ...9 n 27 37 57 n Skip Over Perforation 1 3 increments n 1 to 9 ESC G n n 27 71 n n Default ESC S 0 27 37 83 48 Oki Command ASCII Decimal Paper Out Sensor Off ESC E 1 27 69 49 Paper Out Sensor On ESC E...

Page 77: ...ime ESC NUL 27 125 0 Subscript Printing On ESC L 27 76 Subscript Printing Off ESC M 27 77 Superscript Printing On ESC J 27 74 Superscript Printing Off ESC K 27 75 Underline Printing On ESC C 27 67 Und...

Page 78: ...ptional RS 232C Serial Ethernet Print Servers 6120i 10 100 Base T Internal 6020e 10 100 Base T External 6010e 10 Base T External Receive Buffer Size Maximum 128K Reliability Ribbon Life 4 million char...

Page 79: ...ed Speed Mode Characters per Second Super Speed Draft SSD 570 cps High Speed Draft HSD 507 cps Utility 380 cps Near Letter Quality NLQ 95 cps Characters per Line cpl Setting ML420 ML421 10 cpi 80 cpl...

Page 80: ...2 dpi Double 144 x 144 dpi Quadruple 288 x 144 dpi Resident Fonts Print Quality Available Fonts Near Letter Quality Courier Gothic Utility Gothic High Speed Draft Gothic Super Speed Draft Gothic Bar C...

Page 81: ...3 to 10 76 to 254 mm Interleaf continuous forms orig 4 copies Feed Rear Bottom Weight 10 to 12 lb paper 9 lb carbon Width Range 3 to 10 76 to 254 mm Labels Feed Bottom Only Weight Not applicable Width...

Page 82: ...e 3 to 16 76 2 to 406 4 mm Interleaf continuous forms Feed Rear Bottom Weight 10 to 12 lb paper 9 lb carbon Width Range 3 to 16 76 2 to 406 4 mm Labels Feed Bottom Only Weight Not applicable Width Ran...

Page 83: ...5 RH Electrical Requirements 120 volts ac 6 15 50 or 60 Hz 2 58 W Typical 10 W idle 230 ac 15 14 50 or 60 Hz 2 58 W Typical 10 W idle Physical Specifications Note Height dimensions do not include the...

Page 84: ...n knob and the various paper feed paths Make sure a suitable grounded power outlet is available nearby Unpack If any items are missing contact your dealer immediately Keep your packing materials and c...

Page 85: ...tape then grasp the tabs 1 at either end of the access cover and pivot it toward the front of the printer as far as it will go 2 Remove the printhead shipping restraint 3 Remove the shipping restrain...

Page 86: ...tabs 1 to lift and remove the sheet guide then remove the shipping restraint 5 Reinstall the sheet guide insert the clips on either side of the separator into the notches marked with a triangle then...

Page 87: ...and turn the printer on Install the Ribbon Cartridge Important Make sure you have the correct replacement ribbon for your printer The wrong ribbon will not print when installed in your printer Ribbon...

Page 88: ...on the printer Computer Connections Parallel LPT IEEE 1284 Requires bidirectional cable max length 6 ft 1 8 m not supplied Printer has 36 pin socket 1 Make sure the printer and computer are both turn...

Page 89: ...t supplied Printer has USB B receptacle 1 Make sure the printer and computer are both turned off 2 Attach a suitable USB cable to the printer Then attach the cable to your computer 3 Turn the computer...

Page 90: ...to 8 5 inches Otherwise printing on the platen may damage the printer See Chapter 4 Menu Mode for more information The Font Sample Test prints a sample of the fonts standard to the printer The top of...

Page 91: ...intout of all 96 ASCII characters in a rolling pattern in whatever typeface is selected default LQ Courier The top of the printout shows the Printer Model Emulation Country Code and Firmware Revision...

Page 92: ...ge the Hexadecimal Dump Mode 1 Make sure paper is loaded 2 Turn off the printer 3 Hold the SEL and FF LOAD keys for several seconds while turning on the printer To exit the Hexadecimal Dump Mode Press...

Page 93: ...1 Turn the printer on The Windows Add New Hardware Wizard window displays 2 Click Next 3 Insert the CD into your CD ROM drive 4 Follow the on screen instructions to install the software for your print...

Page 94: ...C Carbonless continuous forms 81 82 Card Stock 81 82 Centering printhead position 63 Character Pitch 39 Selecting 23 Character Set 28 36 Character Width 39 Characters Per Second CPS 7 Code Page Charac...

Page 95: ...printer III Commands 69 71 Initialization string 61 Interleaf Continuous Forms 82 Interleaf continuous forms 81 Interleaved 2 of 5 80 Italics 28 41 L Labels 81 82 Language 28 Length Page Rear Feed 29...

Page 96: ...over 29 41 Pitch character 28 39 PlatenKnob part number 67 Postnet 80 Power rating 3 Print Method 78 Print Mode 28 40 Print Registration 31 40 Print Server Option 68 Print Size 79 Print Speed 7 79 Pri...

Page 97: ...t Sample Test 90 Hex Dump 92 Thickness Paper 80 Time Out 32 41 Top Feed 81 84 Bottom Margin 30 Line Spacing 30 Pull Tractor 68 Single Sheet 11 Top of Form 35 Forms Tear Off 8 12 17 Paper Shield 9 12 R...

Reviews: