Oki ML3410 Handbook Download Page 15

Bottom Feed Continuous Forms

                                                                                                                                                
Bottom Feed Continuous Forms

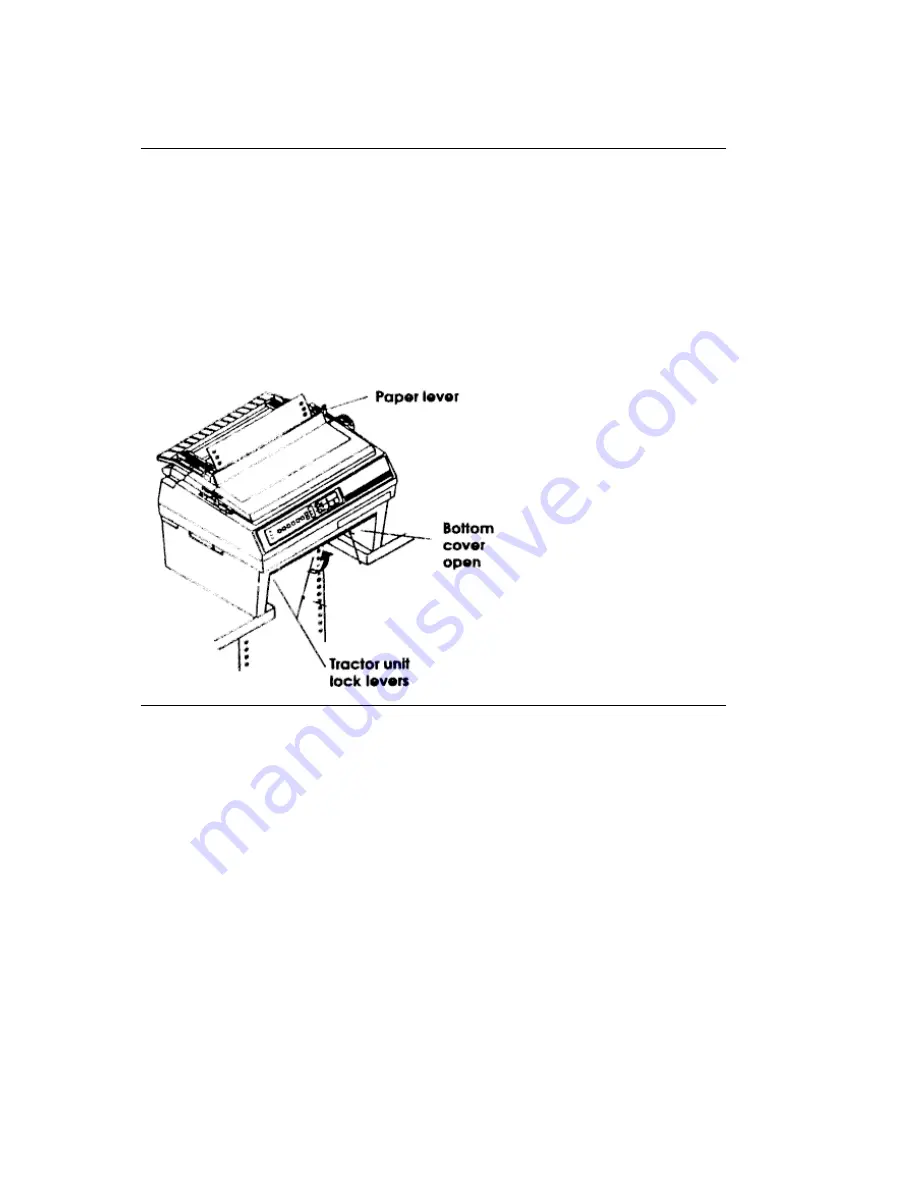
1. Make sure the paper lever is set for single-sheet paper

 (back).

2. Put a stack of continuous forms paper below the printer.
3. Open the door on the front of the tractor unit.
4. Open the tractor covers and set the paper on the pins.
5. Pull the lock lever forward to unlock the tractor.
6. Slide the tractor to adjust to the width of the paper, then push the lock lever back to lock the 

tractor in position.

7. Close the tractor covers and the unit door.
8. Make sure the printer is on and selected. Press the FORM FEED button to advance the paper 

into the printer.


ML3410 ( 96-02-07 )

Summary of Contents for ML3410

Page 1: ...Chapter 1 Manual Front Cover PACEMARK 3410 Printer Handbook for Epson IBM Microline Pacemark Models PN 59249101 PM3410 PACE PM3FM 12 91 Final ML3410 96 02 07...

Page 2: ...and make sure you have the following items Pacemark 3410 Printer Platen knob Power cord Ribbon cartridge Sheet separator w rollers Bottom tractor unit Printer Handbook If you are missing any of these...

Page 3: ...Preliminaries Preliminaries After unpacking the printer there are a few minor tasks that must be performed ML3410 96 02 07...

Page 4: ...d before you can begin 1 Open the front cover of the printer 2 Remove the shipping restraint located under the printhead 3 Open the rear cover Set the pull up roller on the printer so that the tabs on...

Page 5: ...You will notice that the shaft on the platen knob has a flat side that matches the flat side of the shaft in the printer 1 Line up the flat side of the platen knob shaft with the flat side of the pri...

Page 6: ...e fit into the notches in the side plates of the printer Push down on the cartridge until it clicks into place See the diagram on the cartridge Note Turn the knob in the direction of the arrow if the...

Page 7: ...ld face the same direction as the front of the printer 2 Pick up the printer and put it on top of the bottom feed unit as shown Be sure the printer is firmly seated on the unit 3 Plug the cable on the...

Page 8: ...and the interface cable have to be connected before you can use your printer Before you begin make sure that the power switch is off Plug the power cord into the printer but do not plug it into an ele...

Page 9: ...e clips to it If you want to use the serial interface loosen the metal plate with a Phillips screwdriver and slide it to the right to uncover the serial port Plug your cable into the serial port and t...

Page 10: ...e the recommended head gap to ensure the best print quality and easy paper feeding To adjust the head gap open the front cover The blue head gap lever is located on the right side of the printer Use t...

Page 11: ...if you call for service Important Use only continuous forms paper to run these tests Print Sample Test Turn the printer on while holding down the LINE FEED button The test prints a two page sample of...

Page 12: ...per Loading Paper The Pacemark 3410 has three standard paper handling configurations rear fed continuous forms bottom fed continuous forms and top fed single sheets All three are flexible and trouble...

Page 13: ...he rear cover and pull it through 4 Open the tractor covers and set the paper on the pins 5 Pull the lock lever forward to unlock the tractor 6 Slide the tractor to adjust to the width of the paper th...

Page 14: ...8 Close the rear cover 9 Press the FORM FEED button to advance the paper ML3410 96 02 07...

Page 15: ...the tractor unit 4 Open the tractor covers and set the paper on the pins 5 Pull the lock lever forward to unlock the tractor 6 Slide the tractor to adjust to the width of the paper then push the lock...

Page 16: ...sure to activate the Form Tear Off selection for the one you are using rear feed or bottom feed After you load paper and press the FORM FEED button the paper will advance past the printing top of form...

Page 17: ...n 2 Lift the paper support to the upright position 3 Align the left paper guide with the paper icon on the support 4 Insert a piece of single sheet paper and adjust the right paper guide to the width...

Page 18: ...pressing the FORM FEED button 2 Hold down the TOP OF FORM button while you adjust the page up or down using the MICRO FEED buttons The red line on the plastic ribbon shield marks the base of the prin...

Page 19: ...s paper from the paper path 3 Move the paper lever to the single sheet position if you re switching from rear feed 4 Follow the instructions under Single Sheet Paper for loading single sheets To chang...

Page 20: ...Pull Tractor The Optional Pull Tractor This option is available for specialized bottom feed applications where a pull tractor is required either alone or in combination with the bottom feed unit ML34...

Page 21: ...the same way we ll illustrate the procedure with the CSF 3001 noting any differences as they arise Unpack your cut sheet feeder and make sure you have all the parts Cut Sheet Feeder Bin rack 1 for the...

Page 22: ...into the receptacle on the printer The arrow on the plug faces up 8 Fit the wire rack s into the hole s on the back of the bins 9 Slide the output tray into the channels on the sides of the CSF This...

Page 23: ...ure the paper lever is in the single sheet position 3 Fan a stack of paper and square it Put the paper in the paper bin 4 Adjust the paper guides to the width of the paper 5 Once the paper is in the p...

Page 24: ...IN SELECT light is on you are using bin number 1 To move to bin two 1 Make sure that the printer is deselected Press the SELECT button if the SELECT light is on 2 Press the BIN SELECT button The BIN S...

Page 25: ...CSF 3002 Be sure to adjust the head gap lever 5 9 and push the envelope lever back Load envelopes with the flaps facing down and toward the front of the printer Set the envelope lever to the rear For...

Page 26: ...puter expert to learn how to use it The control panel always shows the actual settings of the printer If you change any of these features through your computer the panel lights will also change Some f...

Page 27: ...per and so on 3 SELECT light This light is lit when the printer is ready to receive data If the SELECT light is not lit the printer is deselected and can t receive data If the light flashes there s a...

Page 28: ...osition to the tearoff position This allows you to tear off a printed page without wasting an extra sheet of paper See page 16 for details 5 PARK button Press this button to retract continuous forms p...

Page 29: ...ions where speed is more important than appearance such as editing or proofing a document before final printing Utility printing is for everyday use such as memos and internal documents When you want...

Page 30: ...ch feature you can choose between 10 12 15 17 1 and 20 characters per inch and PROPortional spacing at the touch of a button Press the CHARACTER PITCH button to cycle through the choices Note Proporti...

Page 31: ...lect Mode You can customize your printer directly fromthe front panel by using the Menu Select mode It lets you choose your own printer defaults settings and features automatically active when you tur...

Page 32: ...r has ribbon and paper Press both the PRINT QUALITY button and the CHARACTER PITCH button to enter the Menu Select mode When you re in Menu Select mode the functions written below the buttons are acti...

Page 33: ...Exiting Menu Select Mode Exiting Menu Select Mode If you want to leave Menu Select mode at any time just press the EXIT button ML3410 96 02 07...

Page 34: ...t settings of some of those features to fit your needs For example you may want to change the page length to 14 inches if you print alot of legal size documents or 3 inches if you re working on labels...

Page 35: ...M button to move between the items in a group Press the SET button to cycle through the settings for an item To choose a setting press the SET button until you come to the setting you want then press...

Page 36: ...uter It covers the fundamentals of setting up a software package for use with your printer MS DOS printing commands and provides some tips on writing BASIC programs to control your printer This inform...

Page 37: ...rsonal computers use PC DOS or MS DOS as their operating system Although DOS is much more limited in printing capabilities than word processing or graphics software there are some commands in DOS 2 0...

Page 38: ...use that packages print commands to print it This is particularly true if the software lets you control a documents appearance page length margins printing features and so on However if your software...

Page 39: ...PRINT C WORK NOTES TXT RETURN Youll see this display on your screen Name of list device PRN If your printer is connected to the LPT1 parallel printer port just press RETURN if its connected to another...

Page 40: ...opy of PRINT COM available you can use TYPE redirecting the file to your printer If you re not using LPT1 as your printer port substitute the name of your port for LPT1 in our example Example TYPE C W...

Page 41: ...to copy a file from one disk or directory to another you can copy a text file to the printer If you re not using LPT1 as your printer port substitute the name of your port for LPT1 in our example Exam...

Page 42: ...e COM1 in the commands shown above with COM2 Likewise your parallel interface may be LPT3 in which case change the MODE command to MODE LPT3 To avoid having to reenter the MODE command s every time yo...

Page 43: ...tement the text between the quotation marks is converted to a string of numbers which are then processed by the printer and output as the dot patterns that make up the individual characters Each chara...

Page 44: ...printer commands expect you to supply a numerical value representing tab stops line spacing etc In most cases values are entered as literal or ASCII characters For example using the Microline standar...

Page 45: ...PI 12 CPI 15 CPI 17 1 CPI 20 CPI Proportional Pitch ML Pacemark 10 CPI 12 CPI 15 CPI 17 1 CPI 20 CPI Proportional spacing is a separate menu item in the ML Pacemark menu Style Normal Italics Size Sing...

Page 46: ...the form tear off feature page 16 by select ing a time for the printer to wait after data before advancing the page to tea roff If your software pauses during printing and causes the paper to bounce s...

Page 47: ...for unformatted listings or programs that dont for mat the page Page Width 13 6 8 The 8 setting emulates a narrow carriage printer If you always use 8 1 2 paper choose this setting to prevent printing...

Page 48: ...amount of the printers buffer used to store data Paper Out Override No Yes A sensor stops printing about 1 inch from the bot tom of a single page Changing this setting to Yes lets you print closer to...

Page 49: ...nge this setting to Full Operation Reset Inhibit No Yes Changing this to Yes pre vents a reset signal from the computer from reset ting the printer to its de faults Print Suppress Effective Yes No Det...

Page 50: ...me makes printer print to the end of the current line Invalid I Prime signal is ignored Pin 18 5V 0V Determines whether volt age is supplied to pin 18 Auto Feed XT Epson IBM Invalid Valid Epson emulat...

Page 51: ...Y and PITCH buttons while you turn on the printer This will put you into the menu mode you can then change this setting to No for normal operation Busy Line SSD SSD DTR RTS Baud Rate 19200 BPS 9600 BP...

Page 52: ...C n n 27 36 n n 1B 24 n n Move to position n n256 60 inches from left margin n n 0 to 255 Max value n 48 n 3 Relative Horizontal position ESC 1n n 27 92 n n 1B 5C n n Move to position n n256 120 inche...

Page 53: ...center justification n 2 right justification n 3 full left right justificationuse carriage return only at end of paragraph Print Direction ESC U n 27 85 n 1B 55 n Prints unidirectionally left to righ...

Page 54: ...the printhead by the current line spacing value n 144 Line Feed ESC 5 n 27 37 53 n 1B 25 35 n Executes a single n 144 line feed without changing line spacing n 0 to 255 n 0 no line feed n 216 Line Fee...

Page 55: ...0 n 1B 43 00 n n 1 to 22 inches This command cancels Skip over Perforation setting Set Form Length in Lines ESC C n 27 67 n 1B 43 n n 1 to 127 lines at current line spacing This command cancels Skip...

Page 56: ...ality character patterns Select Custom Character Set ESC n 27 37 n 1B 25 n n 0 Select custom character set n 1 Select default character set Select Foreign Character Set ESC R n 27 82 n 1B 52 n Select...

Page 57: ...of parameters specified Print Industrial Bar Code Data ESC DLE B n data 27 16 66 n data 1B 10 42 n data n 0 to 127 amount of data Print Postnet Bar Code Data ESC DLE C n data 27 16 67 n data 1B 10 43...

Page 58: ...B 34 See also ESC ESC 7 Cancel Italics ESC 5 27 53 1B 35 Underlining ESC n 27 45 n 1B 2D n Underlines all text except tabs n 1 Start underlining n 0 Stop underlining Start Subscript Superscript ESC S...

Page 59: ...Graphics ESC m n n graphic data 27 42 m n n graphic data 1B 2A m n n graphic data Selects 8 pin graphic mode and prints graphic data m 0 Single density 60 dpi m 1 Double density 120 dpi m 2 Fast doubl...

Page 60: ...screen dumps Each print pattern requires 2 bytes of data m 0 Single density m 1 Double density m 2 High speed double density m 3 Quadruple Density Reassign Graphics Code ESC m n 27 63 m n 1B 3F m n As...

Page 61: ...s printer to menu defaults current position becomes top of page Custom character data is not touched Controlled by menu selection Cancel CAN 24 18 Clears buffer control codes unaffected Set 8th Bit to...

Page 62: ...hen less than 1 2 of paper is left When PAPER OUT light is on pressing SELECT prints 1 line of data at a time Sensor can also be controlled by the menu Half Speed Printing ESC s n 27 115 n 1B 73 n Pri...

Page 63: ...thorizontally singlepass Begin enhancedprinting ESC H 27 72 1B 48 Double strike offsetvertically double pass End enhanced andemphasized print ing ESC I 27 73 1B 49 Begin italic print ing ESC 27 33 47...

Page 64: ...4C Turns subscript on orcancels superscript End subscriptprinting ESC M 27 77 1B 4D Incremental char acter spacing ESC N n 27 78 n 1B 4E n Adds n dot columnsbetween charactersuntil changed orcancelle...

Page 65: ...isher Margins Margins Margins Margins Margins Set left margin ESC C nn n 27 37 67 n nn 1B 25 43 n nn Set left margin tonnn 120 from left most print position nnn 000 to 999 ASCII must be 3digits Set ri...

Page 66: ...are separated bycommas k 0 16 number oftabs Clear tabs ESC ETX CR 27 3 13 1B 03 0D Load Vertical For mat Unit channeldata DC4 data 20 data 63 14 data 3F VFU can set up to 12channels with a totalmaximu...

Page 67: ...25 53 n When printing positionis within 2n 6 of thebottom of the page printer advances to topof next page n 0 to 9 Set top of form ESC 5 27 53 1B 35 Top of form set at cur rent printing position Misc...

Page 68: ...2cpi horizontal densityis 72 dpi Sets densityonly Set Double DensityGraphics ESC R 27 82 1B 52 Horizontal graphicsdensity 120 dpi At 12cpi horizontal densityis 144 dpi Sets densityonly Quasi Quadruple...

Page 69: ...mbinations ofmodes n 96 1 60 dpi2 72 dpi 4 singledensity8 double density16 quad densityn 64 8 double speed16 8 bit graphics Composite com mand ESC n nn n 27 38 n n nn 58 1B 3A n n nn 3A Add values for...

Page 70: ...ltab position Vertical Control Set 6 lpi line feed ESC 4 27 52 1B 34 Also cancels verticaltabs Set 8 lpi line feed ESC 5 27 53 1B 35 Also cancels verticaltabs Set line feed ESC 9 n 27 37 57 1B 25 39 n...

Page 71: ...ts Top of Form atcurrent position n 1 to 128 of lines Cut Sheet FeederControl option Insert page ESC I 27 73 1B 49 Eject page ESC J 27 74 1B 4A Select bin ESC EM n 27 25 1B 19 n n 1 bin 1n 2 bin 2 Cha...

Page 72: ...col umnsCharact ers are max 17dots high each columnrequires 3 bytes ofdata Print Features Select NLQsinglepass ESC 7 27 55 1B 37 Select NLQdualpass ESC 9 27 57 1B 39 Select Utility ESC 8 27 56 1B 38...

Page 73: ...rcancelled n 0 Widthof a dot column varieswith pitch and printquality utility NLQ n 0 to 11 Graphics Set single densitygraphics ESC P 27 80 1B 50 Graphics density72 V 120 H dpi Setsdensity only Set do...

Page 74: ...d at currentpitch with carriagereturn Text LF only graphics mode ETX DC2 3 18 03 12 Text line feed at currentpitch without carriagereturn Miscellaneous Cancel CAN 24 18 Initializes printer printbuffer...

Page 75: ...nnon DB 25P plug or equivalent with 25 pins Cannon DB C2 J9 or equivalent connector shell Serial Interface Signal Requirements Pin Signal Symbol Direction Description 1 Protective Ground PG Ground Con...

Page 76: ...Commonly Used Serial Cable Configurations Commonly Used Serial Cable Configurations IBM 25 Pin Cable Configuration IBM 9 Pin Cable Configuration ML3410 96 02 07...

Page 77: ...the following Amphenol 57 30360 or AMP 552274 1 plug or equivalent with 36 pins AMP 552073 1 or equivalent cover Beldon or equivalent shielded cable maximum 10 feet with twisted pair conductors It mus...

Page 78: ...m feed 0 50 mm 0 020 inches maximum Continuous forms Types Interleaved original plus 5 copies Carbonless original plus 7 copies Width 3 5 to 16 5 inches Cut sheet multi part forms Original plus 3 copi...

Reviews: