Oki ML1190 User Manual Download Page 10

ML1120/ML1190 User’s Guide - Getting started > 10

3.


Platen Knob: turn to move or eject the paper.

4.


Paper Thickness Lever: set according to the thickness of the 
paper. There is also a setting to facilitate ribbon replacement.
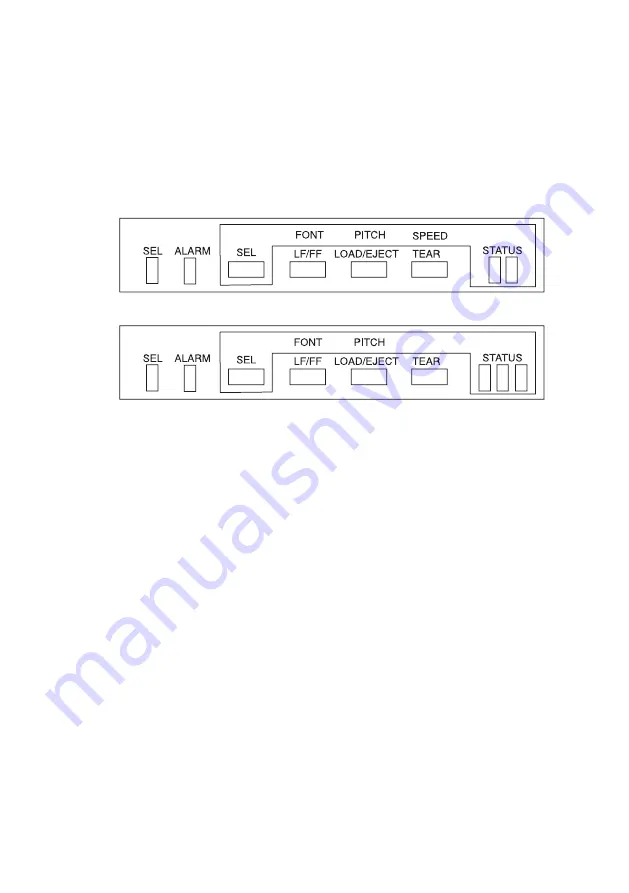
5.


Control Panel: contains button switches and indicators 
(described in detail later) that allow you to operate the printer.


ML1120


ML1190

6.


Power Switch: to turn the printer power ON/OFF.

7.


Ribbon Cartridge: holds the printer ribbon.

Summary of Contents for ML1190

Page 1: ...User s Guide ML1120 ML1190 ML1120 ML1190...

Page 2: ...pleteness of the information contained herein The most up to date drivers and manuals are available from the Oki Printing Solutions web site http www okiprintingsolutions com Copyright 2010 Oki Printi...

Page 3: ...river 16 Printing a test page 16 Printing from a computer 17 Utilities 18 Overview 18 Accessing 18 Description of utilities 18 Installing the utilities 19 Windows 19 OKI DIPUS Dot Impact Printer Utili...

Page 4: ...66 Printer impact mode 66 Normal speed printing 66 High speed printing 66 Quiet printing 66 Setting TOF position at the place of user s choice 67 Troubleshooting 68 Clearing paper jams 68 Cut sheet pa...

Page 5: ...A note provides additional information to supplement the main text CAUTION A caution provides additional information which if ignored may result in equipment malfunction or damage WARNING A warning p...

Page 6: ...Images used in this manual may include optional features that your printer does not have installed This manual is your user s guide check the web site www okiprintingsolutions com for the most up to d...

Page 7: ...robat You can access specific information in two ways In the list of bookmarks down the left hand side of your screen click on the topic of interest to jump to the required topic If the bookmarks are...

Page 8: ...2 Choose which pages you wish to print a All pages 1 for the entire manual b Current page 2 for the page at which you are looking c Pages from and to 3 for the range of pages you specify by entering...

Page 9: ...tting up your printer according to the instructions in the Set up Guide retain your packing materials and container in case you ever need to ship or transport your printer Identifying component parts...

Page 10: ...ccording to the thickness of the paper There is also a setting to facilitate ribbon replacement 5 Control Panel contains button switches and indicators described in detail later that allow you to oper...

Page 11: ...nector connect to printer power cable 3 Paper Guides can be adjusted as required to locate the left edge of cut sheet paper 4 Pin Tractor to load and feed continuous forms 5 Serial connector connect t...

Page 12: ...ich to site your printer Allow enough space around your printer e g at least 60 cm from any wall for easy access to the Platen Knob and the various paper feed paths Make sure a grounded power outlet i...

Page 13: ...STATUS indicators on the control panel illuminate Producing a test print To check that your printer is operational produce a test print on a sheet of 80 gsm A4 paper for example as follows CAUTION Al...

Page 14: ...r in the printer 5 With the long side of the paper against the paper guide insert the paper carefully into the printer The printer will automatically grip the paper and start the test print NOTE If re...

Page 15: ...rect connection to a PC This port requires a bi directional IEEE 1284 compliant parallel cable Serial for direct connection to a PC This port requires a bi directional RS232C serial interface cable US...

Page 16: ...r and follow the on screen instructions to install the printer driver for use with your printer Printing a test page As an example using Windows XP 1 Use Start Printers and Faxes to show the Printers...

Page 17: ...our printer from for example a Windows application on your computer make your printing selections from the driver windows that appear on screen These driver windows have been designed to be easy to us...

Page 18: ...d on the CD shipped with your printer Dot Impact Printer Utilities OKI DIPUS Status Monitor Menu Setup Utility Top of Form Setup Utility Switch Setup Utility Description of utilities 1 OKI DIPUS Dot I...

Page 19: ...tus Monitor Menu Setup Utility Top of Form Setup Utility Button Setup Utility Additional information See the Help for details on using these utilities Status Monitor The Status Monitor is a small back...

Page 20: ...etting Top of Form Setup Utility This utility lets you set the top of form from your computer for each available paper path You can also save frequently used settings to a file on your computer for qu...

Page 21: ...se cut sheet paper and continuous forms in your printer Loading cut sheet paper 1 Ensure that the printer is turned ON NOTE If there are any continuous forms in the printer eject them as described in...

Page 22: ...Guide 1 at the tip of the Printed Line Marker arrow 2 on the Paper Tray 4 Remove the Top Cover and set the Paper Thickness Lever 1 to suit the paper See Setting the Paper Thickness lever on page 41 C...

Page 23: ...f remove the paste and straighten out the curl Crease may occur when thinner media than standard ones like A4 feather paper are used When thin media are used the sheet may be rolled into the roller af...

Page 24: ...quired add another sheet for the printer to continue printing from where it left off To eject a cut sheet left in the printer carry out the following 1 Press the SEL button to put the printer off line...

Page 25: ...us forms supply directly below the printer no more than 3 cm left or right of the printer paper path 3 Ensure the rear of the printer is close to and parallel with the edge of the surface and at least...

Page 26: ...paper See Setting the Paper Thickness lever on page 41 NOTE If the Paper Thickness Lever setting does not match the paper being used paper feeding and printing may not work properly 4 Remove the Paper...

Page 27: ...per position Press the locking lever back down to lock the Pin Tractor in the desired position 6 Lift the locking lever 1 of the right Pin Tractor and slide the Pin Tractor to the required position to...

Page 28: ...n the forms onto the sprocket pins Ensure that the forms are properly aligned on the sprocket pins then close the covers 8 Adjust the right Pin Tractor to accommodate the width of the continuous forms...

Page 29: ...ting the Input Tray into the gooves at the back of the printer and pushing gently forward until the tray clips into place 10 Press the LOAD EJECT button The continuous forms will be taken into the pri...

Page 30: ...ether thus feeding two pages at the same time resulting in paper jam In this case unfasten the pile of sheets before feeding Further if jams occur due to the pile of the paper use of Rear Tractor is r...

Page 31: ...ng at a position other than the tear off perforations 4 Press the TEAR button to reposition the continuous forms in the printer back to the first line print position Aligning the tear off perforations...

Page 32: ...oving continuous forms 1 Tear off the continuous forms See Tearing off continuous forms on page 31 2 Press the SEL button to set the printer off line and reposition the continuous forms in the printer...

Page 33: ...Lift the Pin Tractor covers and remove the forms 6 Close the Pin Tractor covers 7 Replace the Input Tray and Paper Tray by fitting the Input Tray into the gooves at the back of the printer and pushing...

Page 34: ...ML1120 ML1190 User s Guide Paper handling 34 How to use Bottom Tractor 1 Remove the access cover 2 Remove the pull up Assy Access cover Assy Pull up Assy...

Page 35: ...ML1120 ML1190 User s Guide Paper handling 35 3 Remove the sheet guide Assy 4 Remove the left and right knobs of the tractor Assy Sheet guide Assy Tractor Assy Knob...

Page 36: ...s Guide Paper handling 36 6 Fit the U ditch of the tractor Assy to post turn it in the direction of using the post as fulcrum and lock it to the printer proper 5 Fix the sheet guide Assy Sheet guide...

Page 37: ...37 7 Insert the paper from the paper insertion opening as shown in the diagram Paper insertion opening 8 Set the paper to the tractor Assy As regards the ways of choosing the paper size and setting s...

Page 38: ...itch and align the heading position CAUTION In aligning the heading position if aligned by turning the platen knob in the direction of the pitch between the first and second lines may get narrower Be...

Page 39: ...ML1120 ML1190 User s Guide Paper handling 39 cursor 10 Move the cursor in conformity with the width of the paper When a sheet of narrow width is to be used set the cursor as shown in the diagram...

Page 40: ...ssy The access cover B will not close tightly CAUTION When to use the media of narrow width 3 4inches by bottom tractor set the media inside the platen If the media is set outside the platen a crease...

Page 41: ...ifferent paper types as follows paper TYPE Lever position 1 2 3 4 5 6 Cut sheet paper See below 52 80 gsm X 81 127 gsm X Envelope X Carbon paper or Pressure sensitive paper 40 gsm See below 2 part X 3...

Page 42: ...User s Guide Operating instructions 42 Operating instructions Control panel ML1120 The status alarm indicators and button switches on the control panel allow you to check printer status and control th...

Page 43: ...ess status Indicates Head Thermal Alarm status Indicates Power Save mode long cycle flashing ALARM ON If printing indicates lack of paper i e no paper present OFF Paper present status Flashing Paper j...

Page 44: ...ML1120 ML1190 User s Guide Operating instructions 44 ML1190 The status alarm indicators and button switches on the control panel allow you to check printer status and control the printer 1 2 3...

Page 45: ...Indicates Head Thermal Alarm status Indicates Power Save mode long cycle flashing ALARM ON If printing indicates lack of paper i e no paper present OFF Paper present status Flashing Paper jam alarm s...

Page 46: ...ode Delivers the continuous form to the cut position If the button is pressed again or data is received the original form position is restored On line and off line Cut sheet manual mode Ineffective SE...

Page 47: ...sheet mode 2 To activate menu mode carry out one of the following While holding down the SEL button set the printer Power Switch to ON 3 Place the cut sheet on the Paper Tray The cut sheet passes thr...

Page 48: ...ward through the menu groups to the required group 3 Press LF FF button or TEAR and LF FF button together to step forward backward through the menu items to the required item 4 To change the setting f...

Page 49: ...whether to use proportional spacing or not Yes No Style Select either font style Normal Italics Size Select the character scale size Single Double Symbol sets menu Character Set Select either ANK cha...

Page 50: ...ation setup command is received the received command is given priority 25 4 mm 1 No Page Length Select the length of a continuous form 279 4 mm 11 296 3 mm 11 2 3 304 8 mm 12 355 6 mm 14 431 8 mm 17 7...

Page 51: ...93 mm 2 3 19 05 mm 3 4 21 17 mm 5 6 23 28 mm 11 12 25 40 mm 1 27 52 mm 13 12 Use top of form Bottom feed menu Line Spacing Select line feed pitch 6 LPI 8 LPI Skip Over Perforation Select whether to sk...

Page 52: ...aper on the tray and feeding it while the printer is waiting for paper to be fed in cut paper manual feed mode Invalid 0 5 sec 1 0 sec 2 0 sec Page length control Control the page length of cut paper...

Page 53: ...hics print data exists in a line Bi directional Uni directional 7 or 8 Bits Graphics Set the graphics data unit to 7 or 8 bits ML emulation only 8 7 Receive buffer size Select size of the received buf...

Page 54: ...tion or not upon receiving a CR code Yes No Auto CR Select whether to perform auto CR operation upon receiving a carriage return command IBM emulation only Yes No Print DEL Code Set whether 7FH code i...

Page 55: ...on for the print head by the number of characters of 10CPI ANK Default Mode1 Mode2 Power Saving Set whether to enable or disable the power saving function of the printer Enable Disable Power Save Time...

Page 56: ...e Disable Serial I F Parity Set parity None Odd Even Ignore Serial Data 7 8 Bits Set serial data length 8 bit 7 bit Protocol Set protocols DTR X ON X OFF DTR X ON X OFF Diagnostic Test Set Cancel loop...

Page 57: ...cter pitch 10 CPI 12 CPI 15 CPI 17 1 CPI 20 CPI Proportional Spacing Select whether to use proportional spacing or not Yes No Style Select either font style Normal Italics Size Select the character sc...

Page 58: ...ation setup command is received the received command is given priority 25 4 mm 1 No Page Length Select the length of a continuous form 279 4 mm 11 296 3 mm 11 2 3 304 8 mm 12 355 6 mm 14 431 8 mm 17 7...

Page 59: ...93 mm 2 3 19 05 mm 3 4 21 17 mm 5 6 23 28 mm 11 12 25 40 mm 1 27 52 mm 13 12 Use top of form Bottom feed menu Line Spacing Select line feed pitch 6 LPI 8 LPI Skip Over Perforation Select whether to sk...

Page 60: ...aper on the tray and feeding it while the printer is waiting for paper to be fed in cut paper manual feed mode Invalid 0 5 sec 1 0 sec 2 0 sec Page length control Control the page length of cut paper...

Page 61: ...ional Uni directional Receive buffer size Select size of the received buffer 1line 32 K 64 K Paper out override Select whether to detect paper end or not No Yes Print Registration 1 Adjust the print s...

Page 62: ...CR operation upon receiving a carriage return command IBM PPR and IBM AGM emulation only Yes No SI select pitch 10 CPI Set how to handle an SI command received in 10 CPI mode IBM PPR and IBM AGM emula...

Page 63: ...ded is set to SEL or DESEL On line Off line Print Direction Command Select the validity of a one way print setup command Valid Invalid Print Speed Command Select the validity of a print speed setup co...

Page 64: ...rial I F Parity Set parity None Odd Even Ignore Serial Data 7 8 Bits Set serial data length 8 bit 7 bit Protocol Set protocols DTR X ON X OFF DTR X ON X OFF Diagnostic Test Set Cancel loop testing of...

Page 65: ...us forms are used place the paper on the Pin Tractor For cut sheet mode do not insert the paper at this stage 4 In continuous forms mode press the LOAD EJECT button In cut sheet mode place the paper i...

Page 66: ...s illuminated 2 Hold down the SEL button and press the TEAR button Status Indicator 1 turns off and Status Indicator 2 is illuminated High speed printing Use this for high speed printing 1 Ensure the...

Page 67: ...aper will be fed to the printer Single sheets Set the paper in the tray and the paper will be fed to the printer 4 Switch to the off line 5 Push the LOAD EJECT button continuously and adjust the posit...

Page 68: ...perations inside the printer with the Power Switch set to ON 1 Set the Power Switch to OFF 2 Remove the Top Cover 3 Set the Paper Thickness lever to the Replace Ribbon position position 6 WARNING The...

Page 69: ...in the relevant direction and pull the cut sheet out from the top of the printer 7 If a paper fragment remains inside the printer a use tweezers to grip and extract it or b insert a triple folded she...

Page 70: ...e Power Switch to ON Continuous forms jammed in printer WARNING Do not carry out any operations inside the printer with the Power Switch set to ON 1 Set the Power Switch to OFF 2 Tear off any unprinte...

Page 71: ...nter 6 If a form fragment remains inside the printer place two or three forms in a stack on the Pin Tractors and turn the Platen Knob to push the fragment out of the printer 7 When the paper jams are...

Page 72: ...resumed at this stage Turn the power OFF verify that the carriage moves properly then turn the power ON again If the problem is still there after you turn the power ON again contact your dealer Respon...

Page 73: ...print head overheats the printer automatically starts unidirectional split printing When the print head temperature drops sufficiently the printer will return to its original operation PE warning The...

Page 74: ...ect positions of the Paper Guide or Pin Tractors Select and adjust the position again depending on the paper type Reselect the left and right margins correctly in the application When continuous forms...

Page 75: ...ed No paper feed Sheets are located off the paper guide Load sheets with their left edges against the paper guide Sheets are not loaded to the end Load sheets to the end The platen rotates without pap...

Page 76: ...er perforation spacing is selected Cancel the skip over perforation spacing The selected skip over perforation spacing does not match the physical tear off perforation positions The paper length selec...

Page 77: ...he printer Clean the exterior of the printer as required but at least every six months or 300 hours of operation whichever comes first 1 Moisten a piece of cotton cloth with diluted neutral detergent...

Page 78: ...to Clean The carriage and the area around it Clean and remove paper waste dirt dust and ribbon shreds The paper travel surface CAUTION When you clean the interior of the printer with a vacuum cleaner...

Page 79: ...ridge CAUTION Only use genuine Oki Original consumables to ensure the best quality and performance from your hardware Non Oki Original products may damage your printer s performance and invalidate you...

Page 80: ...o cool down before touching it 4 Grip the ribbon cartridge with your fingers at each end and slope it up and out to remove it from the carriage 5 Dispose of the cartridge in accordance with your local...

Page 81: ...ghtly loose ribbon may make it easier to mount the ribbon cartridge 8 Hold the ribbon cartridgewith your fingers pressing on its ribbon guide and slope it upward and inward along the guide rails until...

Page 82: ...e the Top Cover 11 Set the Paper Thickness lever to match the paper being used See Setting the Paper Thickness lever on page 41 12 Set the printer Power Switch to ON Consumable order information Item...

Page 83: ...tab yes Direct line feed yes Duplication capability Continuous forms the original page 4 more pages total maximum paper thickness less than 0 325 mm Cut sheet the original page 4 more pages total maxi...

Page 84: ...Power cable 3 core AC power cable approximately 1 8 m length Interfaces Bi directional parallel IEEE1284 1994 USB 2 0 full speed RS 232C Dust and corrosion Use the printer in a general office environm...

Page 85: ...age 4 more pages total maximum paper thickness less than 0 325 mm Cut sheet the original page 4 more pages total maximum paper thickness less than 0 325 mm Feeding direction Feed forward Feed backward...

Page 86: ...Bi directional parallel IEEE1284 1994 USB 2 0 full speed RS 232C Dust and corrosion Use the printer in a general office environment Environmental conditions Operating Storage 5 C to 35 C 20 to 80 RH...

Page 87: ...15 USB 15 L loading paper continuous forms 25 cut sheet 21 M menu settings changing 48 confirming 47 initialising 64 list 49 57 N normal speed printing 66 P paper jams continuous forms 70 cut sheet 68...

Page 88: ...te 1908 19 F Tower 3 China Hong Kong City 33 Canton Road TsimShaTsui Kowloon Hong Kong Tel 852 3543 9288 Fax 852 3549 6040 http www okiprintingsolutions com hk Oki Data Australia Pty Ltd Levwl1 67 Epp...

Page 89: ...43471832EE Rev1...

Reviews: