background image

|

Setting Up

18

7

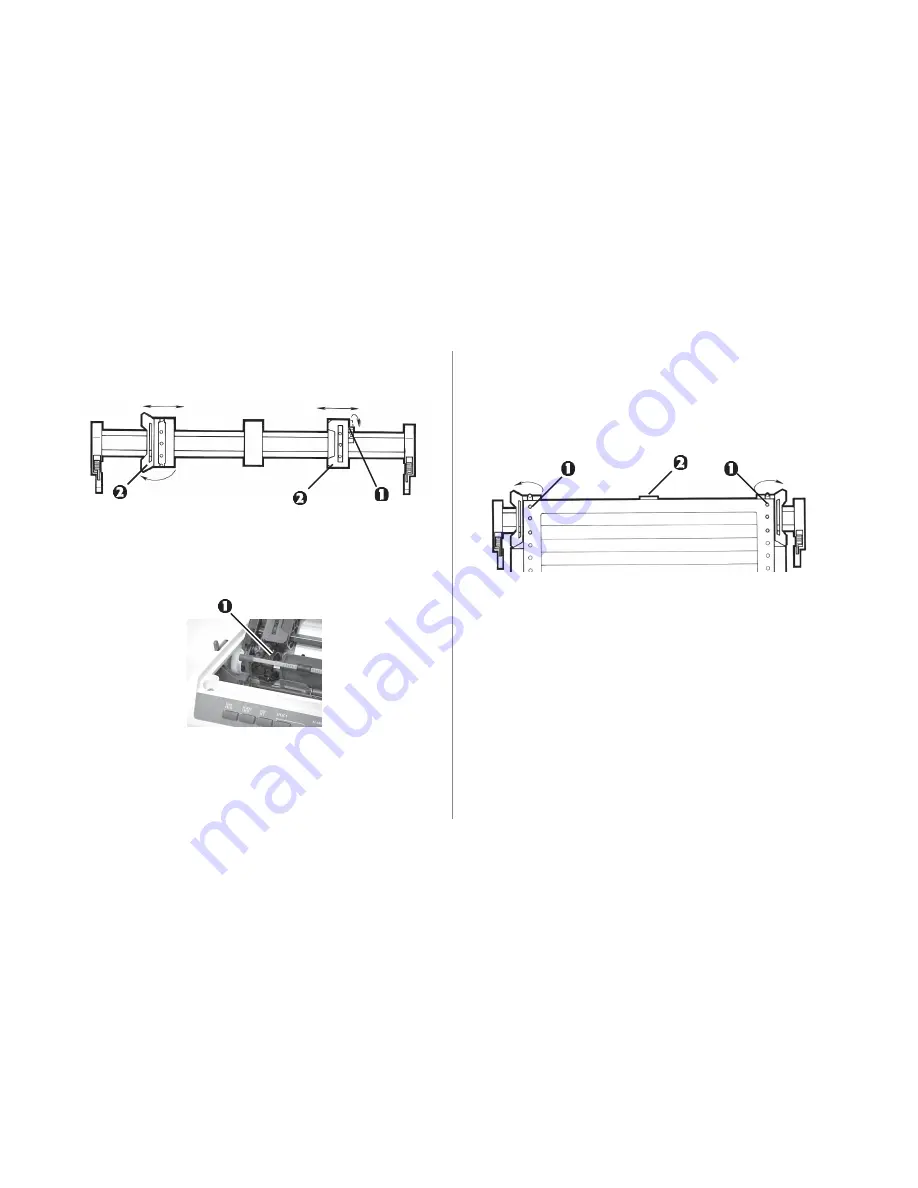
Pull up the lock levers (1) to release the tractors and
open the tractor covers (2).

The pins (1) at either end of the platen are not used
with the pull tractor installed. Please leave them
locked in place.

8

Slide the tractors to align them with the edges of the
paper, then set the paper holes on the tractor pins (1).
Make sure the paper covers the groove on the left side
of the platen, then slide the tractor guide (2) to the
center of the paper.

9

Adjust the tractors so that the paper holes are centered
on the pins, then close the tractor covers.

ë

The paper may jam or cause other problems if it is
stretched too tightly or left too loose on the pins. If
the sprocket holes stretch or tear during printing,
readjust the pins.

Summary of Contents for MICROLINE ML310

Page 1: ...OKI MICROLINE 310 Printer Handbook P N 59342501...

Page 2: ...try Company Ltd ENERGY STAR is a registered trademark of the United States Environmental Protection Agency Epson is a registered trademark of Seiko Epson Corporation SEC registered in the U S and othe...

Page 3: ...d on If the cord becomes damaged or frayed replace it immediately Your OKI printer has been carefully designed to give you years of safe reliable performance As with all electrical equipment there are...

Page 4: ...g for a length of time Do not touch the printhead until it has had a chance to cool off Do not use your printer near water Do not spill liquid of any kind into it Do not poke anything into the ventila...

Page 5: ...tor 10 Install the Power Cord 11 Connect To the Computer 11 Load Paper 12 Loading Continuous Form Paper for Bottom Feed 13 Loading Continuous Form Paper for Rear Feed 16 Loading Single Sheets 19 Run t...

Page 6: ...es and paper are sold separately ML310 Printer Ribbon cartridge Platen knob Power cord Paper separator Grounding screw not illustrated see Connect to the Computer later in this section CD not illustra...

Page 7: ...tape 2 Check for a protective film on the front panel and remove it 3 Lift off the acoustic cover 4 Pull up on the access cover to unsnap it then remove it 5 Remove the shipping retainer that secures...

Page 8: ...rtridge Use only genuine Oki Data ribbon cartridges Install Replace the Ribbon Cartridge 1 If necessary lift off the acoustic cover and remove the access cover Caution It is recommended that the print...

Page 9: ...closest to the front of the printer then lower the ribbon shield over the printhead Caution Printhead may be HOT aligning the tabs with the inserts on the printhead plate If the ribbon won t load easi...

Page 10: ...he knob in the hole on the right side of the printer lining up the notch in the knob with the pin on the shaft Install the Paper Separator Place the tabs 1 on the paper separator into the slots 2 on t...

Page 11: ...he opposite end into a grounded outlet Connect To the Computer The interface cable is not supplied with the printer 1 Insert the plug into the parallel port on the back of the printer 1 and secure it...

Page 12: ...e Printhead Gap Lever Before you load continuous paper be sure to set the blue printhead gap lever 1 as follows position 1 for 1 or 2 part paper position 2 for 3 or 4 part paper position 3 for 5 part...

Page 13: ...opening in the base of the printer with the slot on the stand 2 Place the paper stack on the bottom of the printer stand If the printer is on and selected SELECT light on press the SELECT button to de...

Page 14: ...heet position and turn the platen knob 2 to move the paper up level with the paper bail 3 5 Pull the paper lever forward 6 Pull up the lock levers 1 to release the tractors and open the tractor covers...

Page 15: ...Space the rollers on the paper bail evenly across the paper then close the bail lever 10 Use the platen knob to advance the paper up to the second sheet then move the paper up to where you want the f...

Page 16: ...and selected SELECT light on press the SELECT button to deselect it If you are reloading paper remove the acoustic cover and the access cover 2 With the paper separator lying flat on the printer slide...

Page 17: ...in the slot in the paper separator and guide it into the printer underneath the platen 5 Push the paper lever 1 back single sheet position and turn the platen knob 2 to move the paper up level with t...

Page 18: ...of the paper then set the paper holes on the tractor pins 1 Make sure the paper covers the groove on the left side of the platen then slide the tractor guide 2 to the center of the paper 9 Adjust the...

Page 19: ...e selected will be set automatically when you turn the printer on If the printer is on press the TOF SET button while the printer is deselected SELECT light off to set the position as the top of form...

Page 20: ...LECT light off to set the position as the top of form 9 Replace the access cover 10 Press the SELECT button to reselect the printer the SELECT light will come on Switching Back to Continuous Forms 1 O...

Page 21: ...T button sets the top margin at the current position the SELECT light must be off The Front Panel SELECT button selects or deselects the printer SELECT light shows whether the printer is ready to rece...

Page 22: ...ed by the lights next to the button MODE button selects the type of printing indicated by the lights next to the button NLQ Near Letter Quality high resolution printing in two passes of the printhead...

Page 23: ...the window which asks you to select the manufacturer and model of your printer click Have Disk then browse to the appropriate directory on the CD and double click the inf file For Windows XP Drivers...

Page 24: ...tory on the CD drivers win31 english 7 Click OK twice The Add Unlisted or Updated Printer dialog box appears with OKI DATA ML310 listed 8 Click OK The ML310 appears in the Installed Printers box 9 Cli...

Page 25: ...Parts Item OKI Number Ribbon Cartridge 52102001 Printhead 50063802 Platen Knob 40673402 Item OKI Number Access Cover 42178701 Paper Separator 42017901 Item OKI Number Acoustic Cover 53450001 Pull Tra...

Page 26: ...I Number AC Cord 120V 56631801 For 220V AC cords contact your OKI dealer Item OKI Number Fuses 1 5A Fuse logic board 56301701 1A Fuse power board 56301501 Option Roll Paper Stand Assembly 70007701 Man...

Page 27: ...3 4 5 USA English 11 OFF ON OFF OFF ON French 11 Inches ON ON OFF OFF ON German 11 Inches OFF OFF ON OFF ON British 11 Inches ON OFF ON OFF ON Danish 1 11 Inches OFF ON ON OFF ON Swedish 1 11 Inches O...

Page 28: ...2 Inches ON OFF ON OFF OFF Italian 12 Inches OFF ON ON OFF OFF Spanish 12 Inches ON ON ON OFF OFF Japanese 12 Inches OFF OFF OFF ON OFF Norwegian 12 Inches ON OFF OFF ON OFF Danish 2 12 Inches OFF ON...

Page 29: ...peed Utility 200 cps 10 12 17 1 20 cpi 100 cps 5 6 8 5 cpi High Speed Draft 240 cps 10 and 17 1 cpi 300 cps 12 cpi NLQ 50 cps 10 12 17 1 20 cpi 25 cps 5 6 8 5 cpi Emulation Epson ESC P Characters Per...

Page 30: ...me To Repair MTTR 15 minutes Ribbon Life 3 million characters Printhead life 400 million strokes per wire Physical Dimensions Size 381 mm 15 inches wide 378 mm 14 9 inches deep 128 mm 5 inches high We...

Page 31: ...27 28 Control panel 21 22 lights 21 22 D Driver printer 23 E Electrical specifications 29 Emulation 29 F FORM FEED button 21 Front panel 21 22 lights 21 22 Fuses replacement 26 H HSD light 22 L Langu...

Page 32: ...er 23 weight 30 Printhead gap lever 12 shipping retainer 7 R Replacement parts 25 Ribbon installation 8 9 replacement 25 shield 8 S SELECT button 21 light 21 Self test 20 Separator paper 10 Setting Up...

Reviews: